
How to Convert Voice Memo to MP3 [4 Methods]
98% accurate, real-time transcription in just a few clicks. 58 languages and multiple platforms supported.
Recording a voice memo is one of the simplest ways to keep track of your thoughts and ideas. Apple doesn't offer a built-in way to convert your voice memos into MP3 format for use with other apps and devices, but there are several methods you can use.
In this post, I'll show you four techniques to convert Voice Memos to MP3 files, covering various devices and platforms.
Method 1: Convert voice memos to MP3 using iTunes/Apple Music
If you've got access to a Mac, you can convert your voice memos to MP3 with the Apple Music app. This method will not work on your iPhone or iPad, so skip to the following method to learn how to convert directly on your device.
Step 1: Configure your Apple Music import settings
To convert your voice memo into a different format with Apple Music, you must use the app's file import settings. Open the 'Music' app menu, select 'Settings,' and then select the 'Files' tab. Click the 'Import Settings' button, and change the 'Import Using' setting to 'MP3 Encoder'.
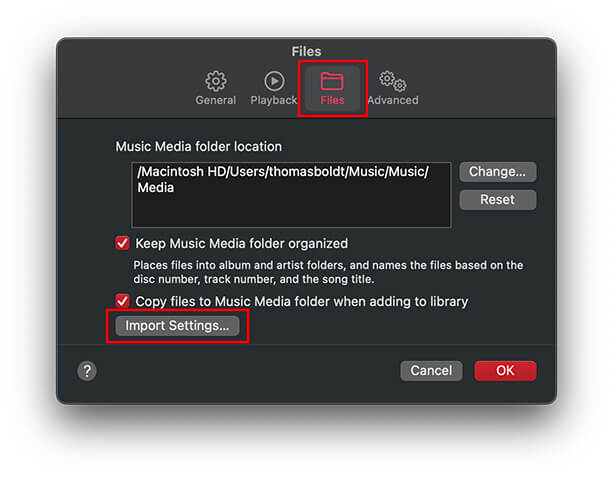
You can optionally adjust the quality, although the default setting of 160kbps should be sufficient for most purposes. Click 'OK' to save the changes, then close the Settings window.
Step 2: Locate your voice memo file
Next, you must move the voice memo file onto your computer. If you use iCloud, the process is straightforward, and your voice memo should already be synced and accessible within the Voice Memo app on your Mac.
Open the Voice Memo app on your Mac, select the voice memo you want to convert, and then click and drag it onto your desktop. You can also drag and drop it into a specific folder to help keep things organized.
If you don't use iCloud, locate the voice memo on your mobile device, tap the 'three dots' menu, and tap 'Share.' You can Airdrop it to your Mac, email it to yourself, or any of the other standard options.
Step 3: Import the voice memo to Music
Open the 'File' menu, then select 'Import' and browse to find your voice memo file.
Select the voice memo using the 'Songs' section of your library, then open the 'File' menu, select 'Convert,' and click 'Create MP3 Version.' A second version of the file will appear in your library.
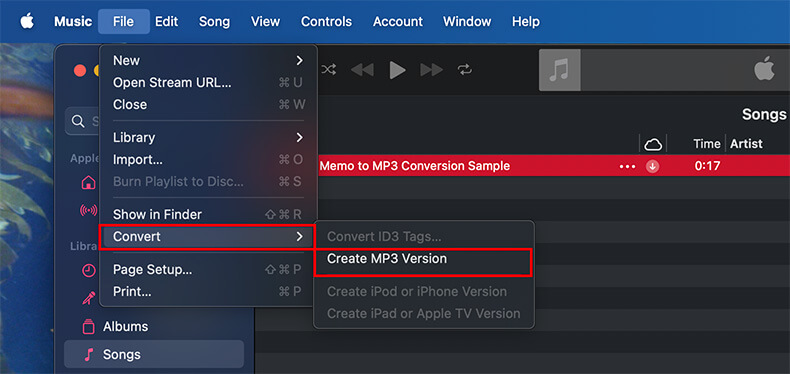
To locate the new MP3 file, option-click or right-click the new version in your library and select 'Show in Finder' from the popup menu.
Method 2: Convert voice memos to MP3 on iPhone using a converter app
If you want to complete the MP3 conversion process on your iPhone, the Notta mobile app offers a simple free option. The Notta mobile app is also available for iPad and Android.
Step 1: Share your voice memo with Notta
Open the Voice Memo app, then select the voice memo you want to convert and tap the 'three dots' icon next to it. Tap 'Share' and then select 'Notta' from the list of apps and services.
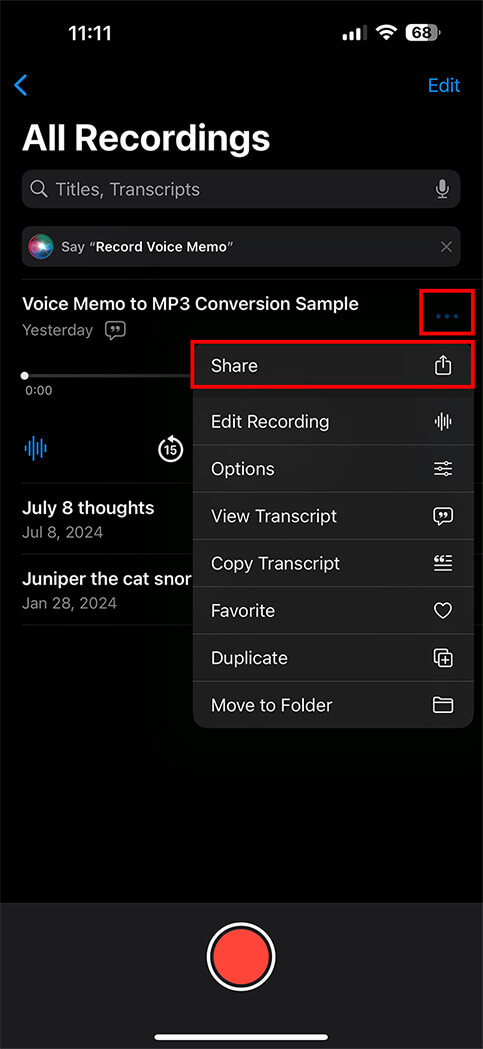
Notta will import your voice memo file into the app and automatically create a transcription.
Step 2: Export your voice memo as MP3
In the Notta app, tap the 'three dots' icon in the upper right corner, then tap the 'Export' button. Tap 'Export Audio' and choose where to send your file.
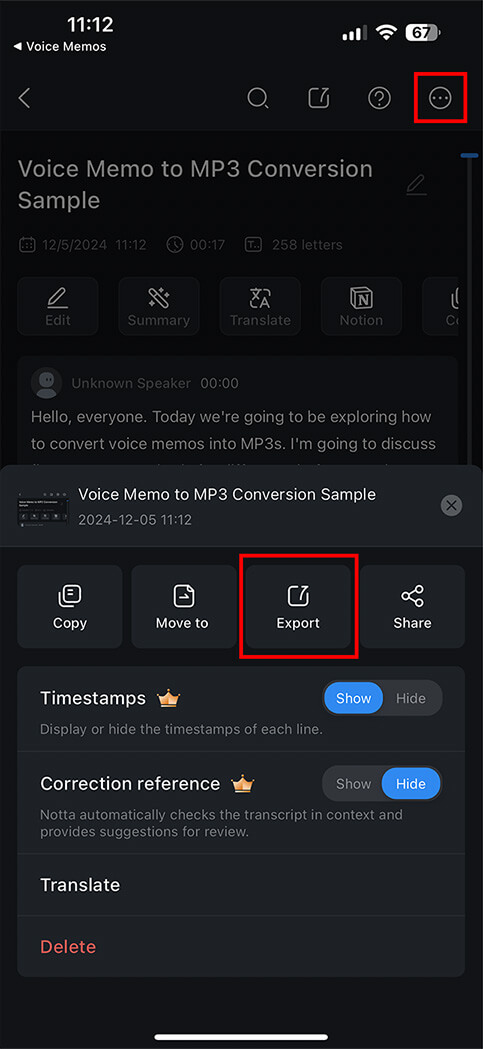
You can email it to yourself, Airdrop it to your Mac, or choose 'Save to Files' to store the file on your iPhone or iCloud.
Notta can convert your spoken interviews and conversations into text with 98.86% accuracy in minutes. Focus on conversations, not manual note-taking.
Method 3: Convert voice memos to MP3 online using a web-based tool
If you don't want to use an app to convert your voice memo to MP3, you can use Notta's convenient web-based tool on any device, although this method is best suited for computers. To convert on your mobile device, try the free Notta app described in Method 2.
Step 1: Locate your voice memo file
To upload your file to the Notta website, you need to locate the file first.
If you're using a Mac with iCloud, your voice memo should be synced to your computer already. Open the Voice Memos app, and drag and drop the voice memo you want to convert onto your desktop or another Finder window.
If you're using a PC or you don't use iCloud, open the Voice Memos app on your mobile device, select the voice memo, and tap the 'three dots' icon. Select 'Share' from the popup menu, and then choose your preferred method for exporting the file. You can email it to yourself, Airdrop it to a nearby Mac, or use any of the other standard sharing options.
Step 2: Upload the voice memo to Notta
Log in to your Notta dashboard, and click the 'Upload & transcribe file' button in the upper right corner. Drag and drop your voice memo file into the popup window, or click the 'select documents' link and browse to select your file.
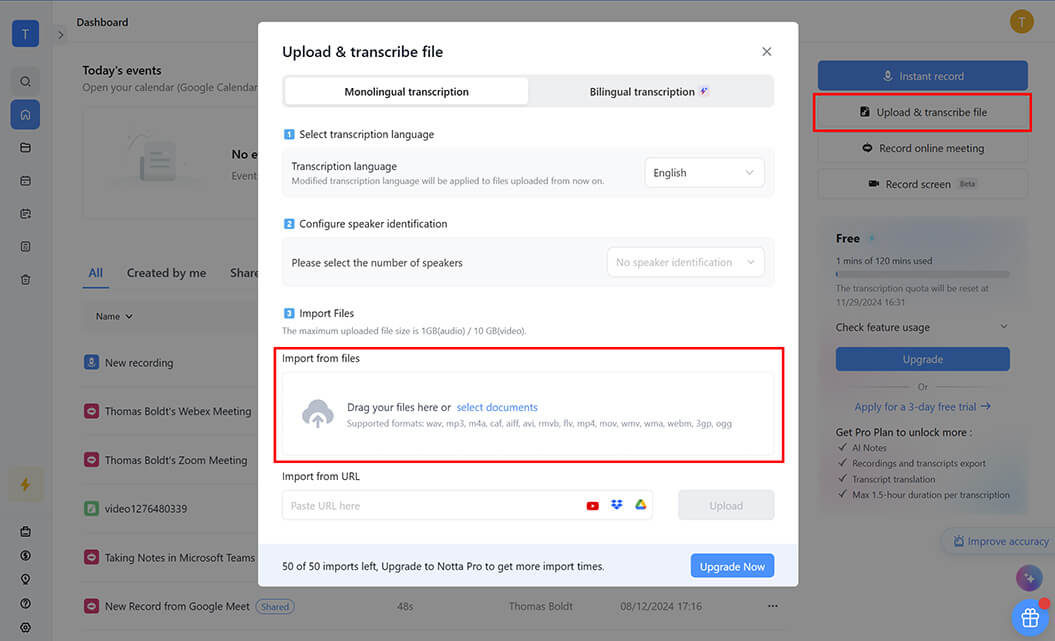
Once the upload process is complete, a new entry with the same file name will appear in your dashboard, and Notta will transcribe the file automatically.
Step 3: Export your voice memo as MP3
Click the new entry in your dashboard to open the transcript window, and then click the small 'Download' icon in the upper right corner.
In the 'File format' menu, select 'Audio (.mp3)' and click the 'Download' button.
Method 4: Convert voice memos to MP3 on Windows using VLC Media Player
VLC is a powerful free and open-source media player that can convert between various audio and video formats.
Step 1: Download and install VLC
Download the latest version of VLC from the official developer website and install it, following the on-screen instructions.
Step 2: Locate your voice memo file
Open the Voice Memo app on your iPhone or iPad, select the memo you want to convert, and tap the 'three dots' icon. Select 'Share' from the popup menu, and select your preferred method. Email the file to yourself, or choose 'Save to Files' and connect your device to your PC to transfer the file.
Step 3: Convert your voice memo
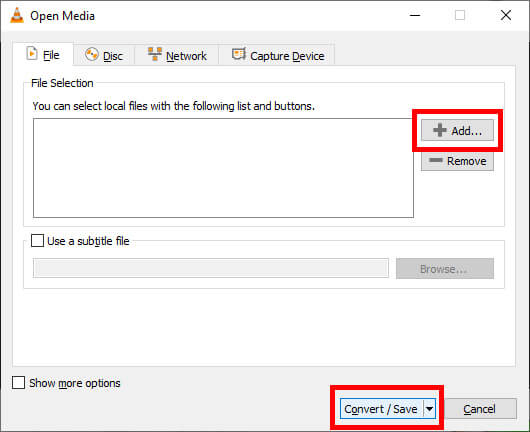
Launch VLC Media Player, then open the 'Media' menu and click 'Convert / Save.' In the 'Open Media' window, click the 'Add' button and browse to select your voice memo file, then click the 'Convert / Save' button.
A new popup window will open with conversion options. In the 'Profile' dropdown menu, select 'Audio - MP3' and then click the 'Browse' button to specify where VLC will save the new file. Optionally, you can also click the small 'wrench' icon to customize your MP3 quality settings.
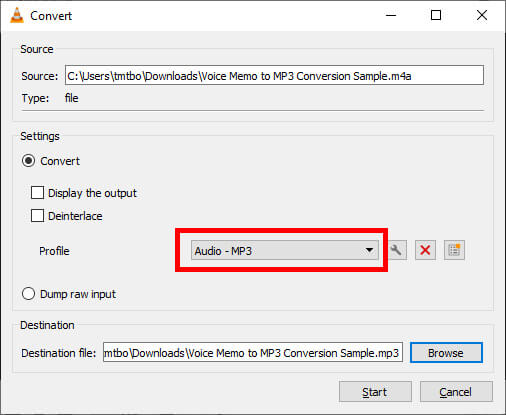
Once you're happy with your settings, click the 'Start' button to convert your voice memo to MP3.
Comparison of different conversion methods
| Conversion tool | Pros | Cons | Best for |
|---|---|---|---|
| Apple Music | Already installed on your Mac Offers three file quality options | Only available on Mac Requires modifying your import settings for all files | Mac users |
| Notta mobile app | Easiest method Transcribe your voice memo | No control over file quality | Quick access |
| Notta web app | No app installation is required Transcribe your voice memo | No control over file quality | Conversion without installing any apps | VLC Media Player | Complete control over file quality Free to use Wide platform support | Complex features Requires app installation | Highest file quality |
Use Notta's AI transcription tool to quickly and easily transcribe audio and videos. We guarantee accuracy and ease of use.
In sum
There are multiple ways to convert your voice memo files to MP3 for use with other apps and devices. Apple Music provides a simple method but is limited to macOS only, while VLC is available on all platforms but is less user-friendly. Notta's mobile app provides the simplest way to convert voice memos directly on your device, while the web app offers quick conversion without requiring an app.