
How to Create a Poll in Zoom Meetings
Saving time and effort with Notta, starting from today!
Do you use Zoom meetings to collaborate with your team or clients? If so, you know how important it is to get everyone's input while ensuring the session is interactive. However, it can be challenging to get meeting participants' attention or make sure their voice is heard.
That's where Zoom polls come in. The polling feature of Zoom is a great way to get attendees involved in the discussion and to get a quick read of their thoughts. But if you're not sure how to create a poll in Zoom, it can be cumbersome to properly use the feature.
As a frequent Zoom user, I know the complexities involved in the process. That's why I have created this comprehensive article where I will reveal how to enable, add, and launch polls in Zoom sessions.
How to Enable and Disable Zoom Polling Feature?
The polling feature in Zoom meetings lets you create single-choice and multiple-choice polling questions. The primary objective of the Zoom polls is to enhance interaction and gather responses from participants.
Before we dive deep into how to enable or disable the Zoom polling feature, here are a few prerequisites to consider.
You must have a Zoom Pro, Business, Education, or Enterprise account to use the polling feature.
Zoom desktop client should be of Global minimum version or higher.
You must install a Zoom mobile app of Global minimum version or higher.
Here's how to enable or disable polling for Zoom meetings:
Step 1: Sign in to your Zoom paid account on the web portal. In the navigation panel, select Account Management > Account Settings.
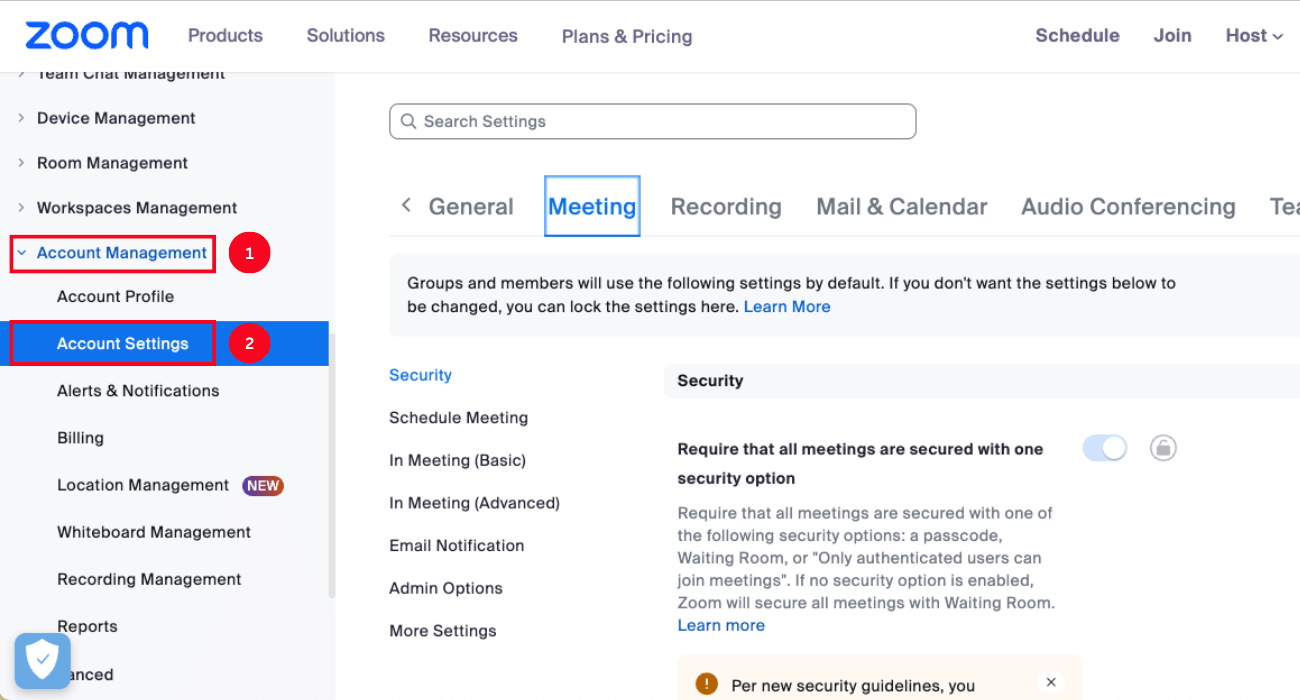
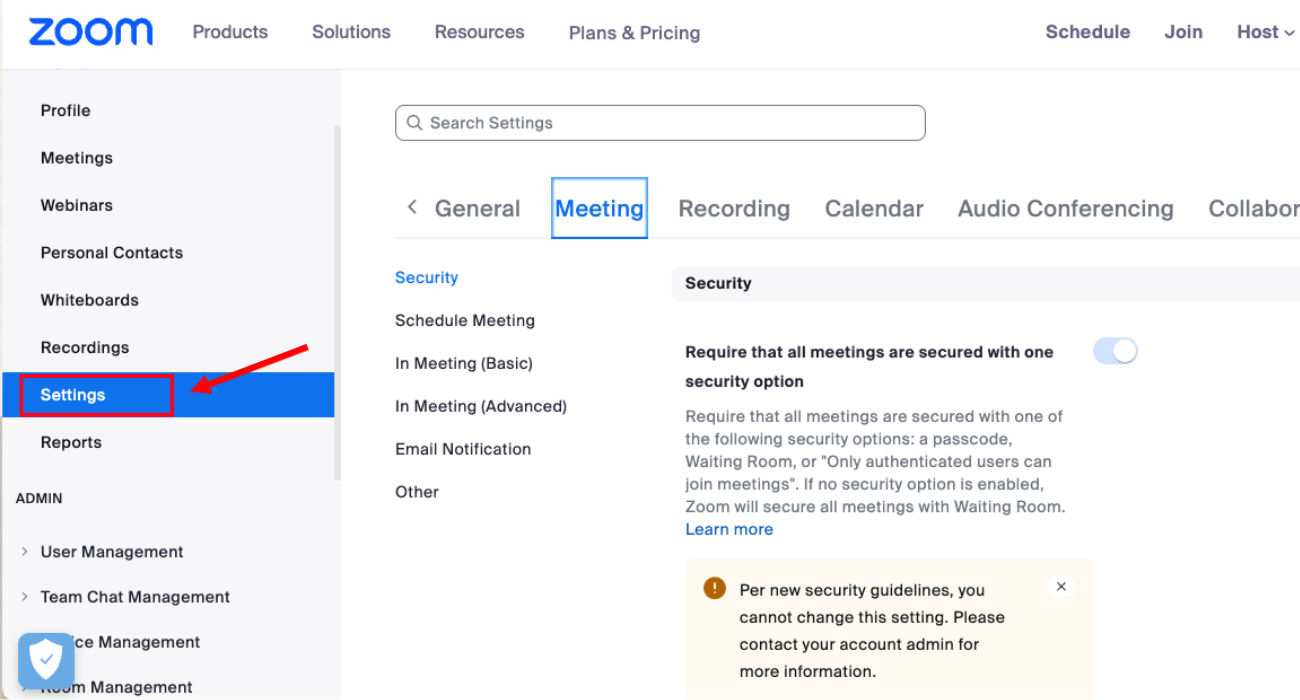
Note: If you are enabling or disabling the poll feature at the user level, sign in to the Zoom web portal and click 'Settings.'
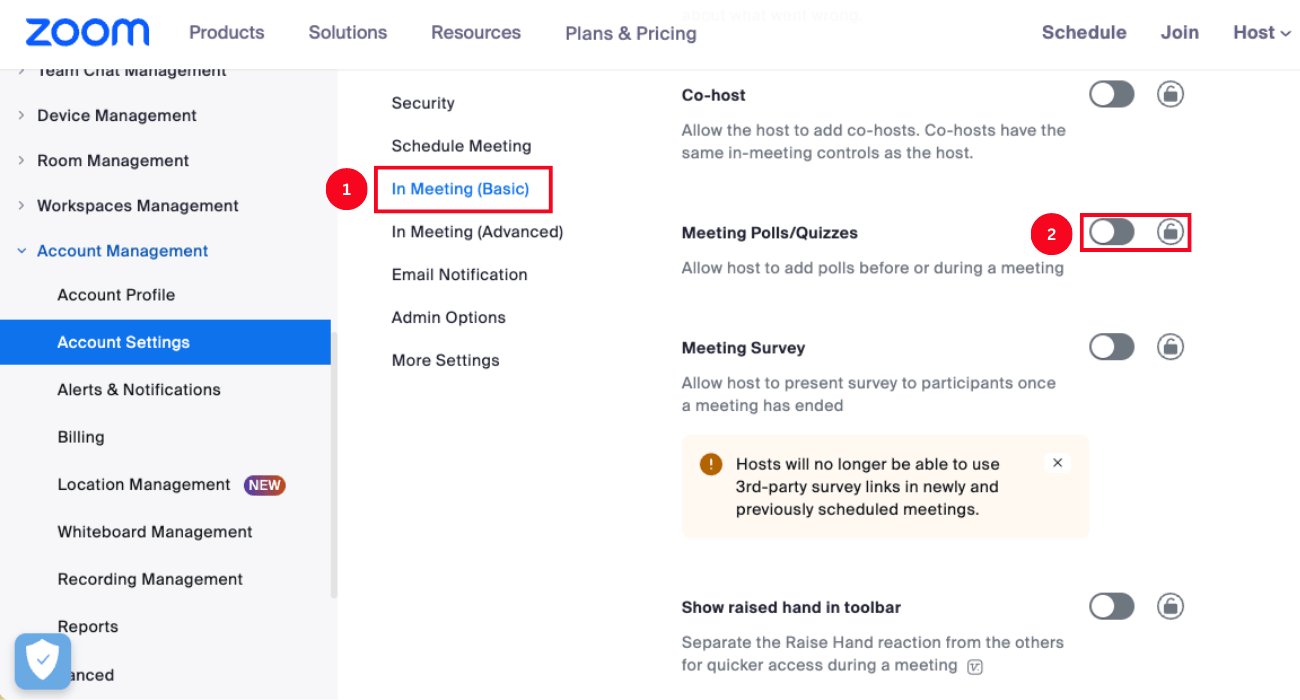
Step 2: Navigate to the 'Meeting' tab and find 'In Meeting (Basic).' Scroll and find the 'Meeting Poll/Quizzes' option. Simply click the toggle to enable or disable it.
Step 3: You'll see different checkboxes below the 'Meeting Polls/Quizzes' option, including:
Allow host to create advanced polls and quizzes
Allow alternative host to add or edit polls and quizzes
Allow users to manage saved polls and quizzes from "Meetings"
Require answers to be anonymous
Allow the host to create breakout rooms from poll results
Simply check the box to enable or disable the particular poll feature during the meeting.
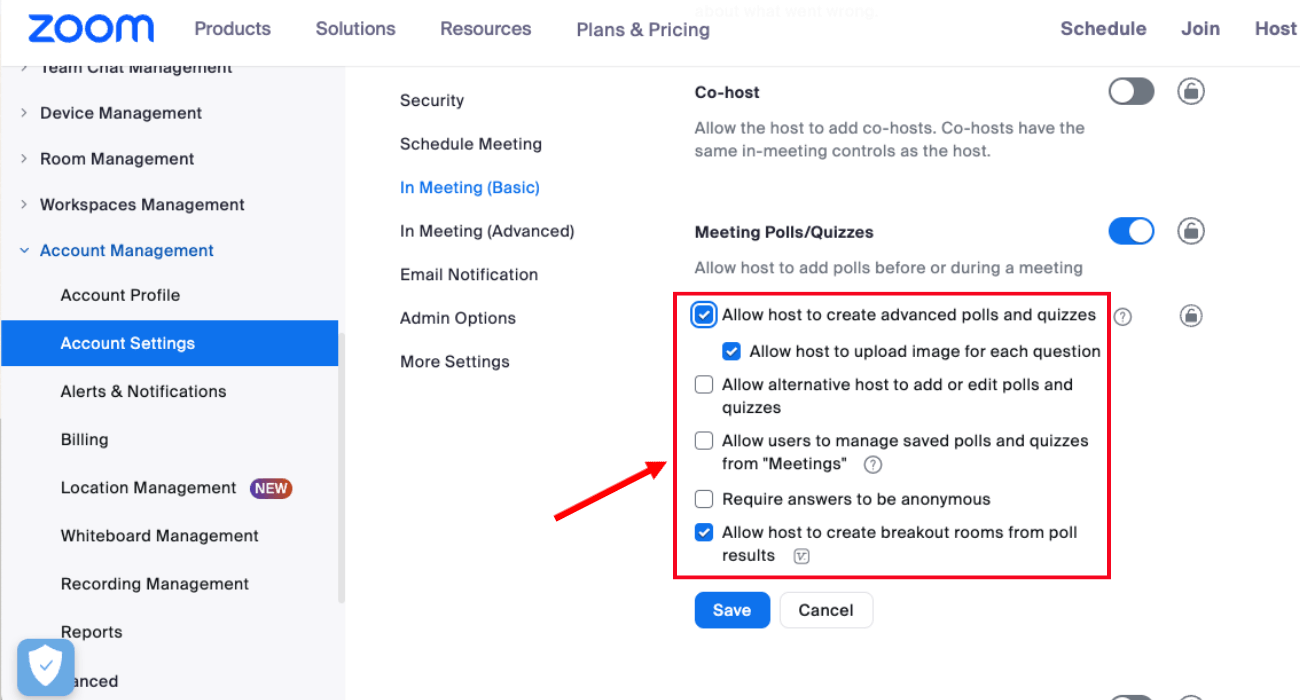
Step 4: Once you have modified the settings, click 'Save.'
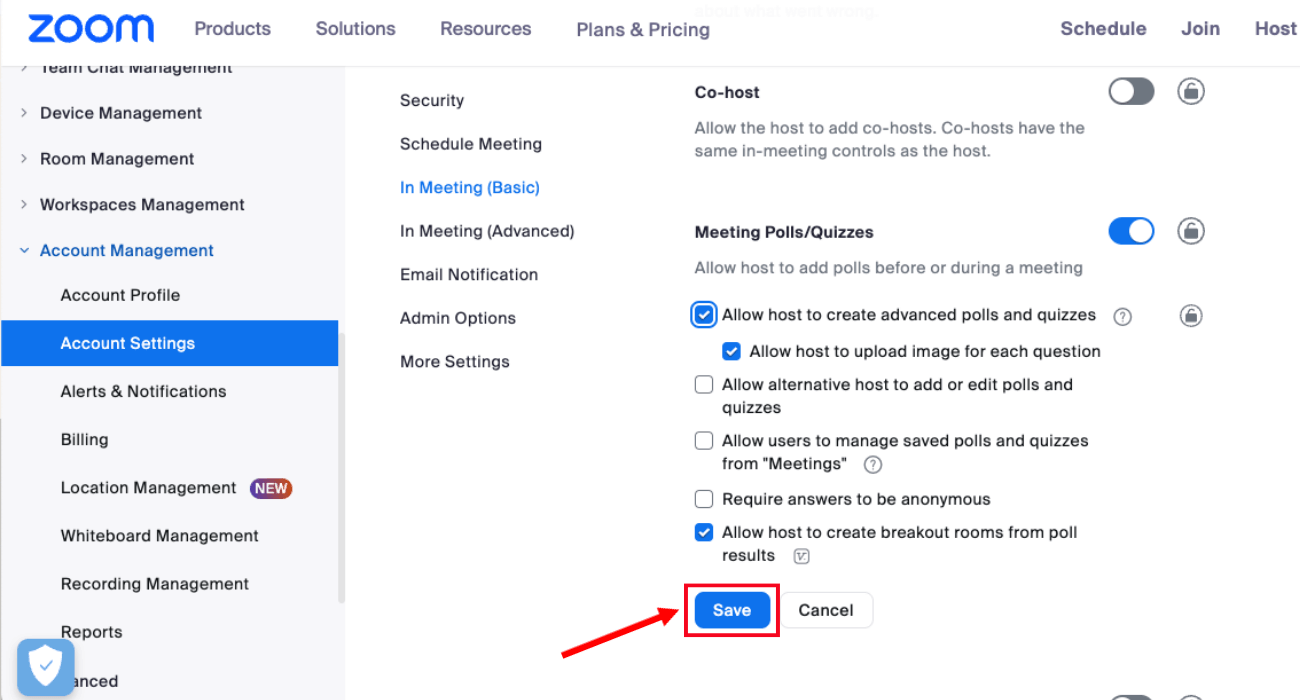
Step 5: Click the lock icon to restrict users from modifying the settings. In the pop-up window, click 'Enable' to confirm.
How to Do Polls in Meetings?
Most of the company's communication takes place virtually, making interactive sessions a need of the hour. Zoom offers a polling feature to ensure virtual meetings are interactive. Using the feature, the meeting host can launch Zoom polls during sessions. They can then download the poll reports with each participant's answers and submission times.
How to Add Poll Questions?
The meeting host can create either Zoom polls in advance or during the live session. Here are step-by-step instructions about how to create polls in Zoom.
Step 1: Sign in to your Zoom Pro account on the web portal. In the navigation panel, select the 'Meetings' tab.
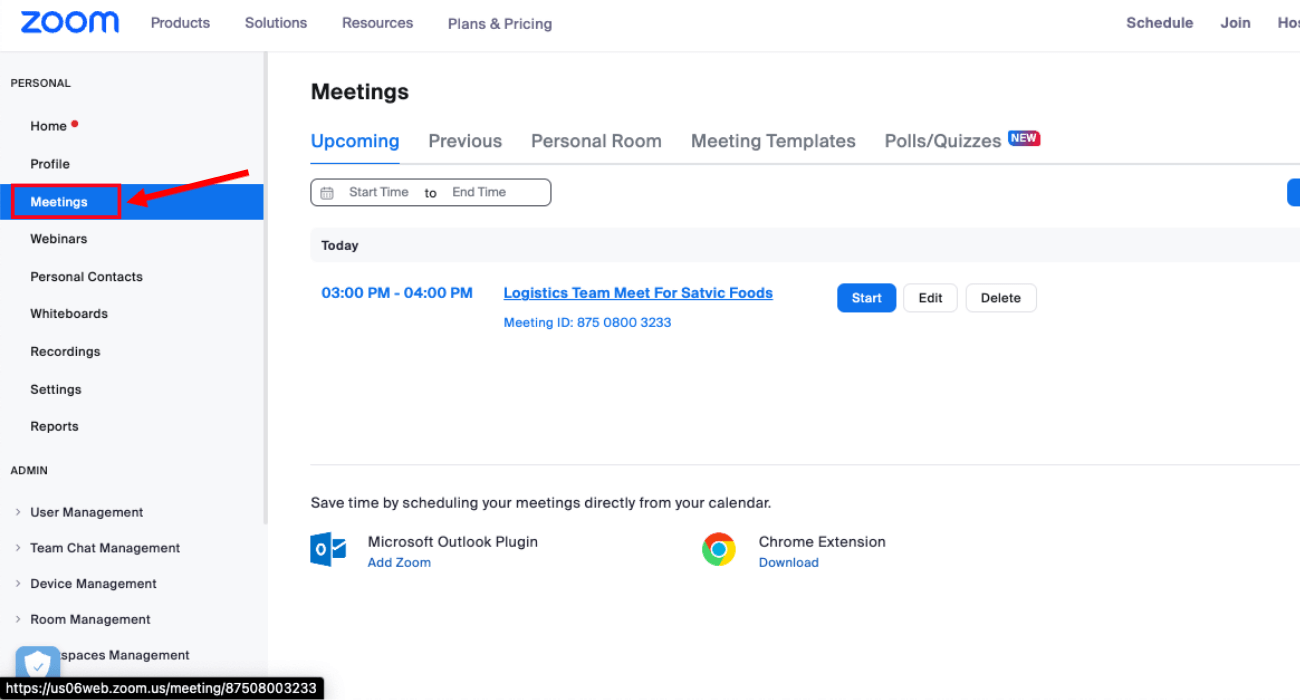
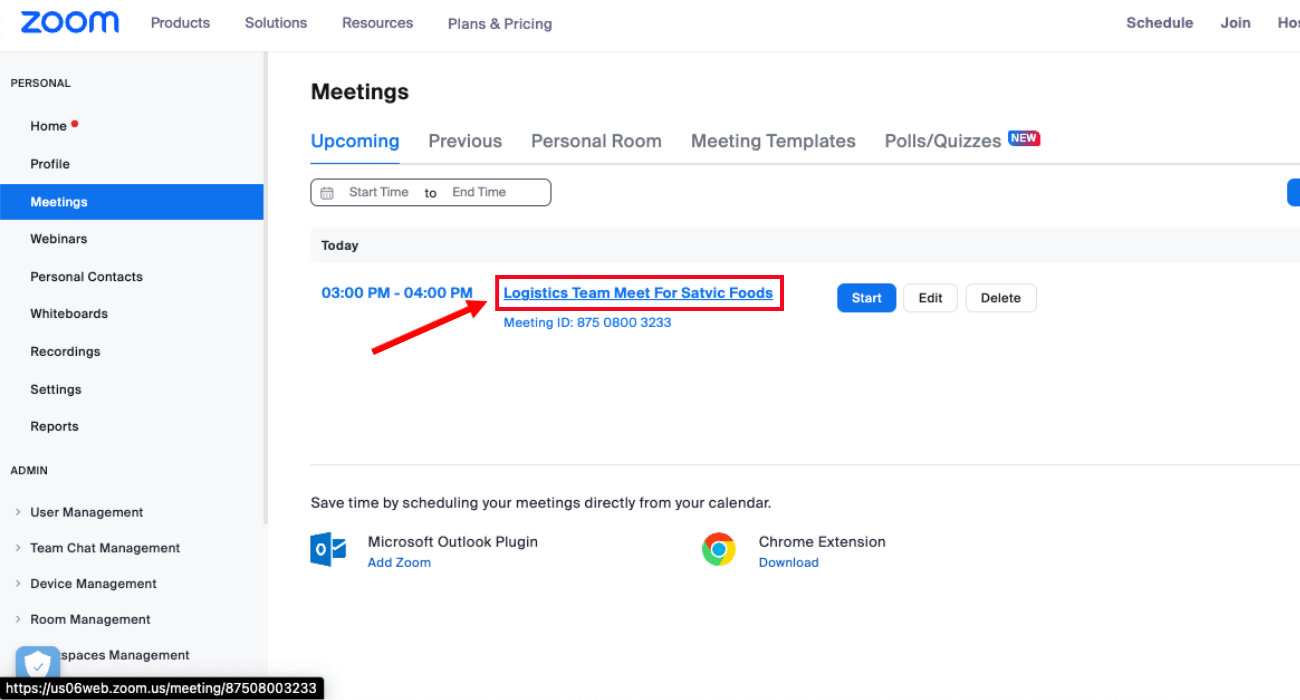
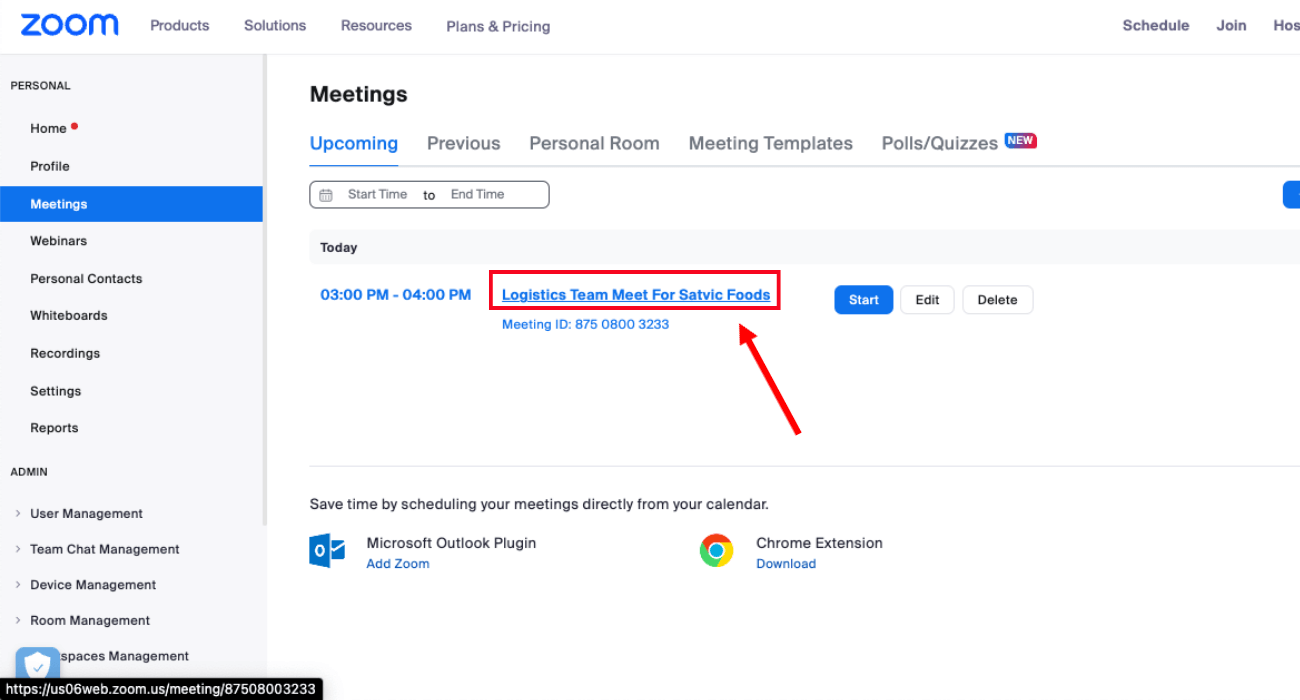
Step 2: If you've already scheduled a Zoom meeting and want to add polls, click the topic, and an editing window will appear.
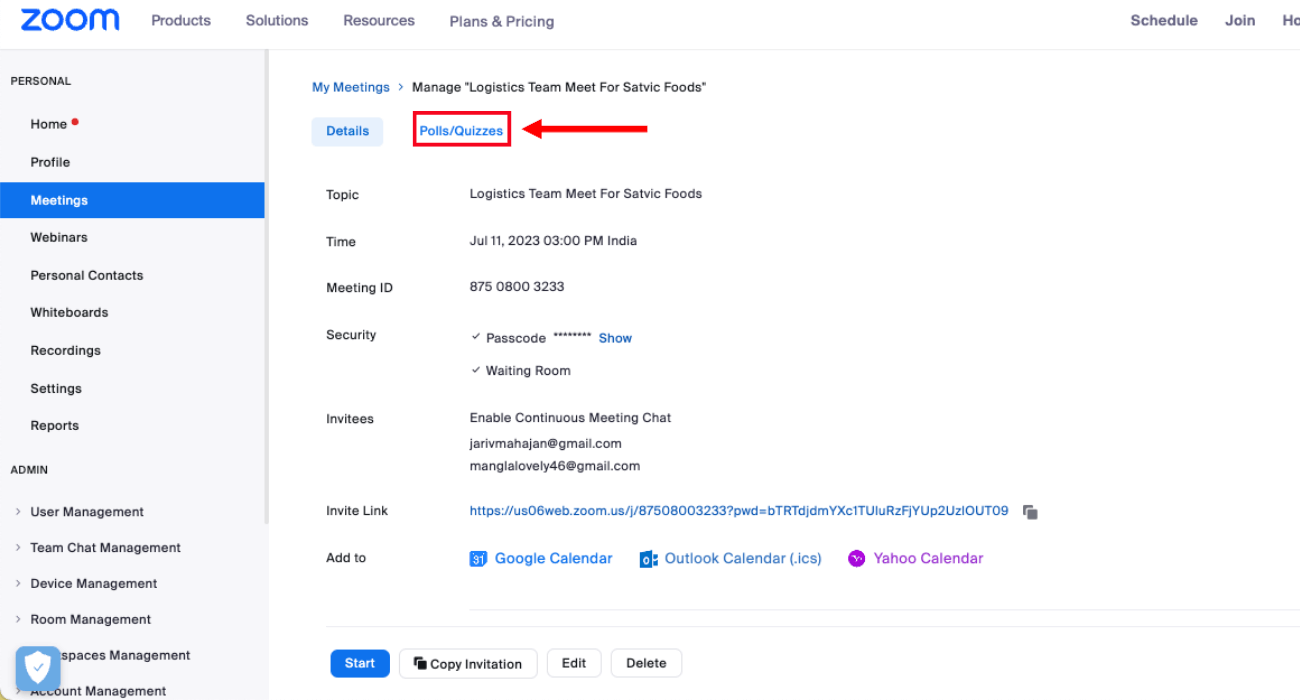
At the top of the page, locate and select the 'Polls/Quizzes' option.
If you do not have any scheduled Zoom sessions, you can schedule a meeting and then follow the mentioned steps.
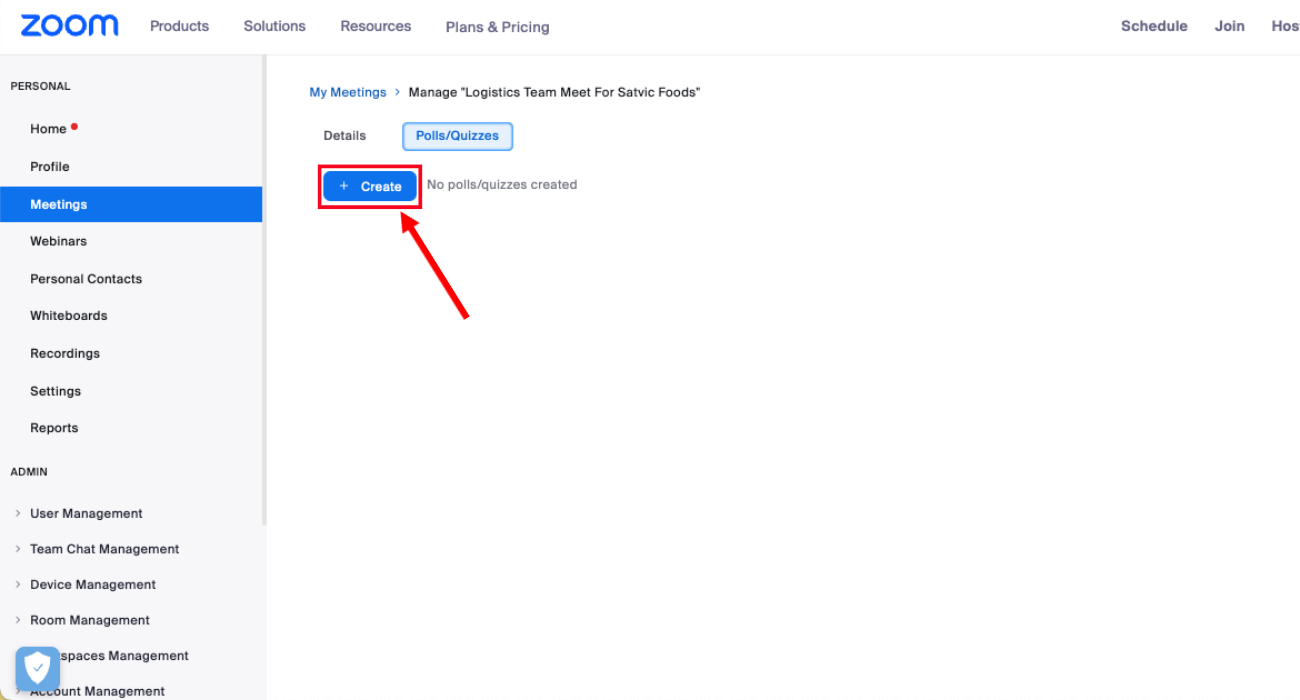
Step 3: To begin creating the Zoom poll questions, select the '+ Create' option.
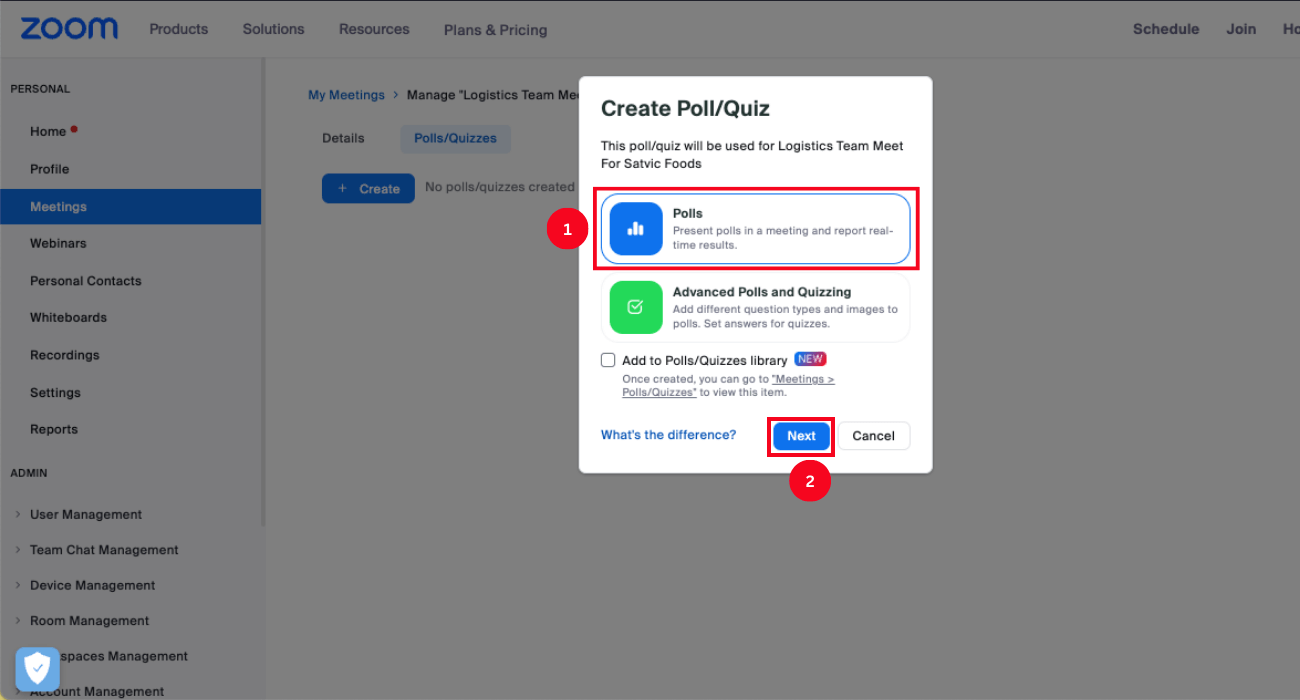
Step 4: In the pop-up window, select 'Polls.' Click 'Next' to proceed.
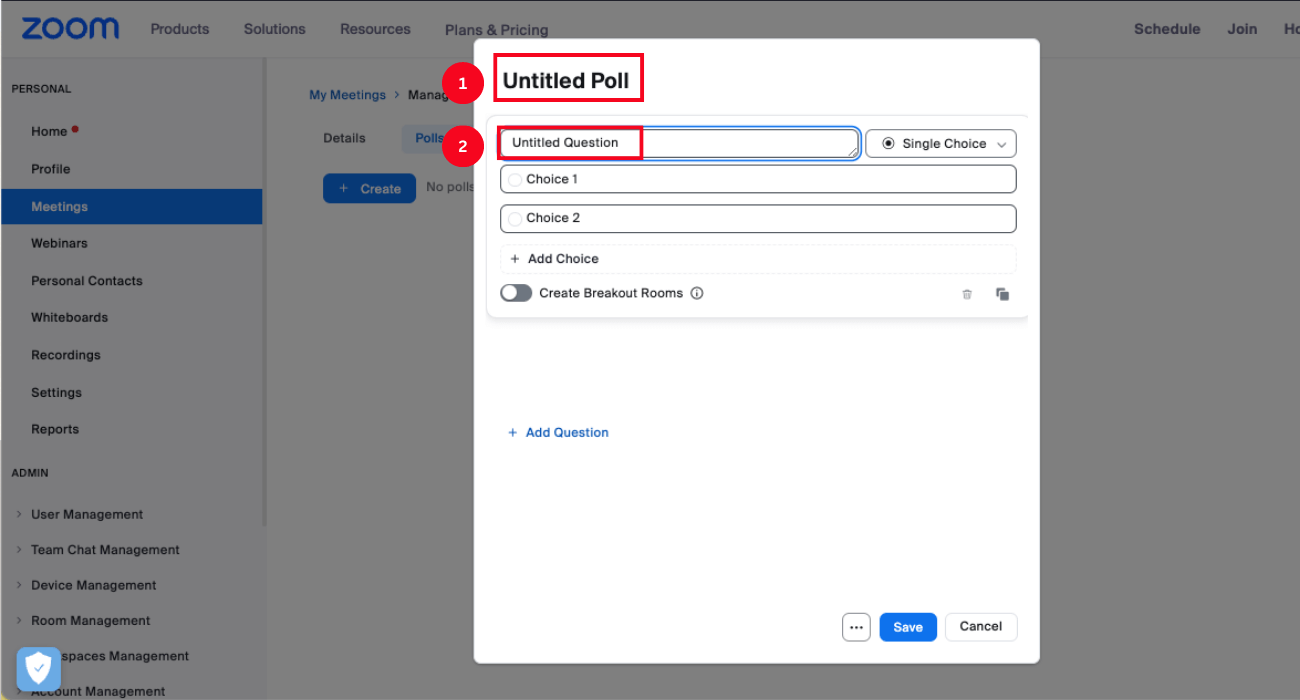
Step 5: Rename the set of polls by selecting 'Untitled Poll.' Similarly, click 'Untitled Question' to edit the name of the poll question.
Click the arrow next to the name of the polling question, and a drop-down menu will appear. Choose the type of question: single choice (where participants can select only one answer) or multiple choice (where participants can choose multiple answers).
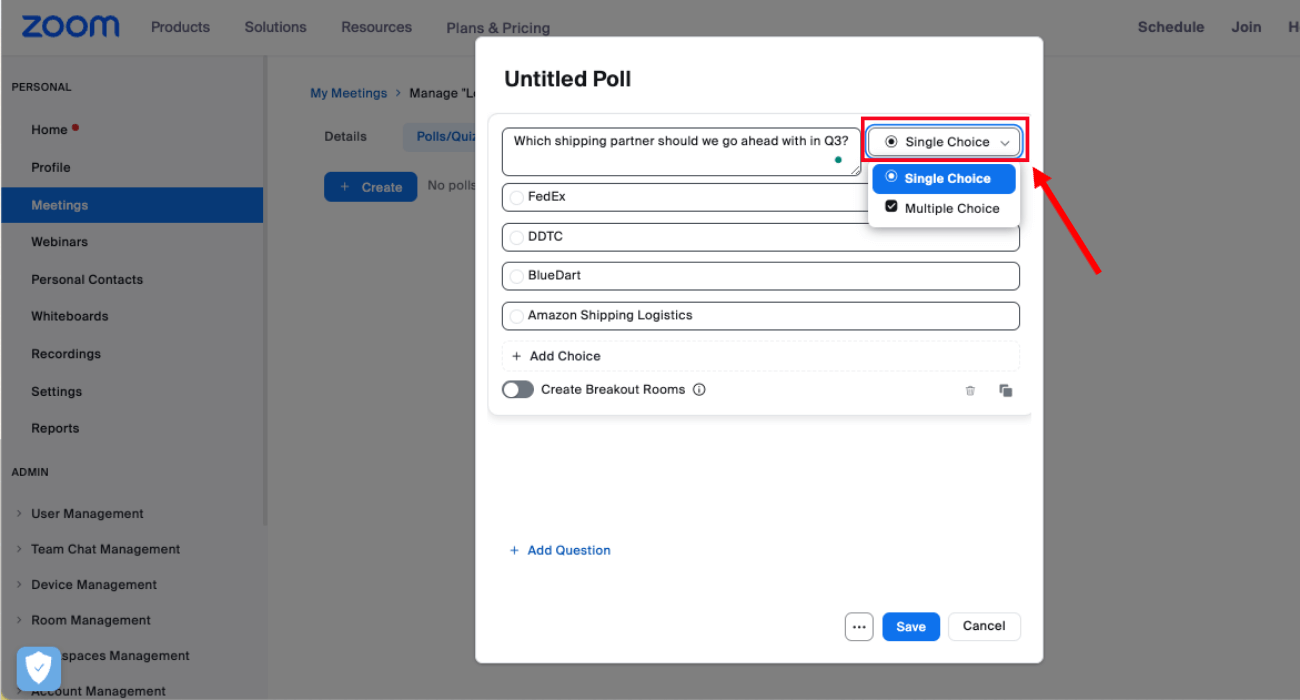
Add the answers by clicking the blank box and selecting '+ Add Choice' to add additional answer options.
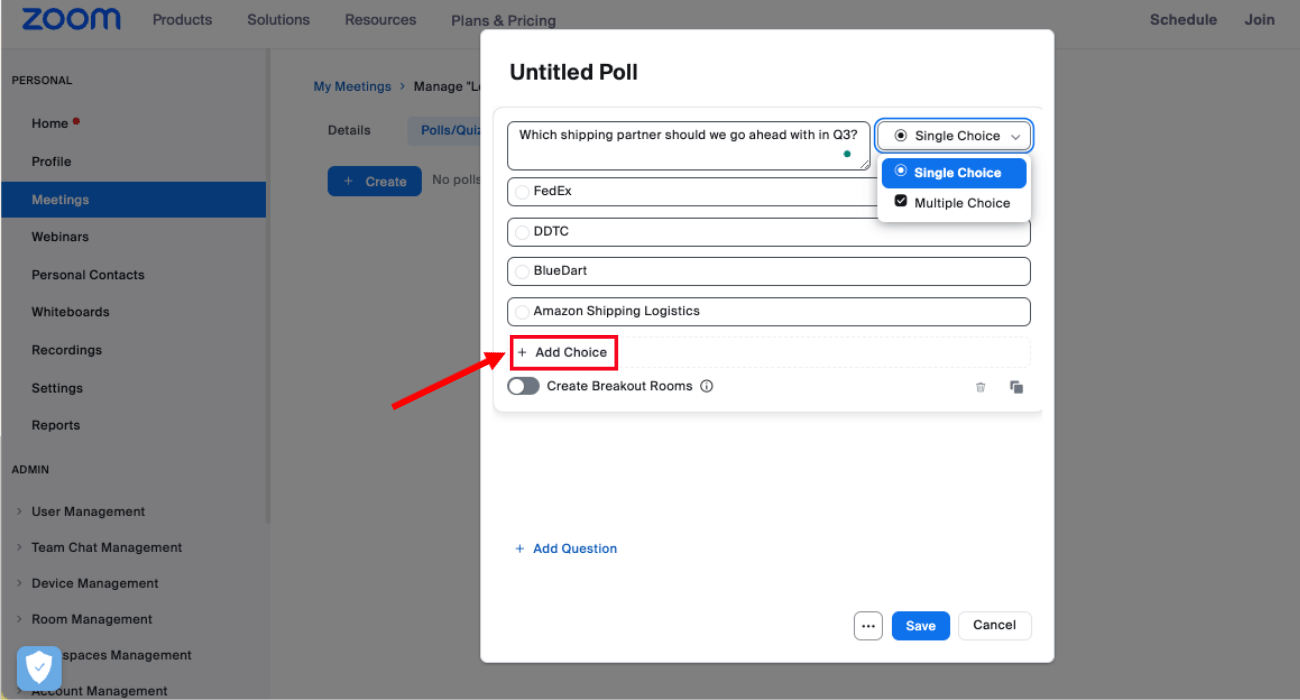
Step 6: Once you have added the questions and answer options, click 'Save.'
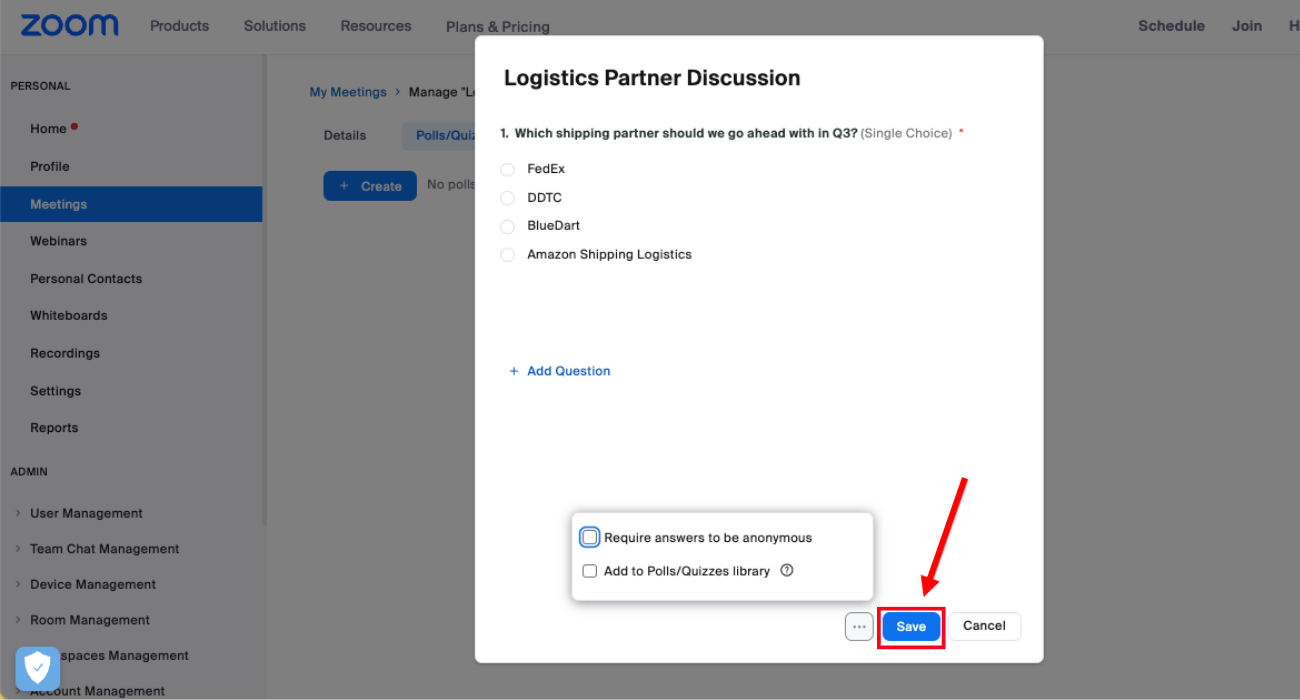
Note: If you use a Zoom desktop client of 5.12.9 or lower, you'll need to edit or create a poll during a live meeting on the web portal. Hosts using version 5.13.0 or higher can create or edit polls in the window during the ongoing session.
How to Launch a Poll in a Meeting?
Whether you're creating polls before the meeting starts or during live sessions, you'll have to use the web portal to add questions and answers. However, polls are not immediately available to the meeting participants, and the host will have to launch a poll for the attendees during the session. Here are the simple step-by-step to manually launch Zoom poll questions.
Step 1: Start scheduled Zoom meetings with the poll feature enabled.
Step 2: In the meeting controls toolbar, you'll find the 'Polls/Quizzes' option. Click it, and a polling window will appear.
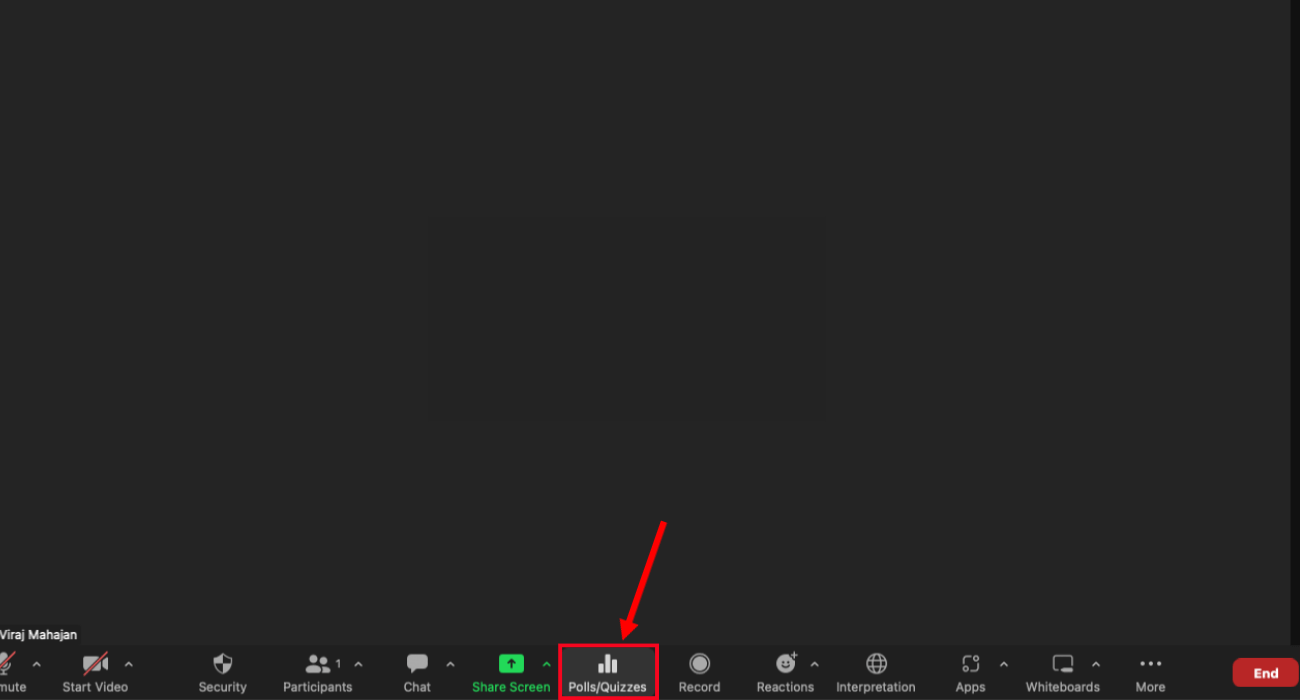
Step 3: In the polling window, click the Zoom poll you want to launch. Select 'Launch.'
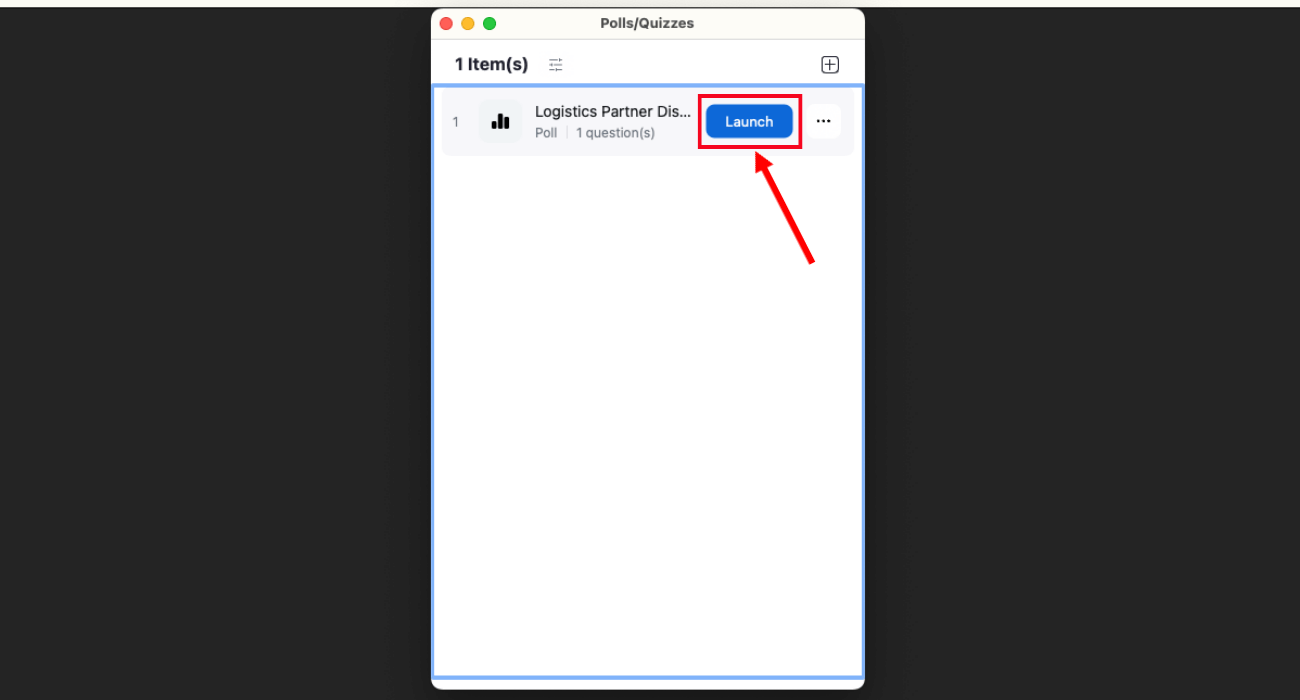
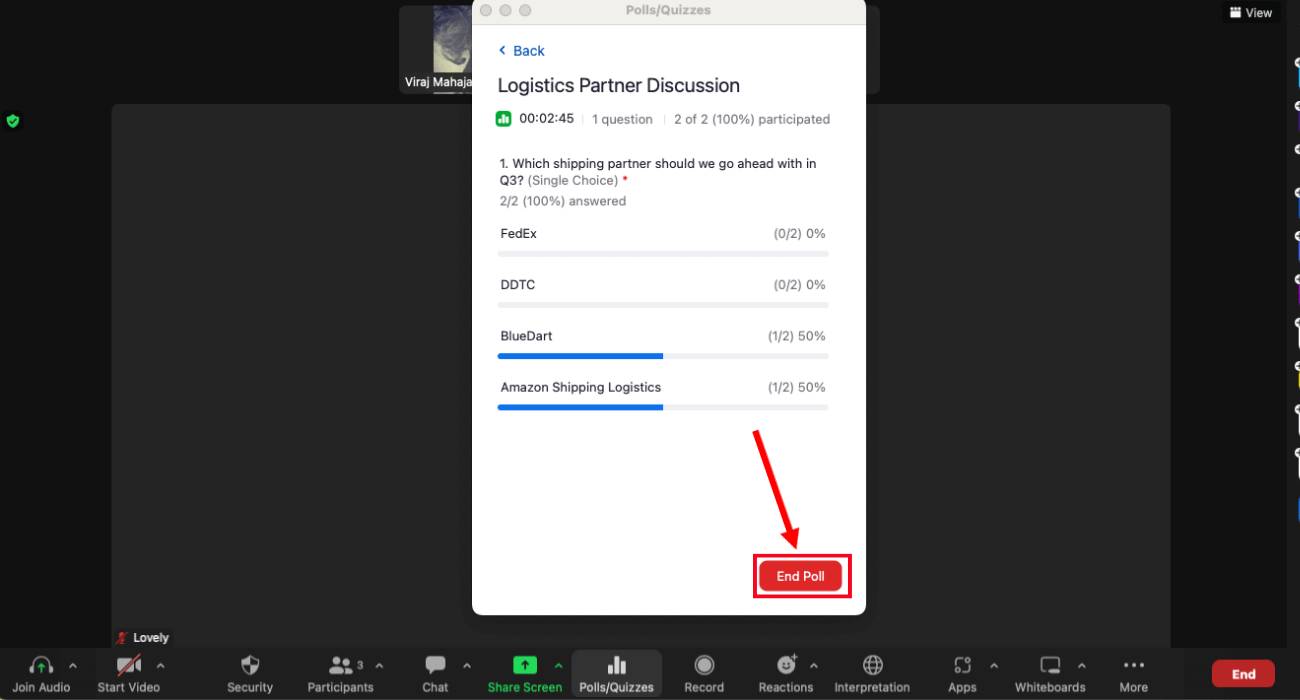
Step 4: The meeting participants can now choose any option to answer the poll question. Once it's done, the meeting host can click 'End Poll' to stop the poll.
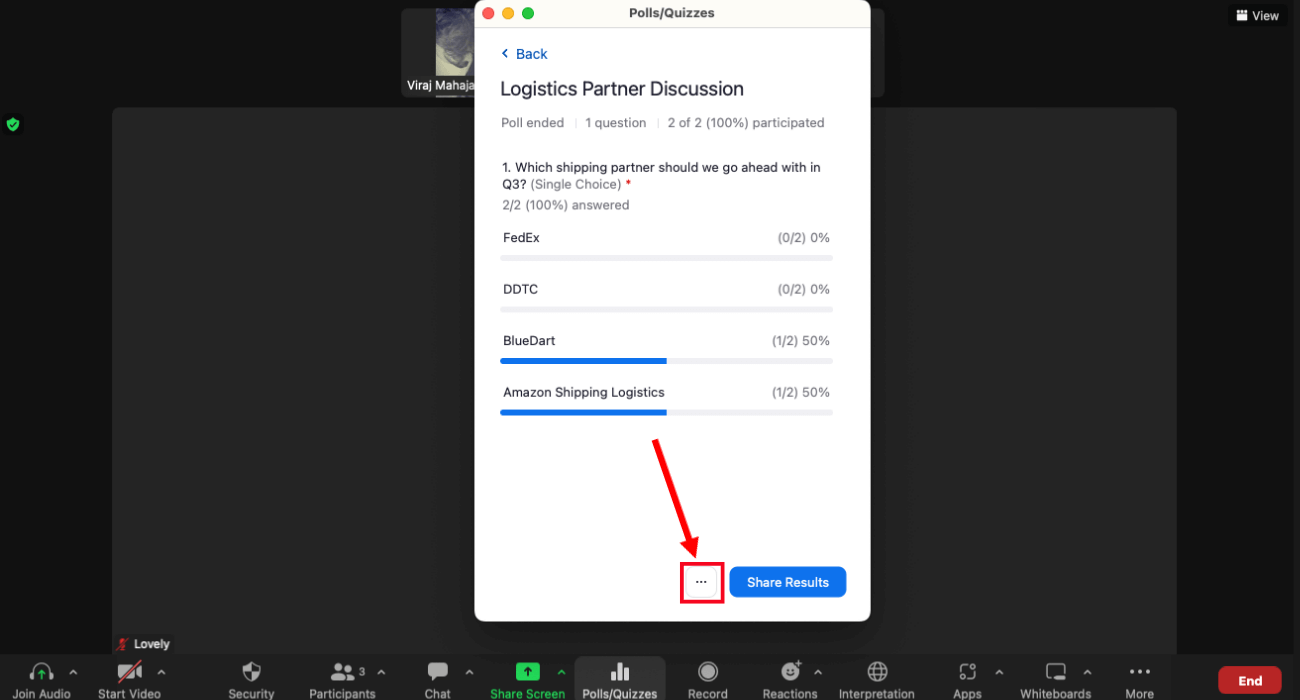
Step 5: Click 'More (...)' to access options, including Relaunch Poll, Download Results, and View Results from Browser.
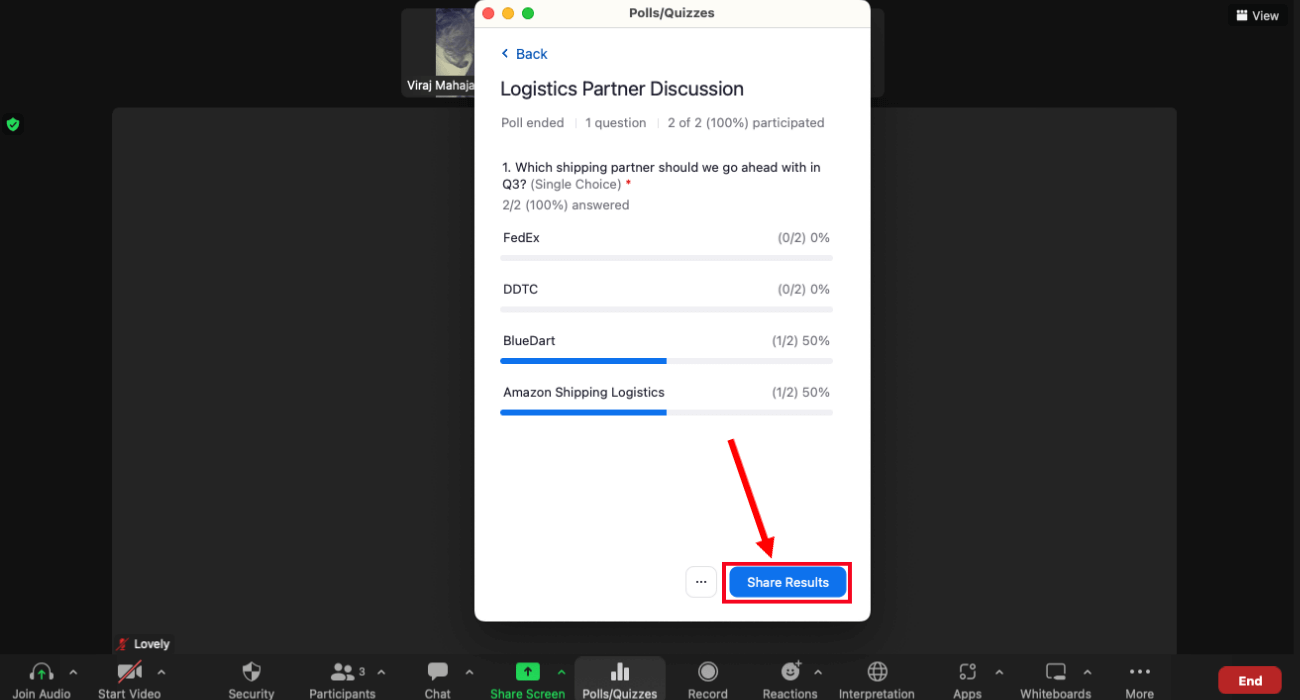
Step 6: Select 'Share Results' to share the Zoom poll results with the meeting participants.
How to Get Poll Reports for Meetings?
Poll reports contain all the essential information about how your meeting attendees responded to your polls. They can help you identify trends, track progress, and make informed decisions. Zoom lets the meeting host generate reports during and after the meeting.
How to Get Reports After the Meeting?
This section will show you how to generate poll reports for your Zoom session once the meeting ends.
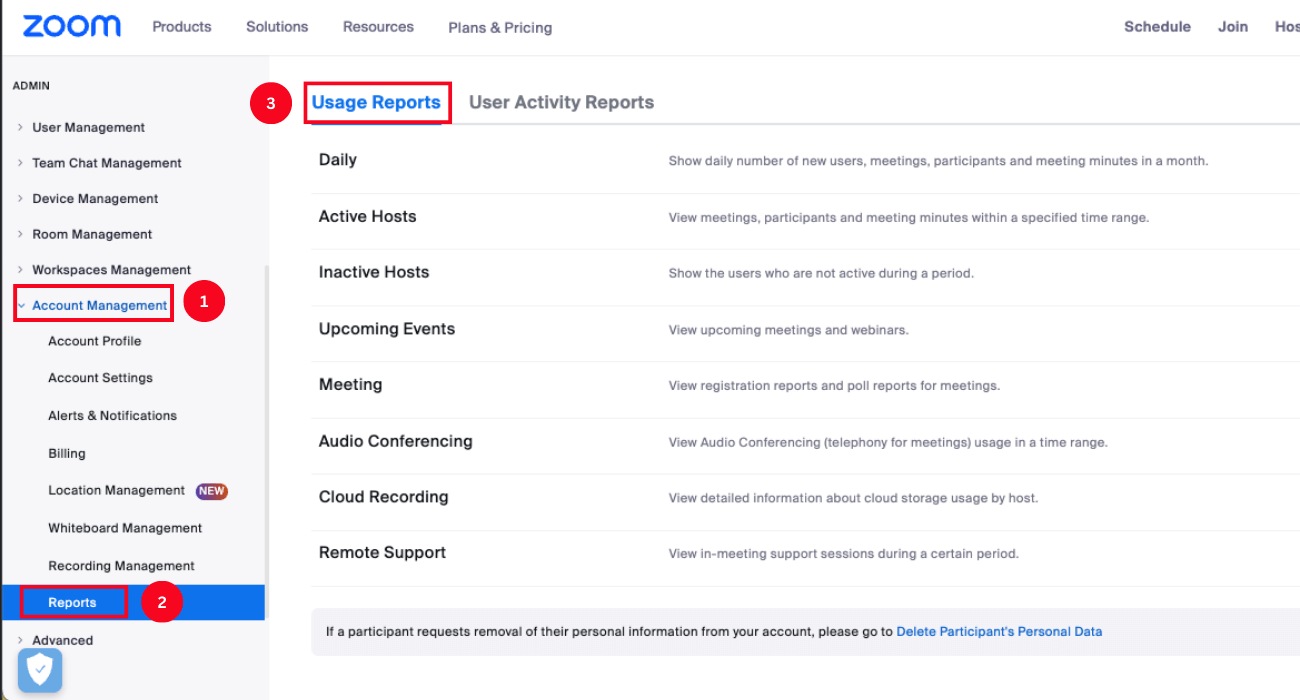
Step 1: Sign in to the Zoom account on the web portal. Head to the navigation menu, click Account Management > Reports. Select the 'Usage Reports' tab.
Step 2: Click 'Meeting,' and the list of previous and upcoming Zoom sessions will appear.
Step 3: In the 'Report Type,' click 'Poll Report.' Select 'Generate' to download the poll report locally on your device.
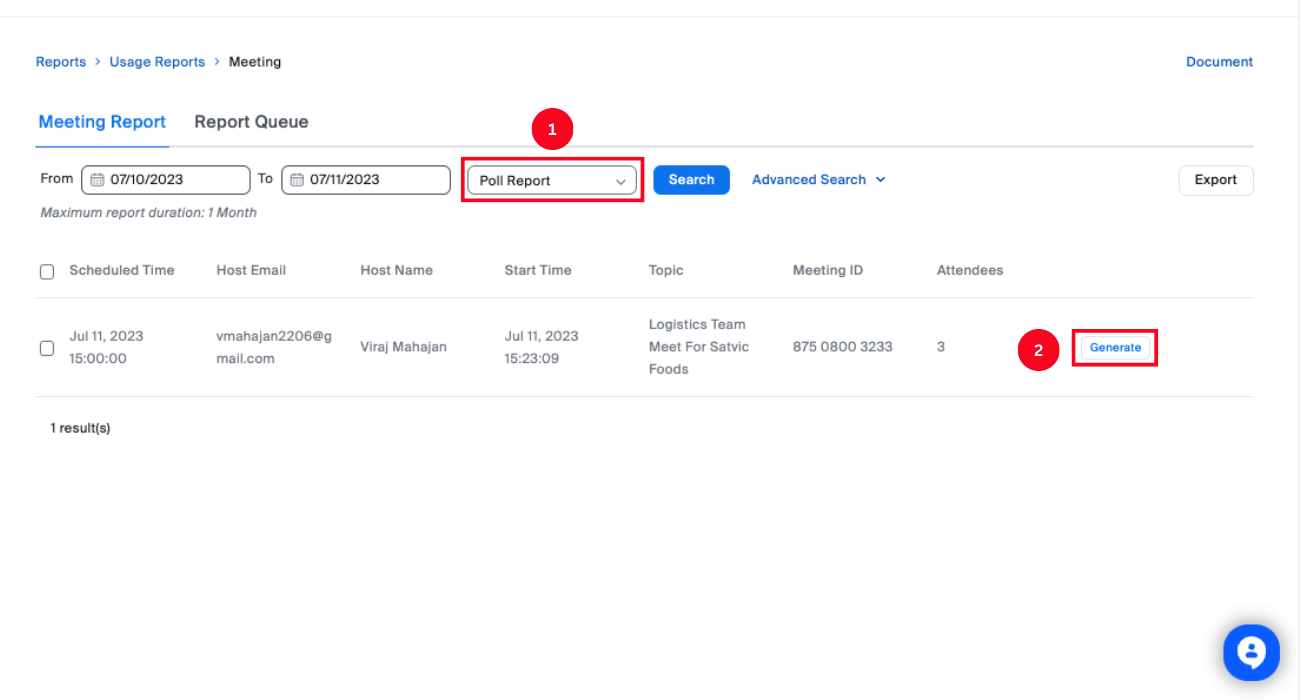
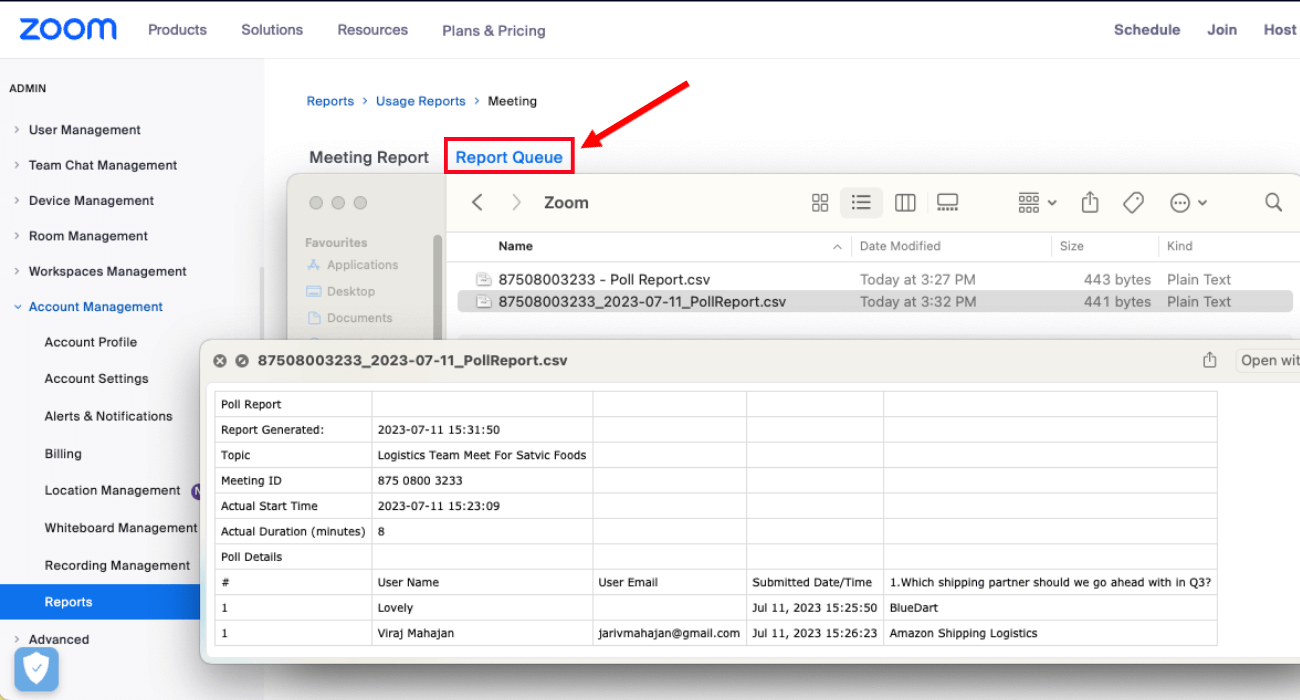
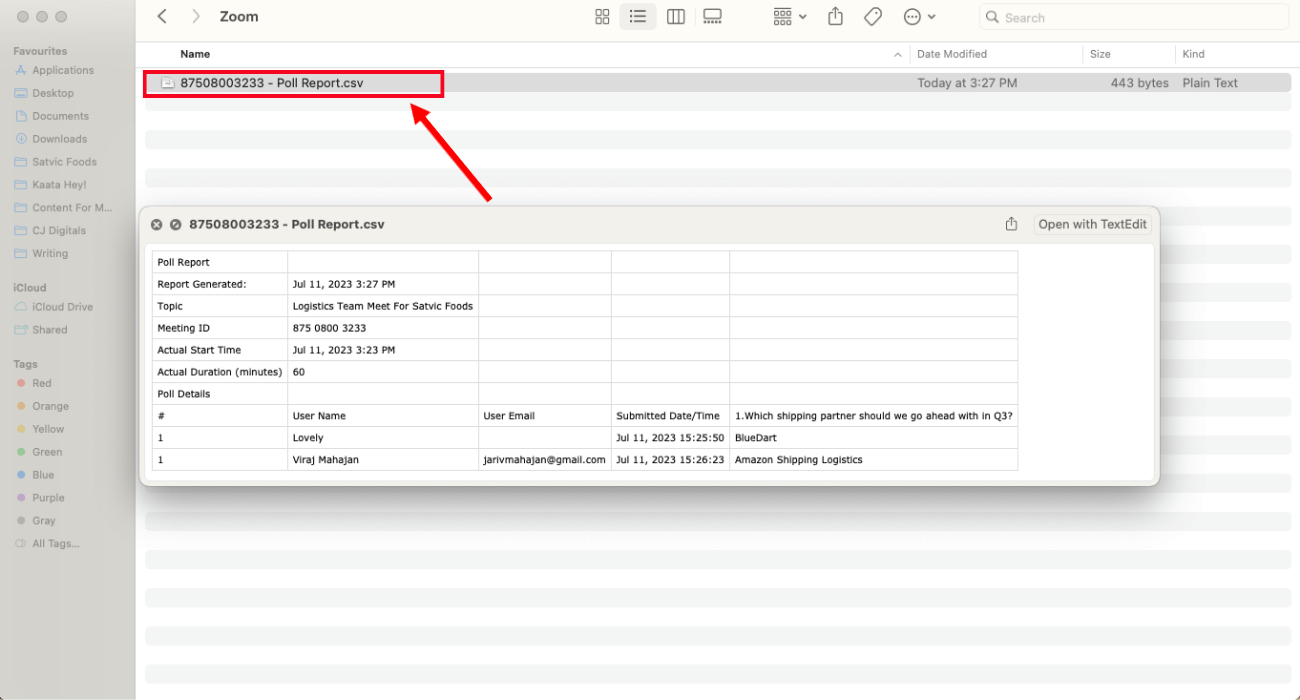
Step 4: You'll be redirected to the 'Report Queues' tab. Click 'Download' to save the poll results as a CSV file.
How to Get Reports During the Meeting?
If you want to generate reports during the meeting, you'll have to enable the Zoom polling feature first. Both the host and alternative host can download the reports during the session.
Step 1: Start scheduled Zoom meetings with the enabled poll feature.
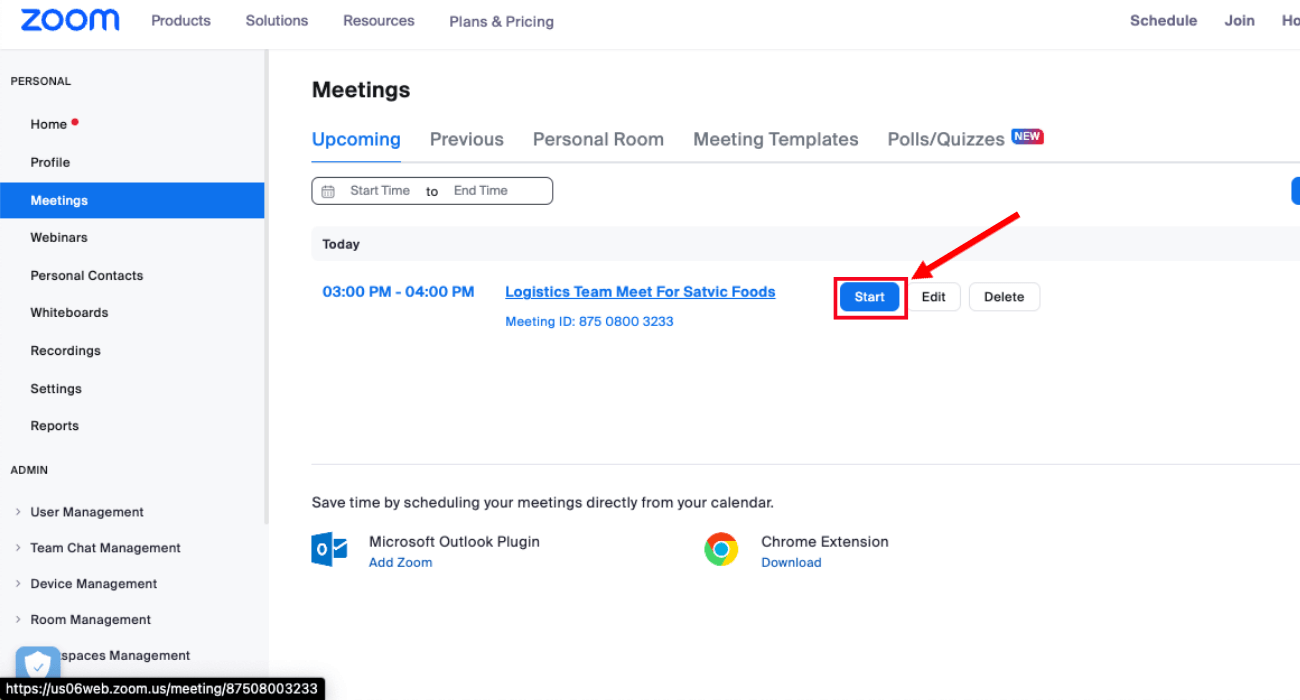
Step 2: Launch the poll by following the steps mentioned in the 'How to Launch a Poll in a Meeting' section.
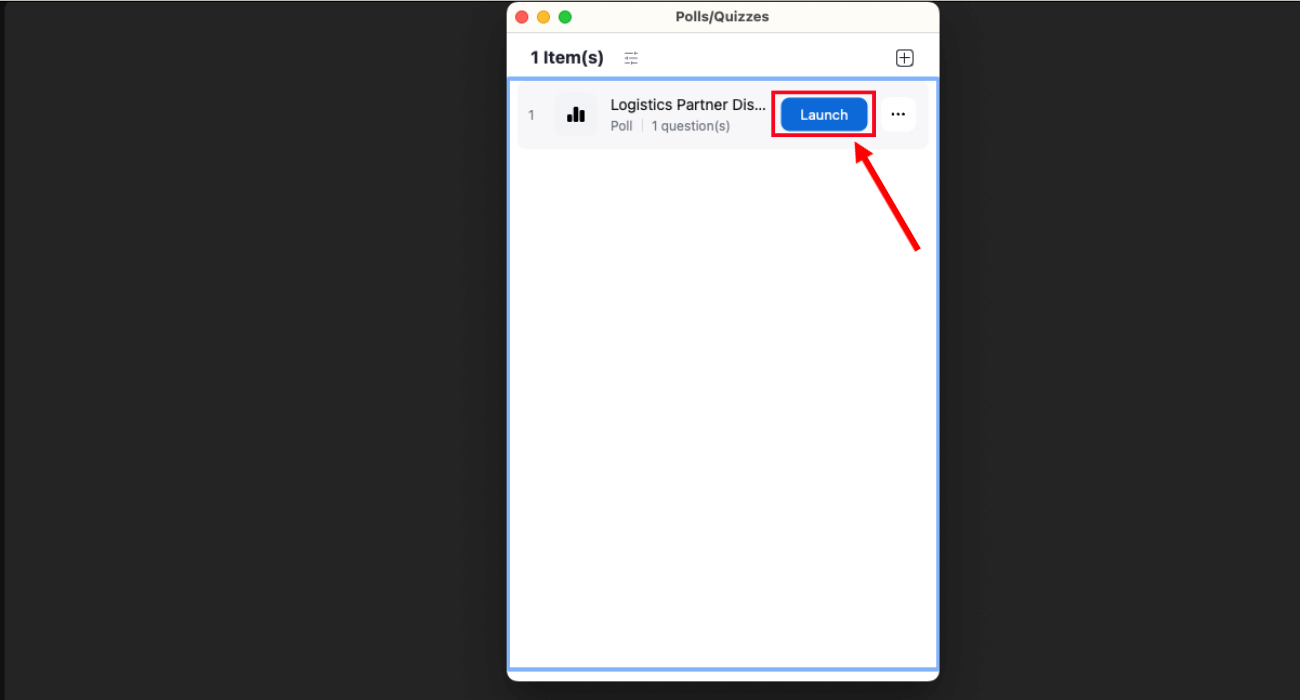
Step 3: Collect poll responses from the meeting attendees and then select 'End Poll.'
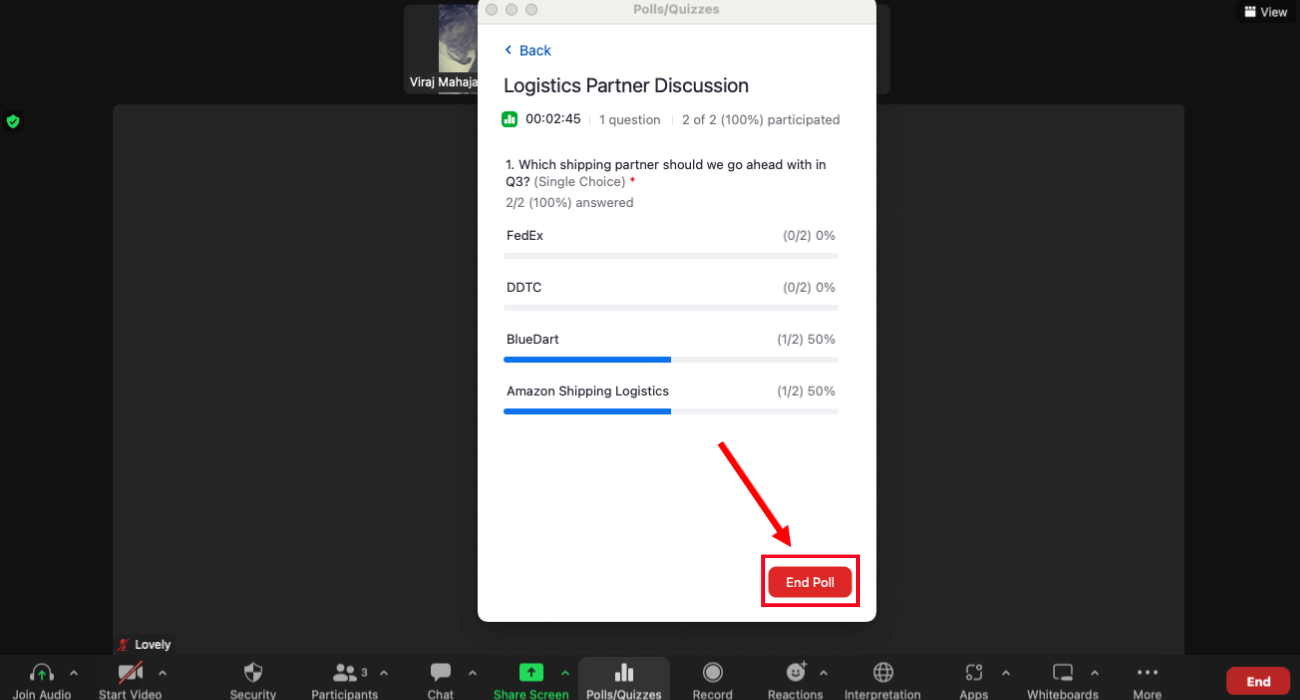
Step 4: Even though you'll see the basic breakdown of poll results in the poll results window, click 'Download' to generate a full report. Zoom will redirect you to your default web browser and start the download process.
FAQs
What Are the Benefits of Zoom Polls?
Zoom offers two main types of polling options: basic and advanced. While the basic feature lets you create single or multiple-choice poll questions, the advanced polling option enables the host to add additional options for question formats.
The best part about the Zoom poll feature is that the host can download the poll reports, which can then be shared with the participants. The host can create 50 individual polls with a maximum of 10 questions per poll in the basic Zoom polling feature.
Let's look at a few main benefits of using the Zoom poll feature:
Polls add an interactive element to your Zoom meeting, ensuring attendees actively participate in the ongoing discussion.
The feature lets the host collect valuable feedback from the audience to improve the presentation, product, or service.
Attendees often lose their attention when sessions go long. Polls can be used to break up long presentations and keep the audience's attention intact.
Since polls can be anonymous, it encourages the meeting participants to give their opinions without being shy or hesitant.
What is the difference between a Poll and a Survey in Zoom?
Polls and surveys are a great way to understand the opinion of meeting participants better. Although both polls and surveys let the meeting host gather insights, they have different features and goals. Below are a few critical differences between polls and surveys.
Goal: While polls are designed to seek quick information, surveys are created for extensive, detailed feedback.
Question Type: Zoom polls generally have single-choice or multiple-choice questions. On the contrary, surveys include single-choice, multiple-choice, ratings, and open-ended questions.
Time: Polls can be quickly answered, while surveys include analytical questions and require more time.
Can I Do Polls in Zoom Breakout Rooms?
Yes, you can do polls in the Zoom breakout room. It is valuable when the meeting host wants to create Zoom breakout rooms based on the attendees' poll answers. For instance, the host can split breakout rooms based on participants who share similar interests. Here's how to do Zoom polls in breakout rooms.
Step 1: Navigate to the Zoom web portal. Open your scheduled meeting or the 'Polls/Quizzes' tab to access the created polls.
Step 2: Navigate to the window where you add poll questions and enable 'Create Breakout Rooms.'
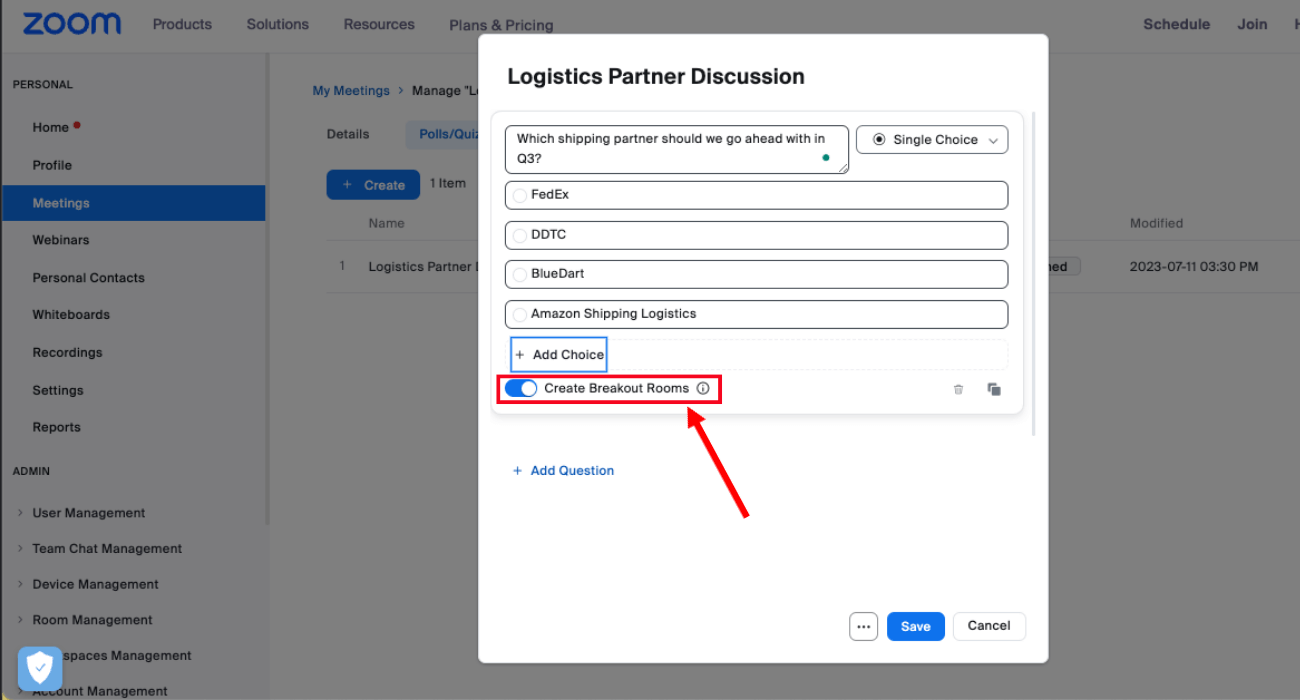
Note: You must uncheck the box indicating 'Require answers to be anonymous' to use the poll feature.
Step 3: Once done, click 'Save.'
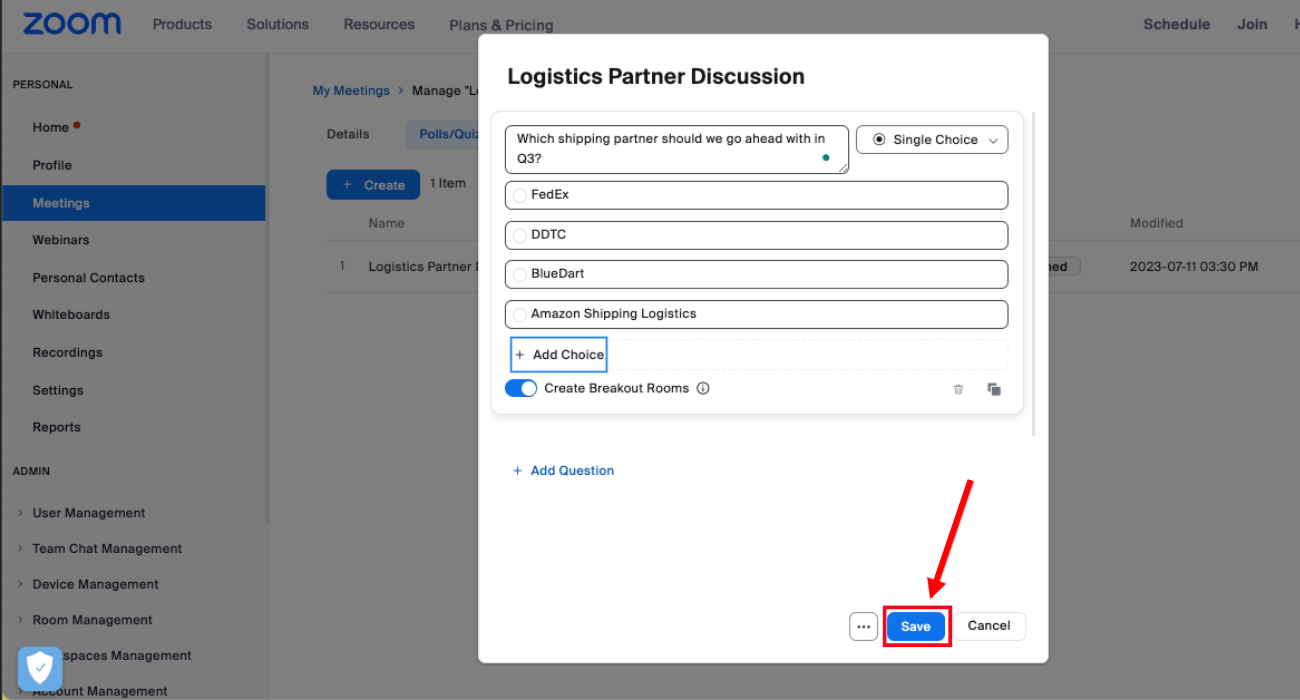
Once the meeting starts, you can launch a poll by clicking the 'Polls' option in the meeting controls. Then, you can select the poll you want to launch and click 'Launch.'
Notta: Supercharge Your Online Meetings with the Power of AI
With virtual meetings becoming more common than ever before, the popularity of AI-powered meeting tools is growing. These tools can help you save time by automatically recording or transcribing your Zoom meetings.
One such feature-rich tool is Notta. It lets you automatically schedule, record, transcribe, and summarize your Zoom meetings, so you can focus on the discussion. Let's understand how you can use Notta to supercharge your Zoom online meetings.
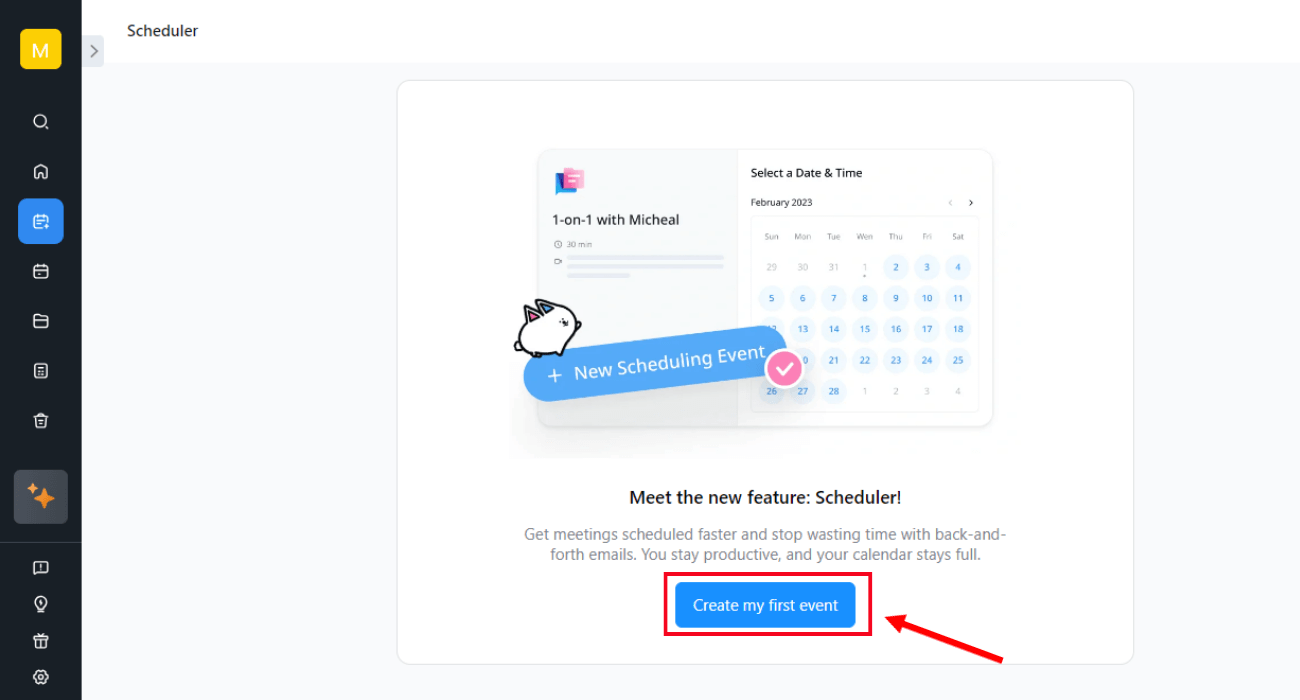
Scheduling Meetings: Notta's scheduler feature lets you connect the AI-enabled software with the Google Calendar. The tool automatically checks your calendar for available times and adds new events as they are scheduled. It streamlines the process of scheduling meetings by bringing everything into one place.
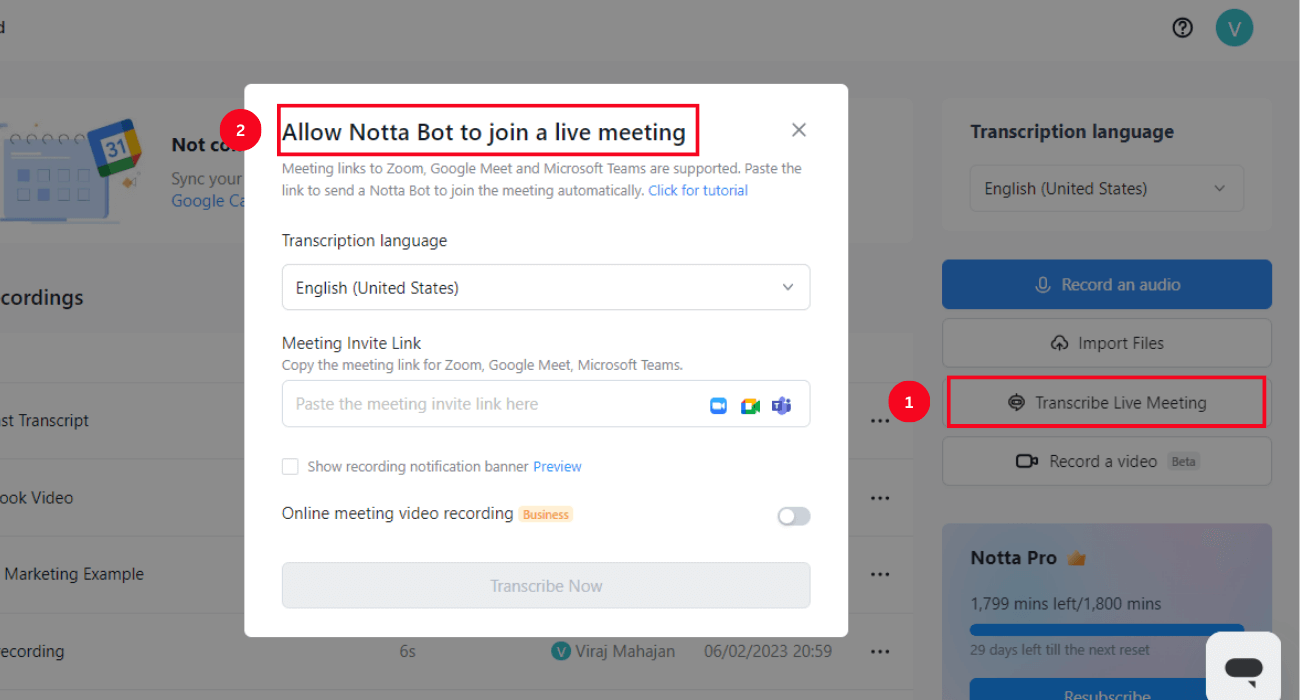
Recording: Notta offers an AI-powered Notta bot that can automatically enter the scheduled Zoom meeting to record and generate transcripts. All you need to do is create a free account on Notta and select 'Transcribe Live Meeting.' Notta bot will enter your Zoom session and generate transcripts in real time. Once the meeting ends, the Notta bot will leave the meeting, and the entire transcript can be accessed on the Notta dashboard.
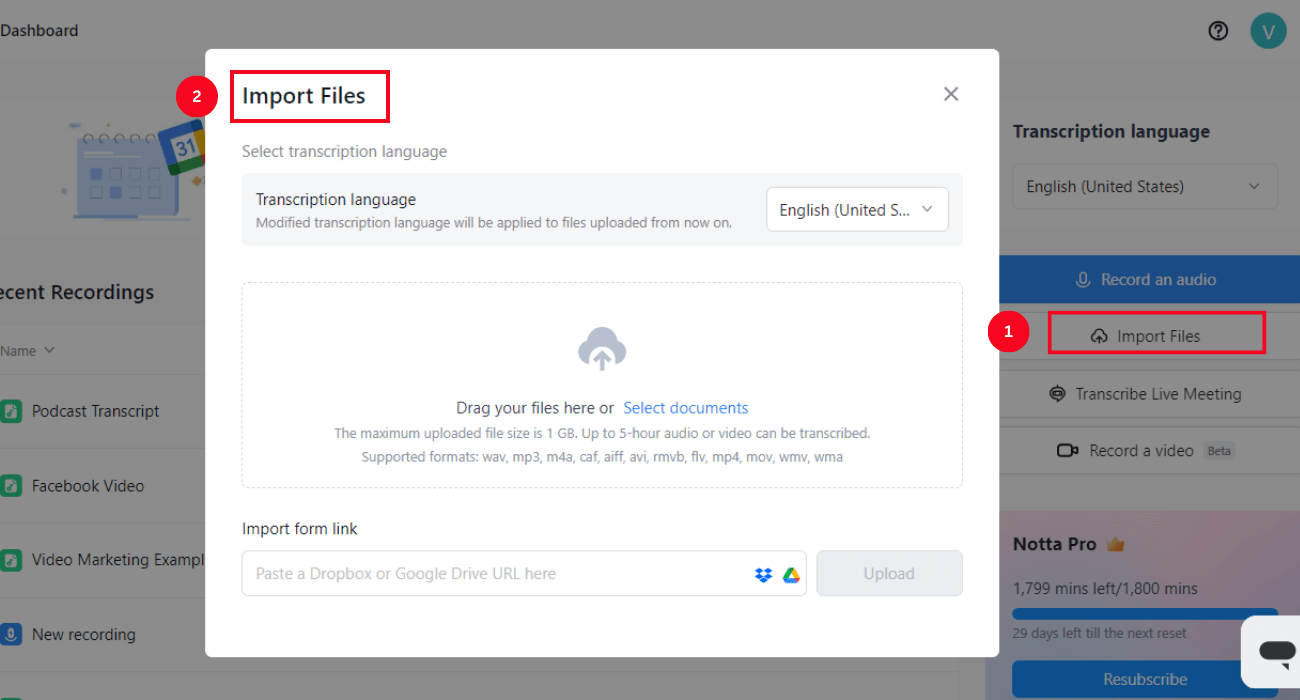
Transcribing & Summarizing: With Notta recording and transcribing tools, you can automatically generate transcripts of your Zoom meetings. The feature-rich Notta bot transcribes your Zoom sessions in real-time, ensuring you never miss any important information. You can also use the 'Import Files' feature to import audio or videos from your computer to generate transcripts or summaries.
Notta is a powerful meeting assistant that can help transcribe virtual meetings on Zoom, Microsoft Teams, Google Meet and Webex in real time and convert meeting recordings in seconds.
Key Takeaways
Zoom polls feature is an excellent tool to improve how you connect with your team members virtually. Following the steps in the 'How to create a poll in Zoom' article will help you create polls before meetings or during the live session. You can also use Zoom poll reports to track the results of your polls and improve your sessions.
But that's not all! If you want to save time and improve your meeting outcomes, consider using an AI-powered meeting tool like Notta. Notta recording and transcribing tool can automatically transcribe your meetings in real-time, generate meeting summaries, highlight key moments, and even create action items.
Sign up for a free trial of Notta today to save time and improve your meeting outcomes.