
How to Install and Set Up Zoom App on Mac
Unlock the power of AI — Notta's meeting assistant records, transcribes and summarizes meeting minutes with one click.
If you are a Mac user wanting to install the Zoom app, you understand the frustration behind compatibility issues and high-end security settings. The Mac's strong emphasis on security makes installing third-party applications such as Zoom complex.
Whenever I install a third party on my Mac, I have to follow a lengthy procedure. Therefore, I understand the complexities involved in installing Zoom for Mac. Fortunately, this comprehensive guide about Zoom for Mac can help you navigate the common setup challenges.
I have installed Zoom on my Mac to elaborate on the process, started a meeting, and even added attendees to the meeting to help readers understand better. So, read along to find the essential prerequisites for installing the app and the step-by-step instructions to start a Zoom meeting.
Prerequisites for installing Zoom app on Mac
Before installing or downloading the Zoom app, it's crucial to ensure that you meet the requirements and modify your Mac settings. One important thing to note is that the Zoom app supports macOS X with macOS X (10.10) or later. If you have a compatible Mac version, the next step is to grant installation permission by following the below-mentioned steps.
Step 1: At the top left corner of the Mac screen, click on the Apple icon. Then, select 'System Settings...'
![]()
Step 2: Select 'Privacy & Security.'
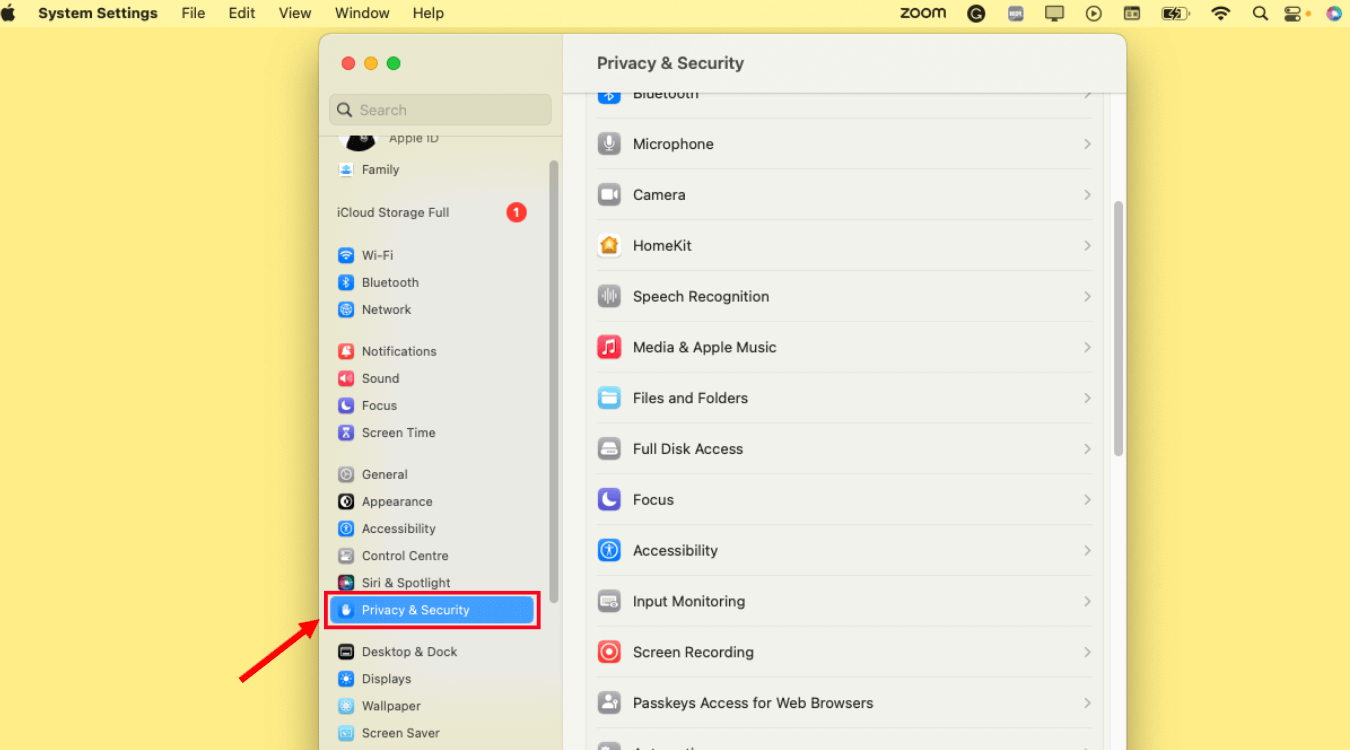
Step 3: At the bottom left of the Mac screen, click the 'Lock' icon to grant permission to make changes.
Step 4: Next, enter the username and password of your computer administrator.
Note: If you are using the updated Mac version, you can skip steps 3 and 4.
Step 5: Scroll down until you find the 'Security' option. Under the 'Allow apps downloaded from,' select 'App Store and identified developers.'
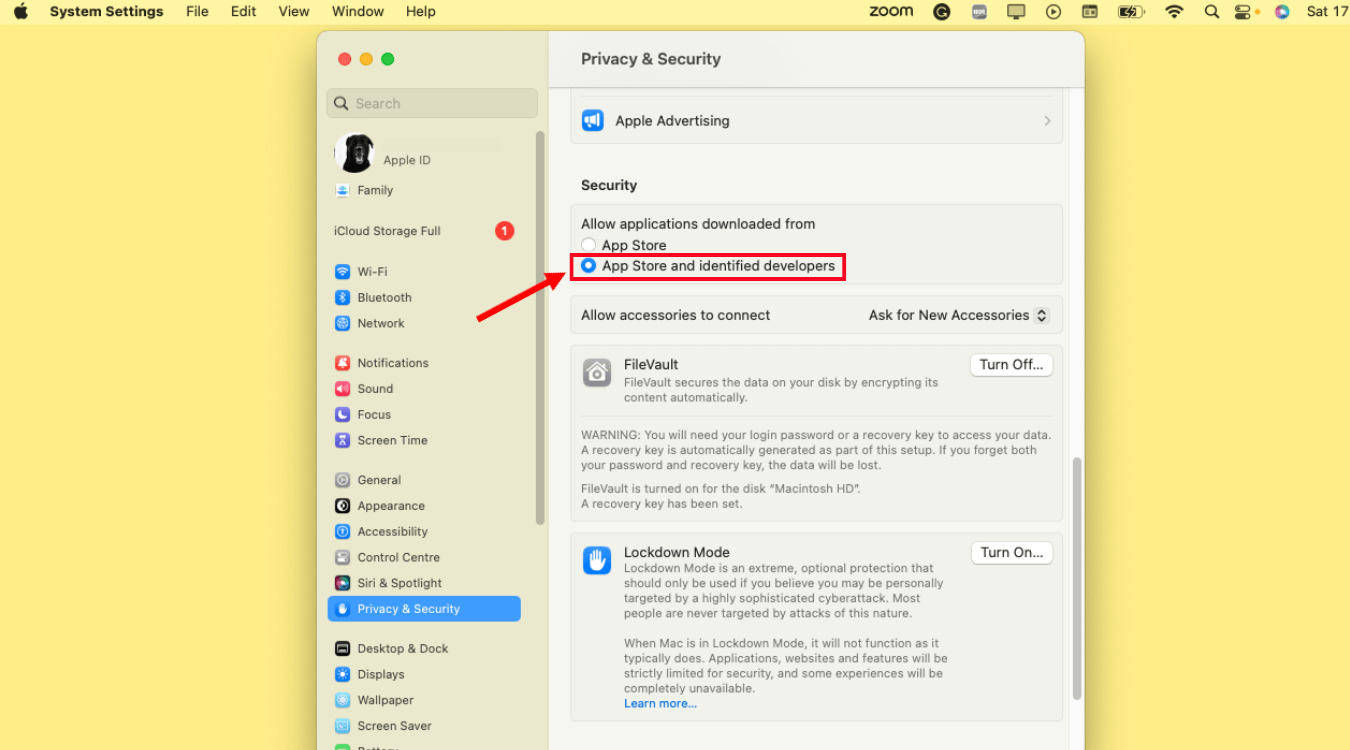
Note: If you use Mac High Sierra (10.13.x), click 'Allow.'
How to download and install Zoom app on Mac?
Once you grant permission and meet the system requirements, your next step is to download Zoom for Mac. This section will reveal the step-by-step process to quickly download and install the Zoom app compatible with your Mac.
Step 1: Visit Zoom Download Center to download the Zoom App on Mac. Under 'Zoom Desktop Client,' select 'Download.'
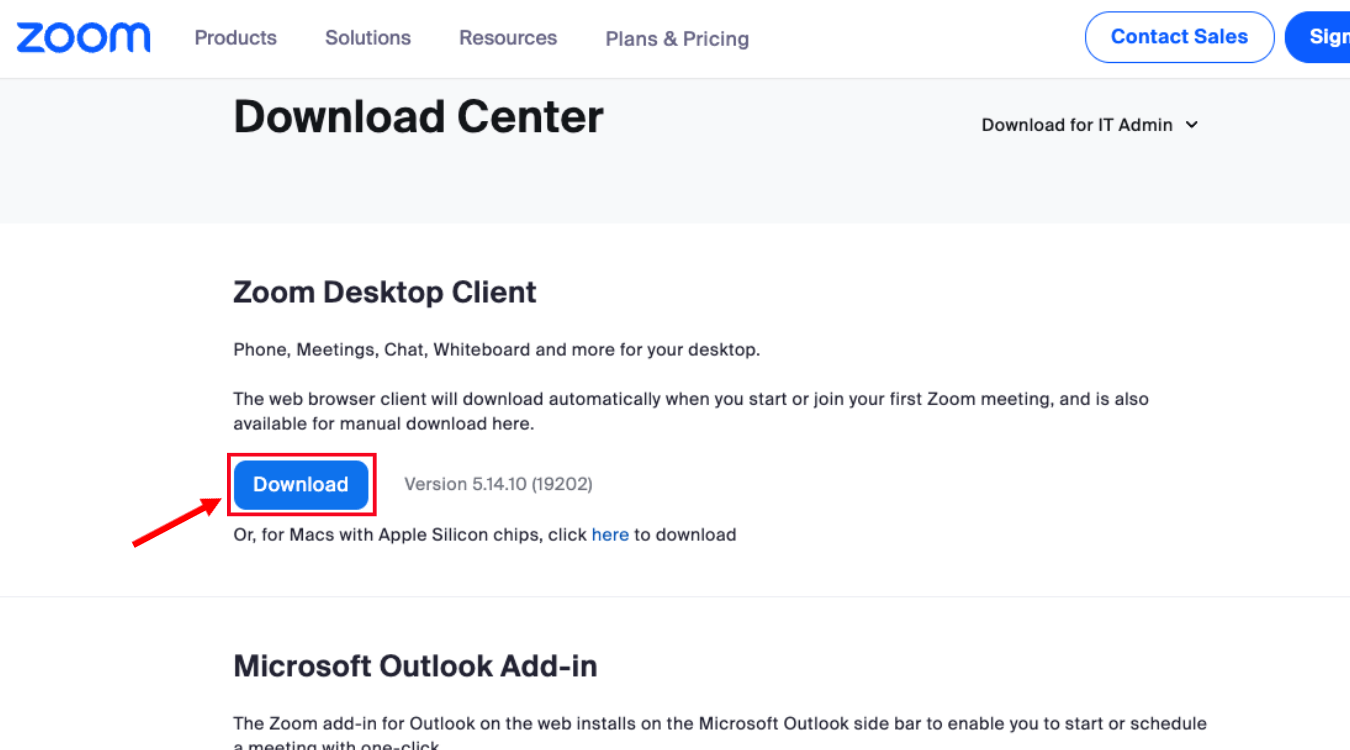
The downloaded Zoom file will be saved to your Downloads folder.
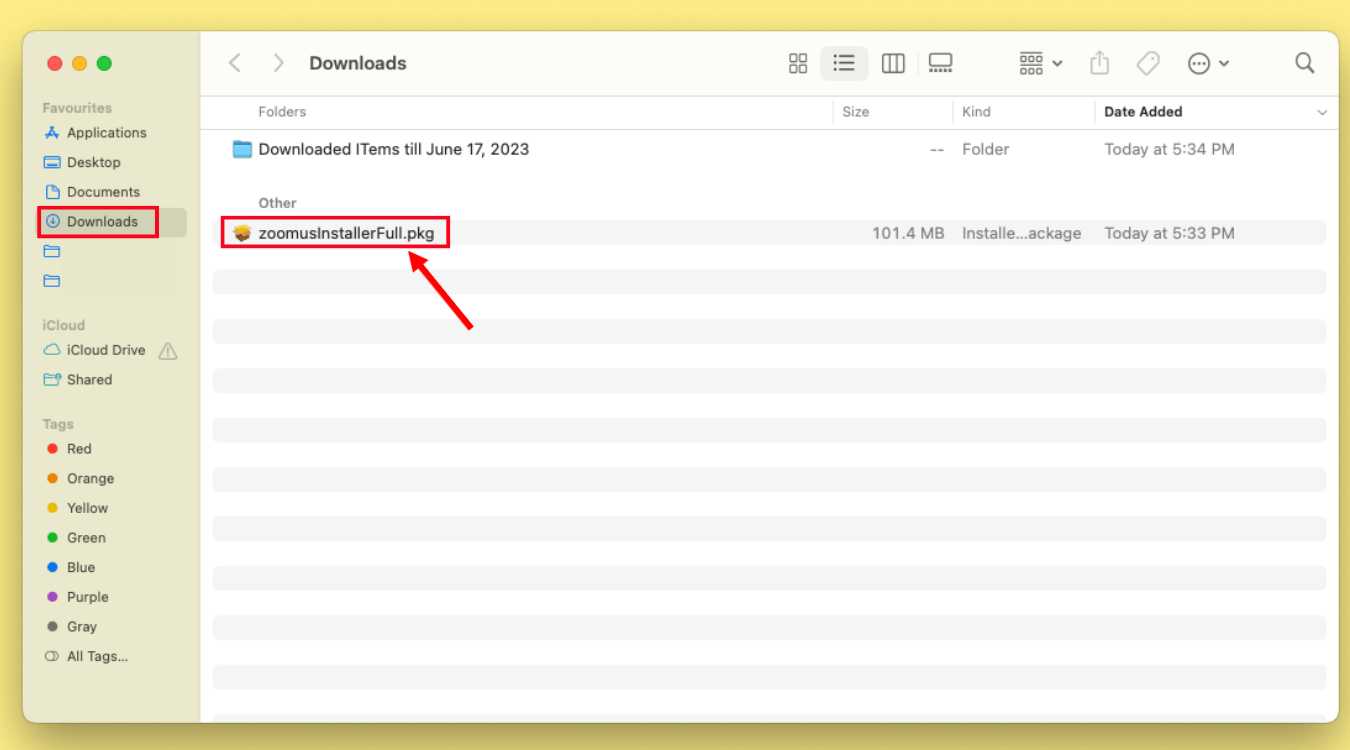
Step 2: Double-click the downloaded file and the installer will open. Click 'Continue.'
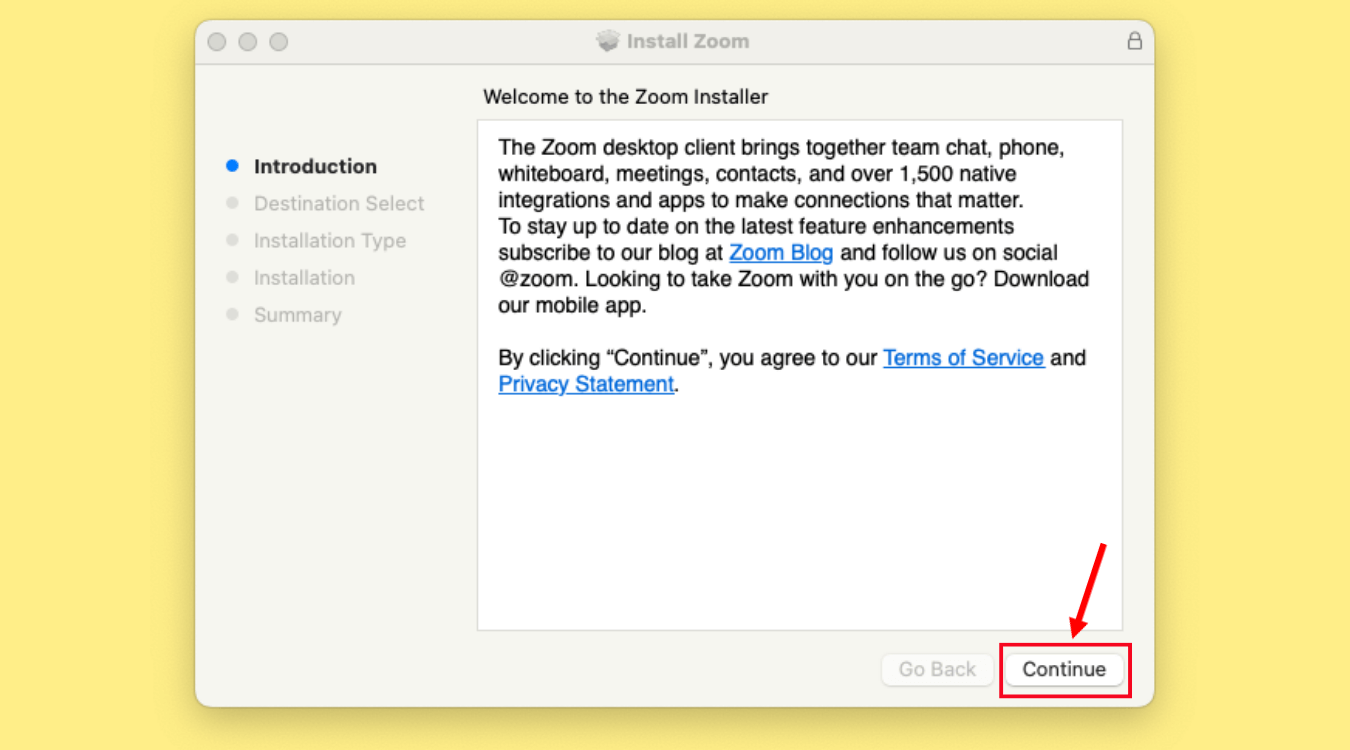
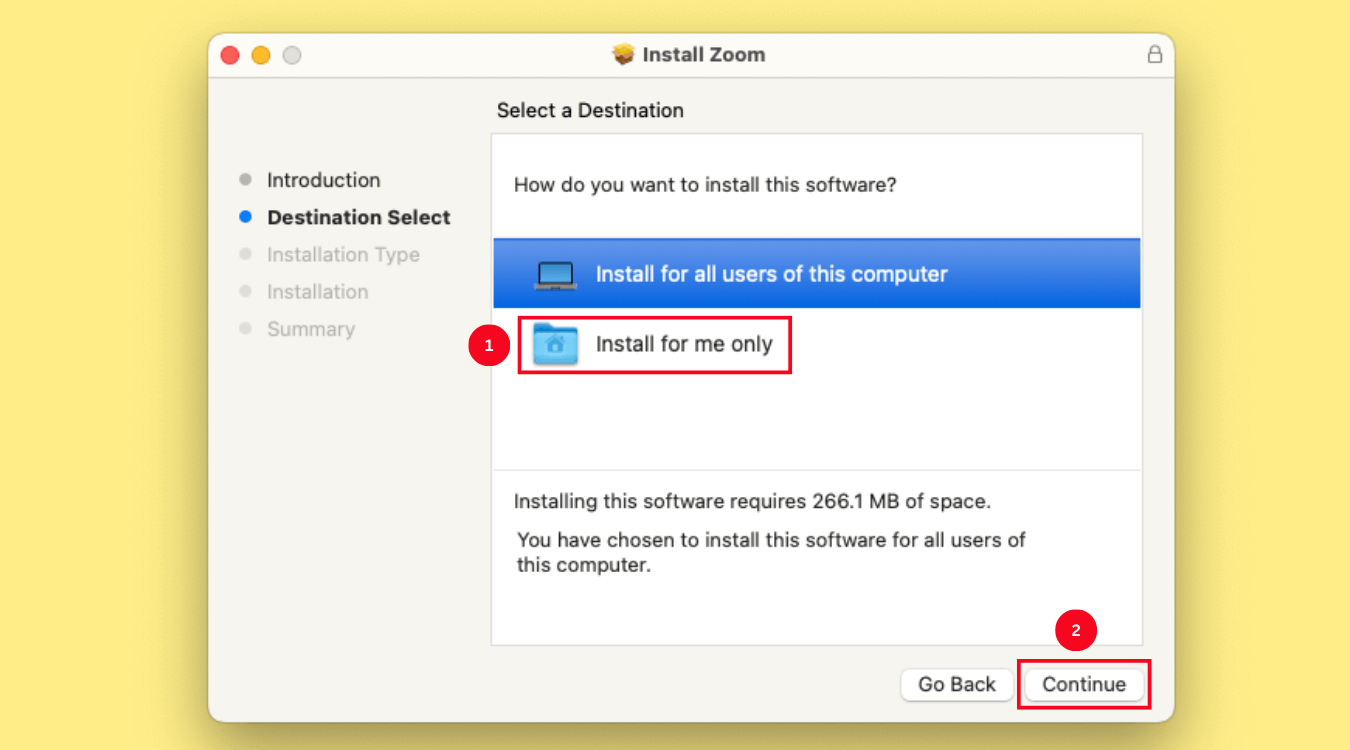
Step 3: Once you select 'Continue,' you will be prompted to choose the installation destination. Select 'Install for me only' and click 'Continue.'
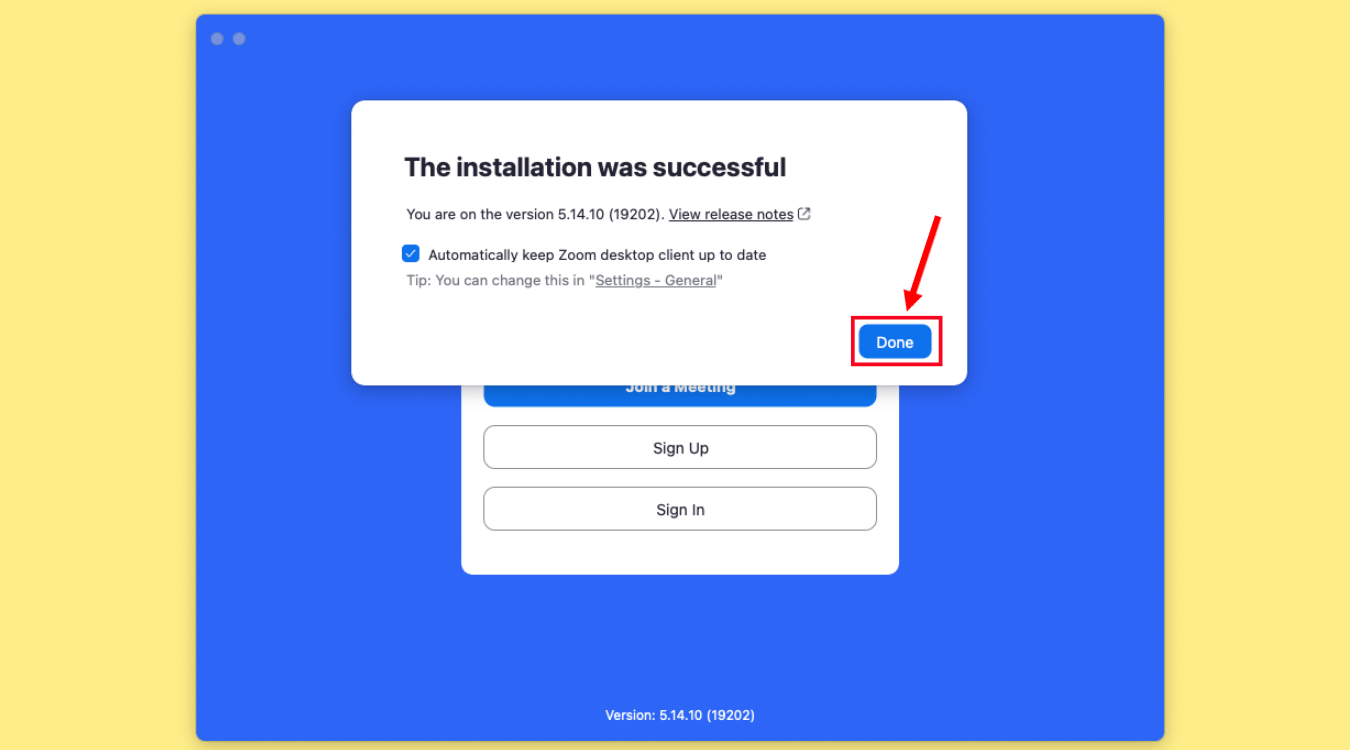
Step 4: Once the Zoom installation is complete, click 'Done.'
If Zoom is not working on Mac or you want to do a fresh install, here are some simple steps to uninstall the Zoom App on Mac.
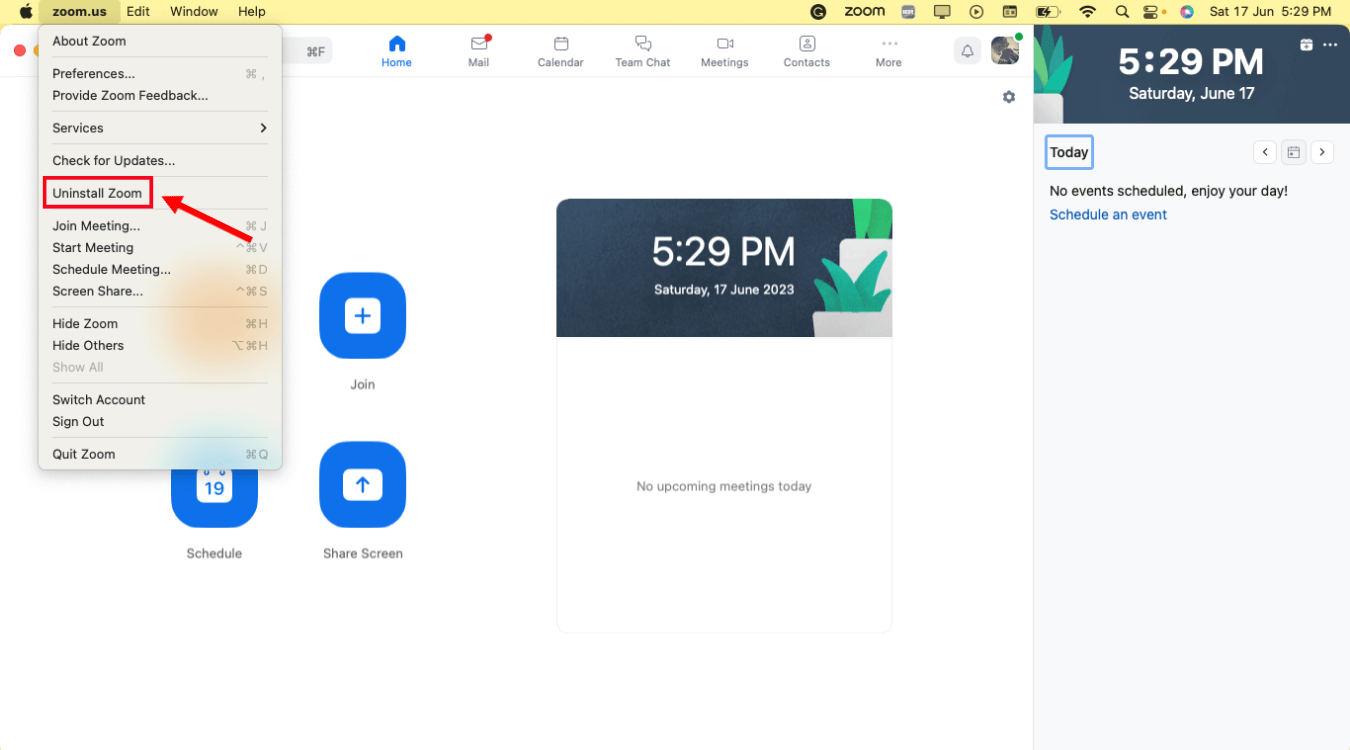
Step 1: Open the Zoom desktop app. At the top of the screen, click Zoom.us.
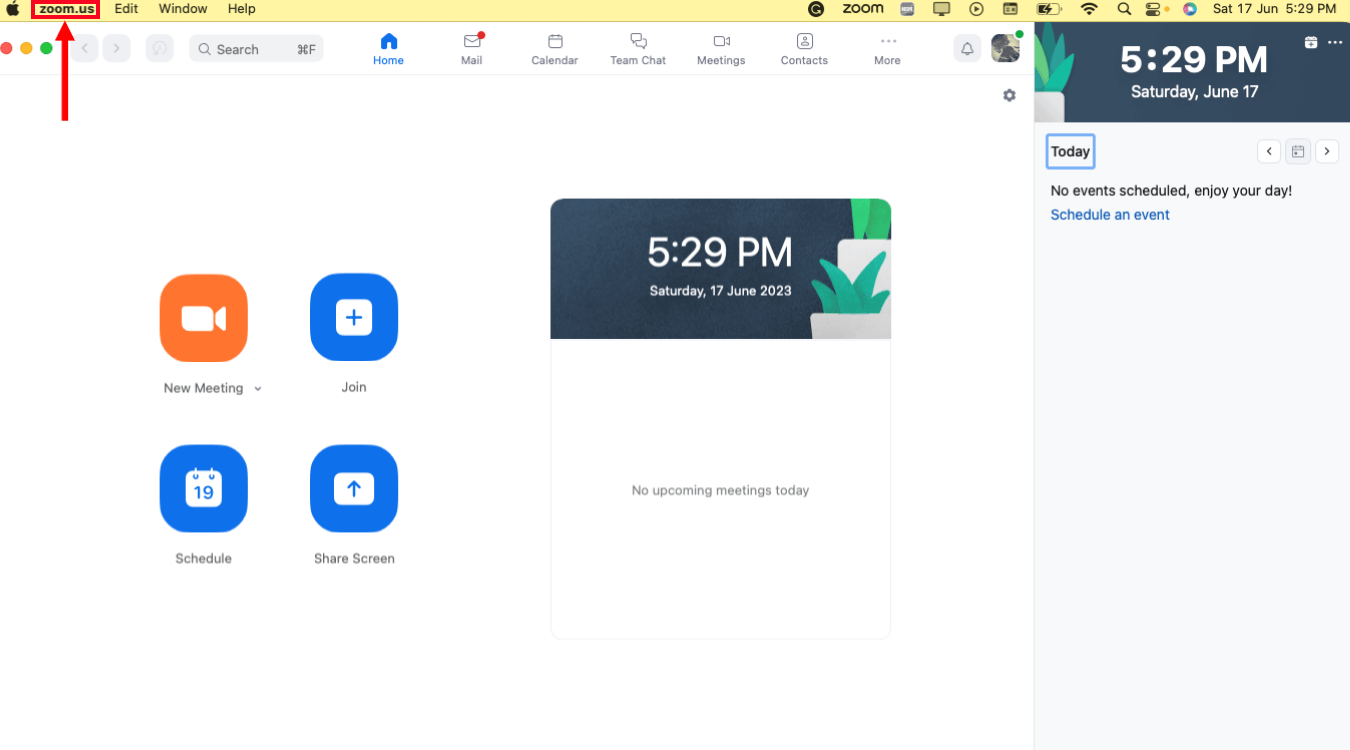
Step 2: Select 'Uninstall Zoom.'
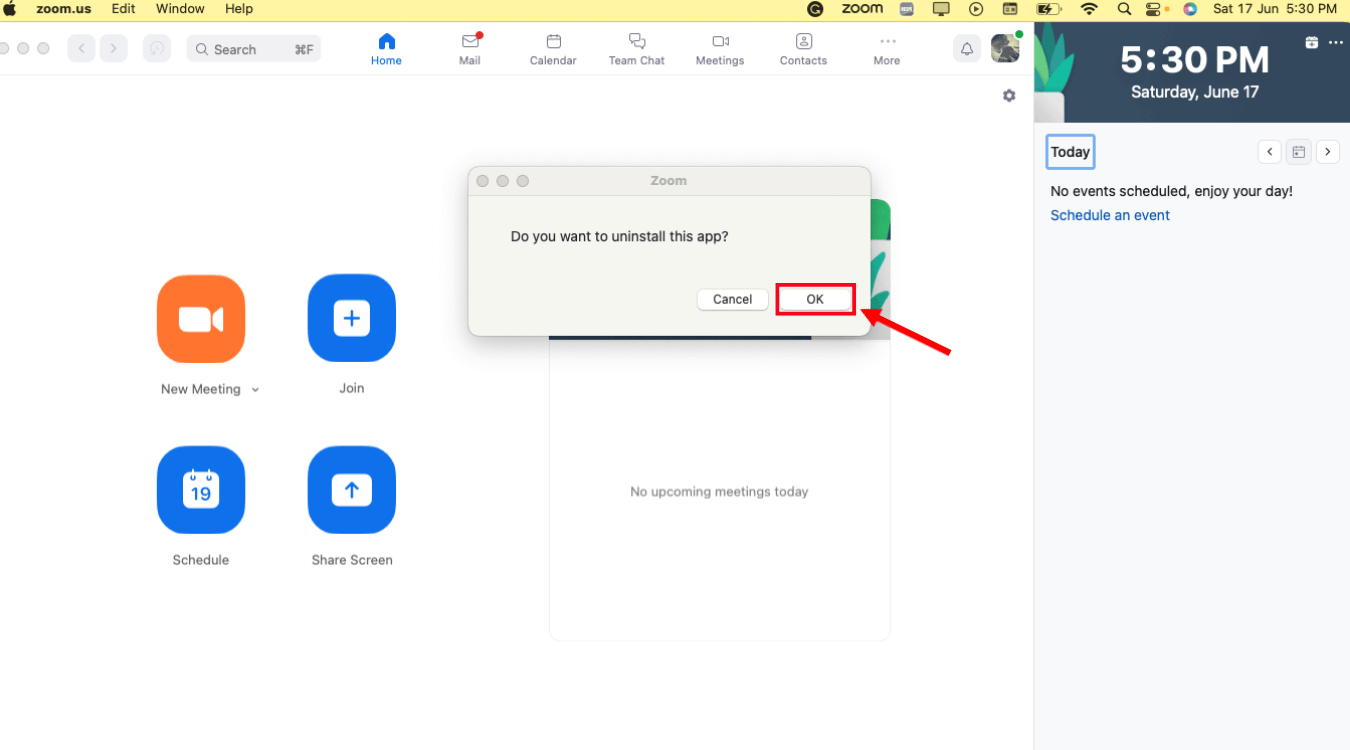
Step 3: Click 'OK' to confirm the Zoom App uninstallation.
Note: The steps mentioned above apply if you use Zoom version 4.4.53932.0709 and higher. However, to uninstall Zoom version 4.4.53909.0617 and below, follow the below steps:
Open 'Finder.' At the top of your screen, select Go > Go to Folder. Input ~/.zoomus/ and move ZoomOpener to your trash.
Repeat Step 1 and move '/Applications/' and '~/Applications/' to trash 'zoom.us.app.'
Move '/System/Library/Extensions/' and '~/Library/Application\Support/' to trash.
That's it! Once you have moved the folders to trash, the Zoom App will be uninstalled.
Notta AI meeting assistant records, transcribes, and summarizes meetings so everyone can stay engaged without missing important details.
How to update Zoom app on Mac?
Zoom consistently rolls out new versions of its app to fix bugs and release new features. The updated version often provides better audio and video experience during virtual meetings. If you want to use the latest Zoom app version on your Mac, here are a few steps you need to follow:
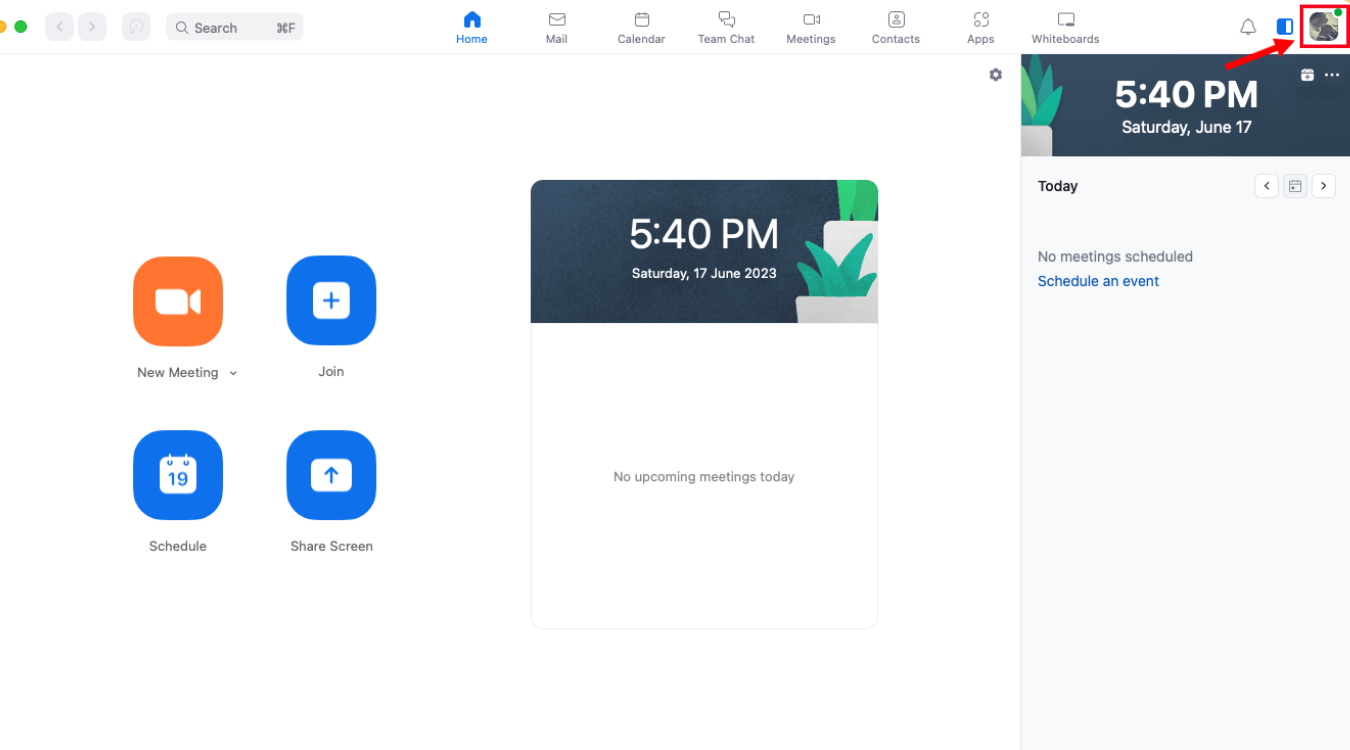
Step 1: Open the Zoom application on your Mac. In the menu bar, click the profile icon.
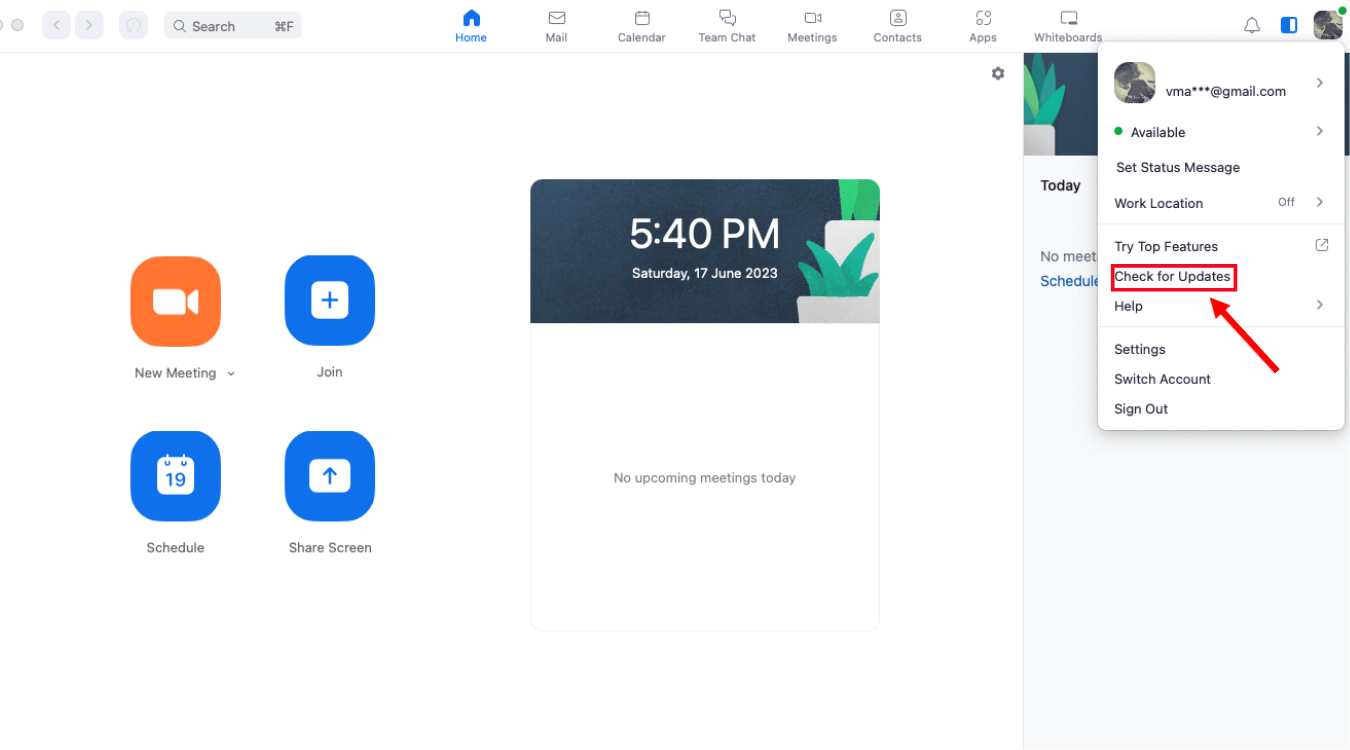
Step 2: A drop-down menu will be visible on the Mac screen, where you can click 'Check for Updates.'
Step 3: Zoom app will check the servers to see if any update is available. You can select 'Update' to download and install the latest Zoom app version.
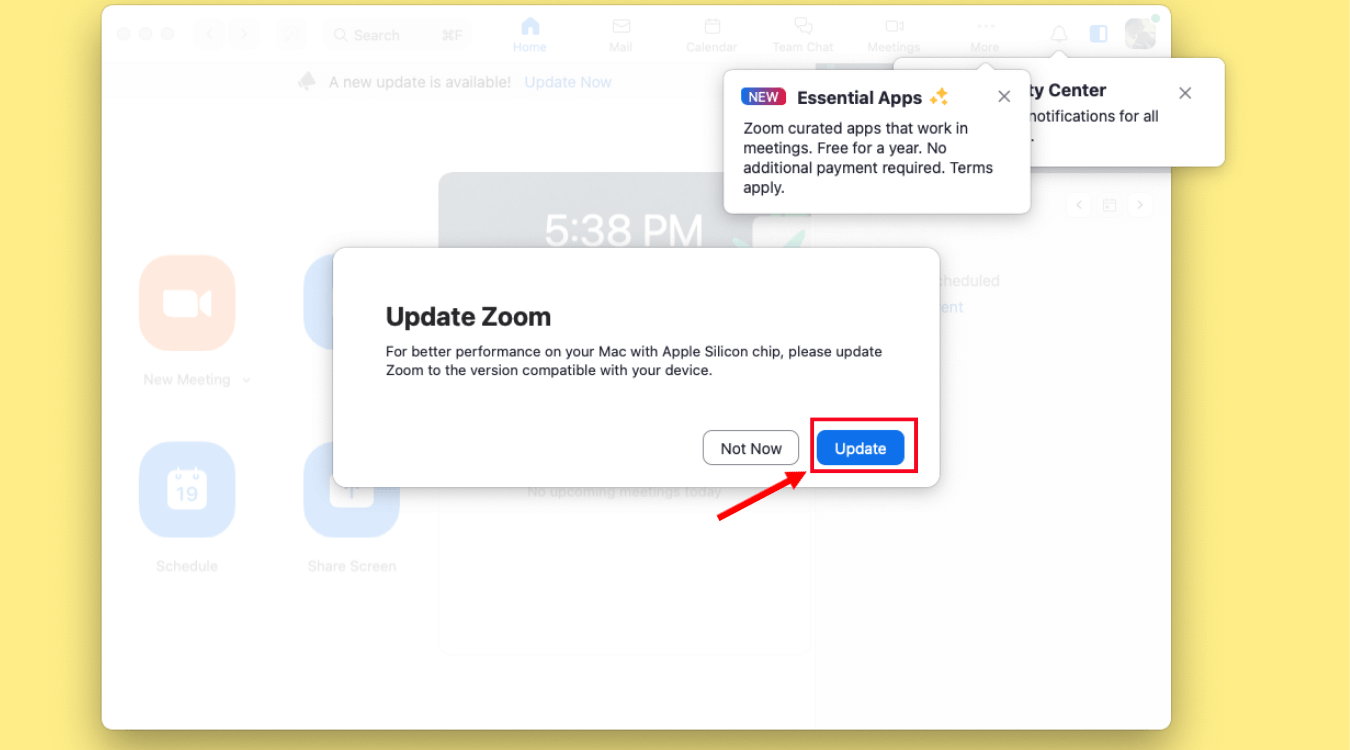
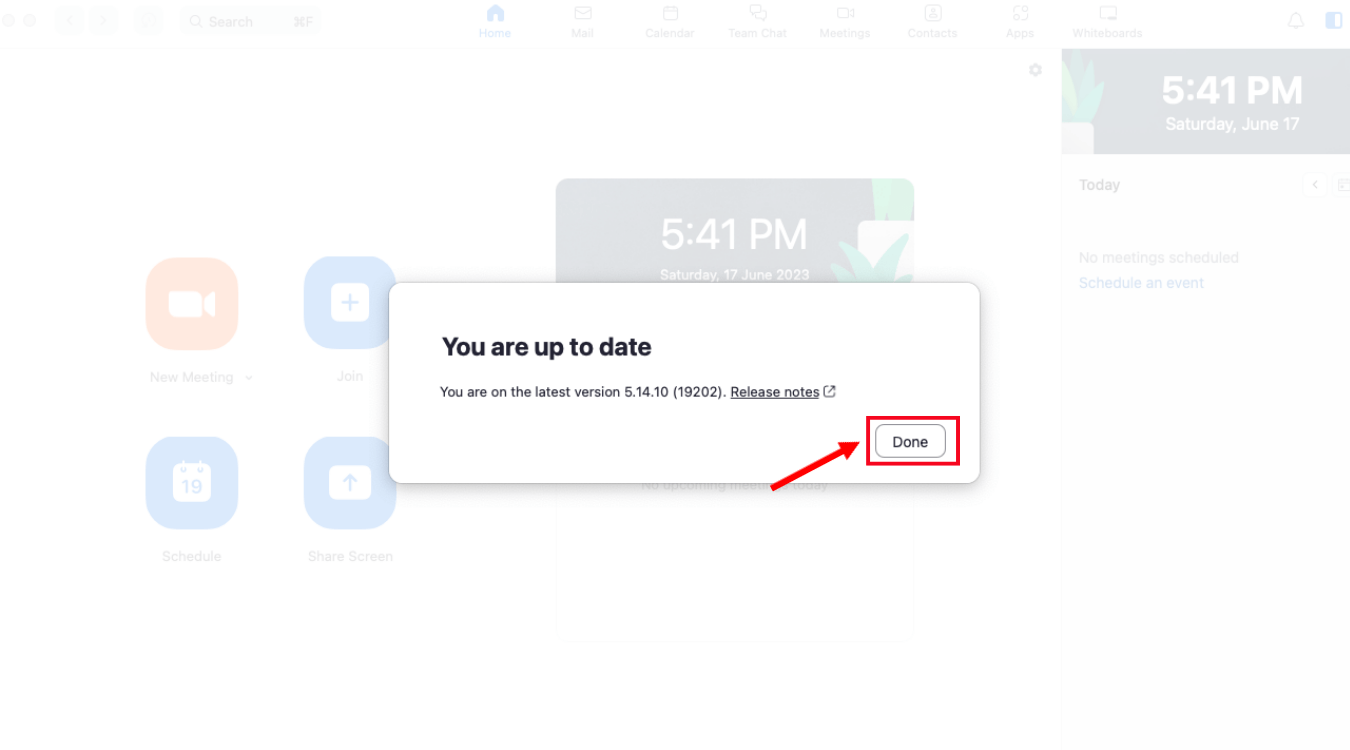
Step 4: Follow the on-screen instructions to quickly install the update. Alternatively, if you see the 'You are up to date' message on the screen, click 'Done' to exit the prompt.
How to start a Zoom meeting on Mac?
Zoom meetings are a simple and convenient way to connect with remote colleagues and share ideas. Before you start a Zoom meeting on your Mac, here is how to grant or edit permissions to use the features of Zoom.
Step 1: At the top left corner of your screen, click on the Apple logo. Select 'System Settings…'
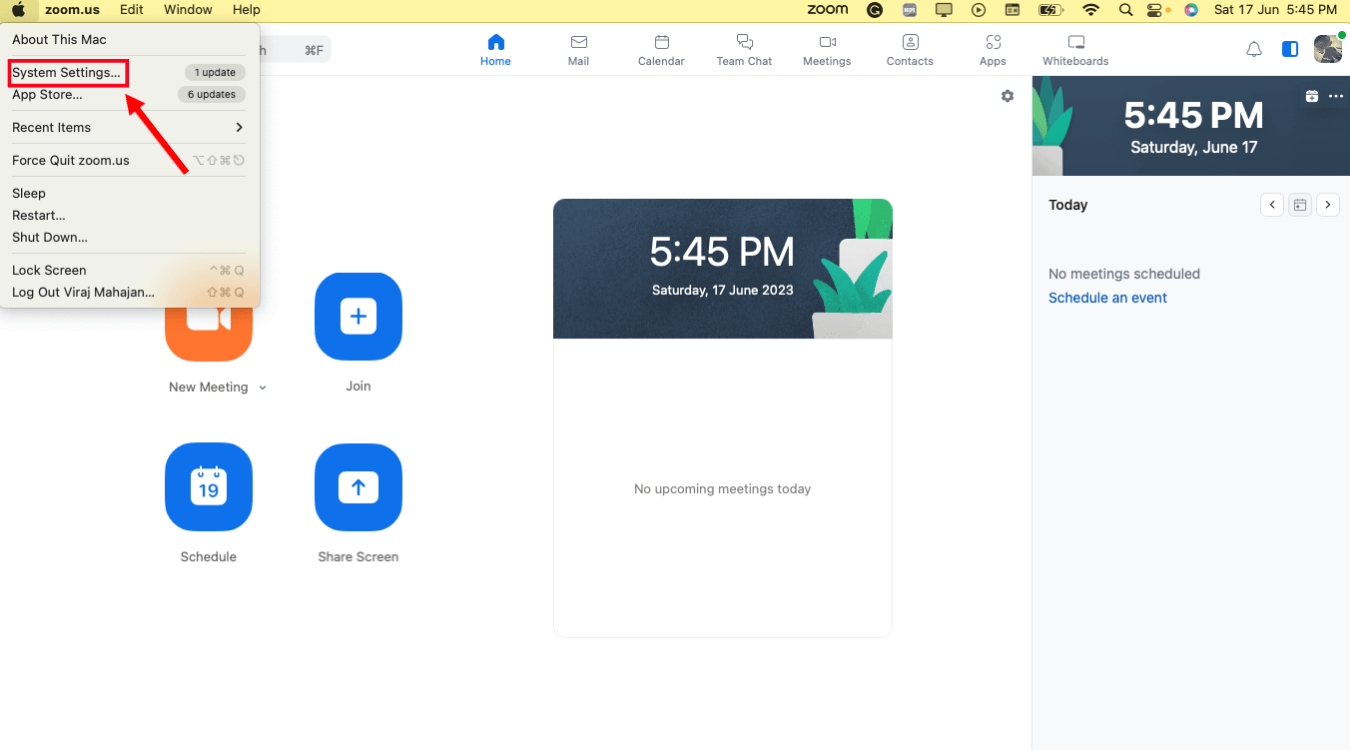
Step 2: Navigate to the 'Privacy & Security' option.

Step 3: Select the 'Privacy' tab. If available, click the 'Lock' icon at the bottom left corner of the screen.
If you are using a Mac of the old version, enter the OS administrator username and password to unlock.
Step 4: Modify the permission for Camera, Microphone, Files and Folders, Screen Recording, and Accessibility. Confirm the consent by checking the box next to zoom.us and Zoom Rooms.
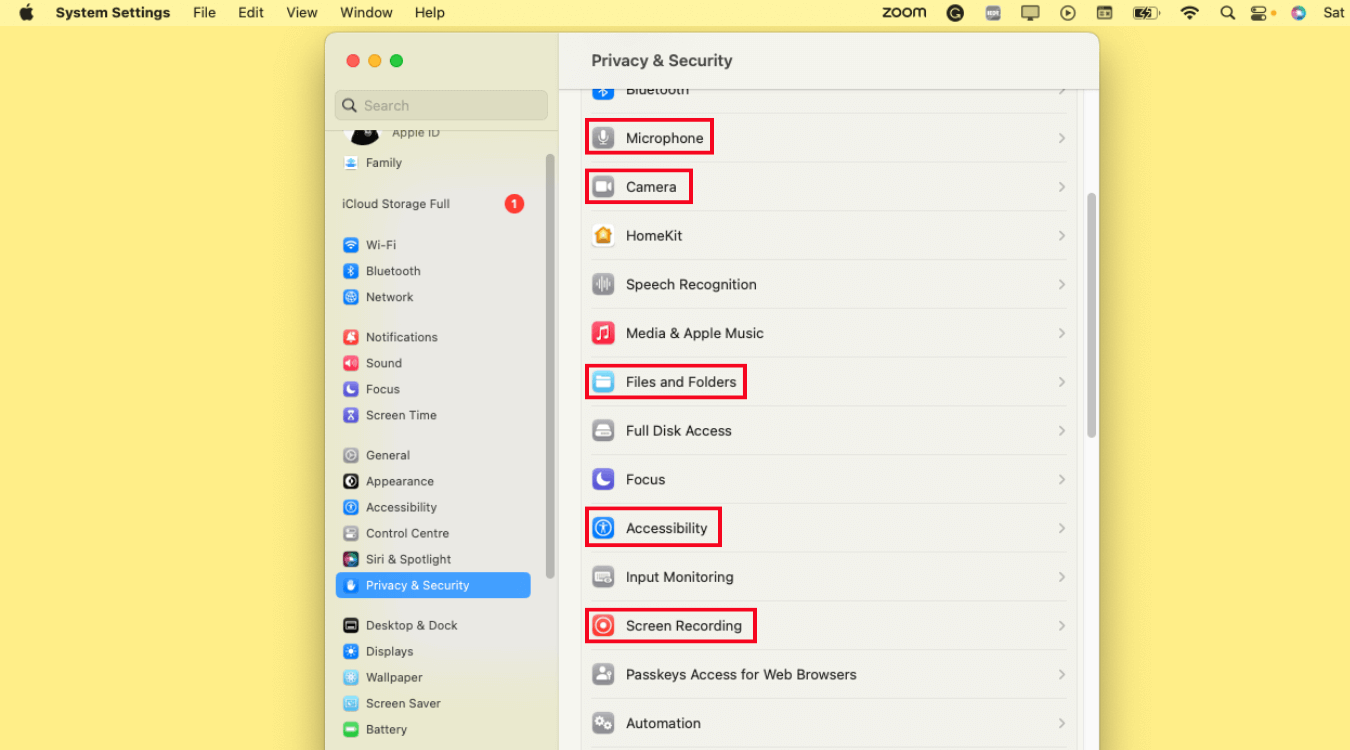
Step 5: Once you have allowed all the necessary permissions, select 'Quit Now' or click the cross icon.
![]()
Once you grant the necessary permissions to Zoom, here is how to start a meeting as a host and invite others.
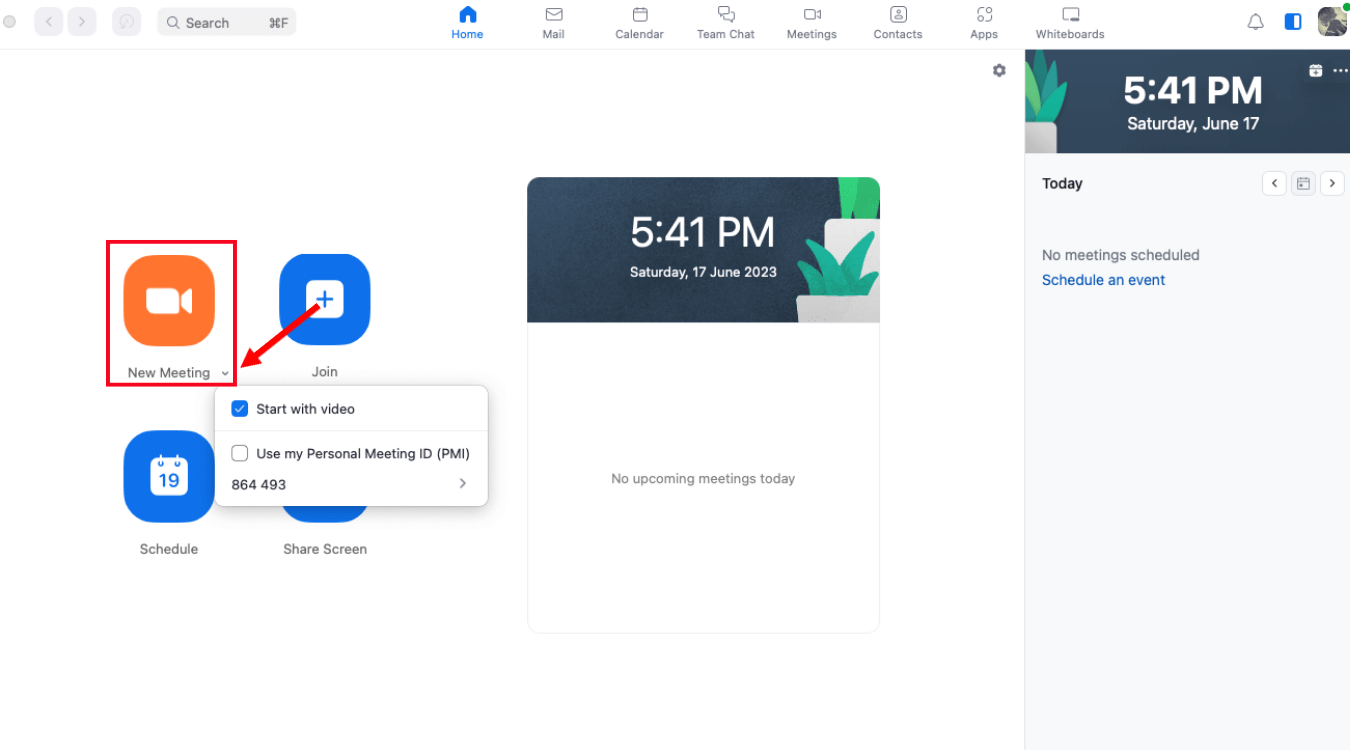
Step 1: Sign in to your Zoom app, and you will see the Home tab. If you want to start a new Zoom meeting, click the 'New Meeting' icon.
You will notice a down arrow next to 'New Meeting.' Click on the arrow, and a drop-down menu will appear. You can either choose 'Start with video' or 'Use my Personal Meeting ID (PMI)' to start a Zoom session.
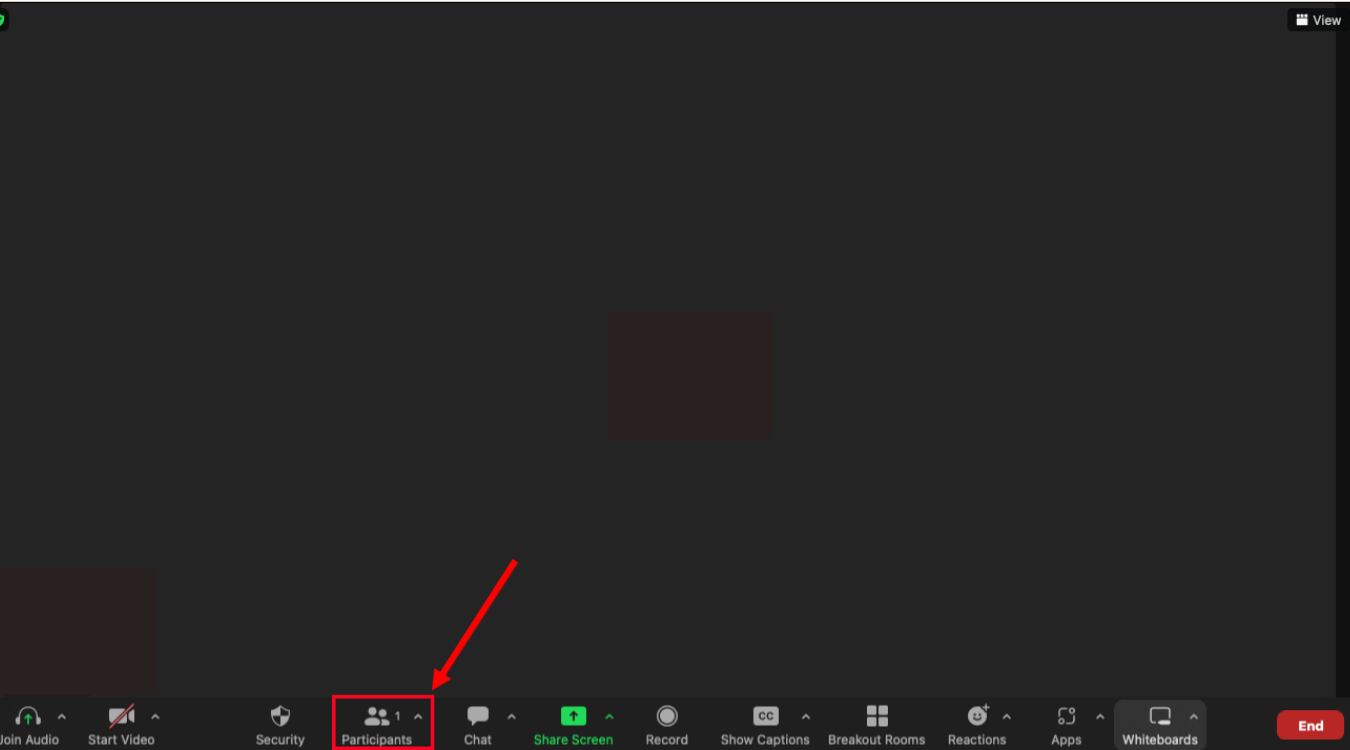
Step 2: In the meeting controls, locate the 'Participants' option and click on the arrow next to it.
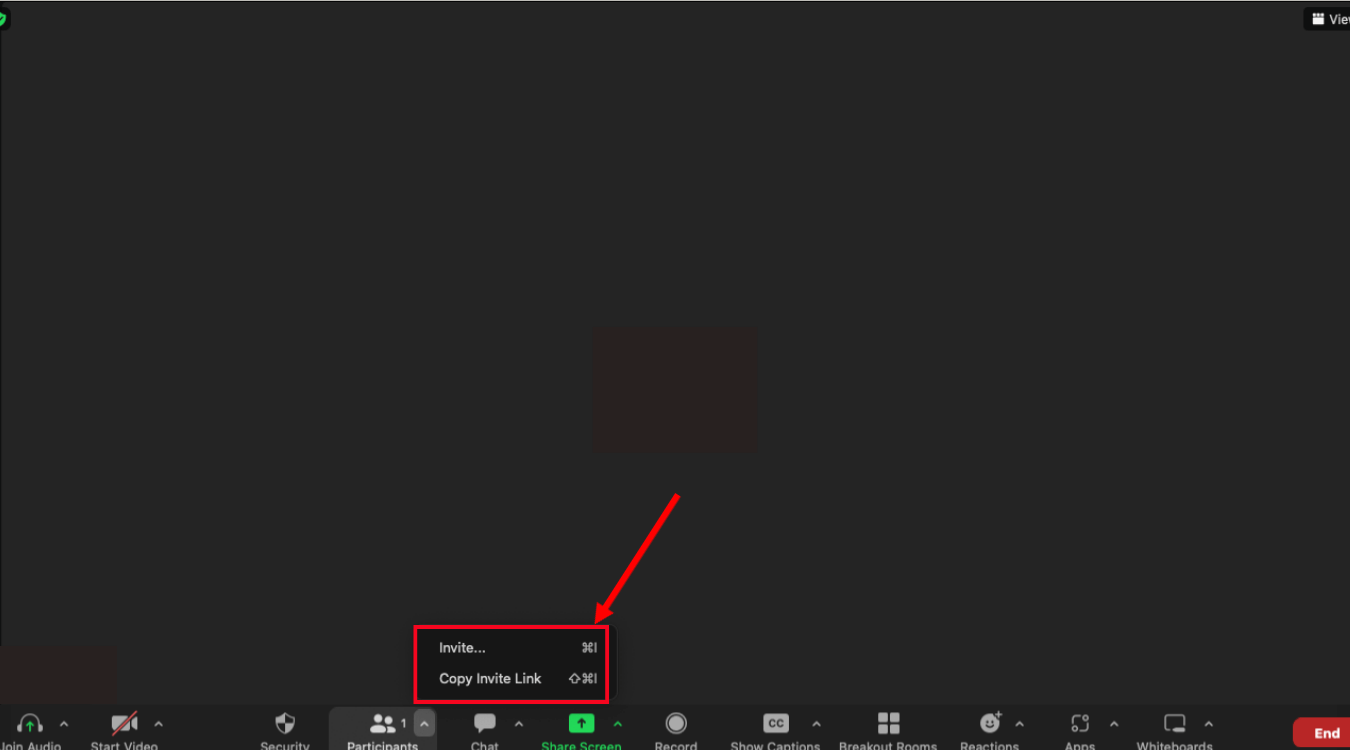
Step 3: A drop-up menu will open where you can find 'Invite' and 'Copy Invite Link.'
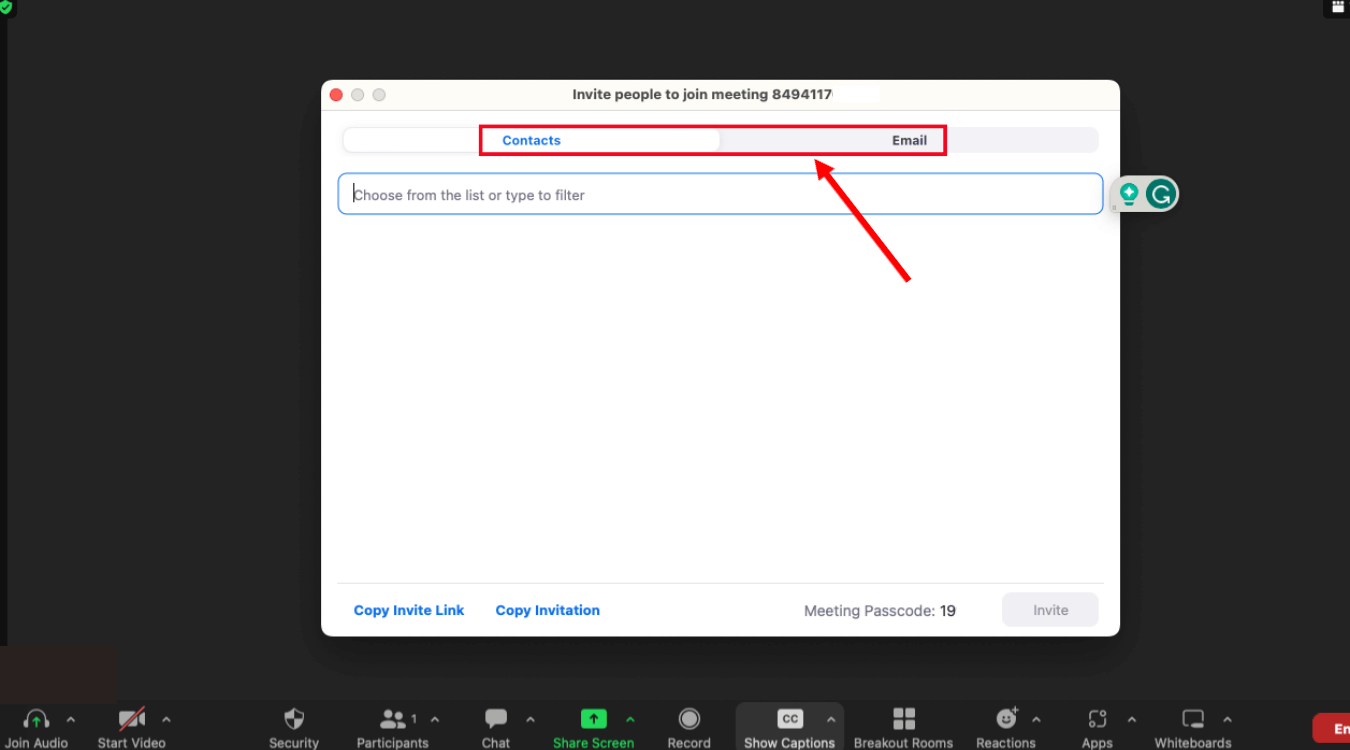
Step 4: Click either 'Invite' or 'Copy Invite Link,' and a new box will appear where you can type the name of your contacts. Alternatively, you can send invites to participants via email.
How to allow Zoom to share screens on Mac?
The Zoom screen-sharing feature lets hosts and participants share their screens, making the meeting more collaborative. To use the video conference screen-sharing feature, start or join a Zoom meeting and click the 'Share Screen' option.
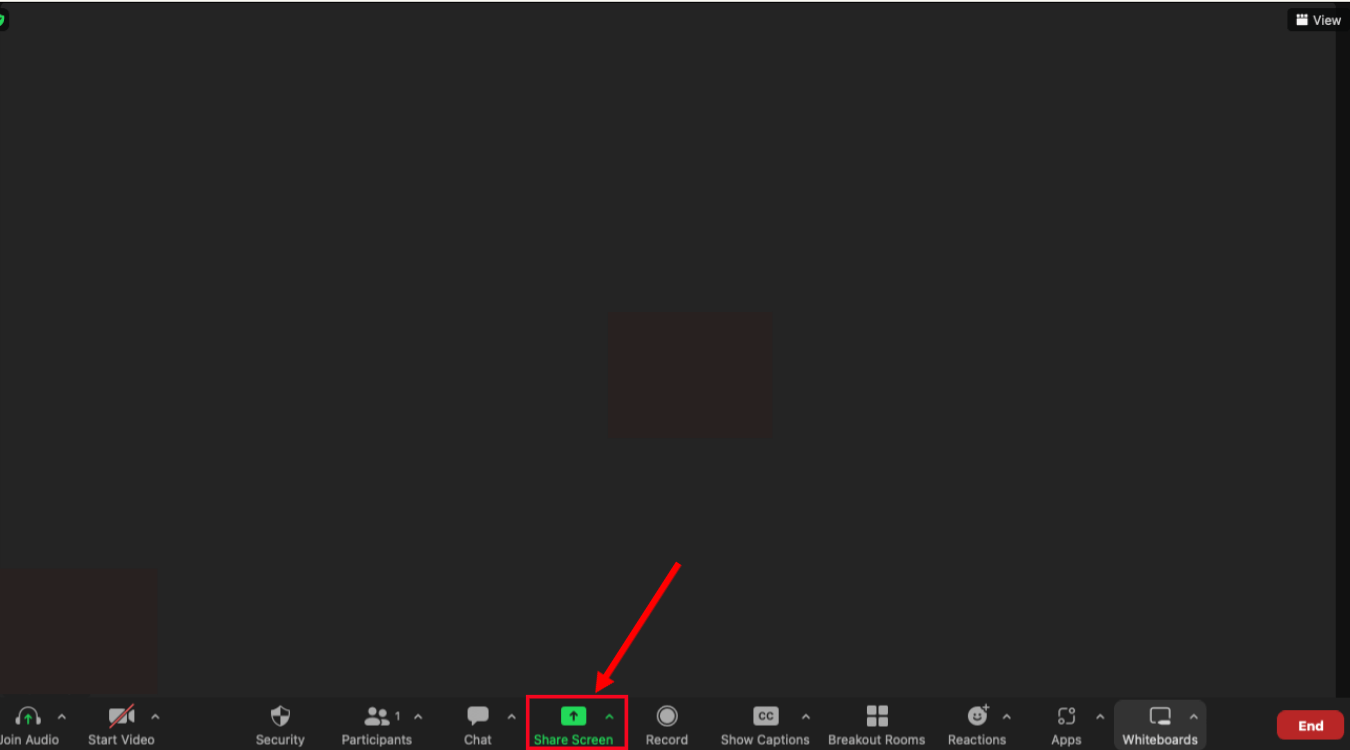
A pop-up window will be displayed, letting you choose the specific screen you want to share with others. Simply highlight the one you want participants to view, and then select the 'Share' option in the lower right corner. That's it! Now all the meeting attendees can view the content of the shared screen.
Notta offers the most integrated AI meeting notes, summaries, and action items so nothing gets missed.
FAQs
Why can't I download Zoom?
Zoom requires you to fulfill a few prerequisites before downloading or installing the app on Mac. For instance, you must install a Zoom App of Global minimum version or higher to use the video conferencing platform.
Additionally, you'll need to modify your Mac's security settings and grant permission to download applications from unidentified developers.
If you need help modifying the settings in the 'Privacy & Security' section, refer to 'How to Download and Install Zoom App on Mac.'
How to use an external camera on Mac for Zoom?
Zoom allows users to conveniently add an external camera to their Mac and use it during Zoom calls. Here is how to connect an external webcam on Mac for your Zoom call.
Open the Zoom app on Mac. In the menu bar, click 'Zoom.us' to open a drop-down.
Select 'Preferences' and locate the 'Video' category. Click on it.
Locate the 'Camera' section and click on the drop-down menu on the right.
All the available webcams on your Mac will appear. You can select the external camera you wish to use.
How to transcribe a Zoom meeting live?
Zoom meeting transcriptions provide participants with a visual format of the spoken content. The host can enable the live transcription feature once the meeting starts.
Besides the in-built Zoom Live Transcription feature, multiple third-party alternatives exist to transcribe meetings in real time. One feature-rich third-party software is the Notta recording and transcribing tool.
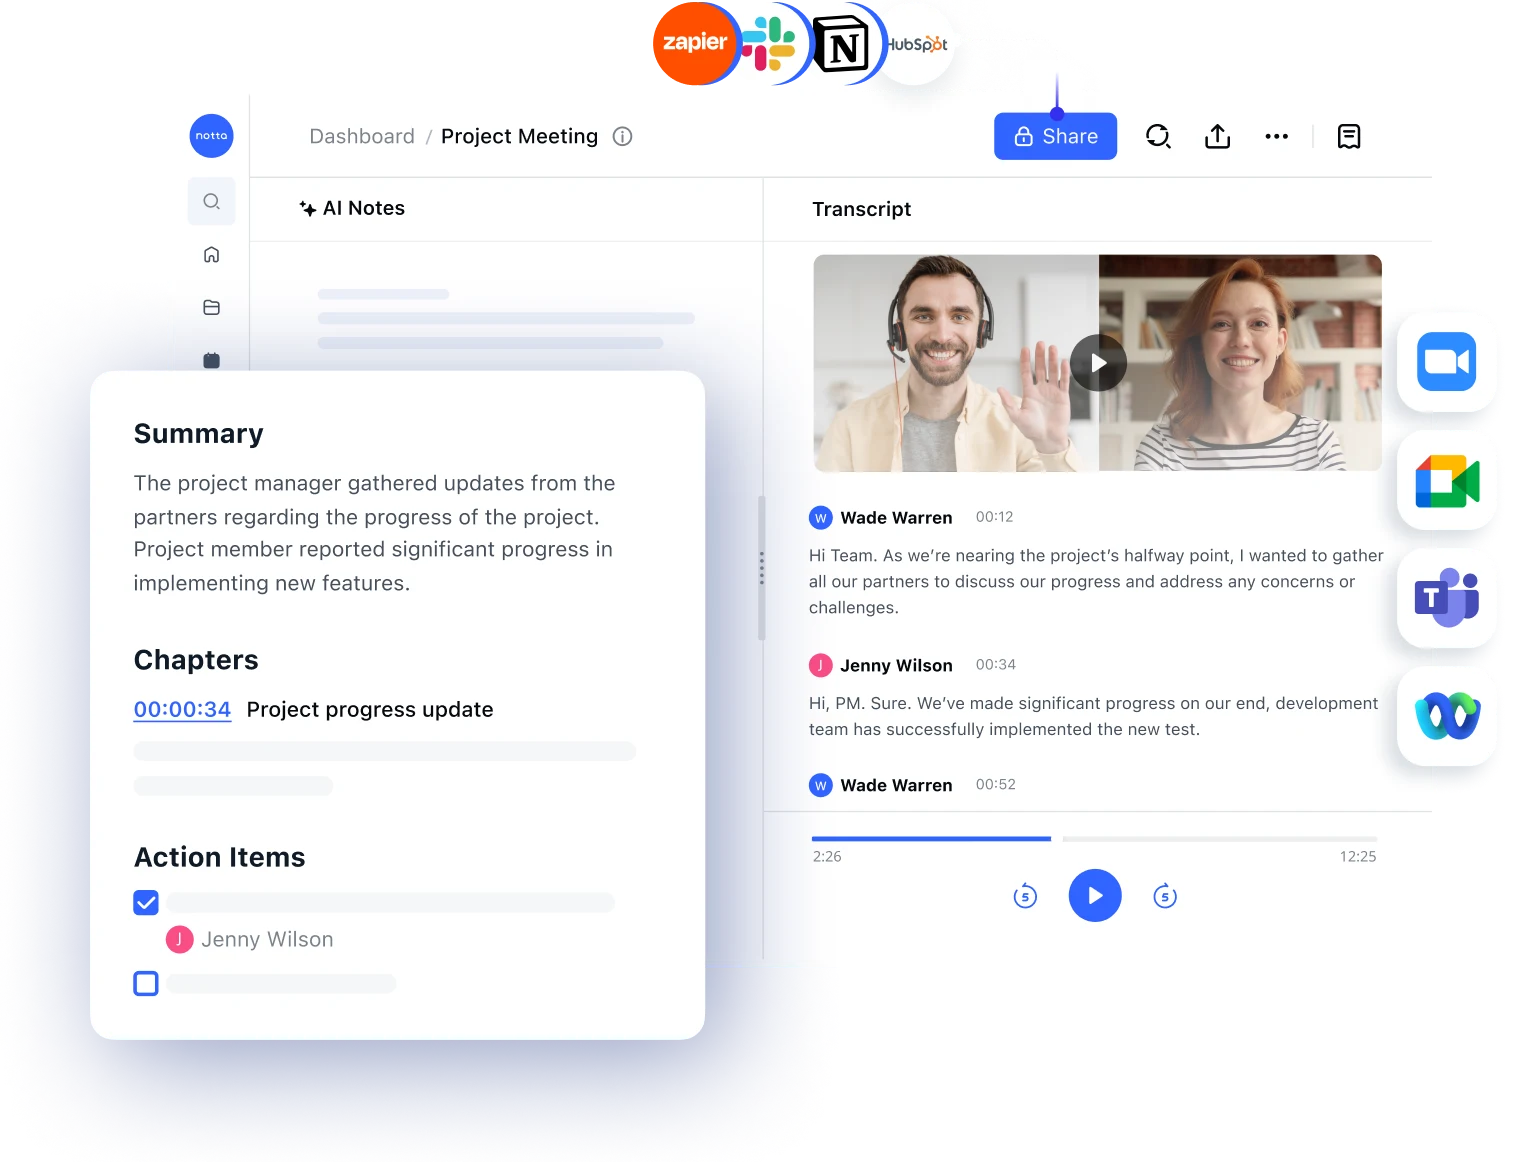
Notta seamlessly integrates with Zoom, making it possible to transcribe meetings in a minute. Below are some simple steps to transcribe a Zoom meeting live using Notta.
Join the Zoom meeting and select 'Participants.' Copy the meeting invitation link.
Create a free account on Notta and go to your Notta dashboard. Select 'Join Live Meeting,' and a pop-up window will appear.
Under the 'Meeting Invite Link' option, paste the invitation link, rename your Notta bot, and click 'Transcribe Now.'
Notta bot will join the Zoom meeting to record and transcribe the conversation.
Once the Zoom session is finished, you can find the complete transcription on the Notta dashboard.
Key takeaways
Downloading, installing, or setting up Zoom for Mac is as easy as using Zoom on Windows or mobile devices. It opens up a world for seamless collaboration and communication. Following the above step-by-step guide will help you download, install, or start Zoom meetings.
If you want to make the most out of your Zoom meetings and save valuable information for later viewing, consider using Notta. With the assistance of this recording and transcribing tool, you can easily view and save meeting transcripts to review them later.