How to Record a Video on Your Mac [Ultimate Guide]
98% accurate, real-time transcription in just a few clicks. 58 languages and multiple platforms supported.
Consuming video is easy, but recording a video is not. Putting together the equipment, writing the script, and editing everything to perfection — or as close as possible — can eat up so much time. Teams who don't want to rely on text-based communication wish they could quickly create a video to share a project update.
If you are someone (like me) who loves the iOS ecosystem, you don't really have to invest in any equipment or tools to record a video. Most MacBooks and iMacs come with a dedicated webcam and mics that can get the job done. I've spent 12 hours trying to find out the best four answers to how to record a video on a Mac.
How to record a video on Mac using Photo Booth
Photo Booth comes pre-installed on your Mac, which means you can take photos or record videos — without installing a third-party application. What I really liked about Photo Booth is the ability to apply various effects to the video recordings — though they are not great for professional videos.
Here is a simple tutorial about how to record a video on a Mac screen.
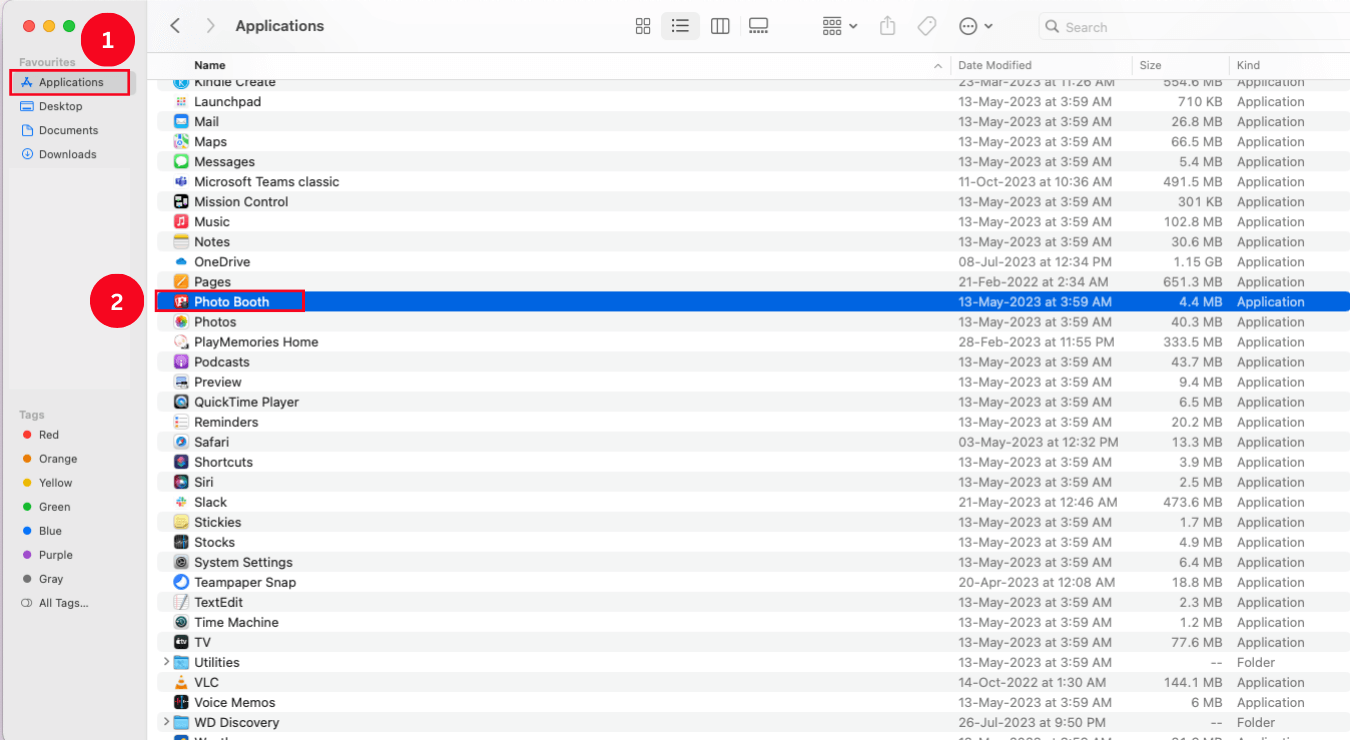
Step 1: Go to the Finder > Applications, and locate the Photo Booth application on your Mac.
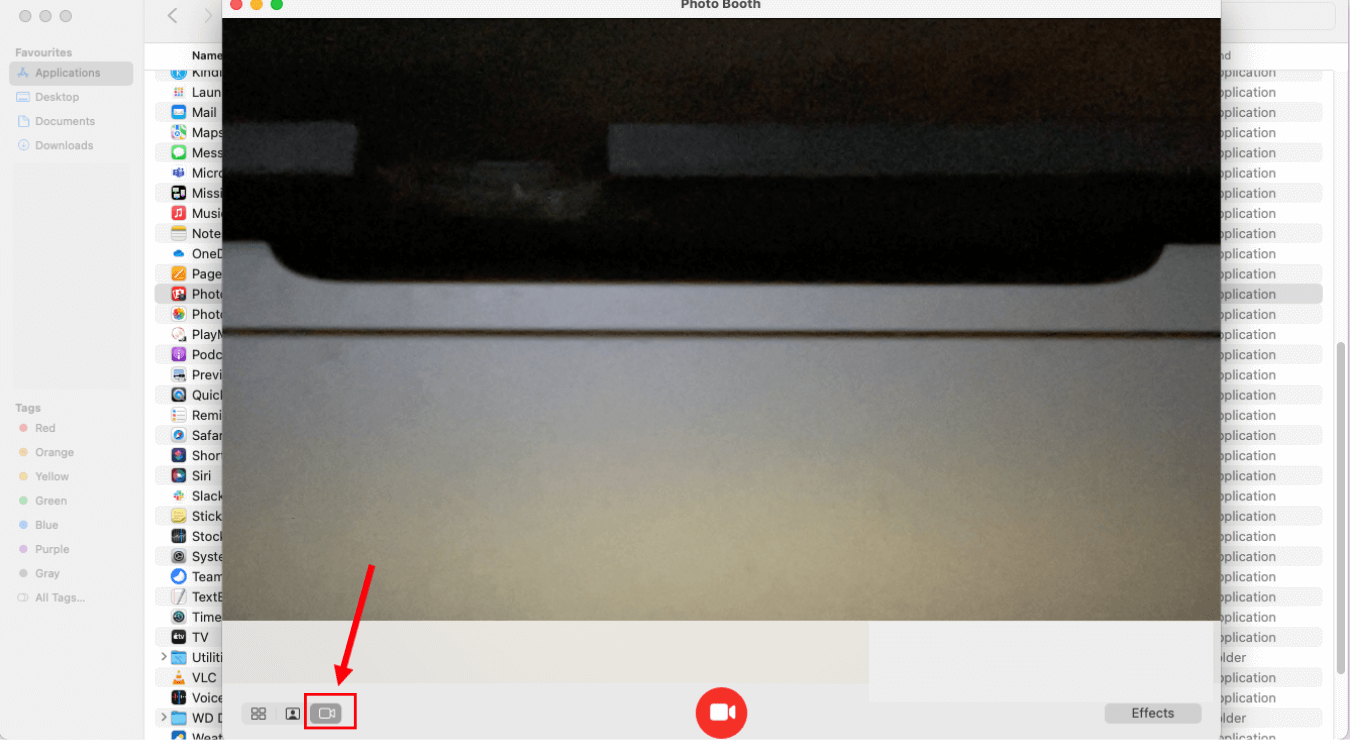
Step 2: At the bottom-left corner, click the 'Video' icon to switch to video mode.
Step 3: Click the red 'Record' icon, and the video recording on your Mac will start. Once you are done, select the red 'Stop' option.
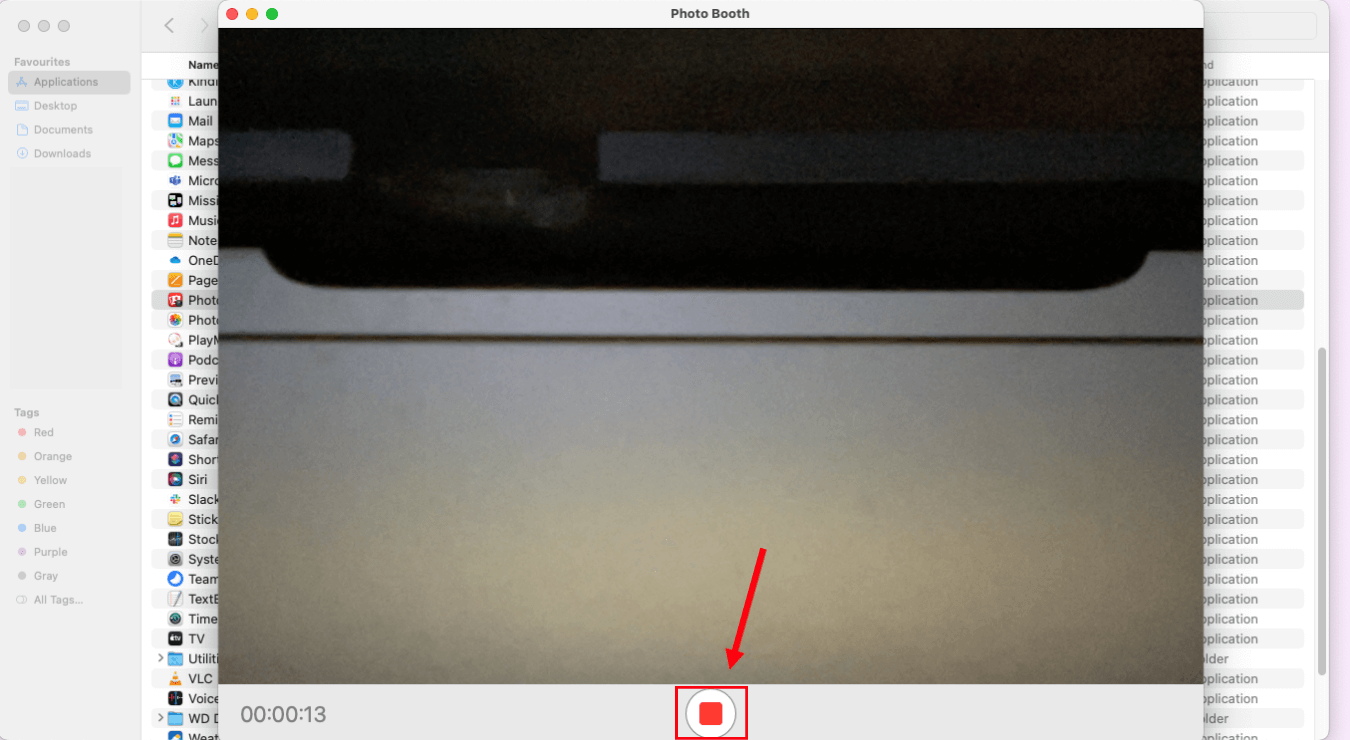
That's it; your video recording is ready! Photo Booth also lets you export the recorded video and save it anywhere on your Mac.
How to record a video on Mac using QuickTime Player
Apple's very own QuickTime Player is another way to record a video and then save it successfully on your device. Just like Photo Booth, QuickTime Player comes pre-installed and can be quickly found in the 'Applications' folder.
Here's how to record a video on a Mac webcam.
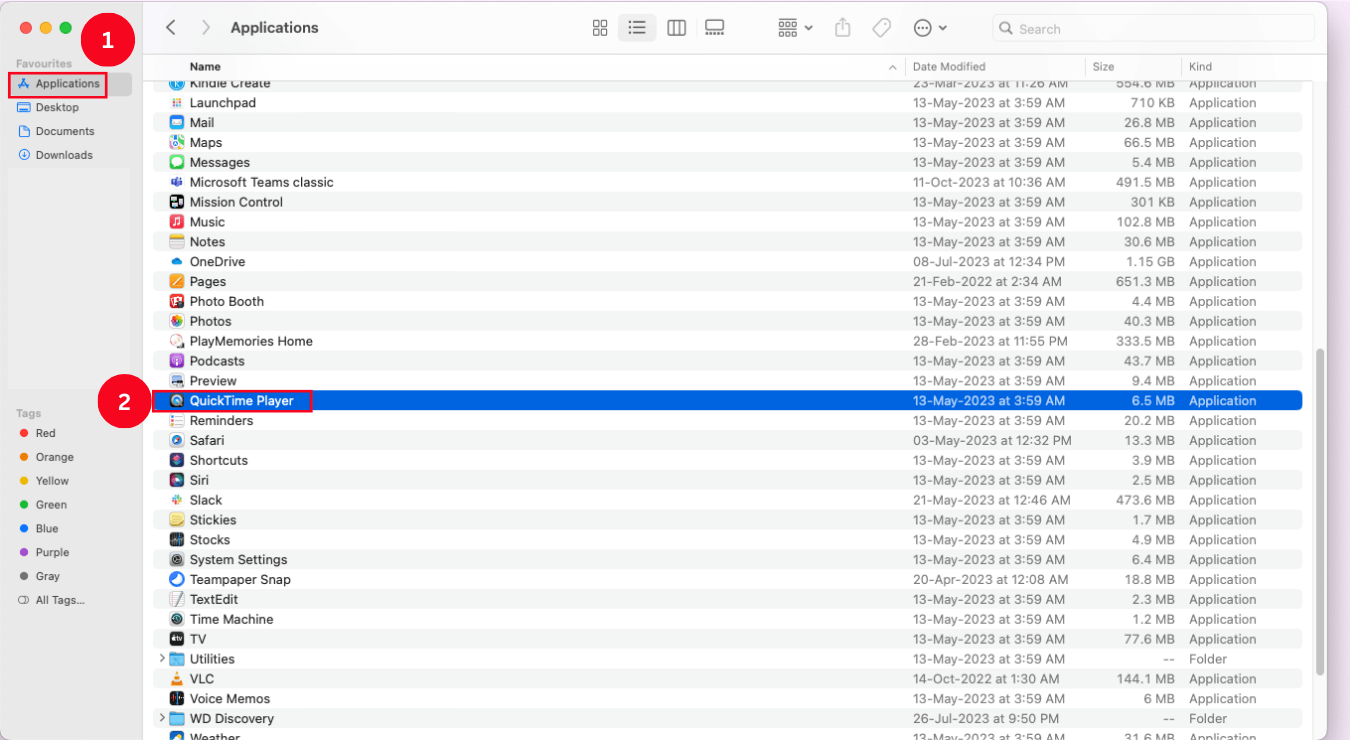
Step 1: Open Finder > Applications, and then select 'QuickTime Player.'
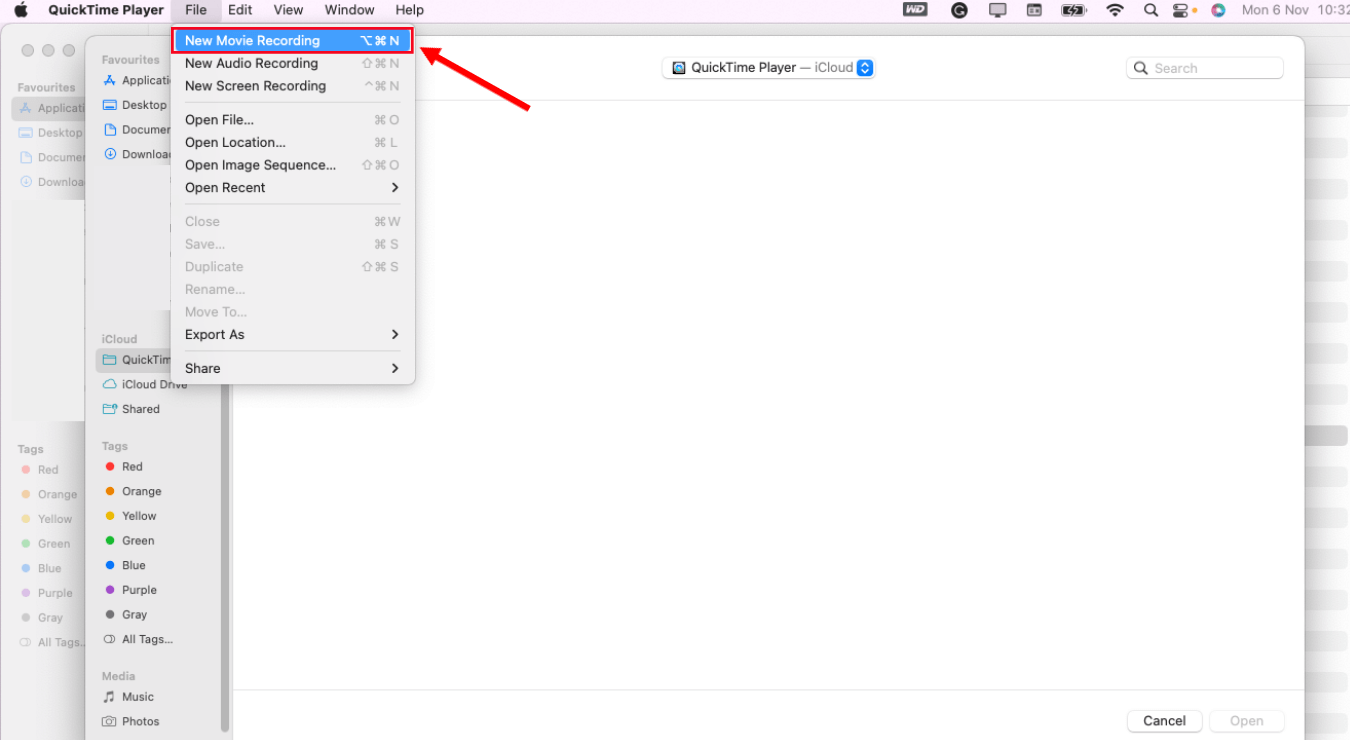
Step 2: At the top menu bar, select 'File,' followed by 'New Movie Recording.'
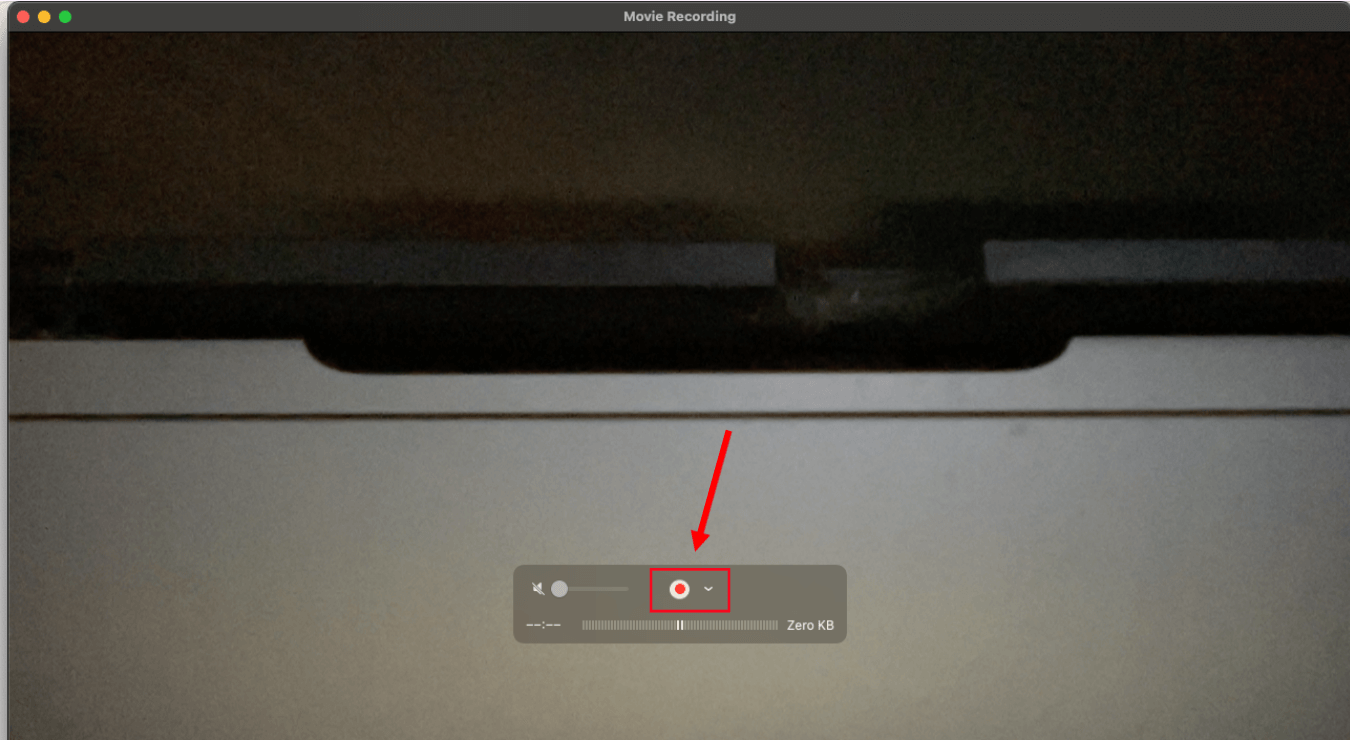
Step 3: Finally, click the red 'Record' button to start recording. Click it again if you want to stop the ongoing recording.
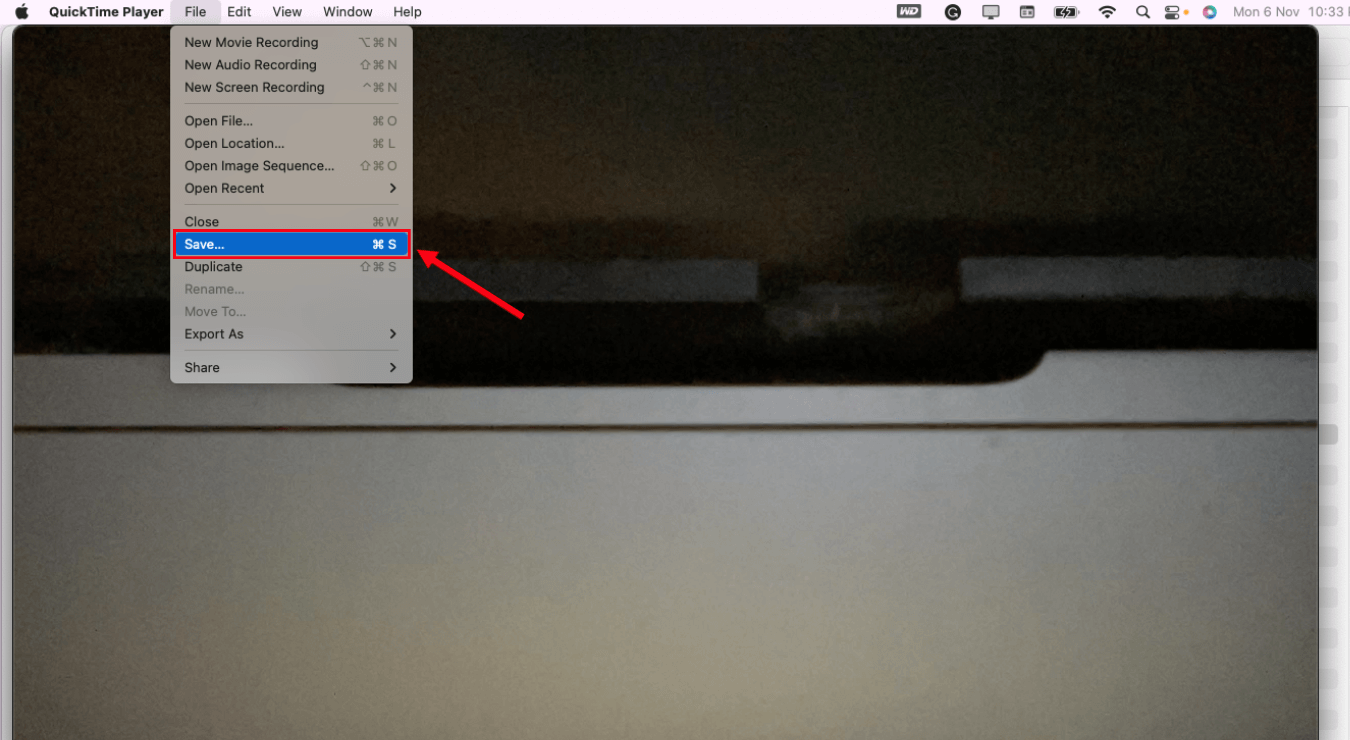
You can save the newly recorded video by selecting the 'File' option followed by 'Save.'
Use our cutting-edge AI solution to take control of your recording tasks and optimize your time and focus.
How to record a video on Mac using iMovie
iMovie has been around for a really, really long time. I remember using it over 10 years ago for the first time. The user interface of iMovie has the vibe of a professional-grade video recording tool, but it's complicated for some users.
Here is how to record a video on a Mac screen with audio using iMovie.
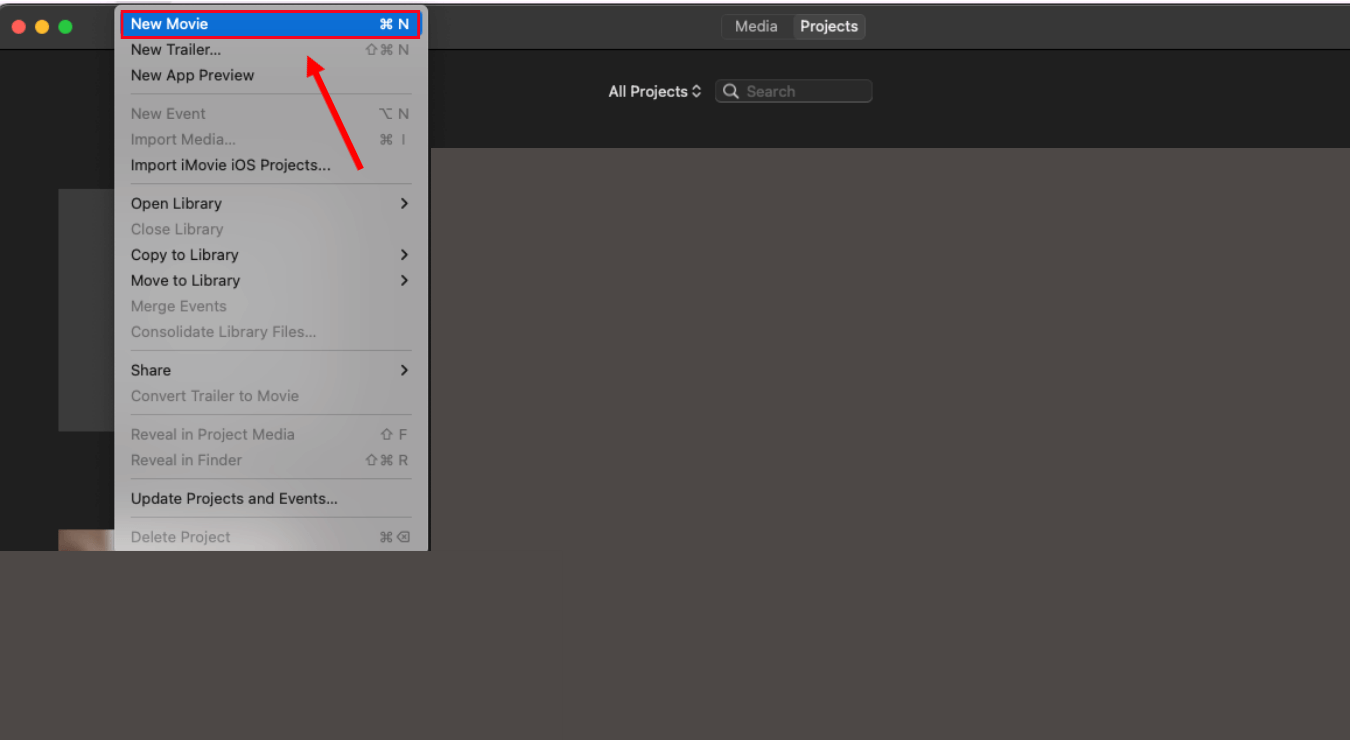
Step 1: First, head to the Mac App Store and install 'iMovie' on your Mac. Go to 'File' and then select 'New Movie' to record via the iMovie application.
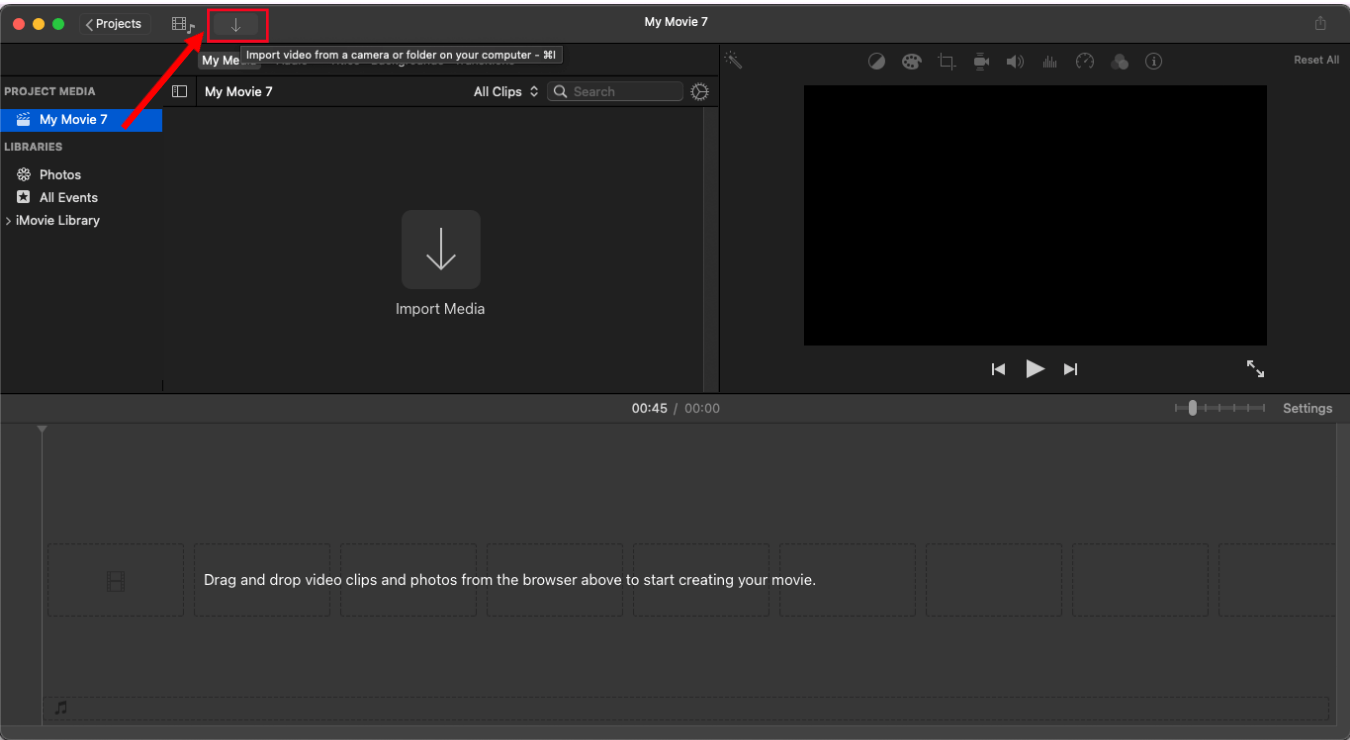
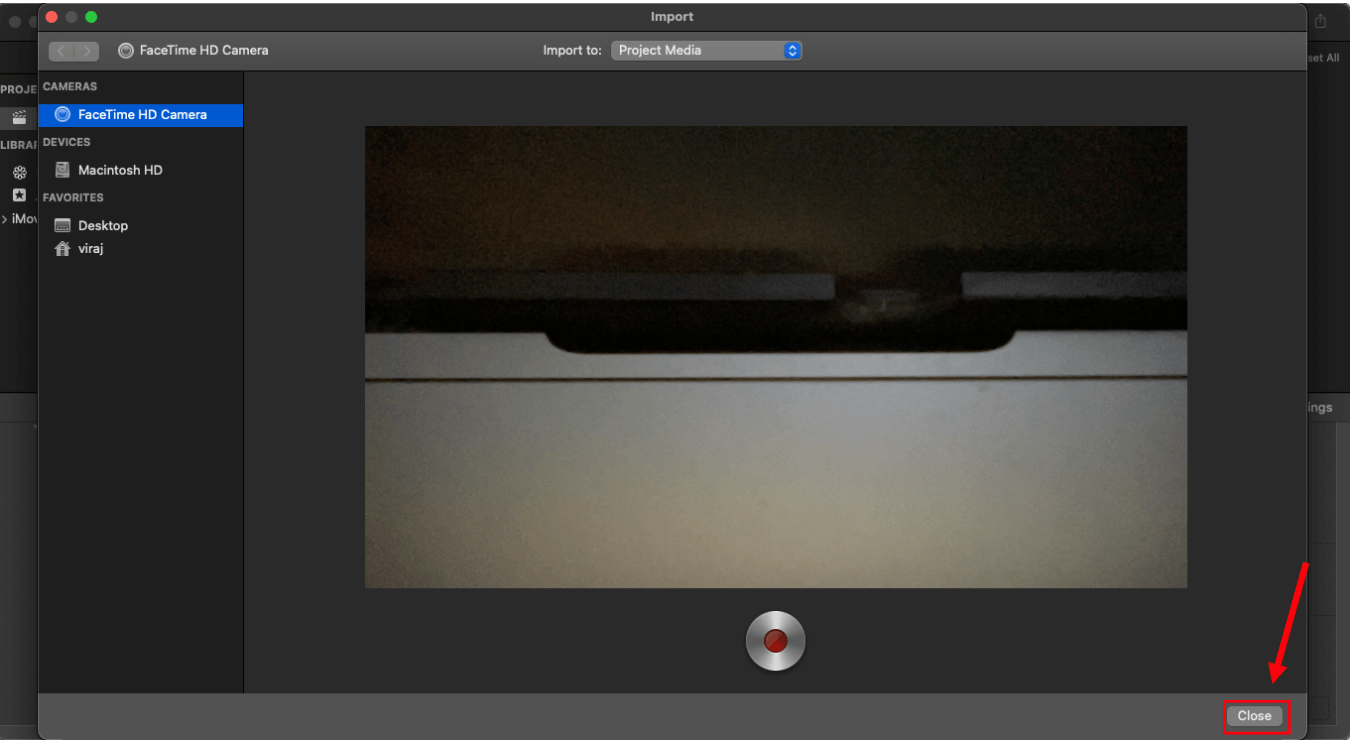
Step 2: At the top of the iMovie screen, select the drop-down arrow to find the 'Import' option.
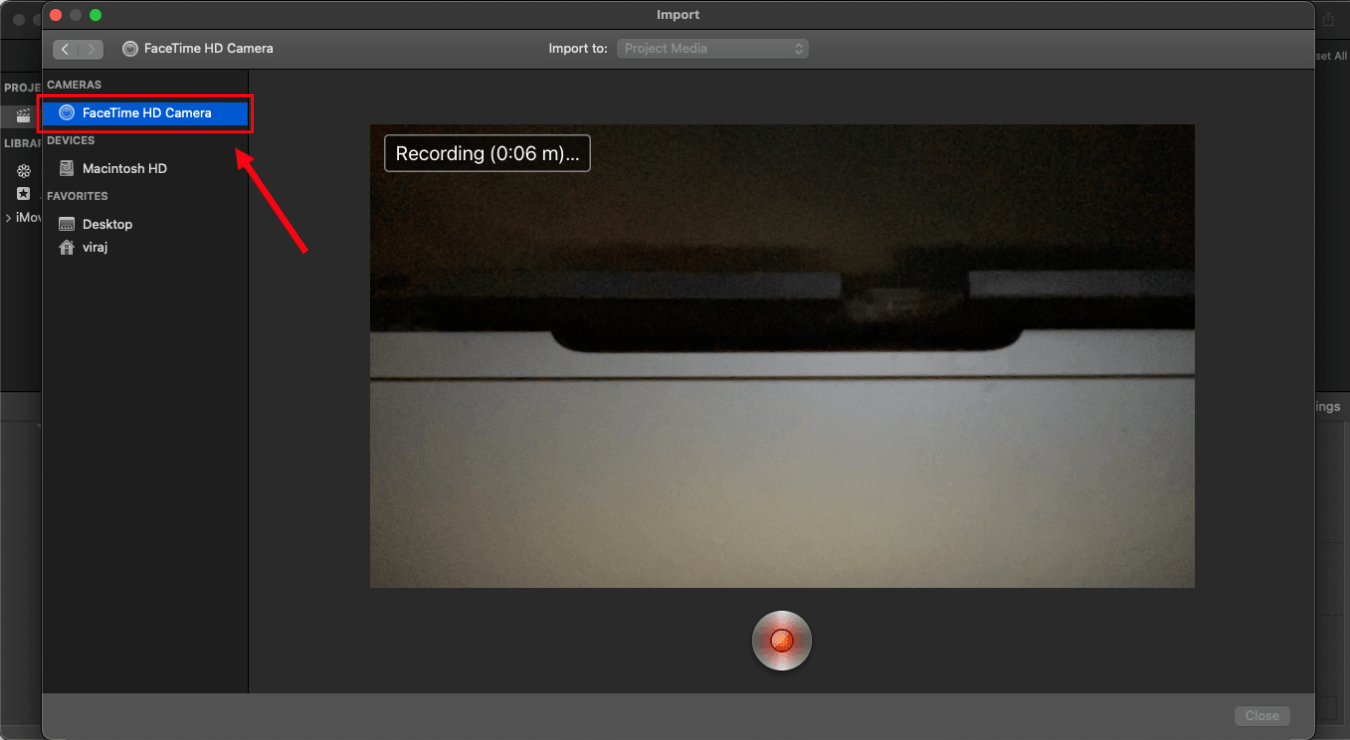
Step 3: From the left panel, select Cameras > FaceTime HD Camera. You can even select the project from the top of the screen to import the video.
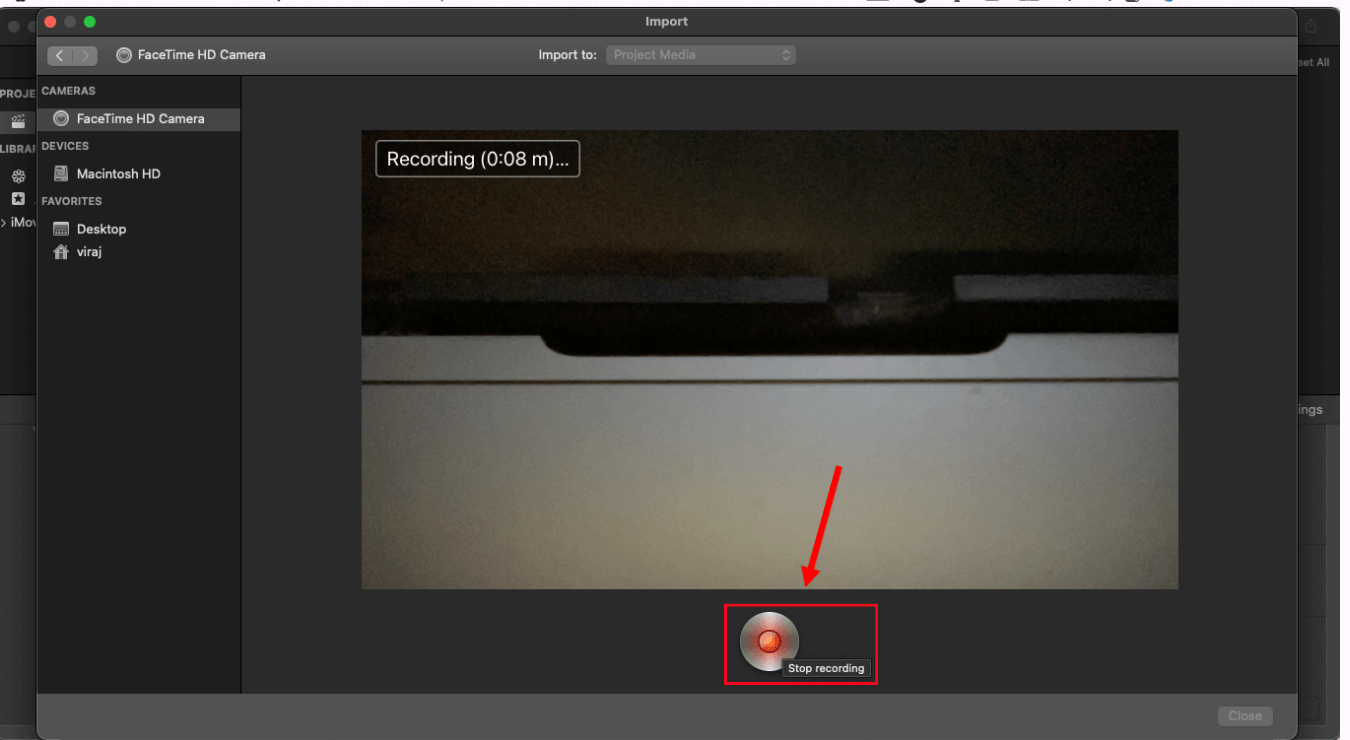
Step 4: Next, click the 'Record' button to start recording on Mac. Once done, select the 'Stop' button to stop the ongoing video recording.
Step 5: At the bottom of the Mac screen, locate and select the 'Close' option to close the recording window. If you want to save the recording on your device or import it into a project, tap on the 'Projects' icon available at the upper-left corner of the iMovie window.
How to record a video on Mac using Notta
When I record video, I usually look for a more professional recording tool where I can not only record but also transcribe the spoken words into text or even generate a summary. Mac's built-in video recorder or third-party apps like iMovie do not offer these features — at least not yet.
While you can transcribe and summarize manually, it can be time-consuming and near-to-impossible — especially when you are on a (tight) deadline. If you are like me here, Notta is a huge time saver. To begin with, it lets you record a video and generates a transcript of everything you say.
Here's how to record a video on a Mac with sound using a third-party app like Notta.
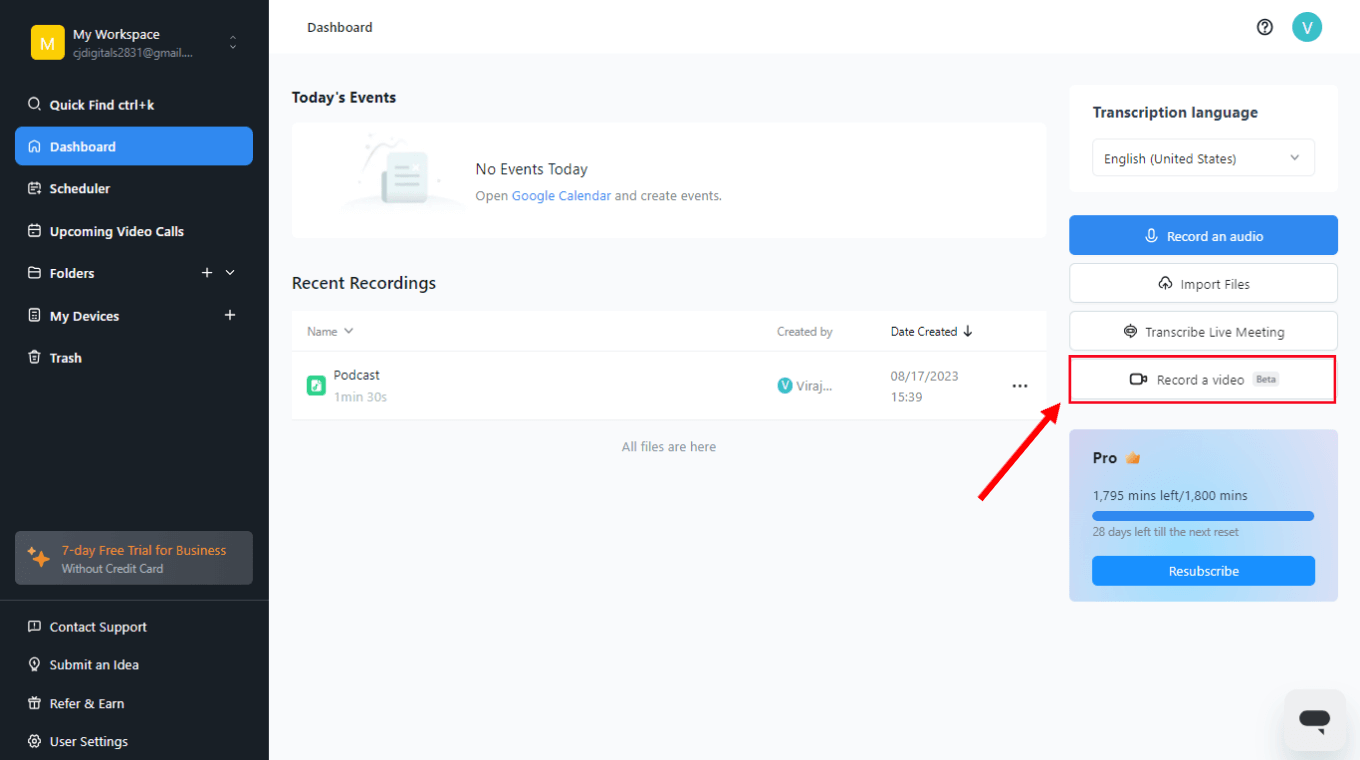
Step 1: Go to the official Notta website and sign up for a free account. Upon entering the Notta dashboard, select the 'Record a Video' option.
Step 2: In the new pop-up menu, select 'Camera Only' and then click the blue 'Start Recording' button.
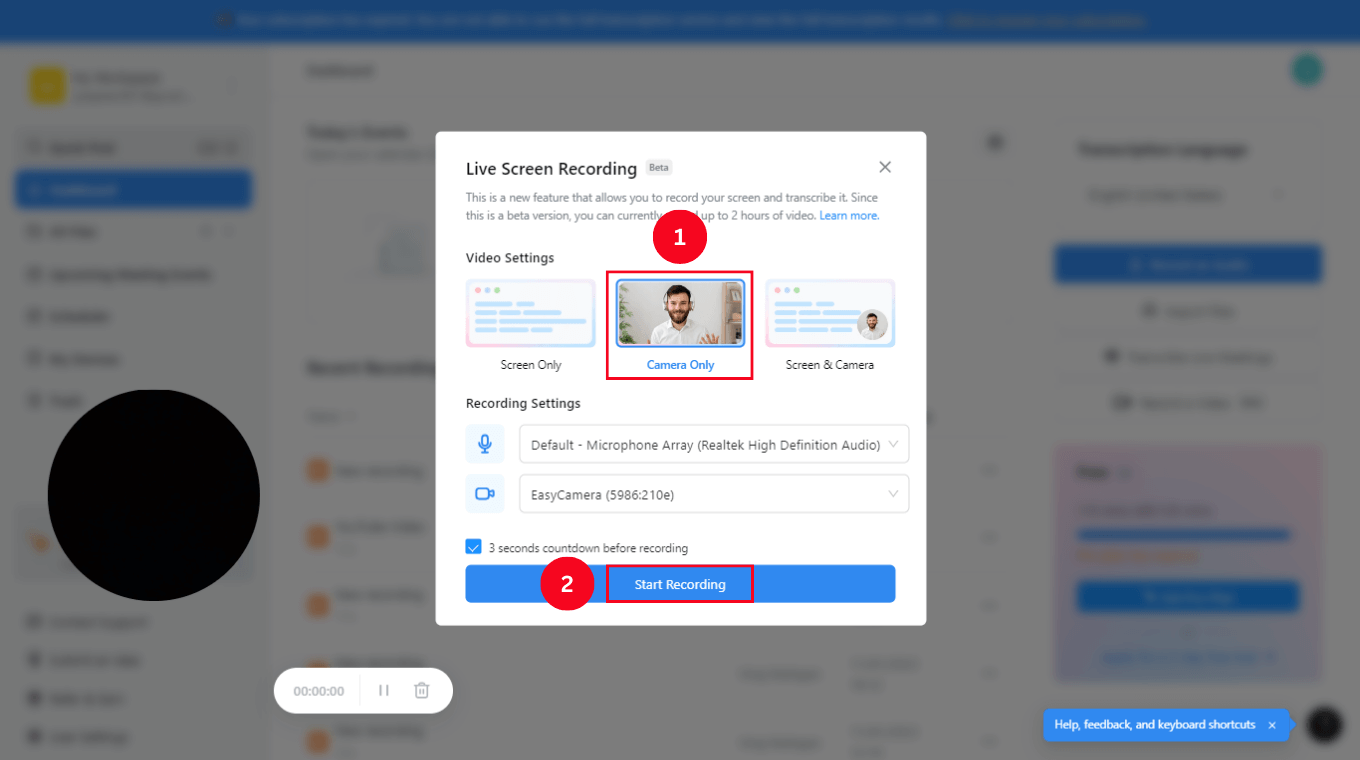
If you want to record a screen along with the camera, select the 'Screen & Camera' and finally hit the 'Start Recording' button.
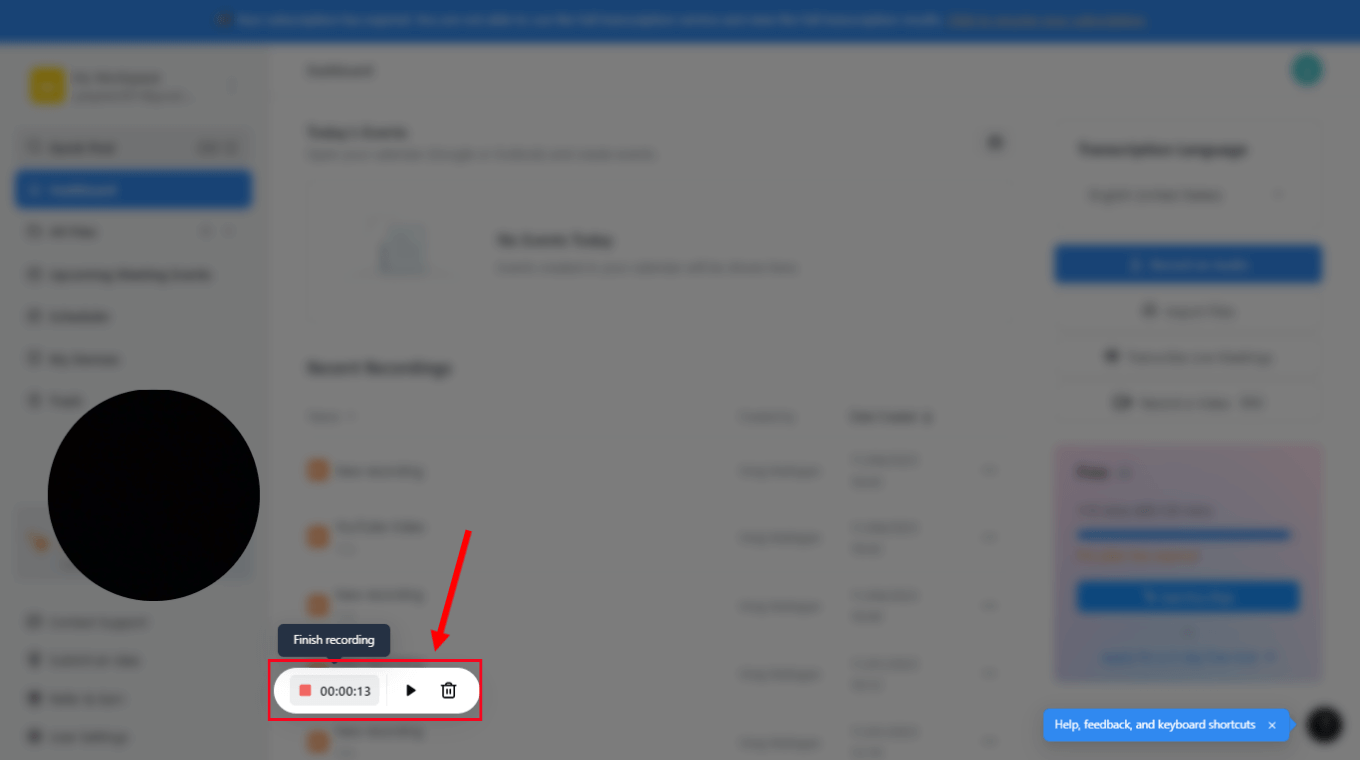
Step 3: Click the red square 'Stop' icon to finish the ongoing recording. Every time you record a video, Notta will automatically start transcribing the spoken words.
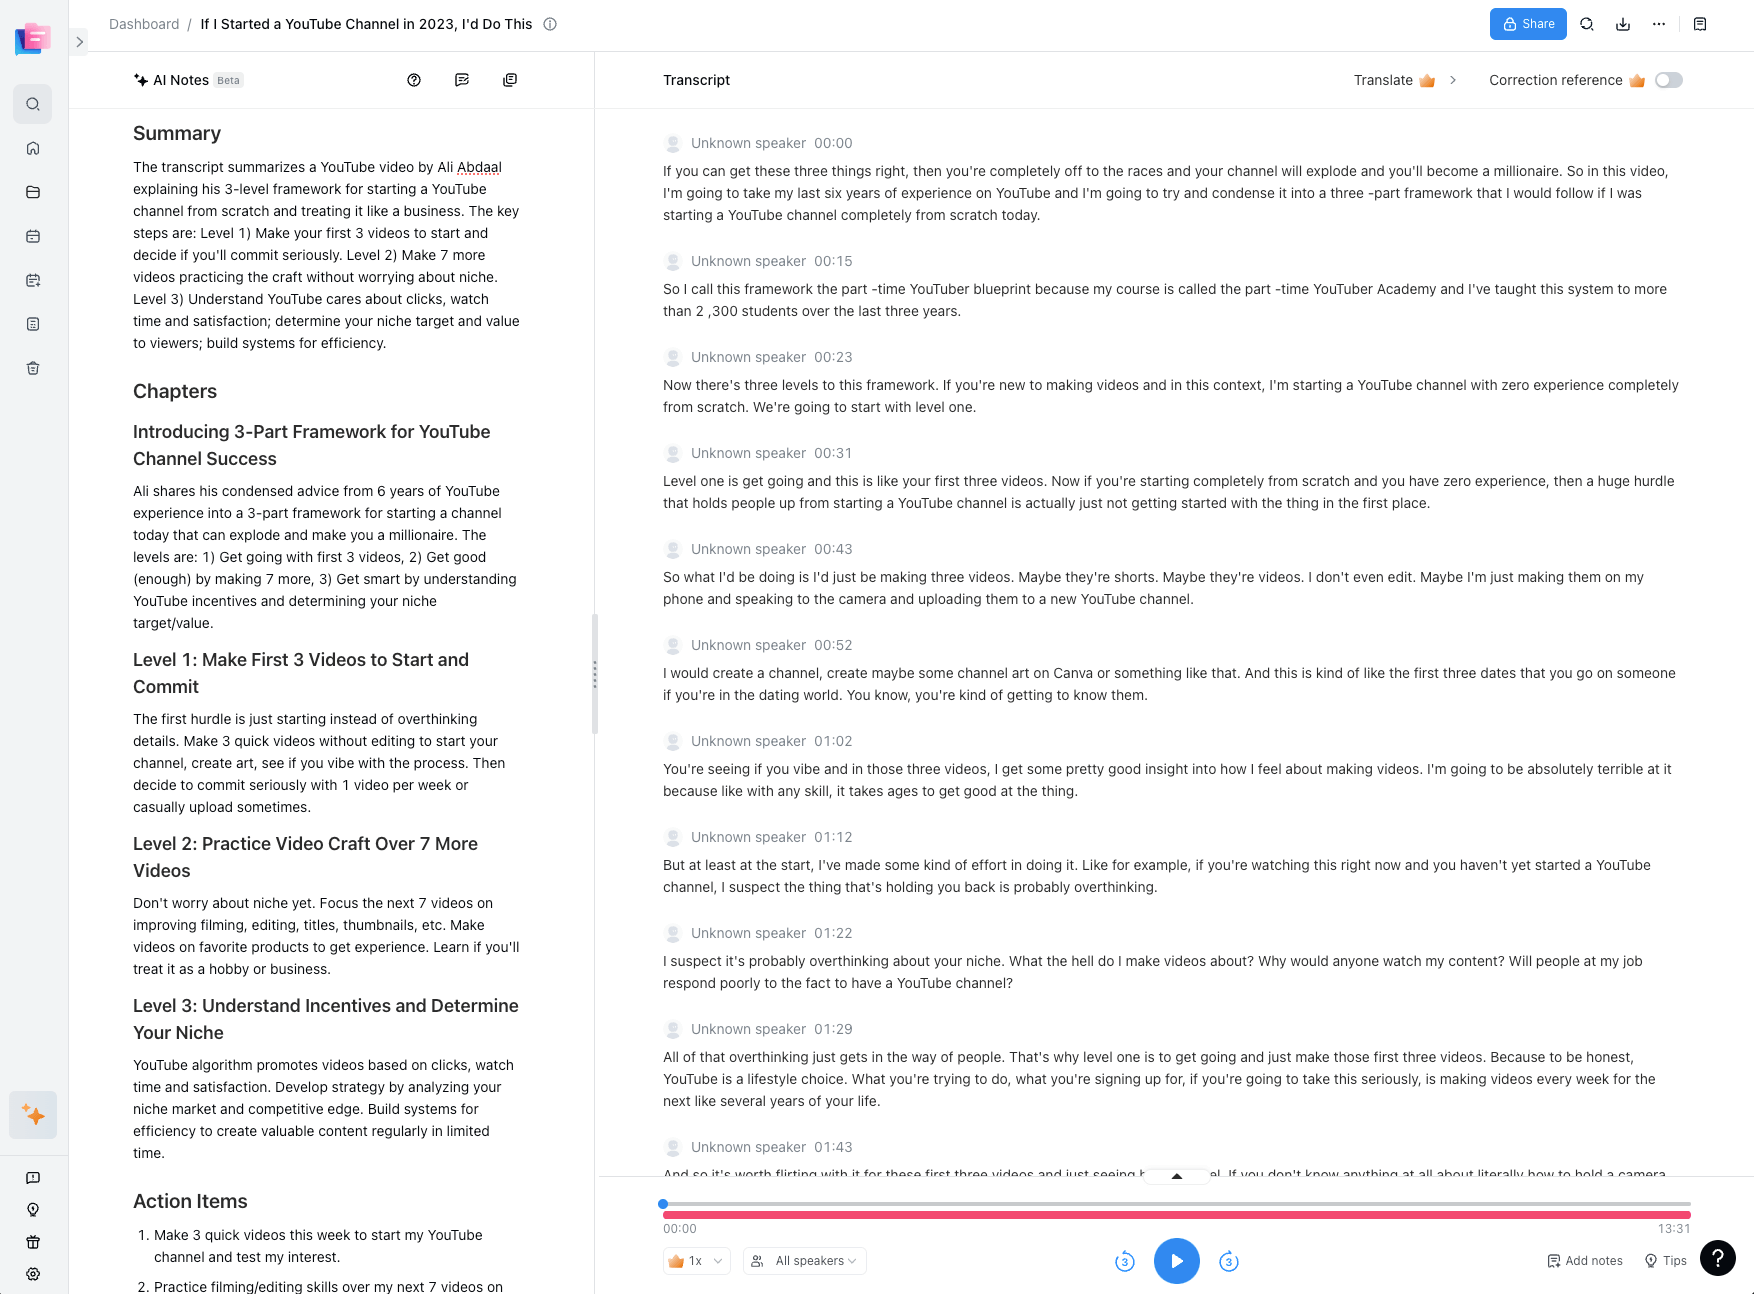
I really like how you can add notes, insert images, and even edit them to generate a professional-looking transcript.
Step 4: Click the 'Download' icon and export the file directly to your device in many formats, including audio (MP3), video (MP4), XLSX, PDF, DOCX, SRT, and TXT.
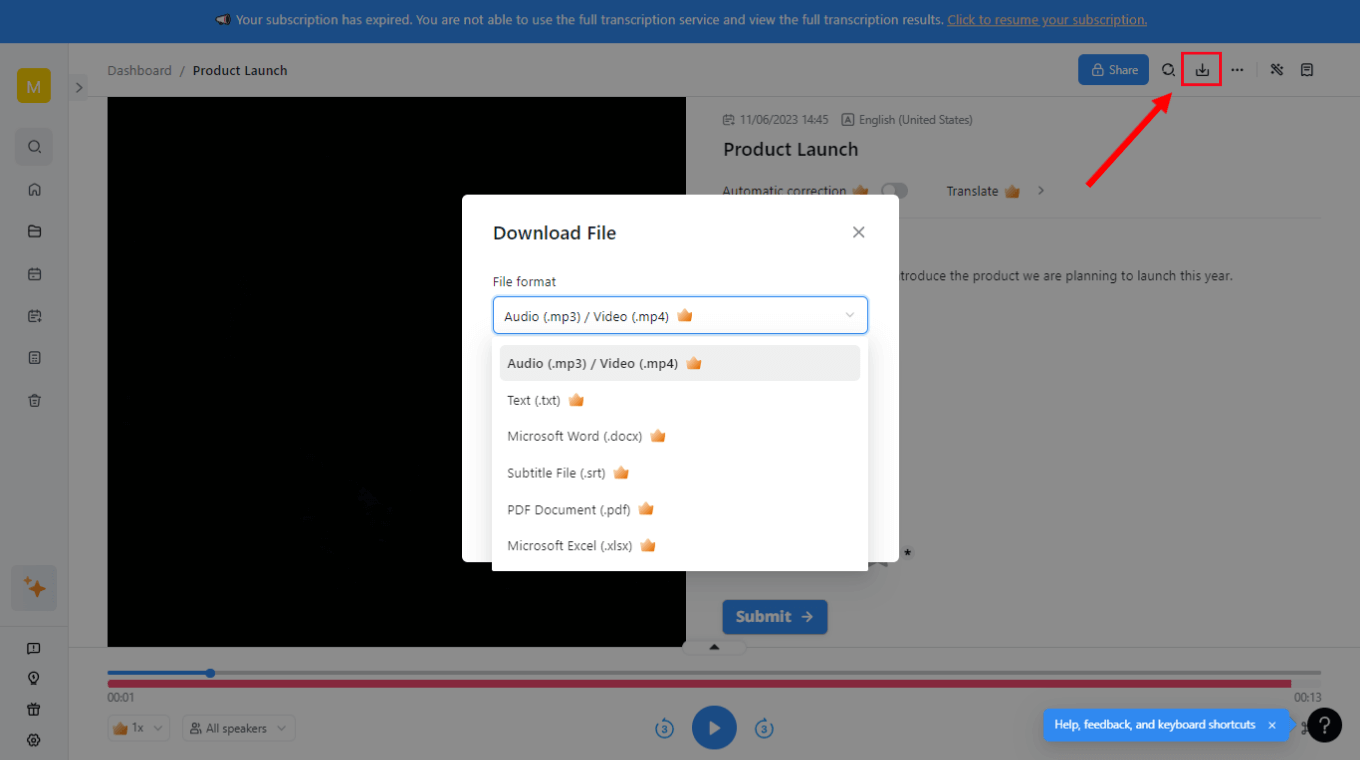
It's very simple to use, and the transcription feature of Notta is pretty solid — but there's more. You can even generate a summary of the recorded video by using the pre-built and AI-powered summary templates in Notta.
Use Notta's AI transcription tool to quickly and easily transcribe audio and videos. We guarantee accuracy and ease of use.
FAQs
What equipment do I need to record a video?
I've filmed a lot of videos — for both personal and professional reasons. While you can definitely record a professional video using a high-quality camera, tripod, external microphone, and LED ring light, they are not mandatory to have.
Macs usually come with a decent built-in mic and webcam. All you need to do is choose a powerful third-party video recording and transcribing tool like Notta and start recording your next professional video on a Mac.
Can I screen record on my Mac with audio?
Yes, Mac comes with a native Screenshot toolbar and QuickTime Player to help you record the screen content with audio. You can even record the screen content on a Mac using AI tools like Notta.
It's an all-in-one tool that can record, transcribe, and even summarize media files — without any effort. After you record a video, it helps you share a link to the file with team members or directly export it to platforms like Notion or Salesforce.
Key takeaways
There are many different reasons why you might need to learn how to record a video on a Mac. A simple video recording helps you share knowledge with team members. If you want to record a simple video and need no editing or additional features, Mac's built-in video recorders are great options.
For recording, real-time transcribing, and summarizing, Notta makes more sense. You can record videos, transcribe the audio into text, and even generate a short summary. It also has a free plan, so you can test the features before investing money.