
How to Send a Calendar Invite in Outlook [Desktop/Mobile]
Unlock the power of AI — Notta's meeting assistant records, transcribes and summarizes meeting minutes with one click.
No one likes meetings, and I'm convinced a part of that comes with the headache of scheduling said meetings and sending calendar invites. If someone emails me with a request like ‘Can you schedule a meeting for the marketing department?’ I immediately begin to think of the lengthy steps.
Microsoft Outlook clearly understood the pain, which is why they created Scheduling Assistant. It allows you to quickly create an Outlook meeting and send the invite to the attendees. If you're new to Outlook and want to know how to send a calendar invite, this guide will help you out!
I've spent hours writing this guide to cover the basics of how to send a Calendar invite in Outlook via desktop and mobile applications. I'll also reveal how to follow up after sending the invite and forward a meeting invite to other attendees.
How to send a calendar invite from Outlook
Before I dig deep, it's worth noting that there are many versions of Microsoft Outlook. For example, I'm using Outlook for Microsoft 365, running on a MacBook Pro, so Outlook's interface may appear differently on your end, depending on the device you are using. Here, I'll reveal how to send a calendar invite from Outlook on the web and mobile.
Schedule with Outlook on the web
Here's how to send a meeting invite in Outlook on the web:
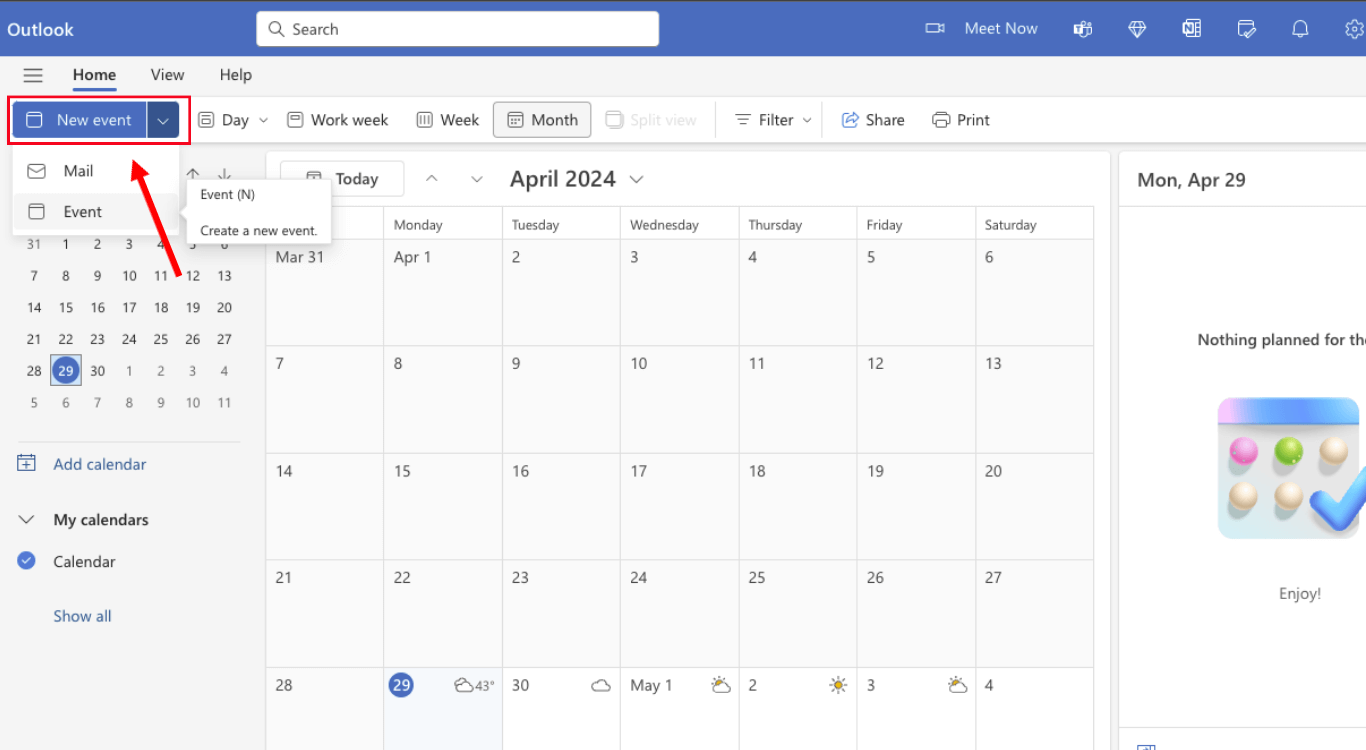
Step 1: To get started, select the ‘Calendar’ and then choose a ‘New Event.’ Here, you'll need to enter the details, start time, end time, and location. You can also double-click any date on the Outlook calendar, and a ‘New Event’ will appear.
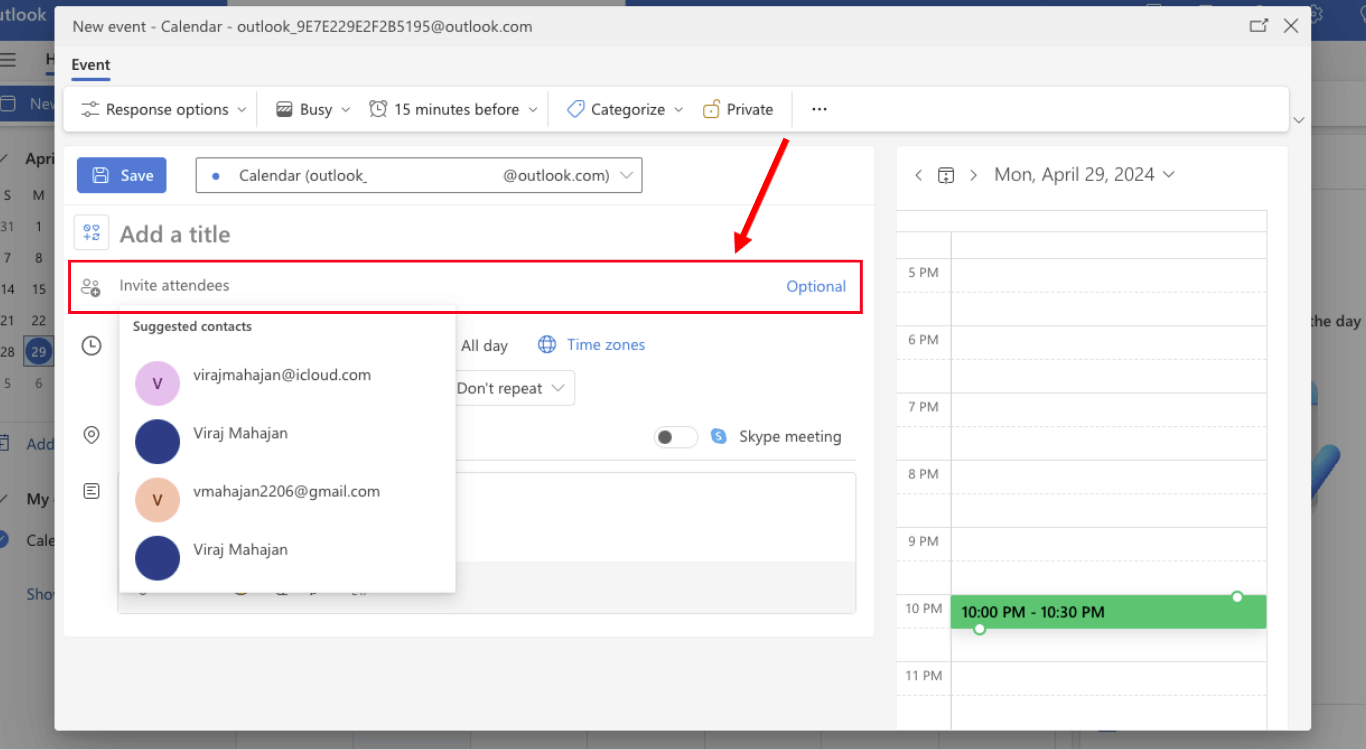
Step 2: If you're scheduling a meeting, you can add the email addresses or names of the people you would like to invite by choosing ‘Invite Attendees.’ You can also select the ‘Optional’ button to invite other attendees.
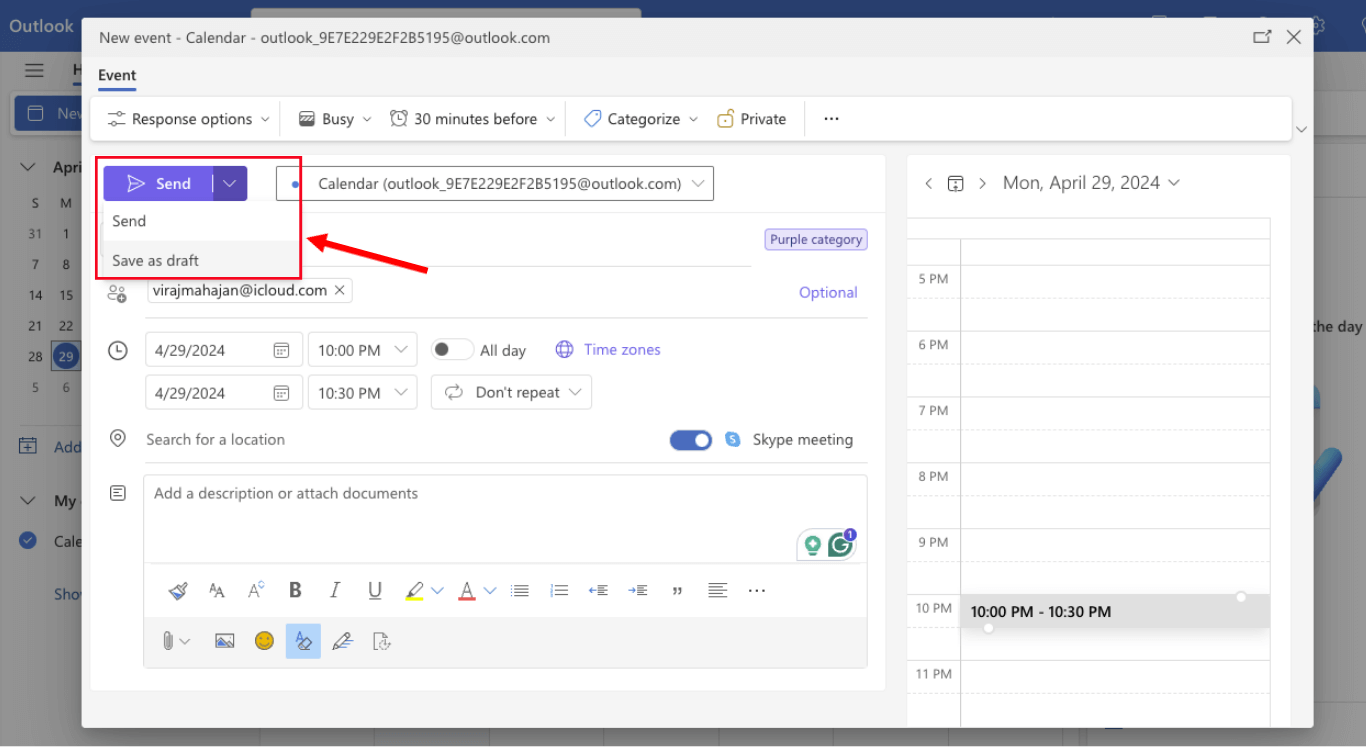
Step 3: Then, choose ‘Scheduling Assistant’ to check out everyone's free and busy times. You can select ‘Repeat’ to schedule a recurring meeting. Finally, tap on the ‘Save’ or ‘Send’ button.
Schedule using the Outlook app
If you prefer using the Outlook app on desktop or mobile for scheduling meetings, here's how to do it:
Step 1: Open the Outlook application on your desktop and then select the ‘Calendar’ icon located on the left side of the screen.
Step 2: Click on the blue ‘New Event’ button and add the event title, start and end time, and invite attendees option.
Step 3: Lastly, select the ‘Send’ button to schedule and send the Outlook meeting invite.
Note: If you want to schedule an Outlook meeting on mobile, download the mobile application on your Android or iOS. To do this, you can select the ‘Calendar’ icon located at the bottom page, add meeting details, and tap ‘Send.’
Create shareable events that connect with your calendar automatically using Notta's meeting scheduler.
How to follow up after sending your calendar invite
Imagine an ideal world where all the attendees would immediately respond with Yes, No, or Maybe. Unfortunately, this does not happen in the real world, where everyone is busy and the mailbox is filled with hundreds of unread messages. That's where the need to follow up after sending the calendar invite comes into the picture. Here, I'll reveal some best practices for follow-up:
Wait for 24 hours: It can be tempting to send a reminder after a few hours of sending the email — but that's not the right way. You'll need to at least wait for a day before sending a calendar invite.
Remind them: Those who have selected Yes or Maybe, you can send a reminder email with the details of the meeting. It's always a best practice to send a reminder 24 hours before the event.
Spell it out: It's a bit different from the other two! You can use this tip before the follow-up and add subject lines, such as ‘RSVP’ or ‘Response Required.’
How to forward a meeting invite in Outlook
If you've missed a few people when sending calendar invites, the best option is to forward the invite. Here's how to forward the meeting invite in Outlook:
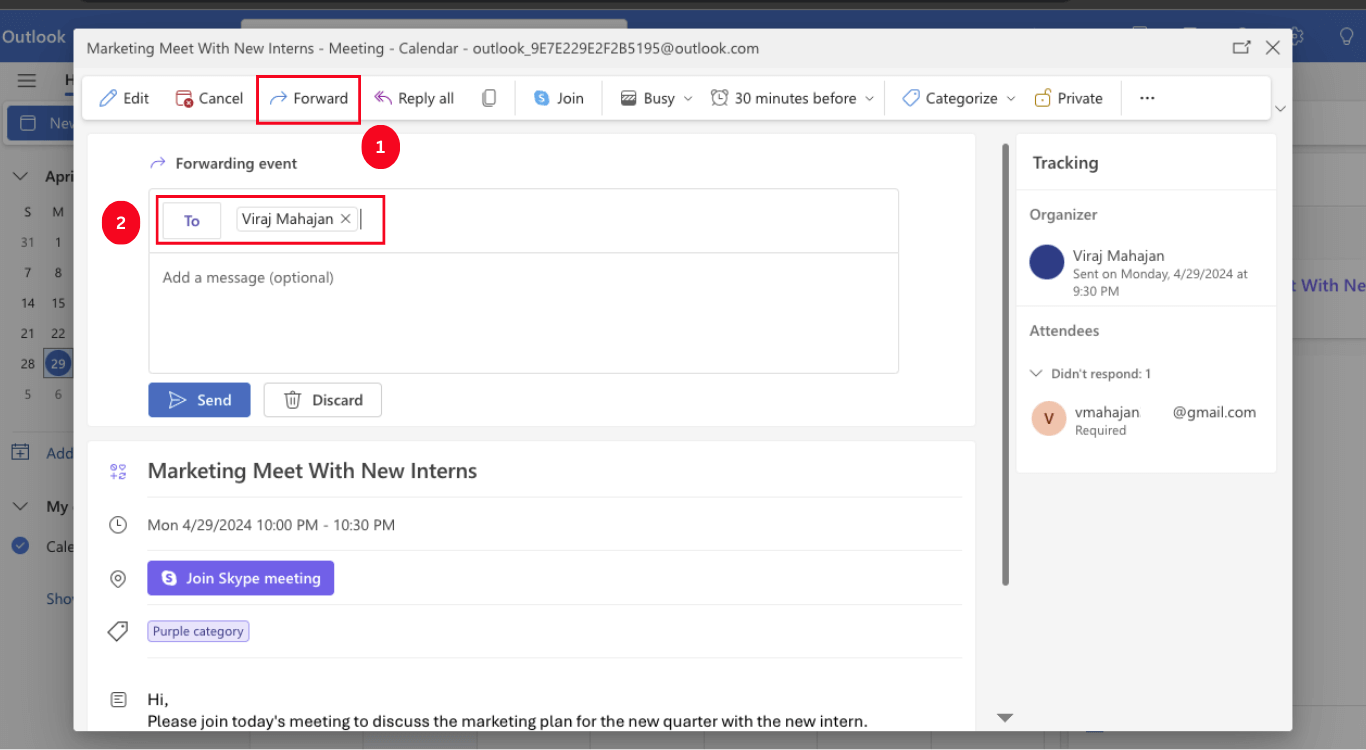
Step 1: Go to your Outlook account and then open the meeting you'd like to forward. On the top toolbar, locate and select the ‘Forward’ option.
Note: If the meeting is a series, you'll have two options: either forward the selected event or the entire meeting series.
Step 2: On the ‘To’ line, you can add the people's names to whom you would like to forward the meeting. Once done, tap on the ‘Send’ button.
How to recall a meeting invite in Outlook
If you're scheduling the meeting in Outlook, you can recall the meeting request by simply canceling the event. This is because whenever you cancel the scheduled event, the meeting gets automatically removed from the recipients’ calendars. But here's an important thing: Don't forget to include a message explaining the change in schedule. Here's how to recall a meeting invite in Outlook:
Step 1: Open Outlook and then locate the calendar event you want to recall or cancel. Click the ‘Meeting’ icon located in the top navigation ribbon, followed by selecting the ‘Cancel’ button.
Step 2: You'll see a message box where you can type the reason behind recalling the meeting invite and then click the ‘Send’ option.
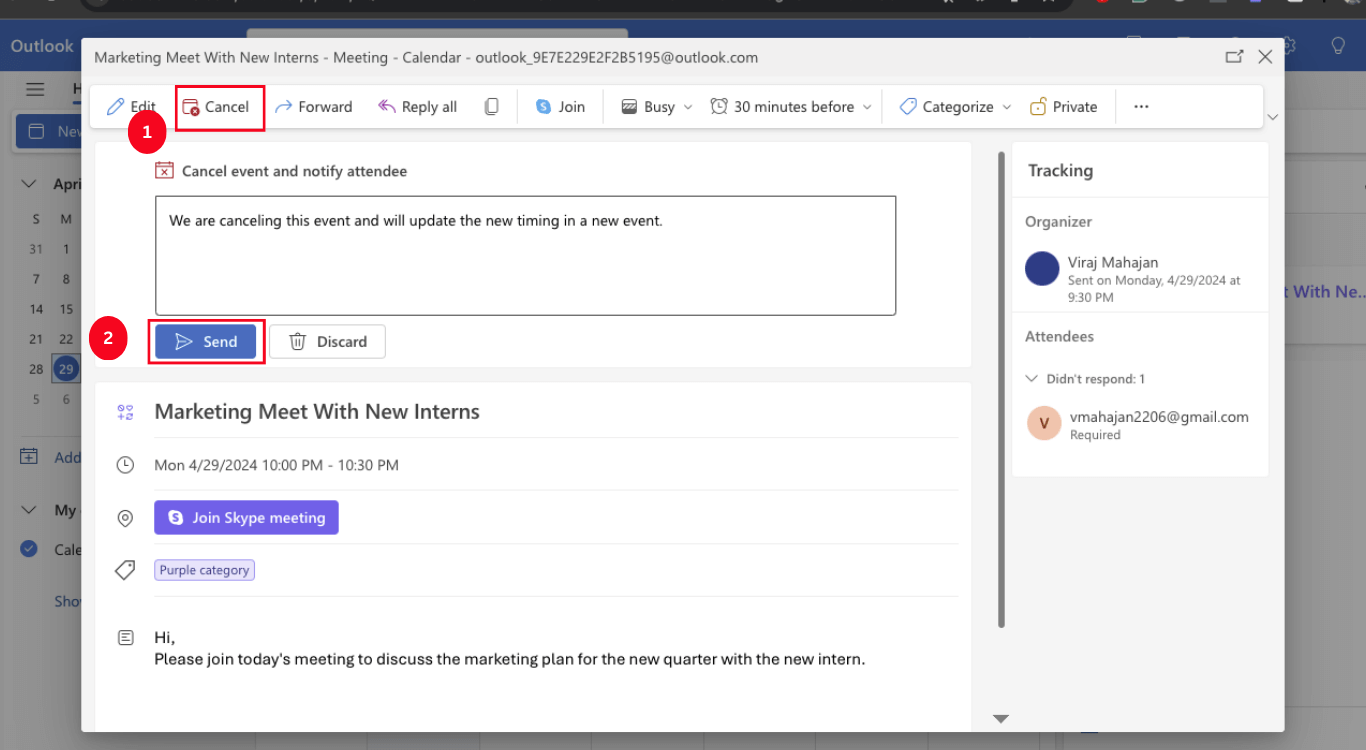
Step 3: If you want to cancel one recurring meeting, select Meeting Series > Cancel Occurrence. On the other hand, tap ‘Cancel Series’ to cancel all future meetings.
How to record & transcribe Outlook meetings?
Meetings — and the tasks that come with them — don't have to be time-consuming. With Notta, you can record, transcribe, and summarize Outlook meetings faster and easier. The AI transcription and meeting note-taking app can help you record your calls, transcribe the audio, and then store everything for later reference. You can also use a range of other features, such as summarizing the long transcripts and generating action items. Here's how to record and transcribe Outlook meetings with Notta:
Step 1: To get started, sign in to your Notta account. If you don't have one, you can create an account for free. Once you've successfully signed in, navigate to the ‘Transcribe live meetings’ option in the right navigation panel.
Step 2: You'll be asked to choose the transcription language, meeting invite link, and bot name to record and transcribe the meeting. Once done, click on the blue ‘Transcribe now’ button.
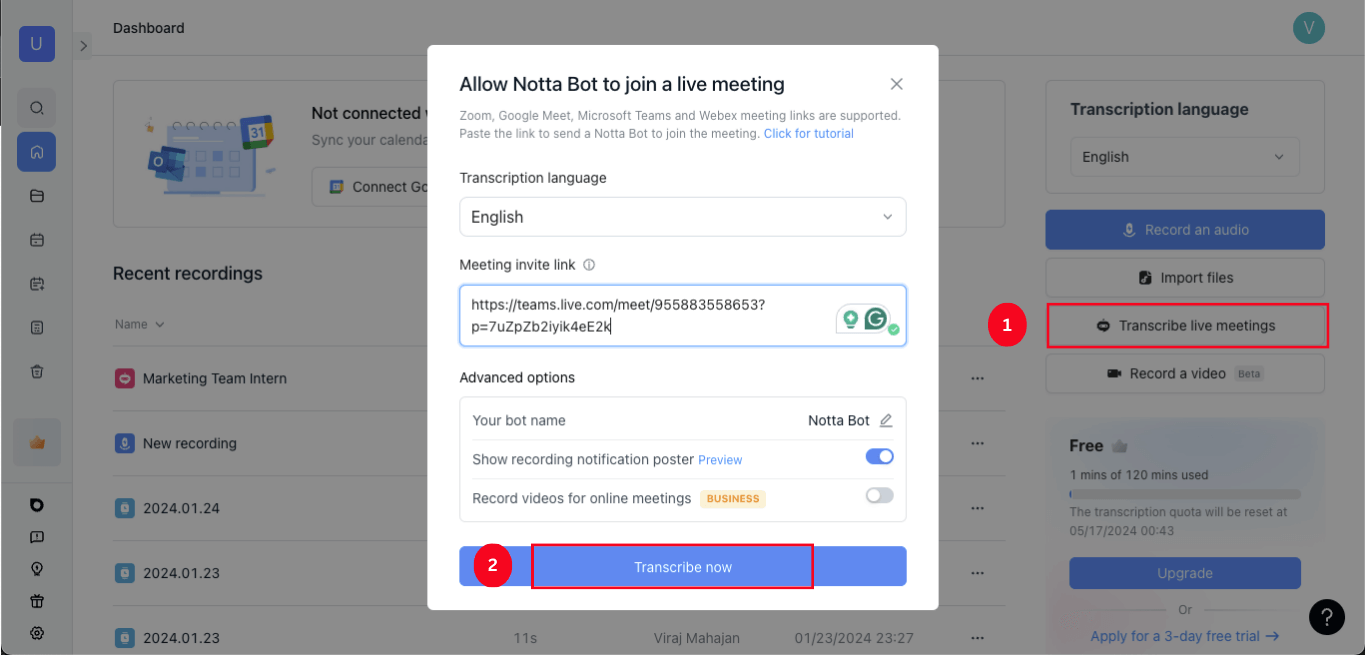
Step 3: The Notta bot will enter the meeting and start converting the spoken words into text. If you want to access the transcribed file, all you need to do is head to the dashboard and double-click on the recently recorded file.
Notta also lets you download or share the transcripts with the meeting attendees so everyone stays in the loop.
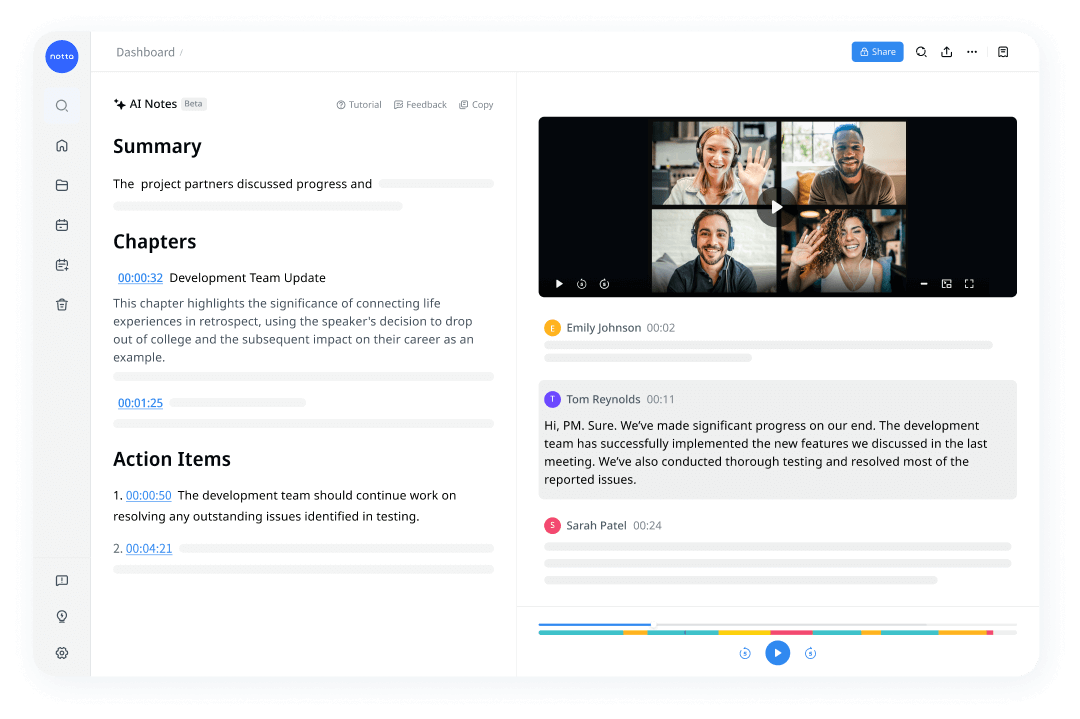
Notta offers the most integrated AI meeting notes, summaries, and action items so nothing gets missed.
Run a perfect meeting with Notta
The quick steps of how to send a calendar invite in Outlook that I've outlined will help you schedule meetings in no time. Microsoft Outlook helps you automate many processes within its application, but let's kick things up a notch. Notta can transcribe your Outlook or Teams meeting and even goes further by extracting notes or action items.
FAQs
Why should you schedule a calendar event in Outlook?
You can use Outlook to organize meetings, send invitations, schedule all-day events, and even create appointments. You can also use different calendars to view group schedules.
Can you send an email as a calendar invite in Outlook?
Yes. You can send an email as a calendar invite in Outlook by clicking the ‘Meeting’ button. This allows you to add the event directly to your calendar. The senders and email recipients also have an option to add the event to their Outlook calendars.
How to make a recurring meeting in Outlook?
Outlook offers a convenient way to schedule a recurring meeting (or an appointment that happens many times). Here's how to create a recurring meeting in Outlook:
Open the Outlook calendar and select the ‘New Event’ option. You can then add a title for your Outlook meeting or event.
Select the ‘Invite Attendees’ and enter the names of individuals to invite people to the meeting or event.
The next step is to either manually enter start and end times or choose a suggested time slot for the meeting.
Choose the ‘Don't Repeat’ dropdown, followed by choosing the recurrence interval you want.
The last step is to enter the meeting location and turn the toggle next to ‘Teams Meeting.’ Click ‘Send’ to confirm.