How to Share Screen on Zoom Meetings
Unlock the power of AI — Notta's meeting assistant records, transcribes and summarizes meeting minutes with one click.
Do you ever find yourself in a Zoom meeting where you need to share your screen with your team, but you're not sure how? If so, you're not alone. Zoom screen sharing can initially seem intimidating, but in reality, it's quite simple.
As a Zoom user who hosts frequent virtual sessions, I know the firsthand pain of not being able to share ideas. That's why I have curated this guide to help you understand how to share screens on Zoom.
In this comprehensive guide, I'll walk you through the step-by-step process to share your Zoom screen via desktop, Android, or iOS device. Additionally, I'll provide you with valuable tips for troubleshooting common issues that may arise while sharing your screen.
Prerequisites for sharing screen on Zoom
The Zoom video conferencing platform lets you share your mobile screen, desktop screen, or other content during a virtual meeting. However, you must meet a few prerequisites to use the Zoom screen-sharing feature.
You must have a Zoom desktop client of Global minimum version or higher for Windows, macOS, or Linux.
If you want to share your mobile screen during Zoom meetings, ensure the mobile app is of a Global minimum version or higher.
Linux sessions using Wayland allow you to share only an entire desktop or whiteboard. If you want to share a specific application, you must launch your Linux session with Xorg.
How to enable and disable screen sharing on Zoom
By default, the screen-sharing feature is enabled for most accounts. But if it is disabled, admins or account owners can follow a few steps to enable the Zoom screen-sharing feature using the web portal. Here's how to enable screen sharing on Zoom.
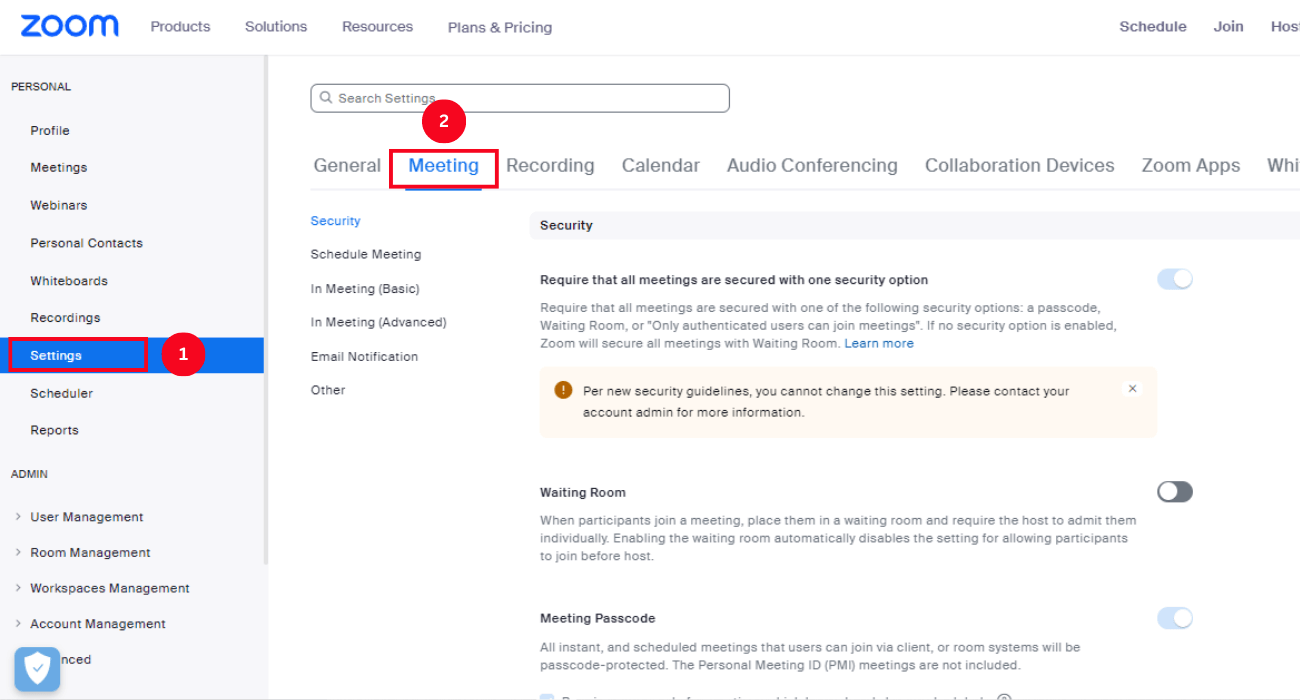
Step 1: Head to the Zoom web portal and sign in. In the navigation panel, select 'Settings.' Move to the top toolbar and click the 'Meeting' tab.
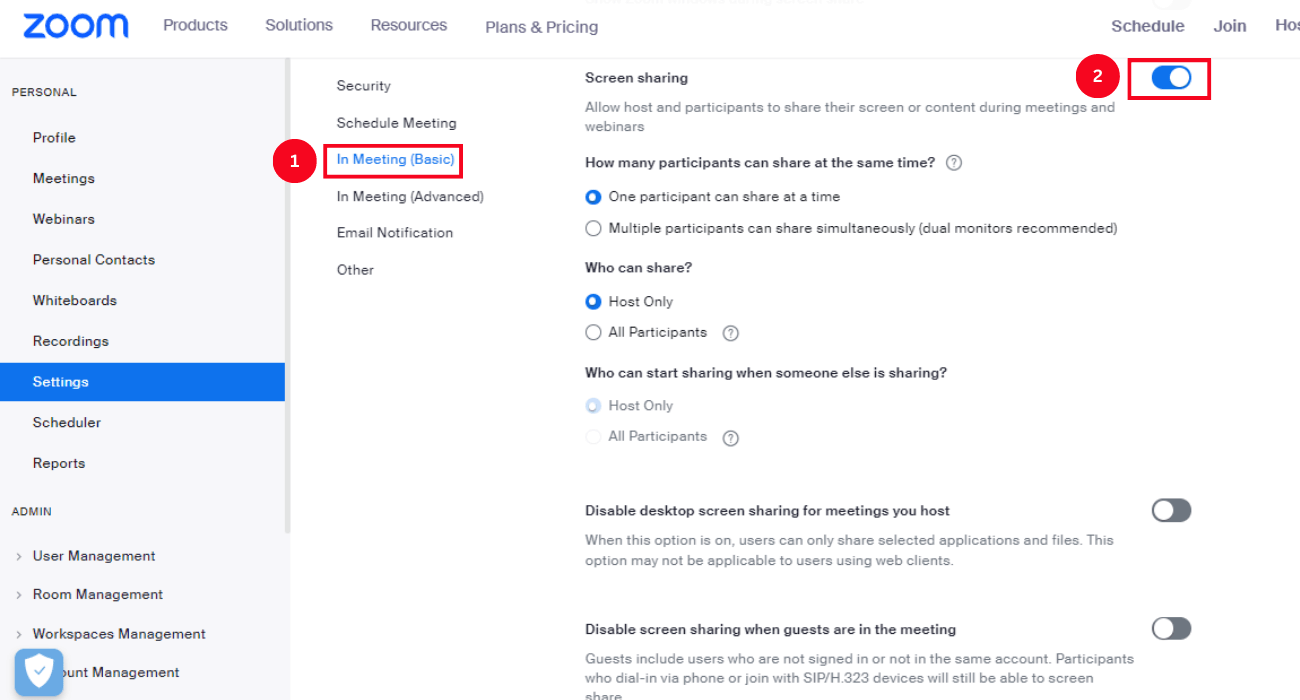
Step 2: Under the 'In Meeting (Basic)' section, scroll and locate the 'Screen Sharing' option. Simply click the toggle to enable or disable the setting.
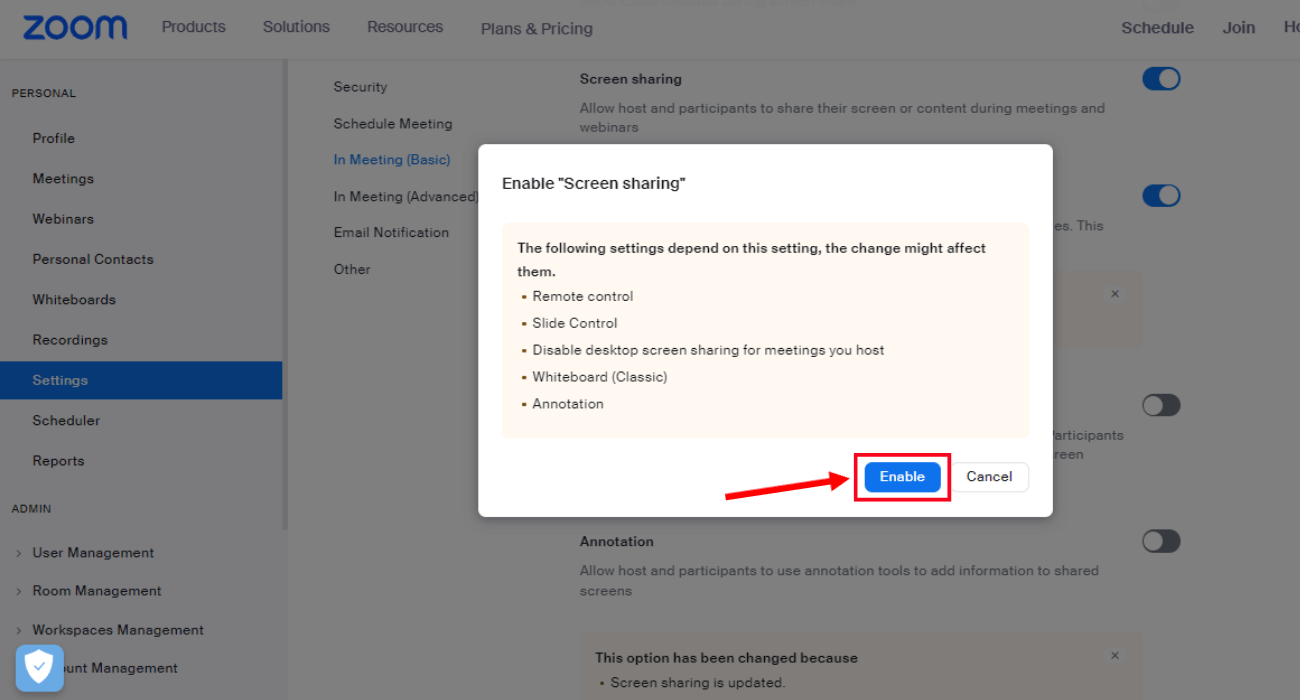
Step 3: If the verification window appears, click 'Enable' to verify the change.
How to share screen on Zoom on Windows/macOS
You can use the Zoom desktop client on your Windows or macOS to share your computer screen during a virtual session. But before that, you'll need to download and install the Zoom desktop application from the Zoom Download Center.
Once successfully installed, here's how to share a screen on Zoom using a desktop client.
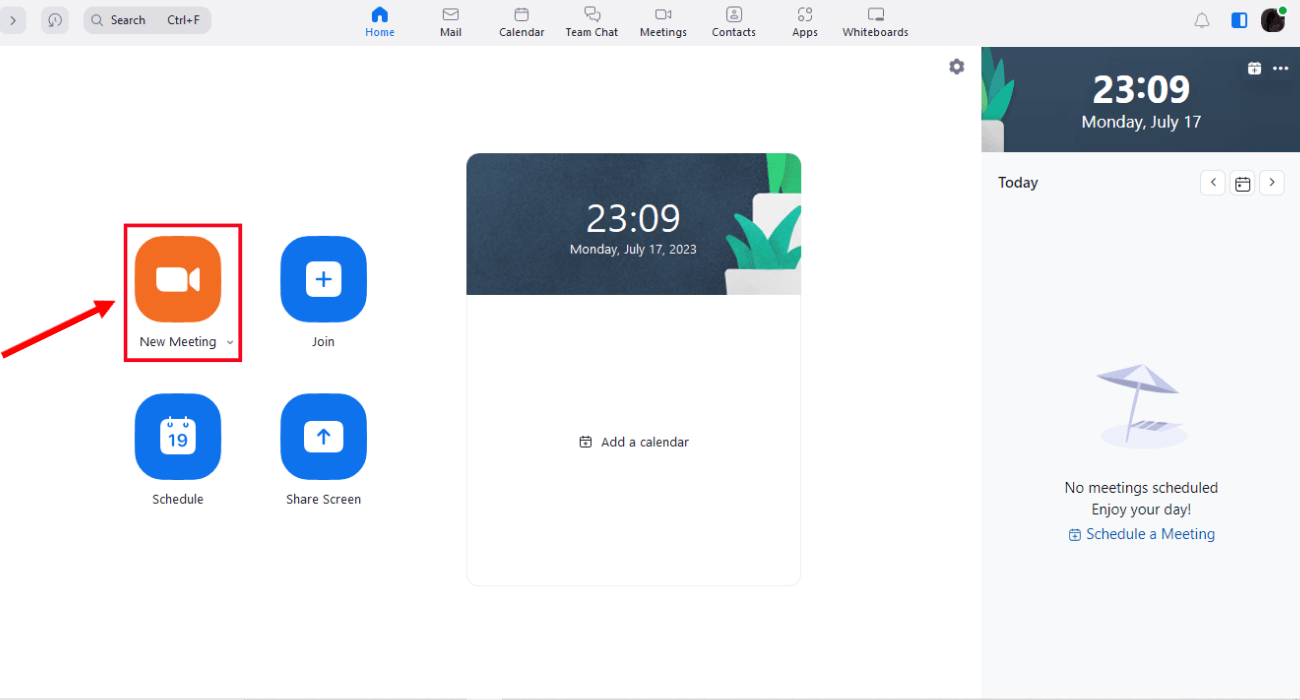
Step 1: Open the Zoom desktop client to host a new meeting or join an ongoing virtual session.
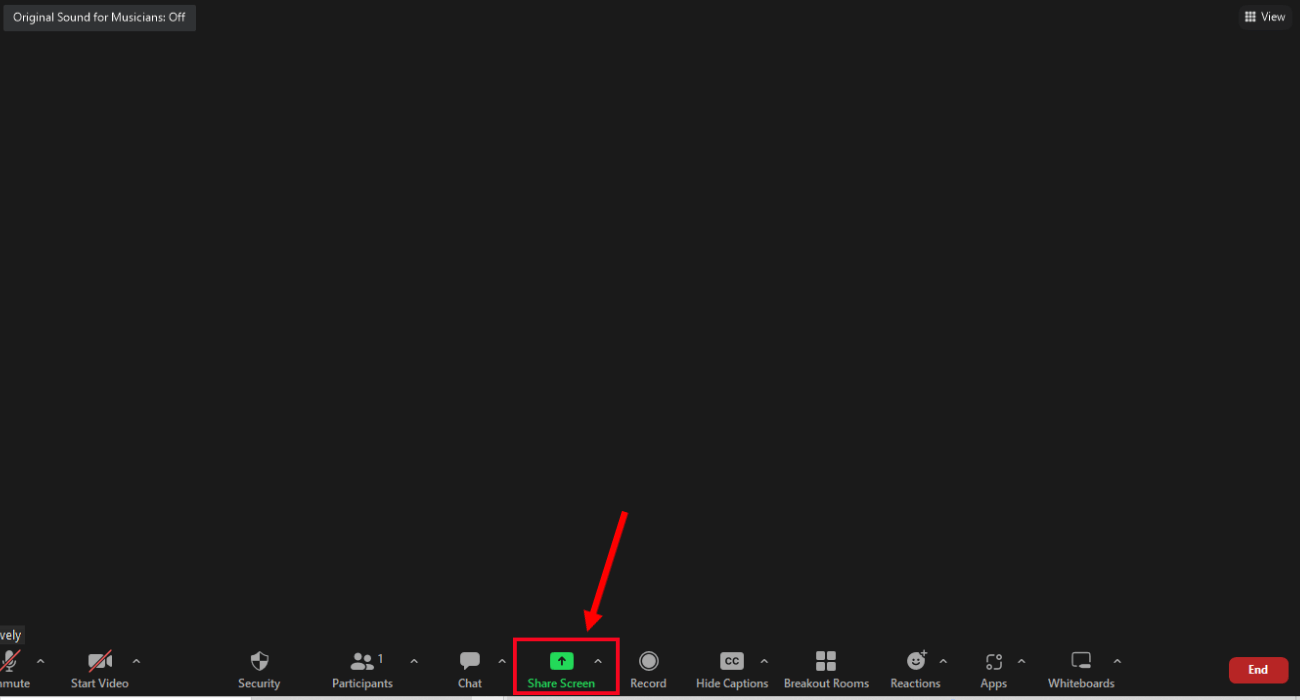
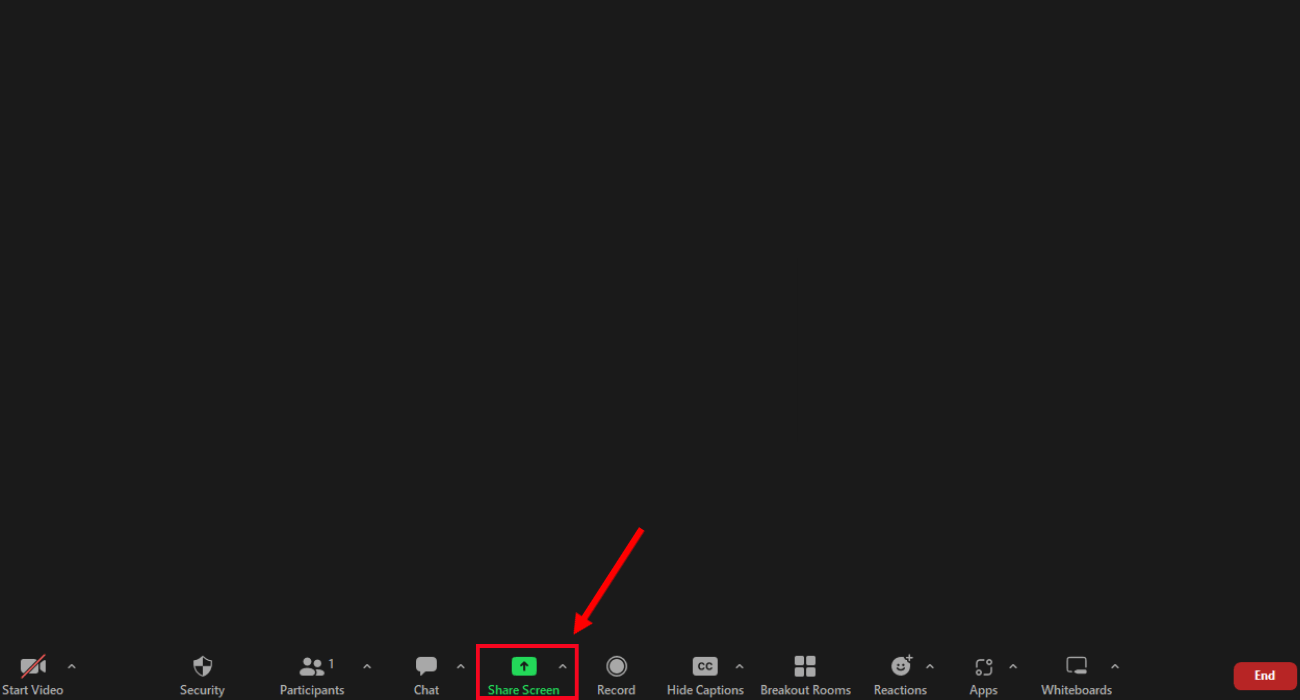
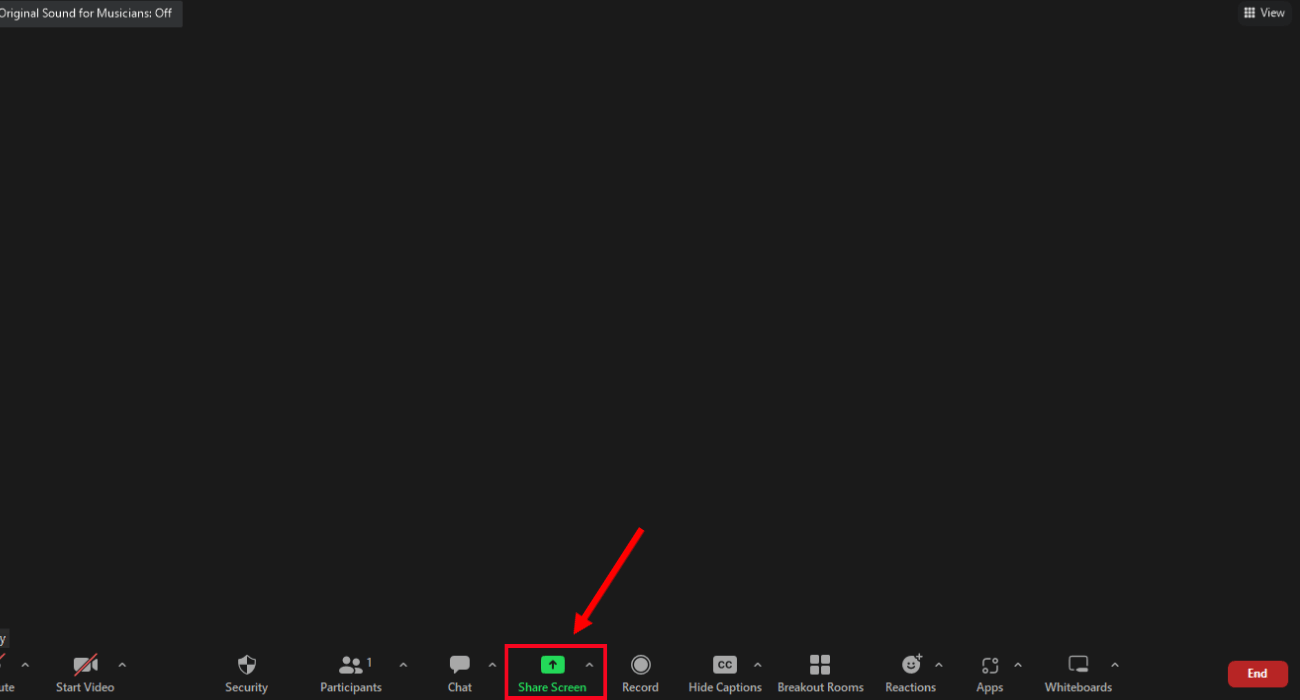
Step 2: Once you've entered the Zoom session, locate the 'Share Screen' option in the meeting controls.
Step 3: Click 'Share Screen.' A pop-up will appear with Basic, Advanced, Files, and Apps options.
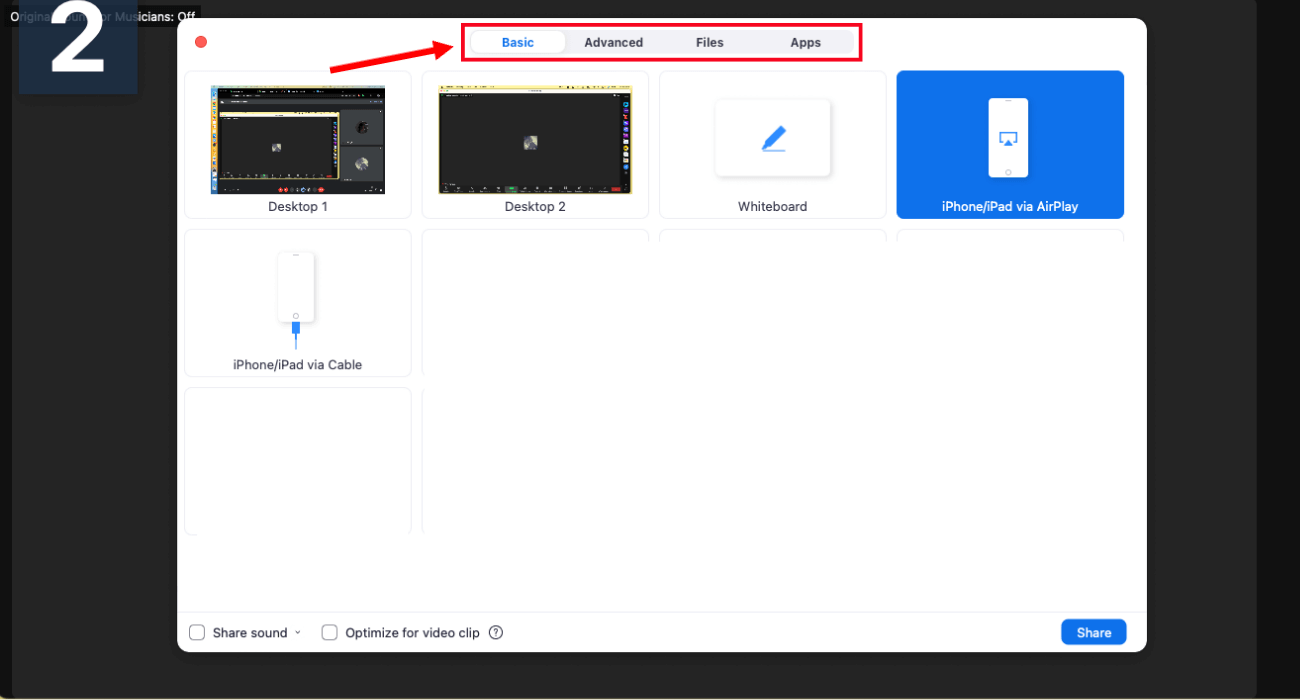
Here is a brief explanation of different Zoom screen-sharing options:
Basic
Screen: Sharing your entire screen means the participants can see all activities on your device.
Whiteboard: You can share a whiteboard with the participants where you can draw and write text. The meeting participants can save the whiteboard with the work after the meeting ends.
iPhone/iPad: You must download a Zoom plugin to share your iPhone/iPad screen in the virtual meeting.
Note: Hold the Ctrl key in Windows and Shift key in macOS if you want to select and share multiple screens at the same time.
Advanced
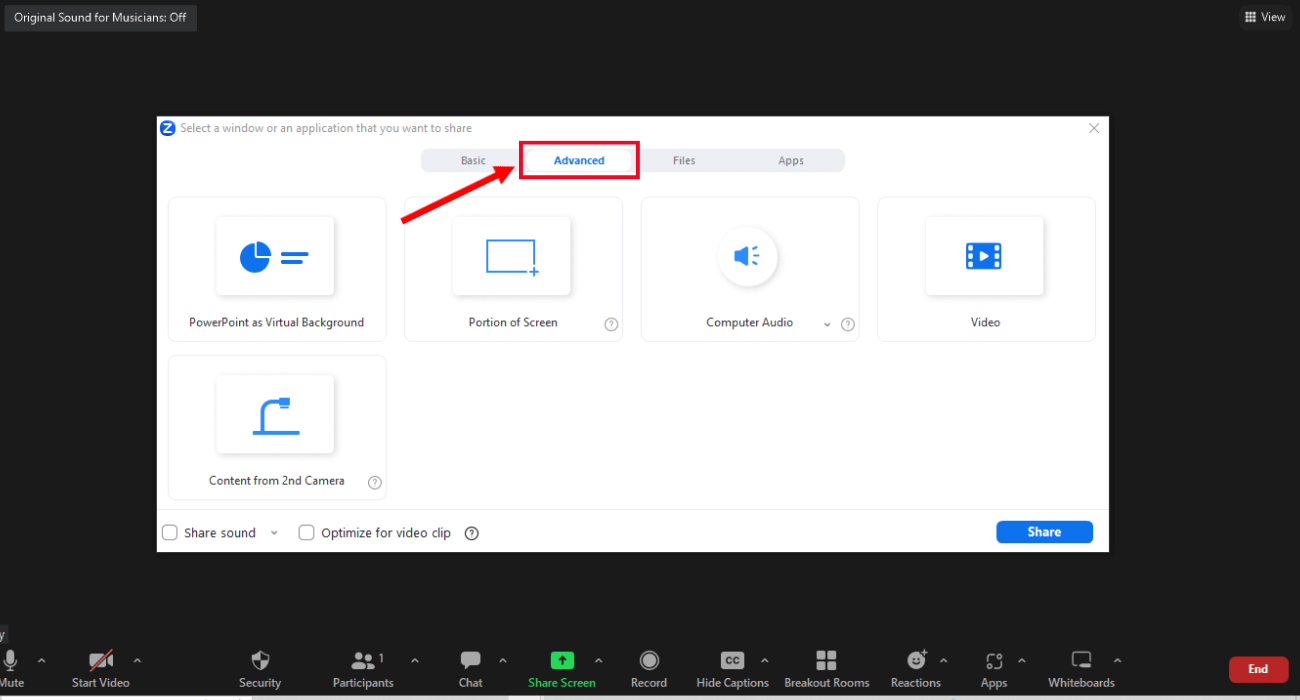
PowerPoint as Virtual Background: The option lets you utilize a slideshow presentation as your virtual background, helping you with a more immersive collaboration.
Portion of Screen: With the help of this feature, you can share only some portion of your screen represented by a green border. You can adjust the part by clicking and dragging any side or corner.
Computer Audio: The option lets you share your computer's sound with the Zoom meeting participants without showing your screen.
Video: The feature lets users share locally stored video content during meetings.
Content from the 2nd Camera: You can share the view from your secondary camera connected to your computer using this option.
Files
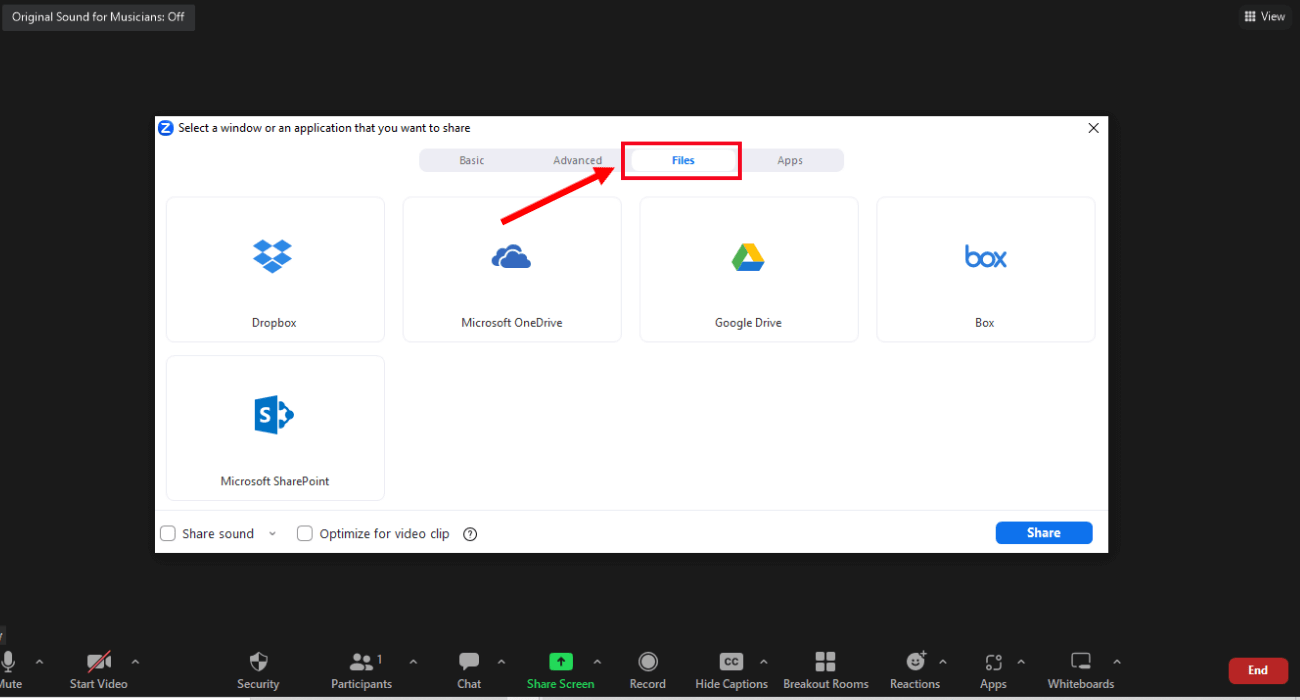
The option lets you connect third-party sharing services like Dropbox, Microsoft OneDrive, Google Drive, Box, or Microsoft SharePoint with Zoom. Once connected, you can share third-party files with the participants.
Note: The meeting host can disable the screen sharing for the participants. If you are hosting the Zoom session and want to enable the screen-sharing feature, locate 'Security' in the meeting toolbar. Under 'Allow participants to,' tick 'Screen Share' to grant permission.
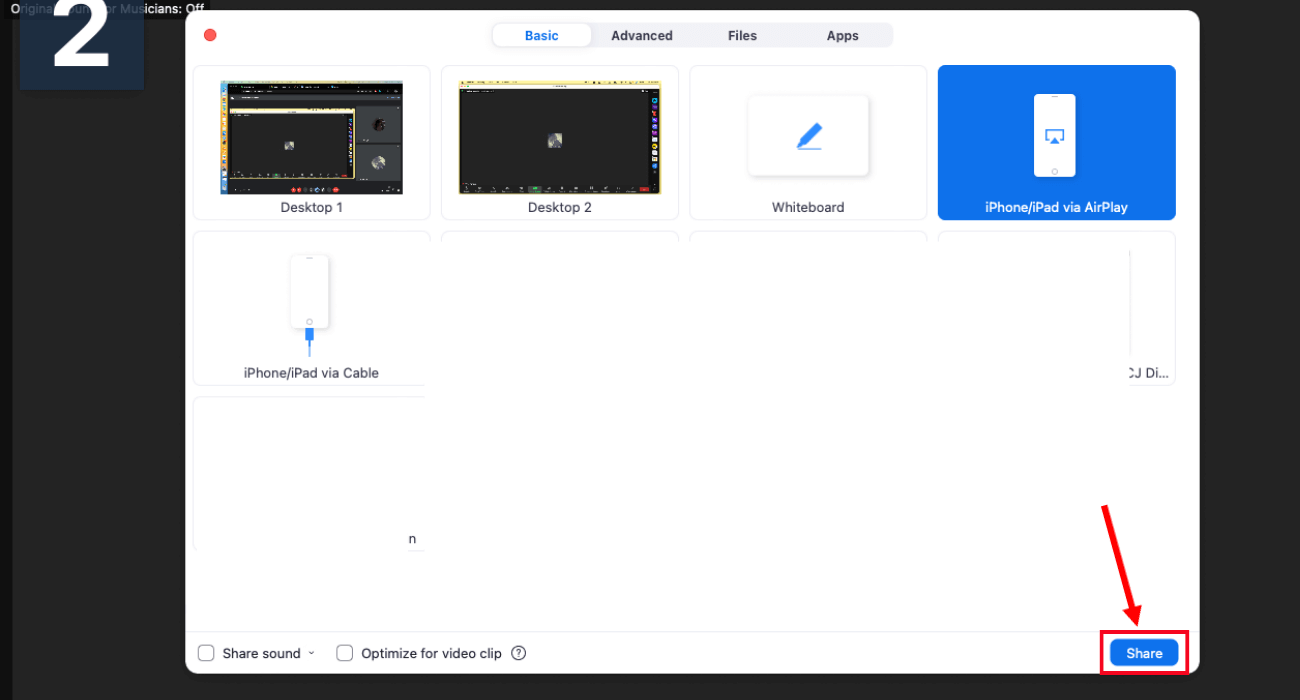
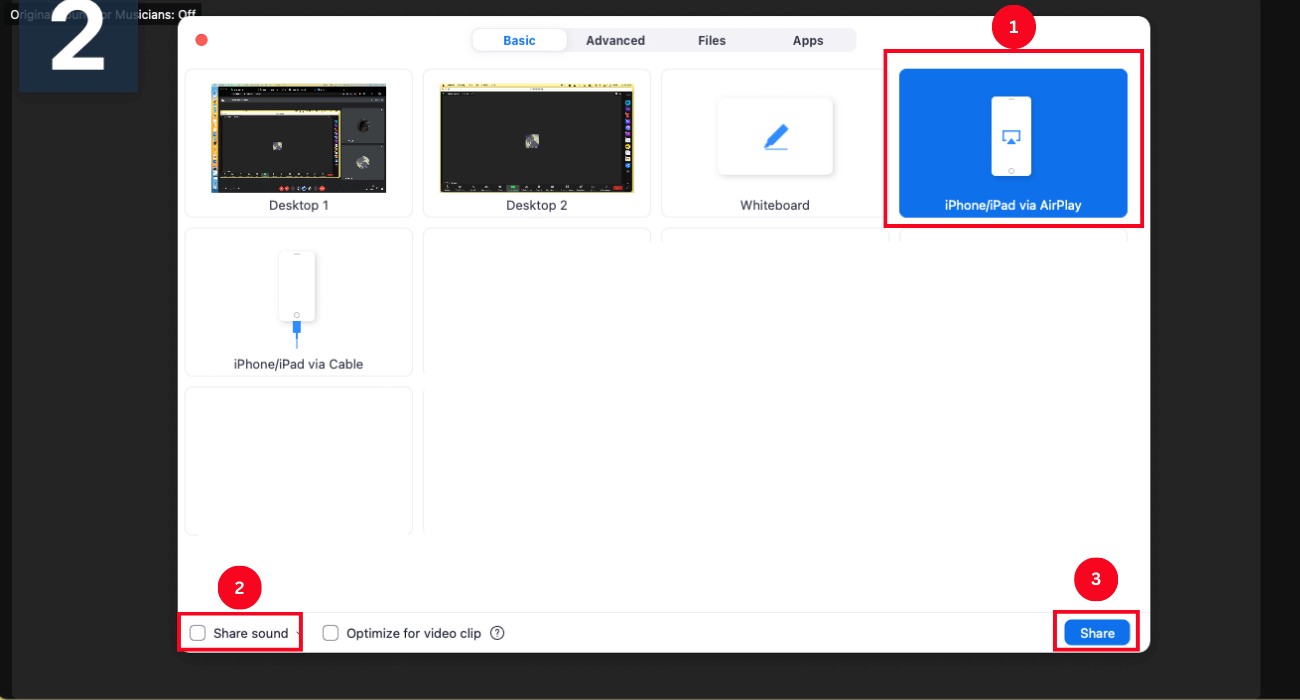
Step 4: Choose the screen you want to share and select the 'Share' option in the bottom corner.
How to share screen on Zoom on Android
If you are hosting a meeting on your Android device, here is how to allow screen sharing on Zoom with the participants.
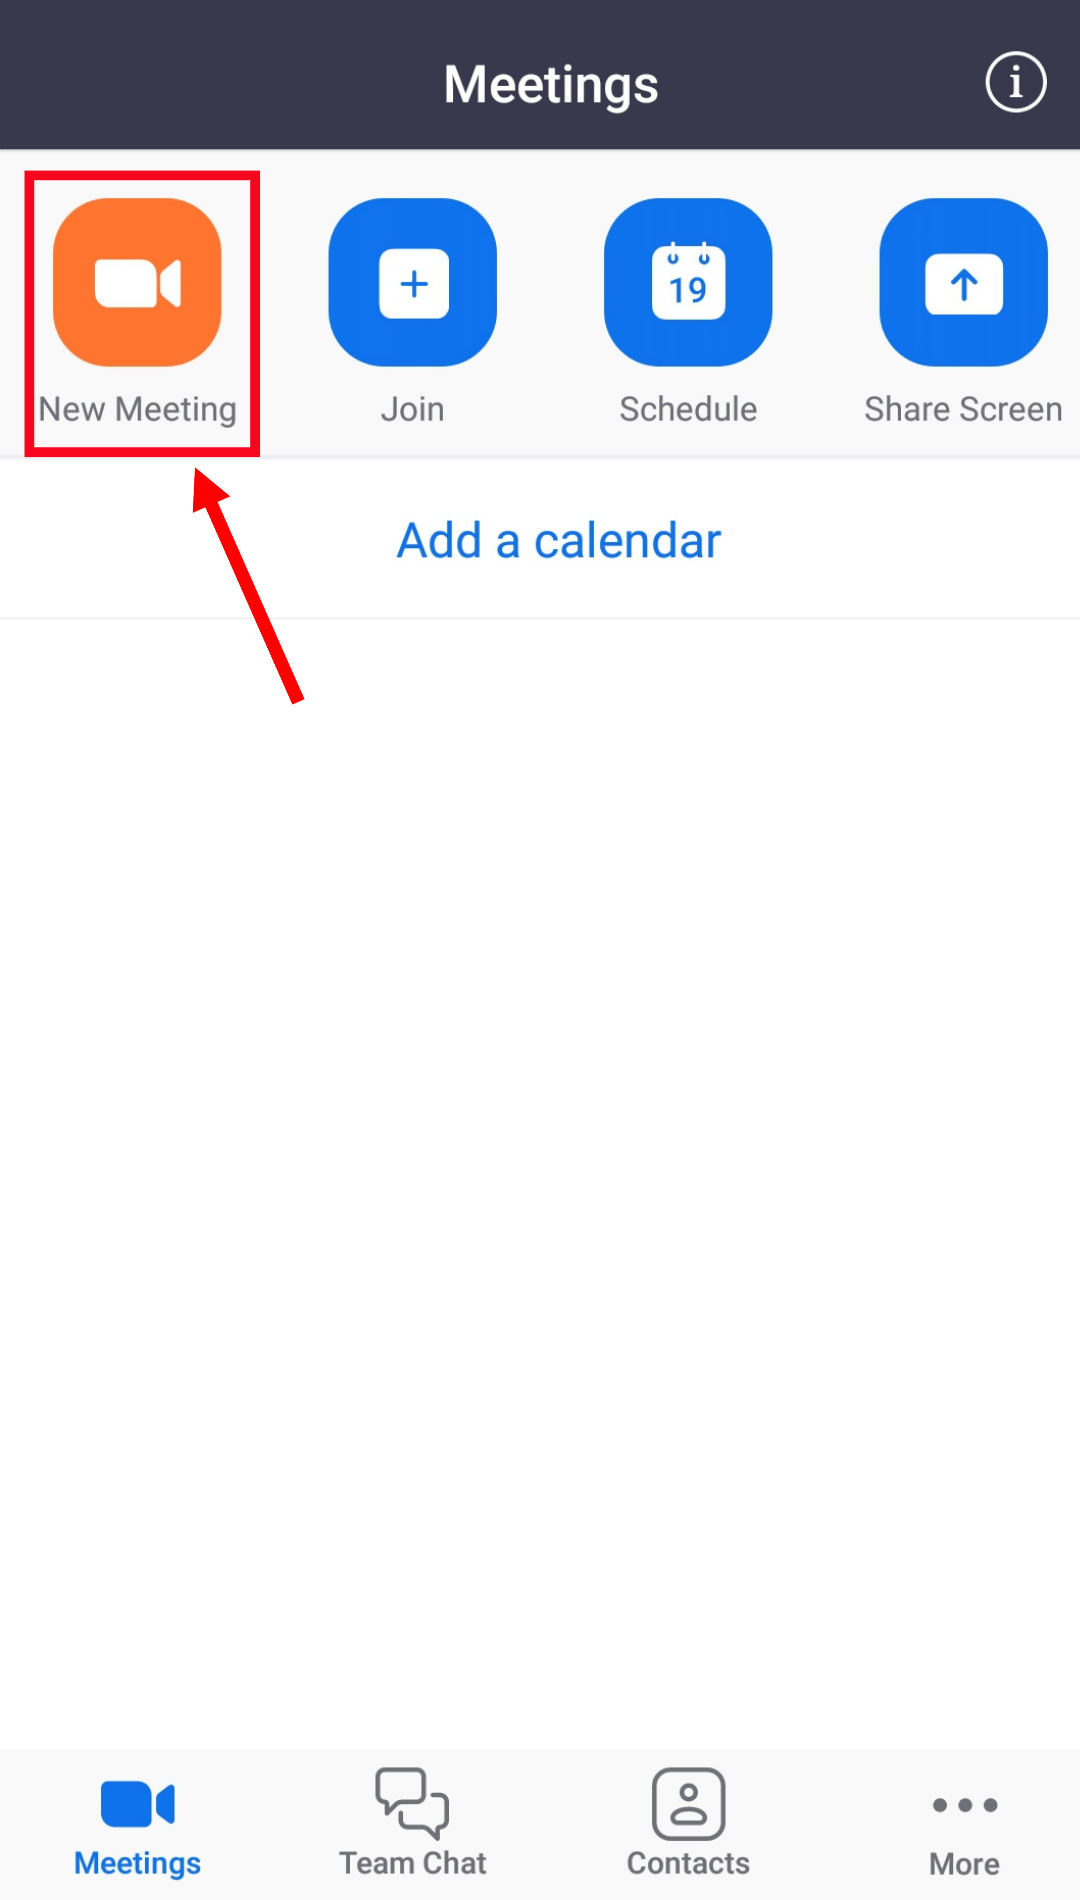
Step 1: Download and install the Zoom Cloud Meetings app. Sign in to your Zoom account and start a 'New Meeting.'
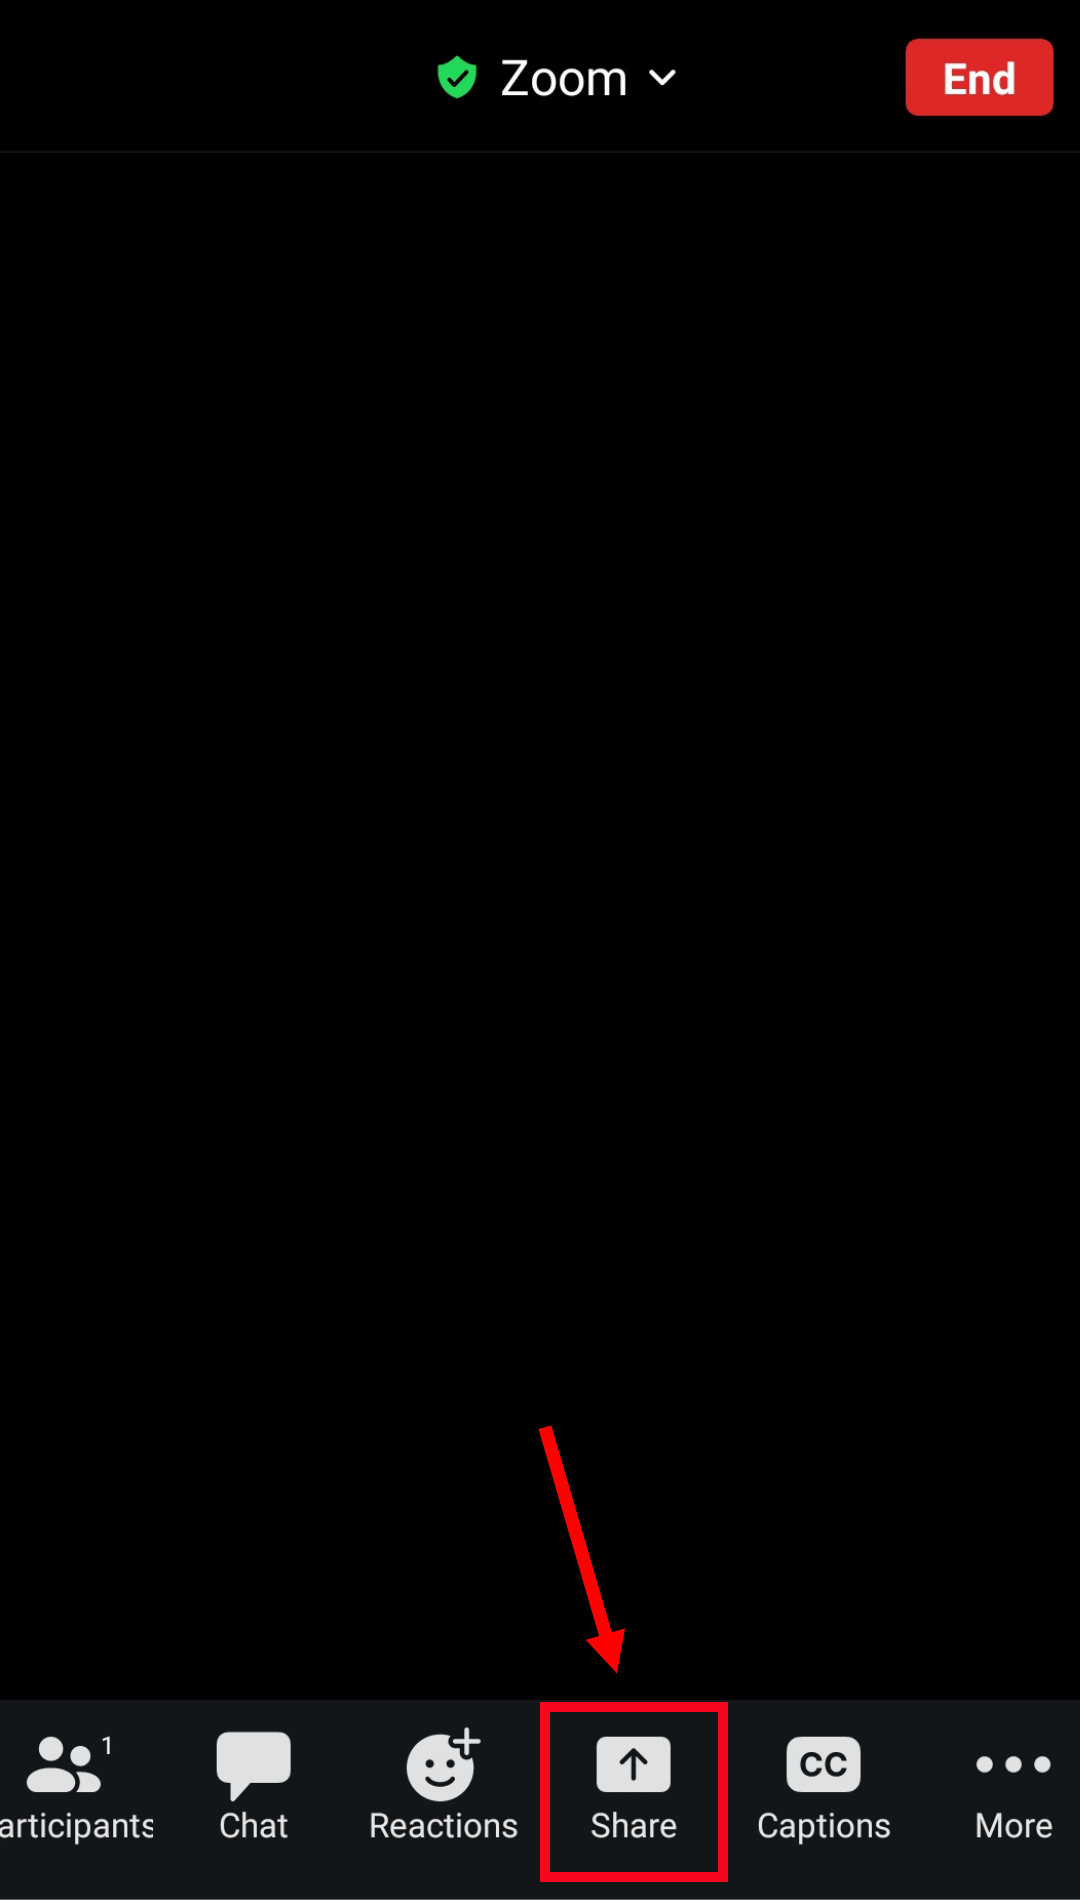
Step 2: Select 'Share' in the meeting controls, and a pop-up will appear, asking what you want to share.
Microsoft OneDrive
Microsoft SharePoint
Google Drive
Box
Photo
Document
Website URL
Bookmark
Screen
Camera
Share Whiteboard
Step 3: Tap the 'Screen' option to share the screen.
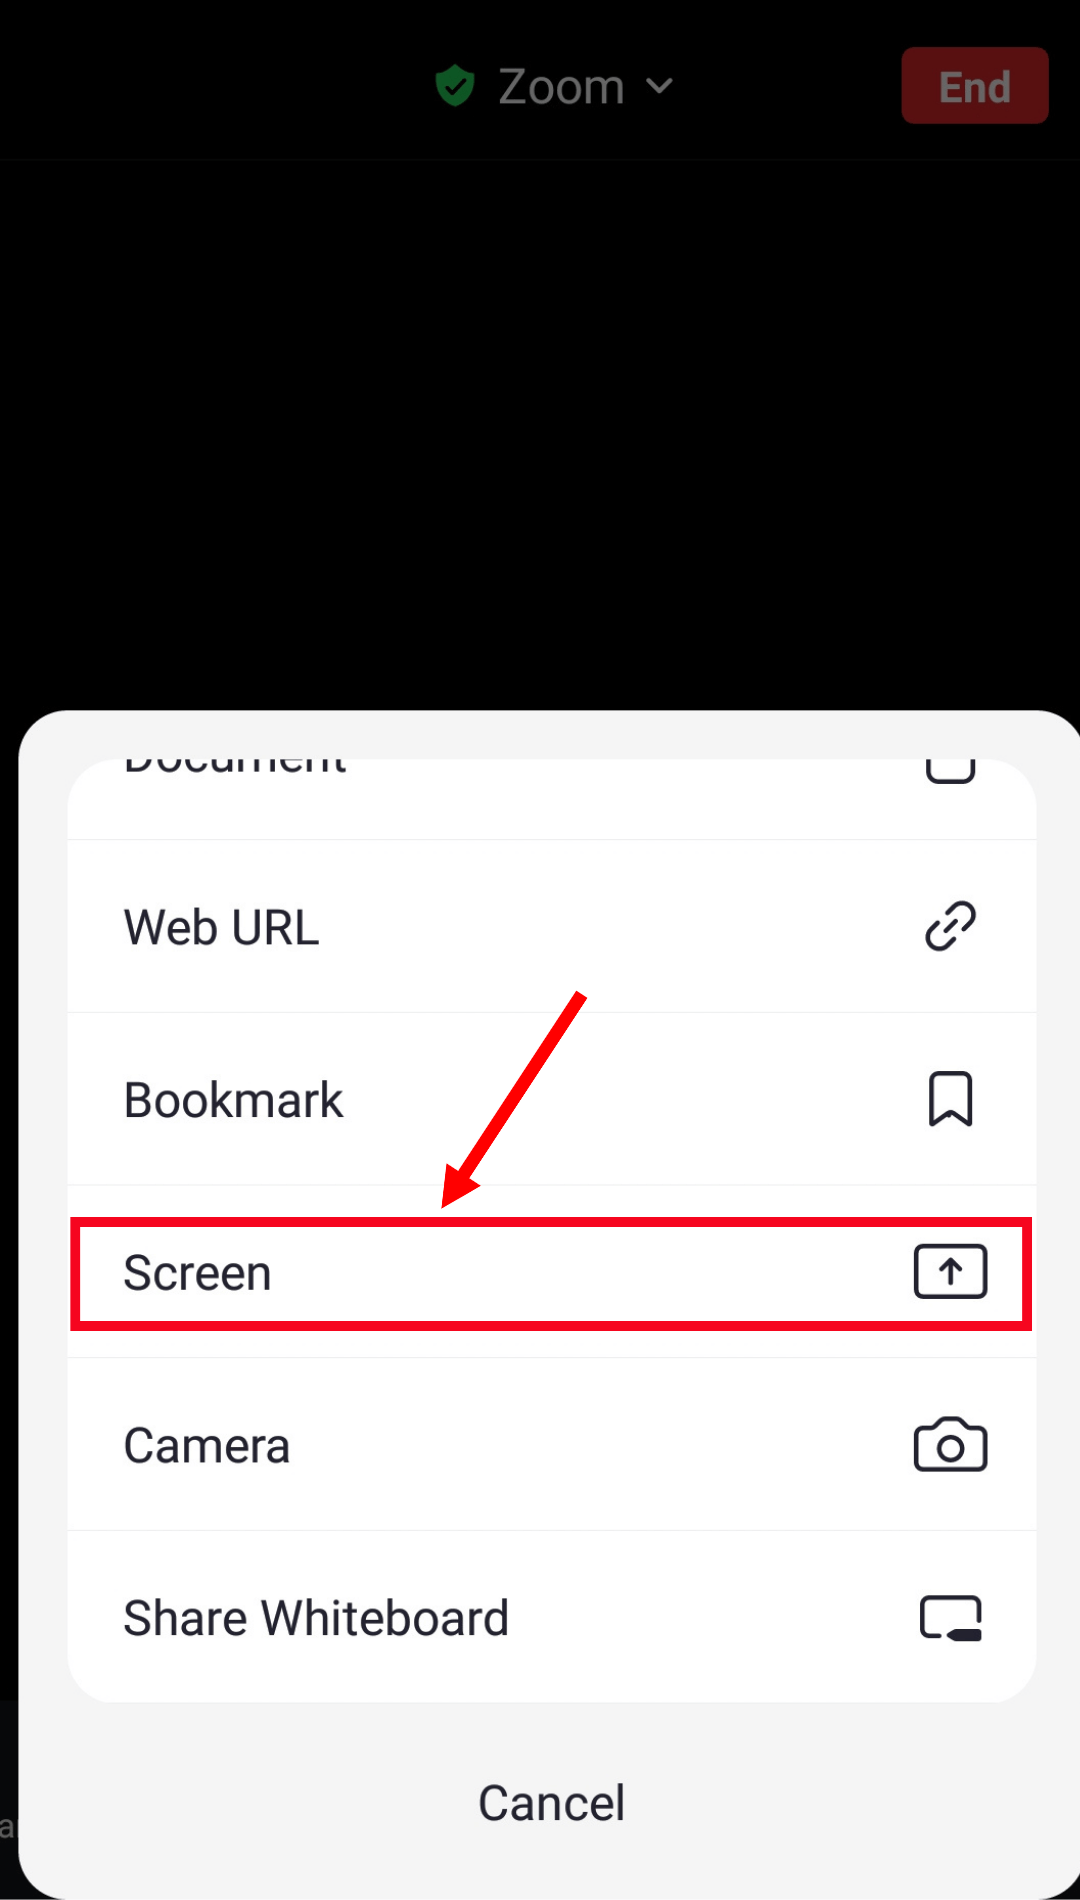
Step 4: A pop-up will appear indicating, 'Zoom will start capturing everything that's displayed on your screen.' Click 'Start now.'

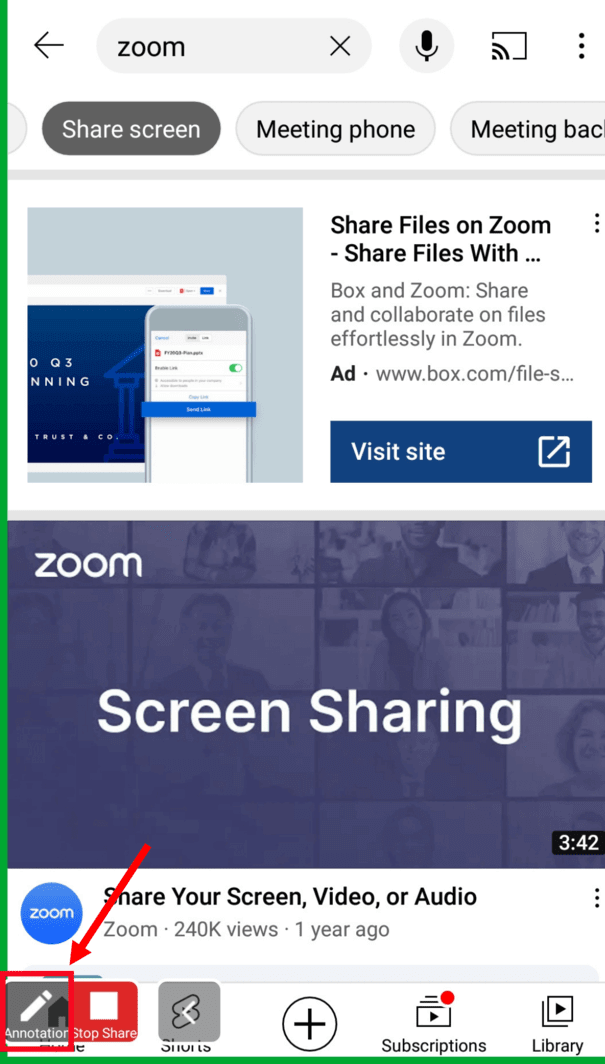
Step 5: Now, the meeting participants can see your entire screen. Click the faint gray arrow at the bottom left of your phone screen and select 'Annotation' to use the Zoom annotation feature.
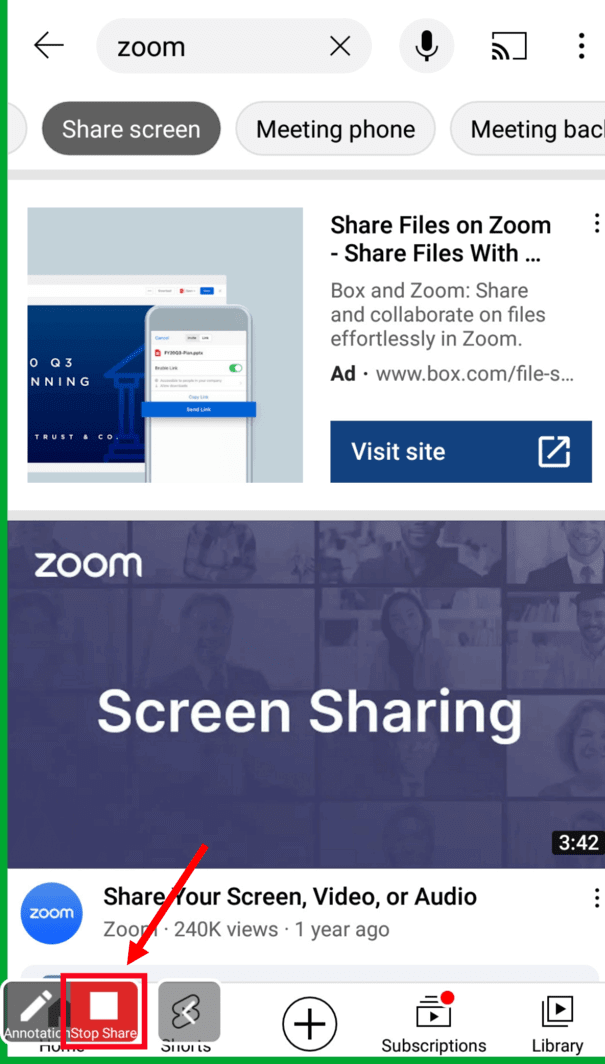
Step 6: Once done, click the faint gray arrow again and select 'Stop Share' to stop using the Zoom share screen feature.
Note: If you are the meeting participant and wish to share the screen, you must ask the host for permission.
How to share screen on Zoom on iOS
Similar to Android devices, sharing your Zoom screen is simple using an iOS device.
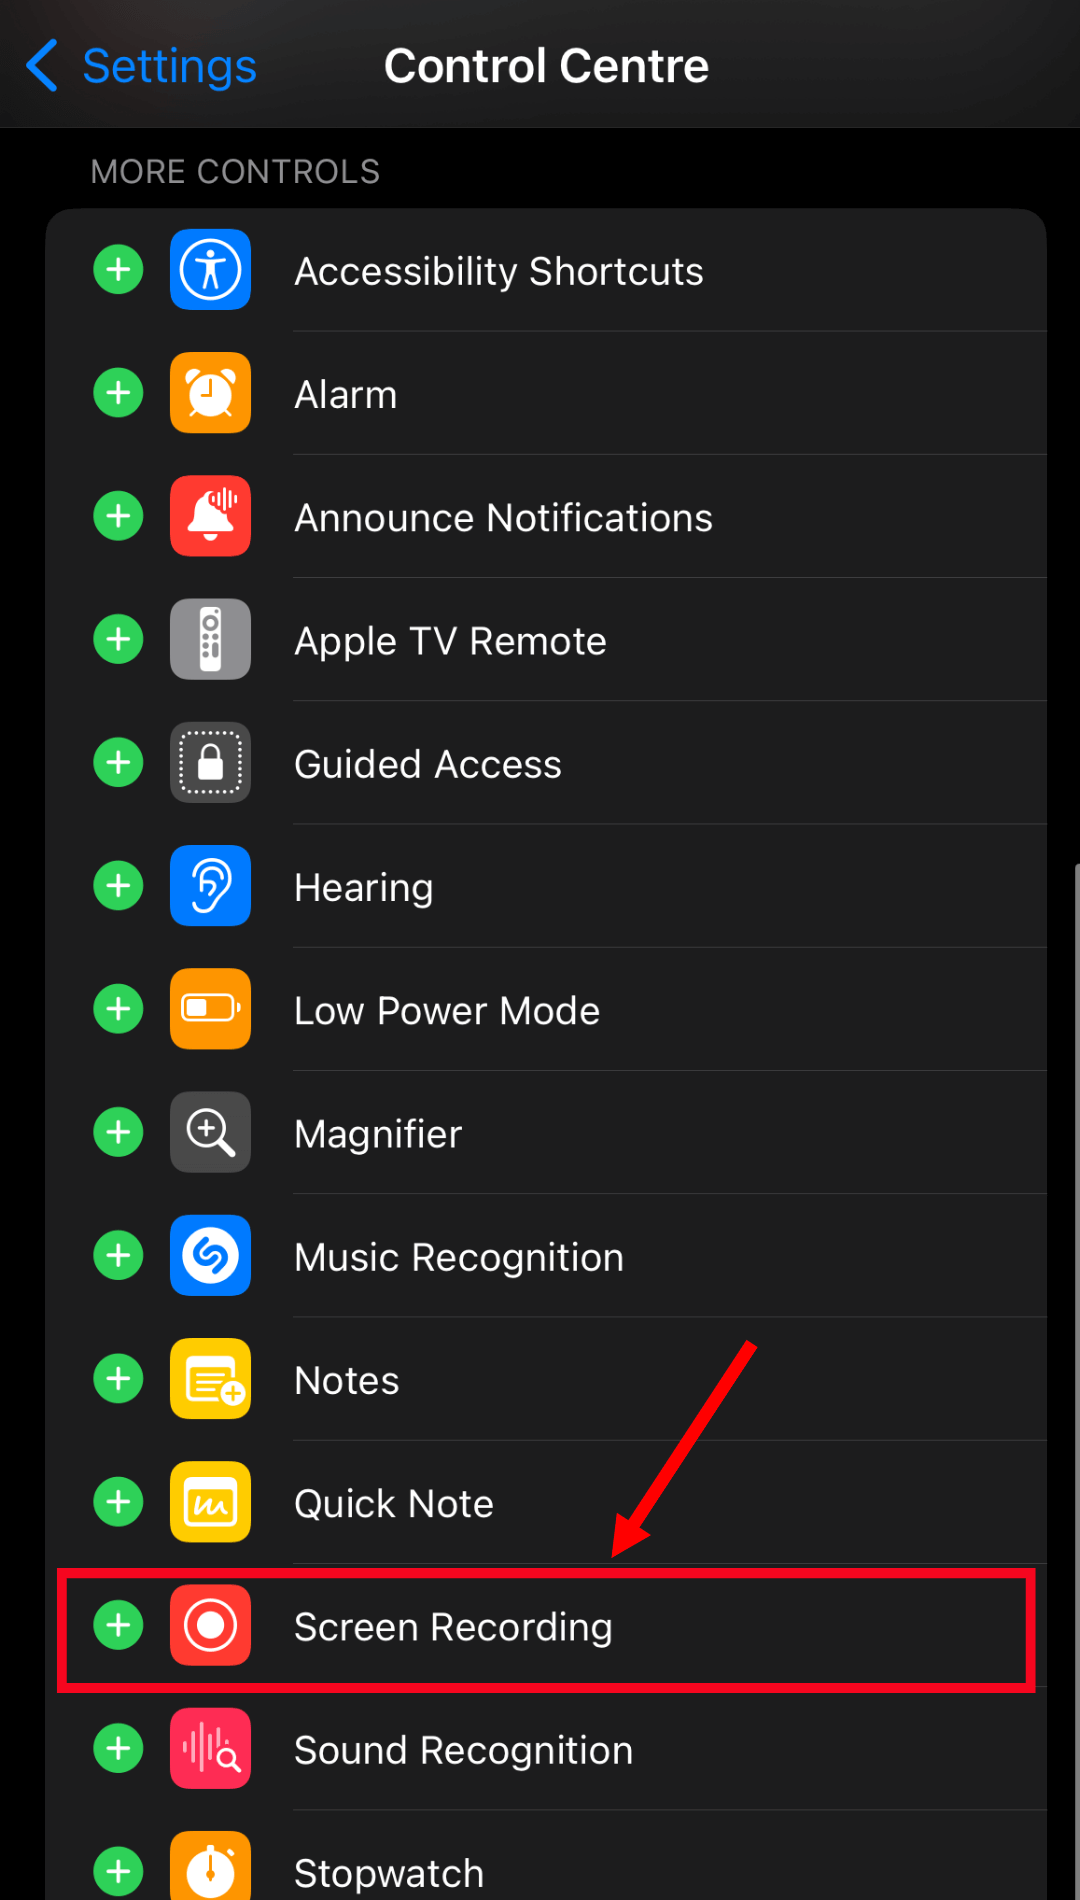
Step 1: First, you must enable the screen recorder feature in your iPhone setting. Go to Settings > Control Centre.
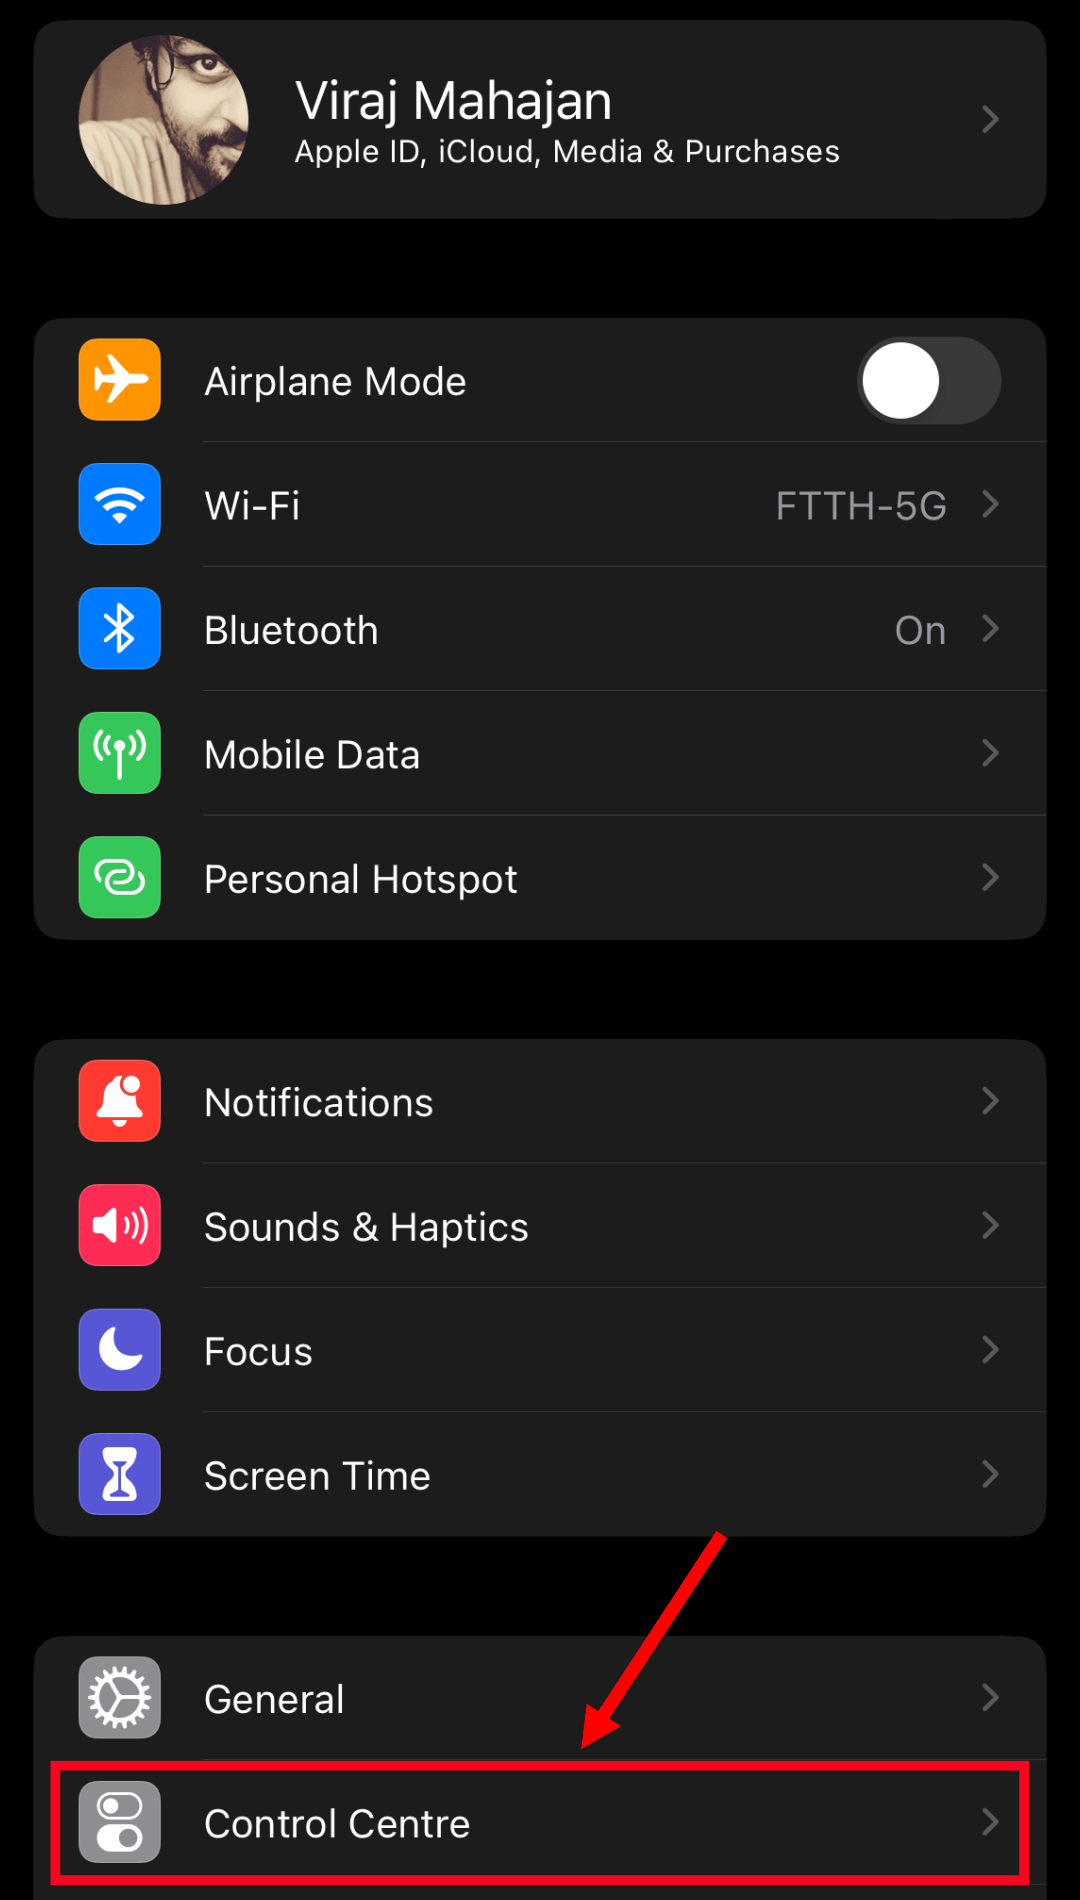
Step 2: Scroll down and locate the 'Screen Recording' option. Select the small green plus sign to its left.
Step 3: Launch the Zoom mobile app on your iOS device. In the meeting controls, tap 'Share.'

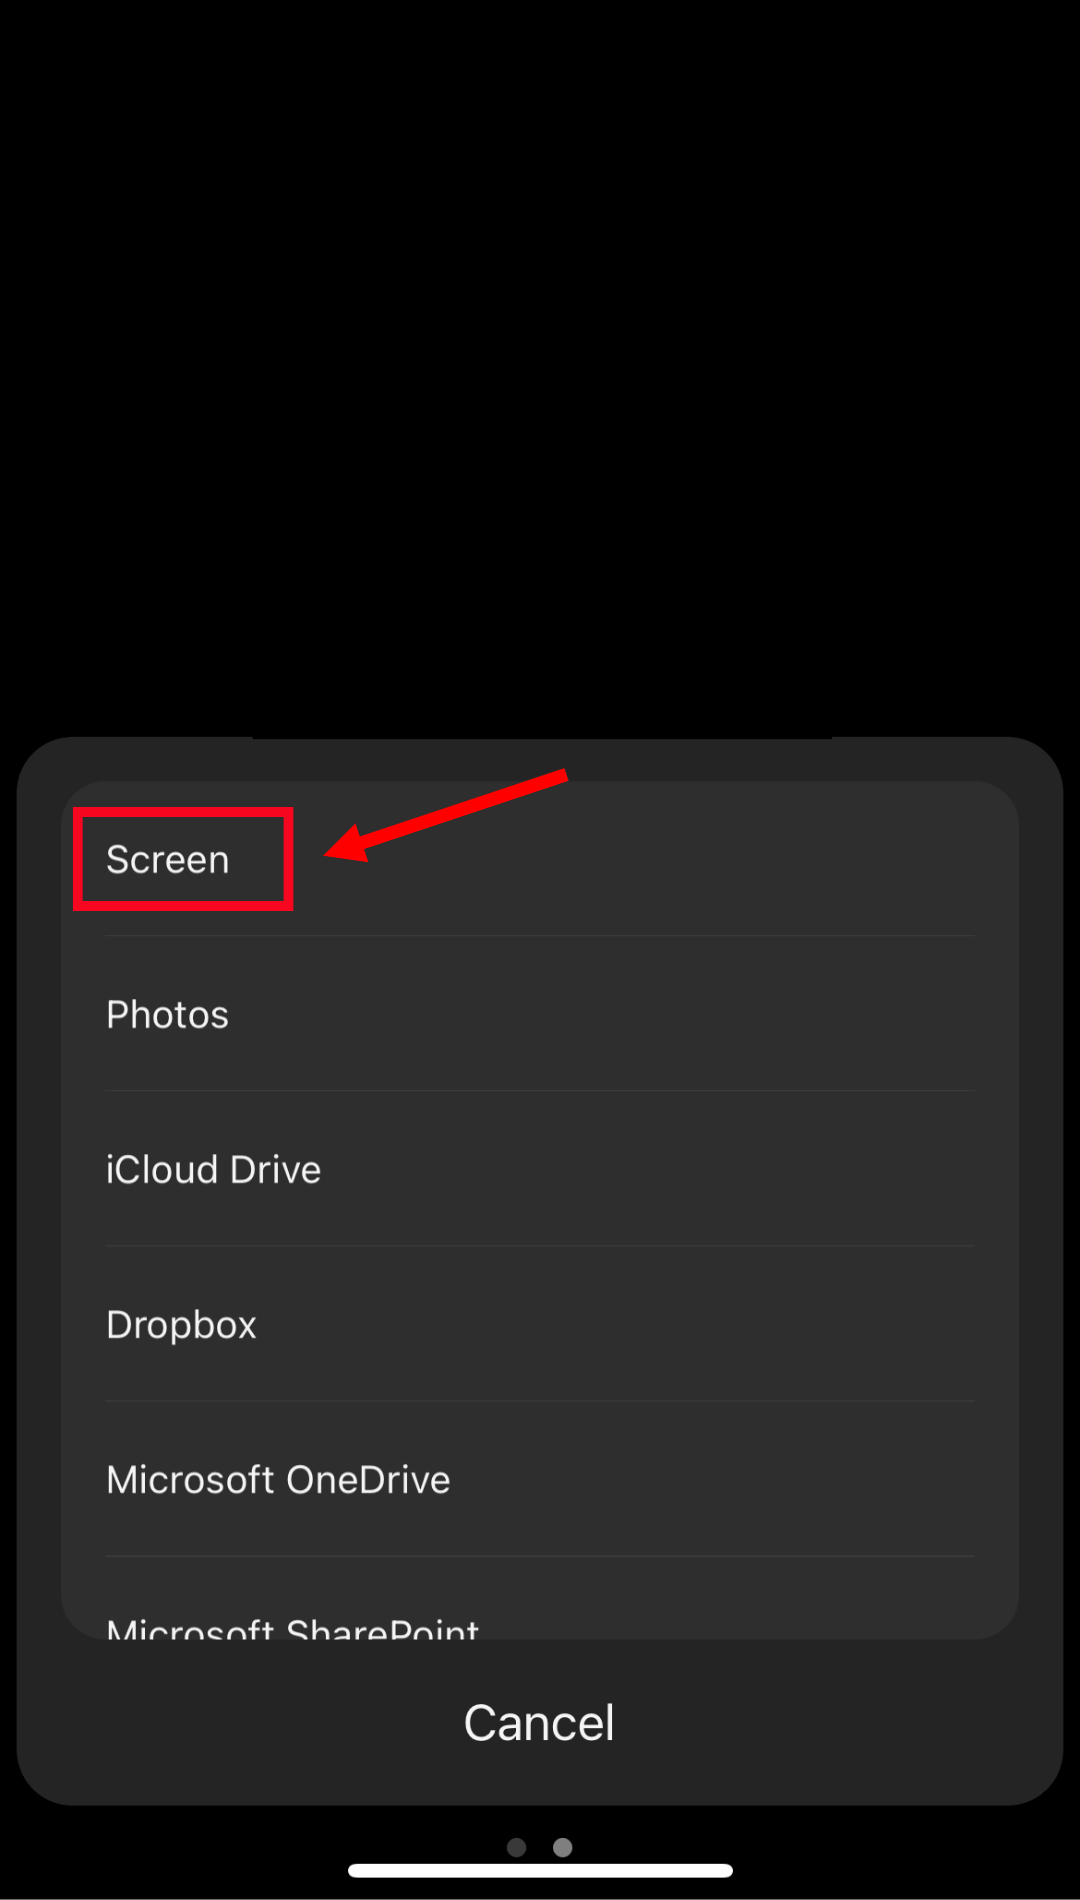
Step 4: In the new Zoom window, select the content you wish to share.
Screen (You'll need an iOS device of 11 or higher to use this feature)
Whiteboard (Only iPad users can use this option)
Photos
Files in third-party services like iCloud Drive, Google Drive, Microsoft OneDrive, and Dropbox. (Only supports PDFs and images)
Website URLs and Bookmarks
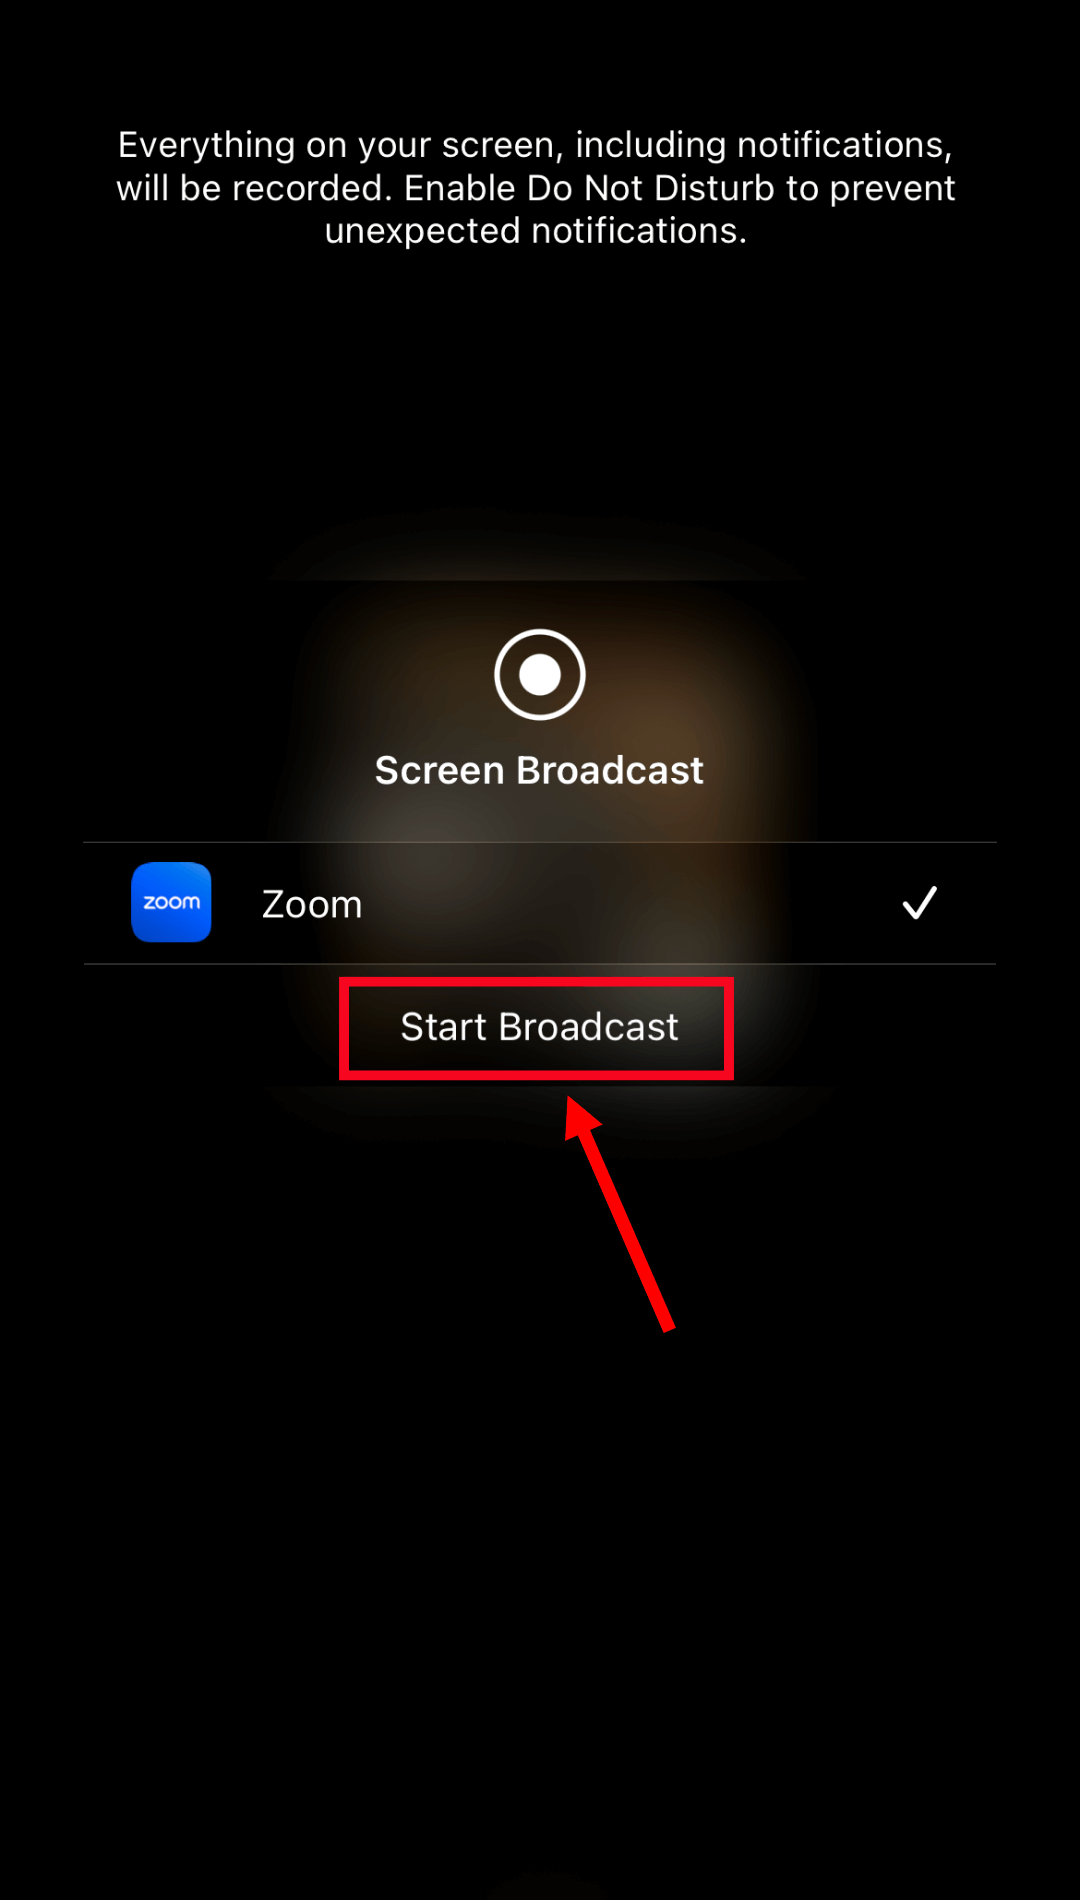
Step 5: Choose 'Start Broadcast' so the meeting participants can see the content. If you want to stop Zoom screen sharing, click 'Stop Broadcast.'
How to share your iOS screen from Zoom desktop client
Zoom lets users share their iOS screen in a virtual meeting executed from the Zoom desktop client. You can share your screen via a cable or utilize the iOS screen mirroring feature.
Share iOS Screen via Screen Mirroring
In order to share your iOS screen via the screen mirroring feature, you'll need to have macOS/Windows 3.5.3 or later and iPhone 4 or later. In addition, you'll need network and computer firewalls allowing Airplay access.
Once you meet the prerequisites, follow the below steps.
Step 1: Open the Zoom desktop client on your Windows PC or macOS. Enter the meeting and select 'Share Screen.'
Step 2: Choose 'iPhone/iPad via AirPlay.' If you want to share your phone audio, select the checkbox next to 'Share Sound.' Click 'Share.'
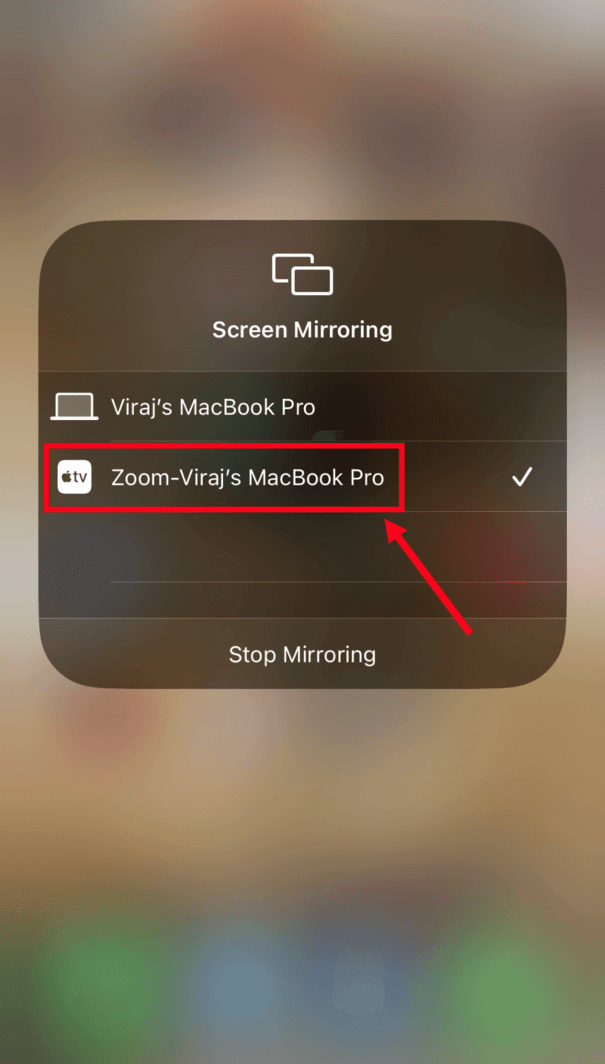
Step 3: Follow the on-screen instructions and connect to the iOS device. Access the control center by swiping down from the top-right screen corner or from the bottom. Tap the 'Screen Mirroring' icon and select the 'Zoom-your computer' option.
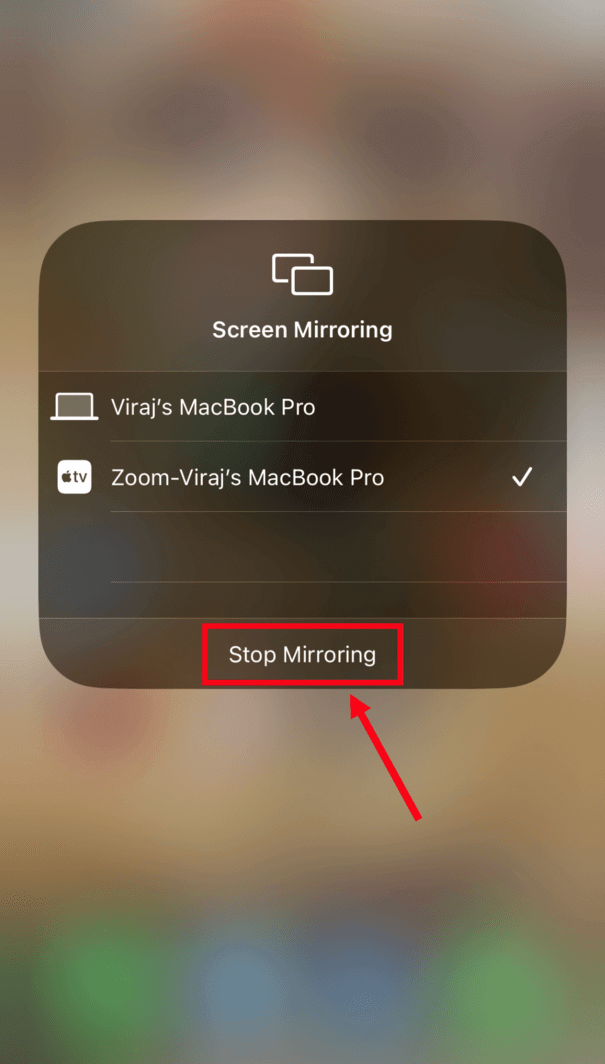
Step 4: Once you're done, tap 'Stop Mirroring' on your iPhone/iPad. Then, select 'Stop Share' on your desktop to stop screen sharing.
Share iOS Screen via a Wired Connection
Sharing the iOS screen via a lightning cable requires macOS 10.10 or later and iOS 8 or later. Additionally, your installed Zoom desktop client for macOS should be 4.0 or later.
Unlike the screen mirroring feature, only macOS devices can be connected to iOS with a wired connection.
Step 1: Join or host a Zoom meeting and click 'Share Screen.'
Step 2: Select 'iPhone/iPad via Cable.' Check 'Share sound' to share your phone audio in the meeting. Select 'Share.'
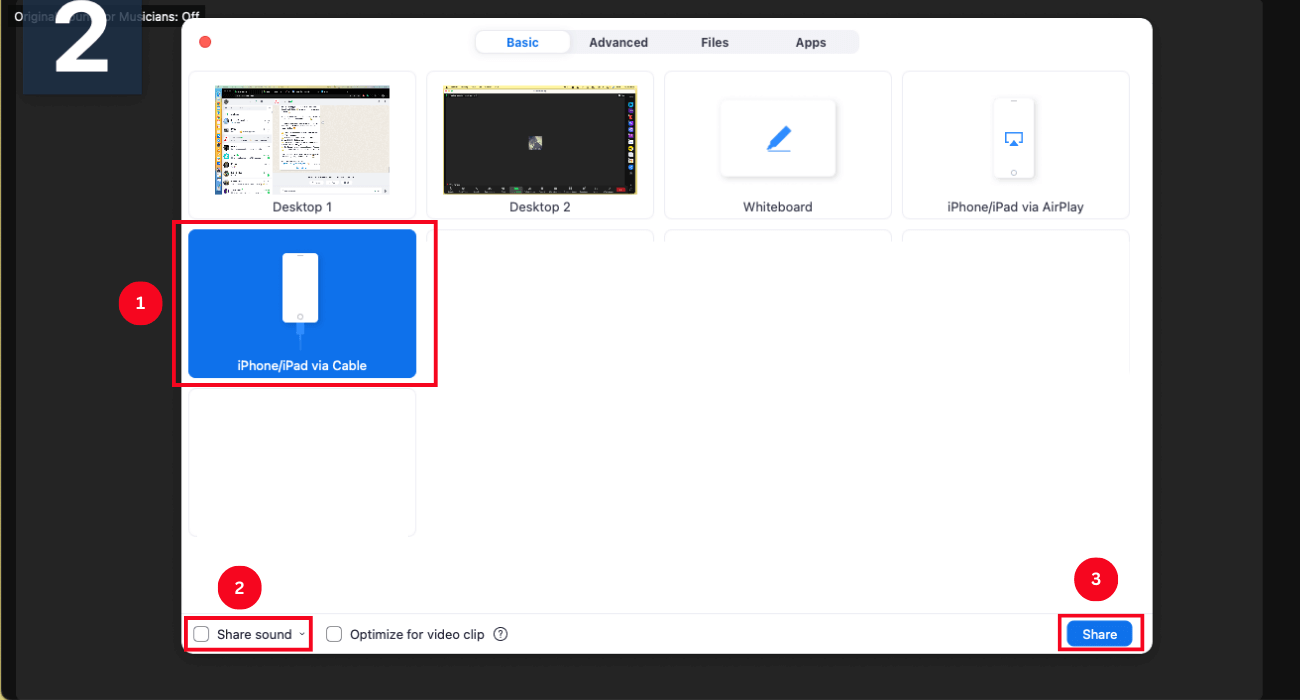
Step 3: Next, follow the simple on-screen instructions to connect your iPhone or iPad via cable. When prompted, select 'Trust' and enter your passcode.
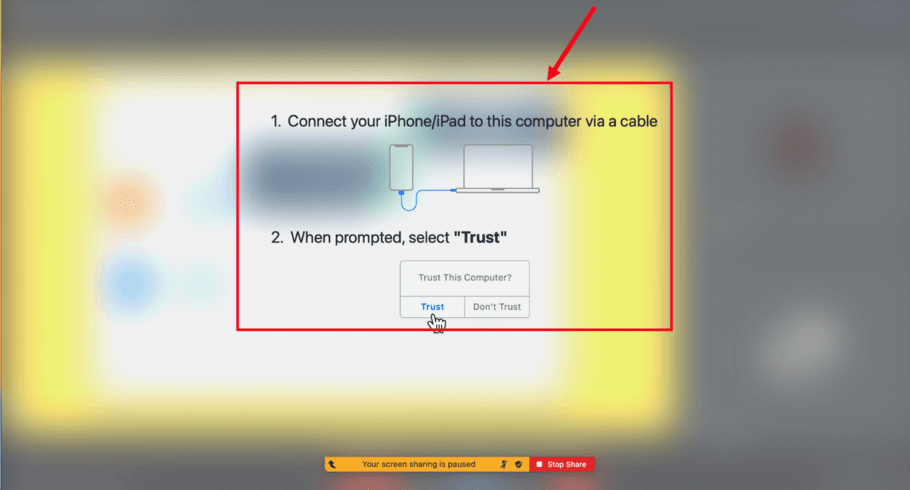
That's it! Your iOS screen will be visible to the meeting attendees.
Why can't I share my screen on Zoom – troubleshooting
Despite meeting all the prerequisites, many Zoom users find it challenging to share their screens when the Zoom share screen is not working. This section sheds light on the common issues that Zoom users face and how to resolve them quickly.
Not updated Zoom app
Using the older version of the Zoom app can restrict you from using the Zoom share screen feature during virtual meetings. The best way to resolve it is by keeping your Zoom app and the system updated with the latest version.
Disabled screen sharing feature
Sometimes the screen-sharing feature is grayed out in the Zoom web portal. This generally means the feature has been locked at the group or account level. You need to contact your Zoom account admin to grant permission.
If you are a participant in the Zoom meeting and cannot locate the feature in the meeting controls, you'll need to contact the meeting host. They must enable the setting by selecting 'Security' in the toolbar and granting permission.
Internal settings issue
The most common issue that restricts users from sharing their screens is internal settings. The simple method to resolve the internal setting issue is by modifying Zoom screen-sharing settings.
Go to the Zoom desktop client, click your Zoom profile picture, and select 'Settings.' Choose 'Screen Share' to adjust the basic and advanced screen-sharing settings.
Black screen display
An issue with your graphics driver can cause a black display while screen sharing on Zoom. The only way to troubleshoot this issue is by updating the drivers. But make sure you have a stable Internet connection while updating OS or any other software.
FAQs
How to share the screen on Zoom if you are not the host?
By default, Zoom allows the host to share a screen during the virtual meeting. If you want to grant access to the meeting participants, follow the below-mentioned steps.
Step 1: On your Windows PC or macOS, start or join a Zoom meeting using the Zoom desktop client.
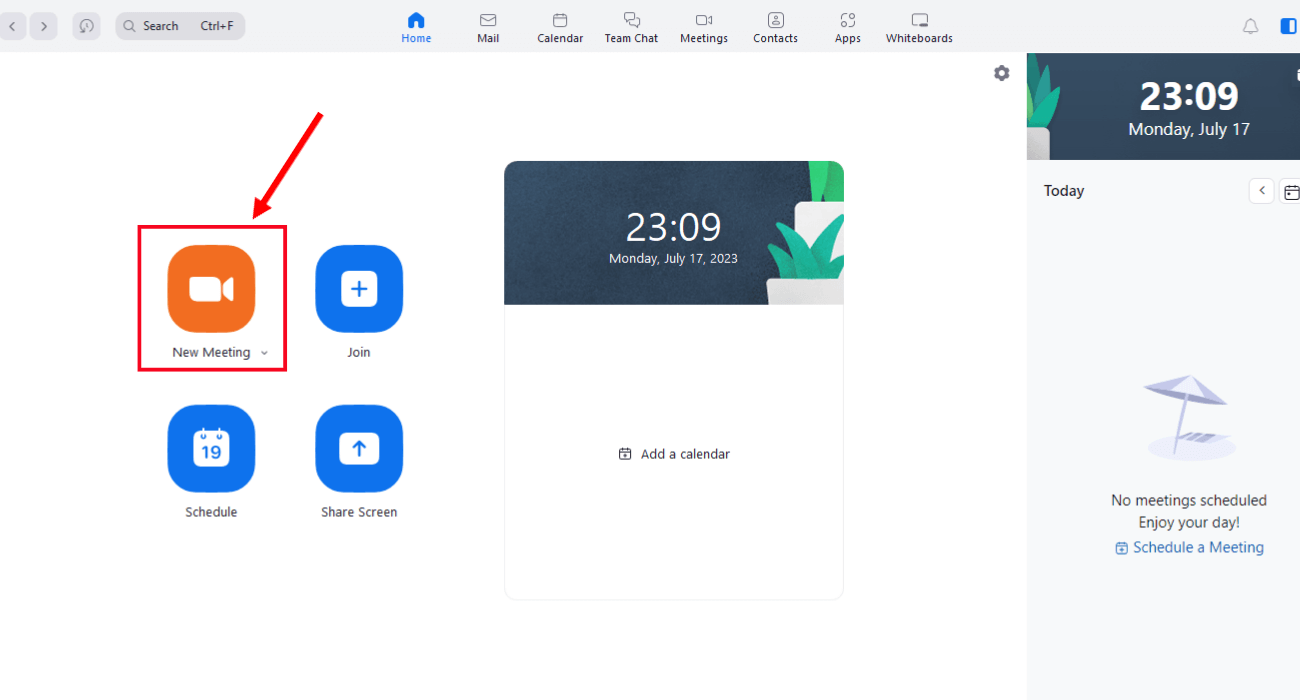
Step 2: Locate the 'Share Screen' option in the meeting controls toolbar. Click the upward arrow next to this option. Select 'Advanced Sharing Options.'
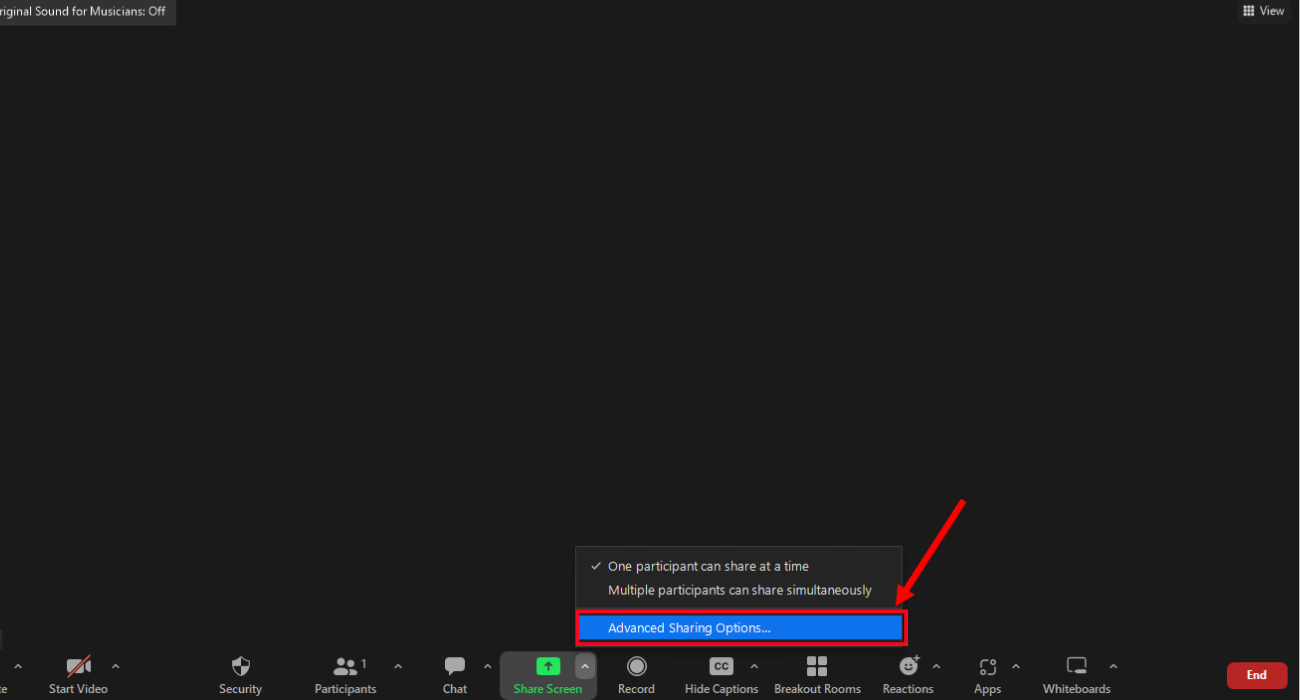
Step 3: Under the 'Who can share' section, enable 'All Participants.'
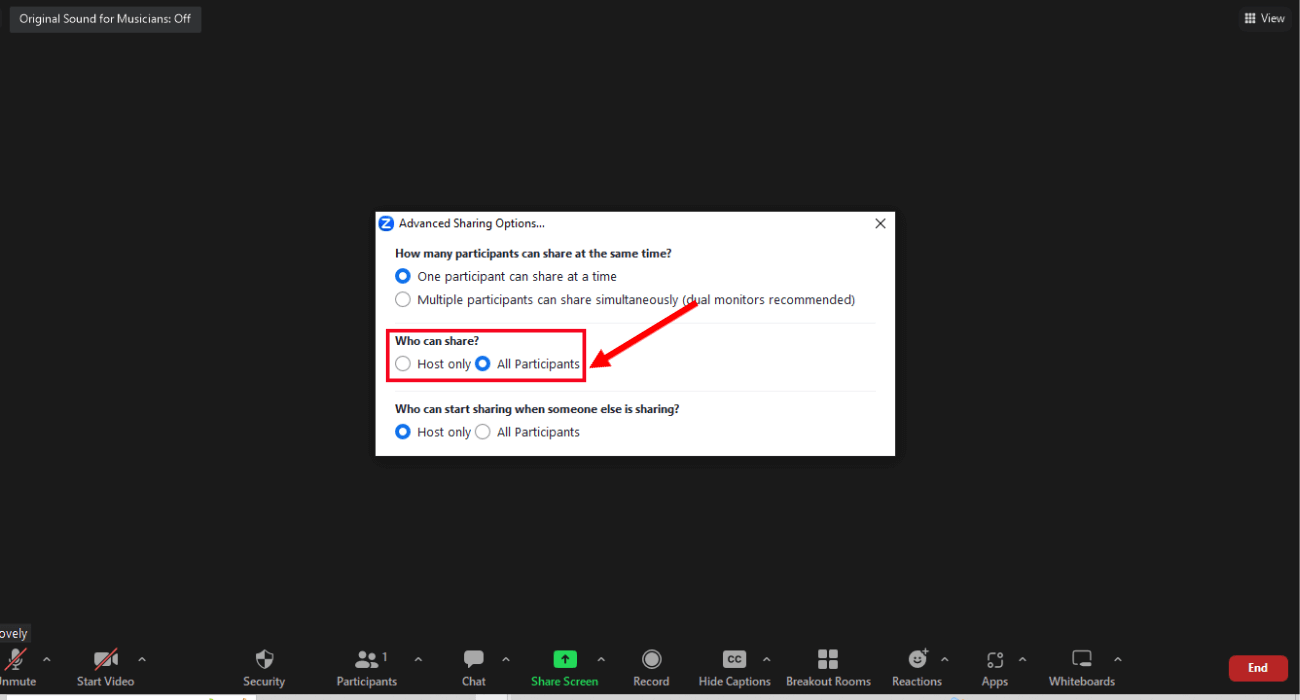
To grant screen-sharing access to the participants using Android or iOS, follow the below steps.
Step 1: Launch the Zoom mobile app on your Android or iOS device. Start a new Zoom meeting or join an ongoing virtual session.
Step 2: In the meeting controls, locate 'More (...).'
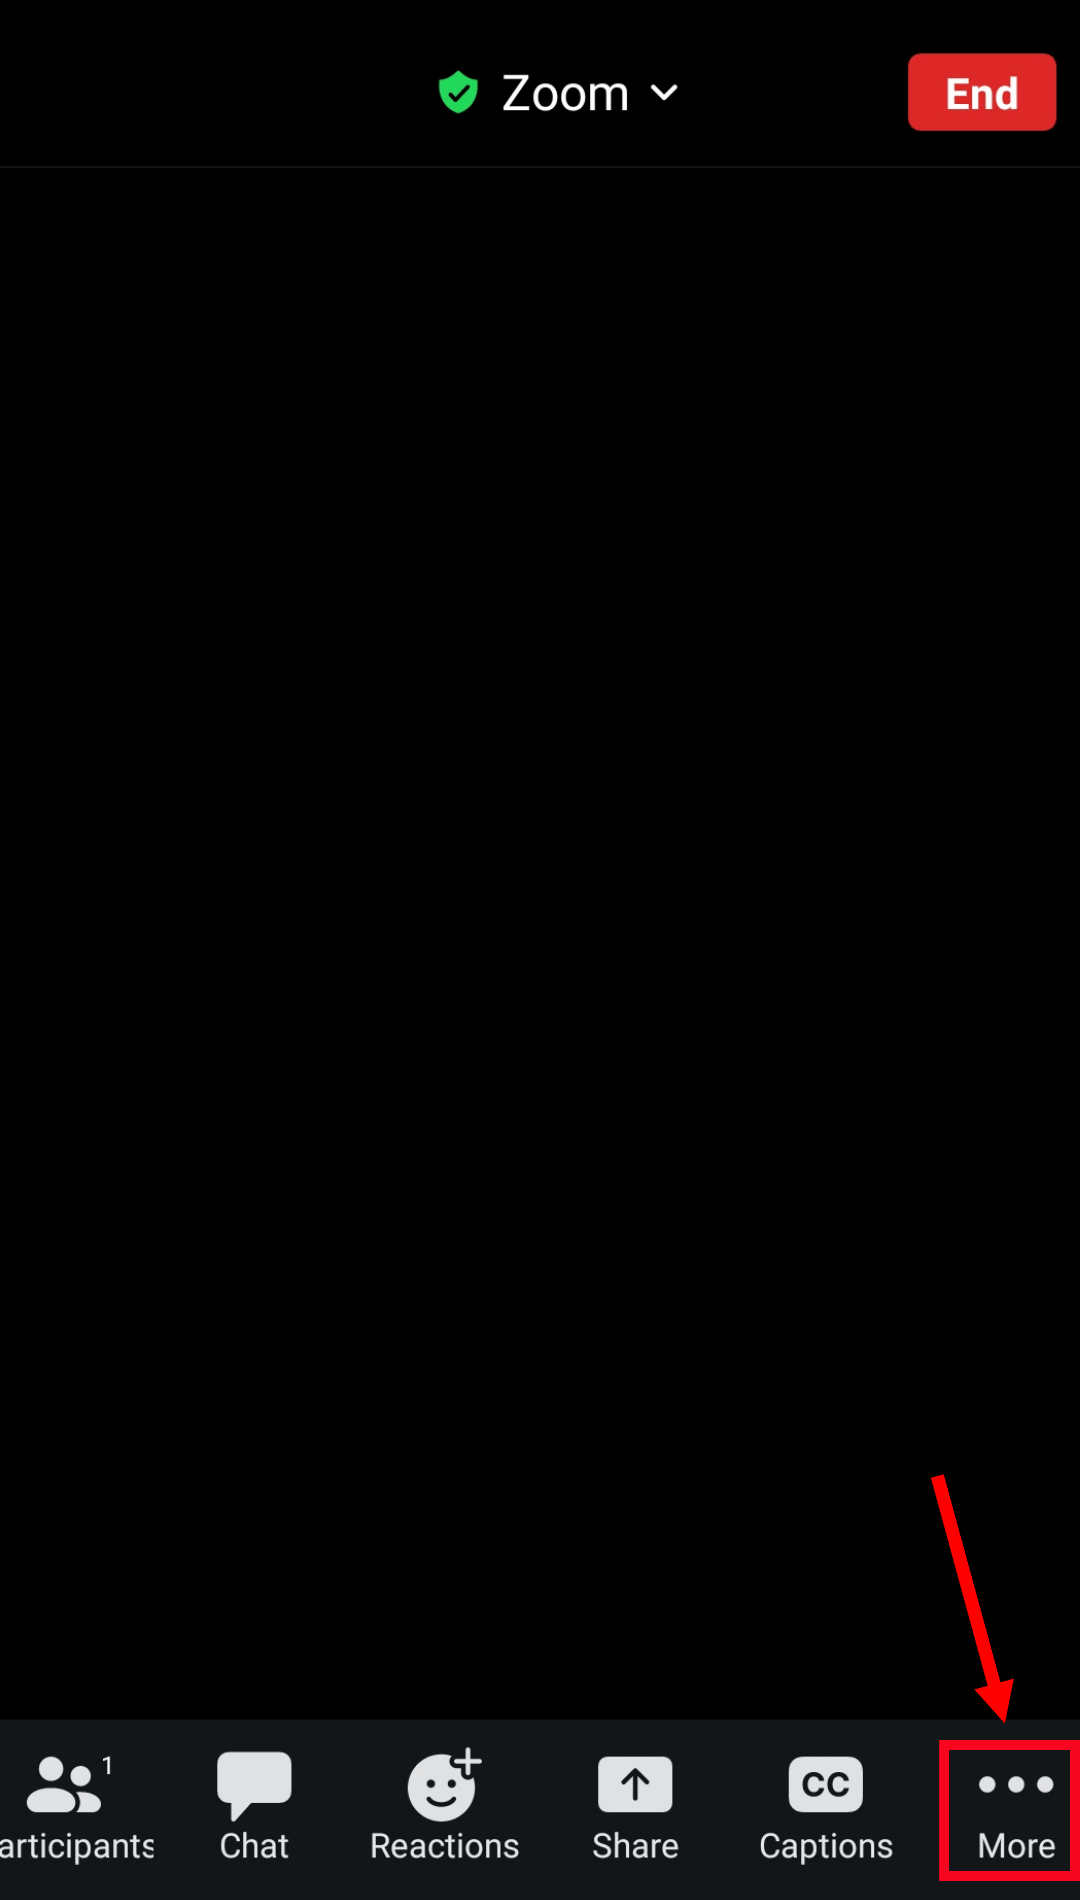
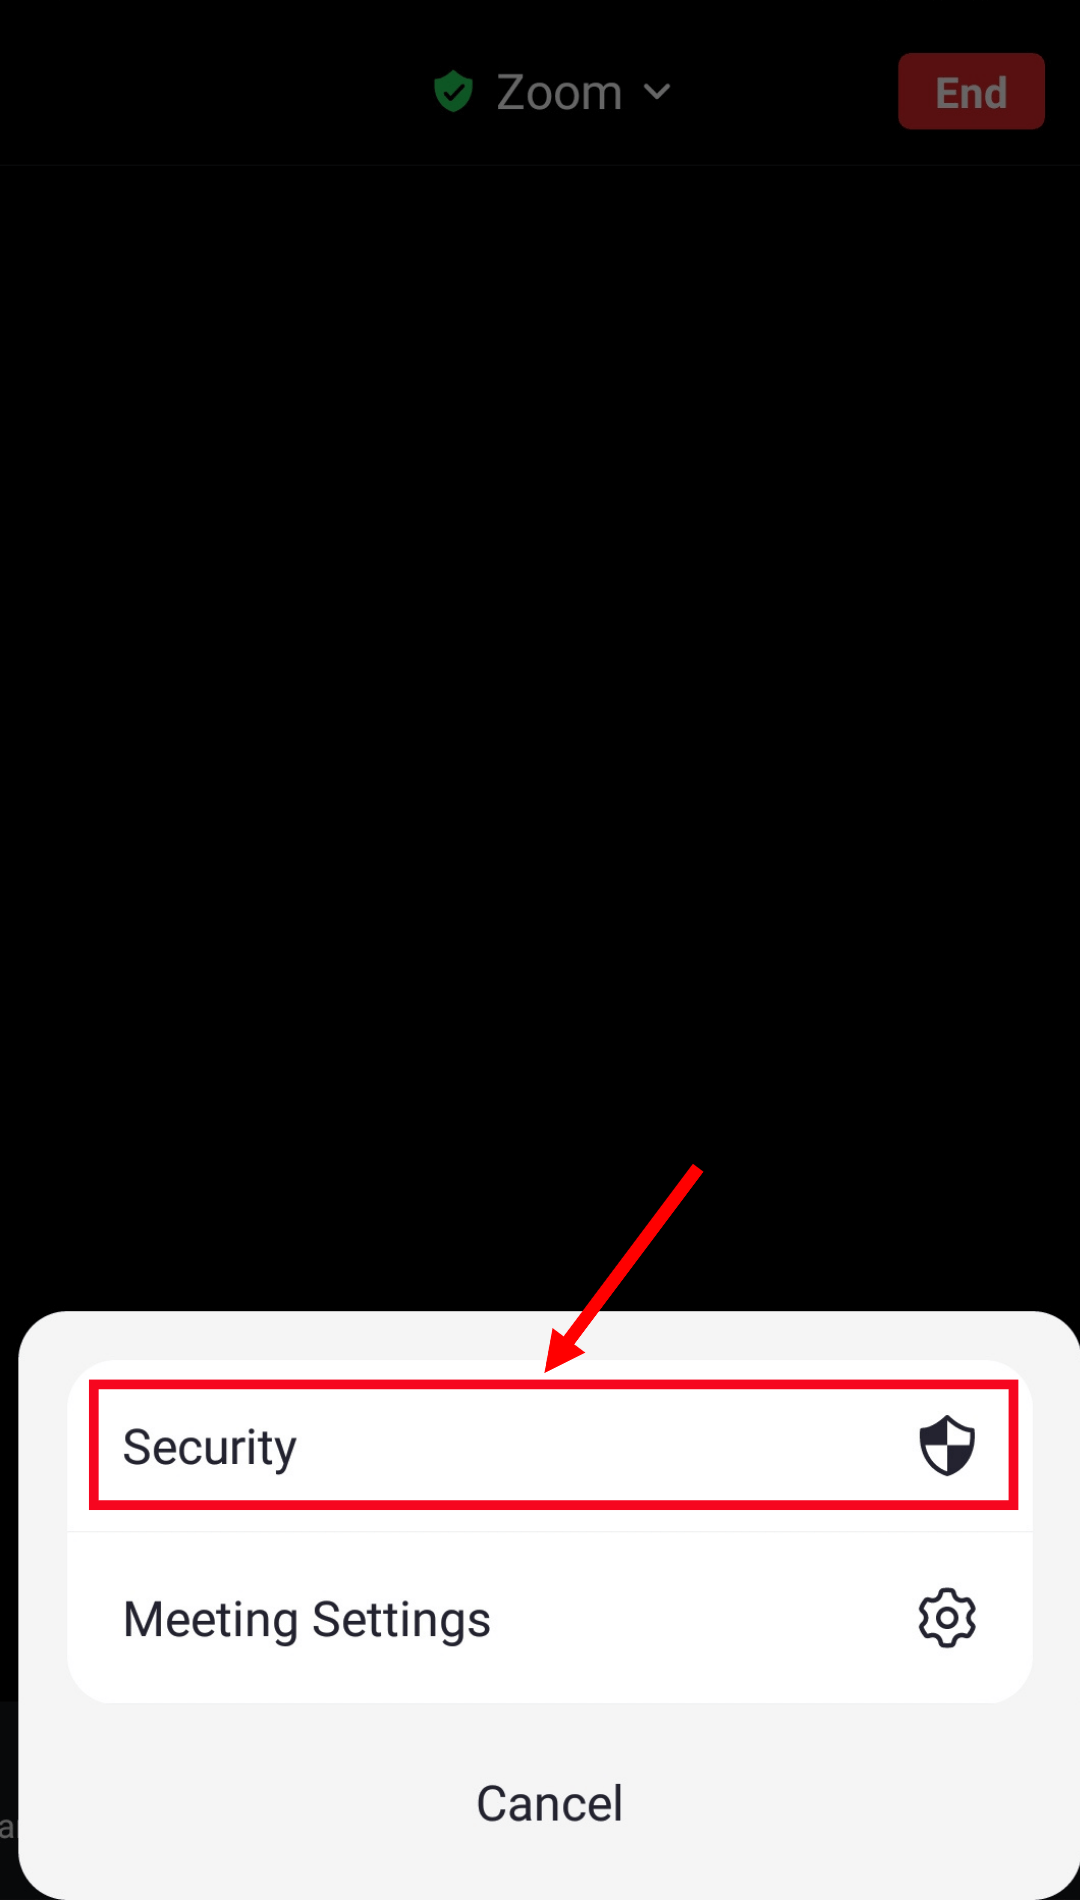
Step 3: Click 'Security,' and you'll be redirected to the settings page.
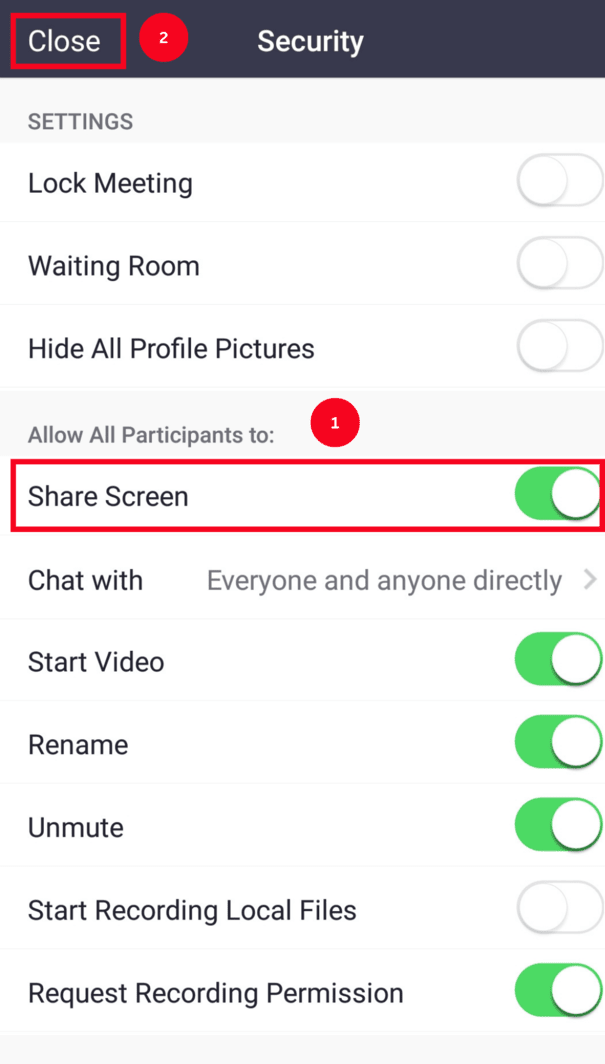
Step 4: Under the 'Allow all participants to' section, enable the 'Share Screen' option. Click 'Close' to return to your Zoom meeting.
How do I enable screen sharing on Zoom Mac system preferences?
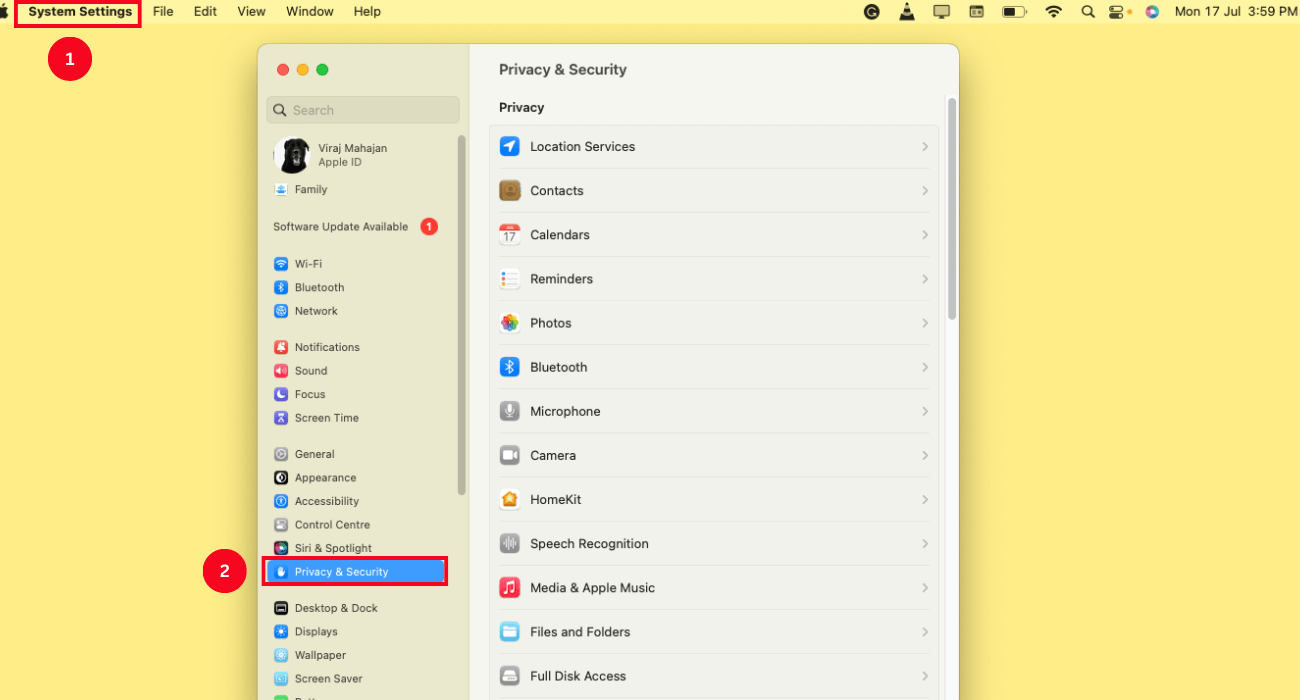
If you are sharing a screen in a Zoom virtual meeting for the first time, you'll need to enable the feature in your Mac system preferences. Below we'll reveal the steps to enable the screen recording feature.
Step 1: Head to the Apple logo and select 'System Settings…' Then, click the 'Privacy & Security' option.
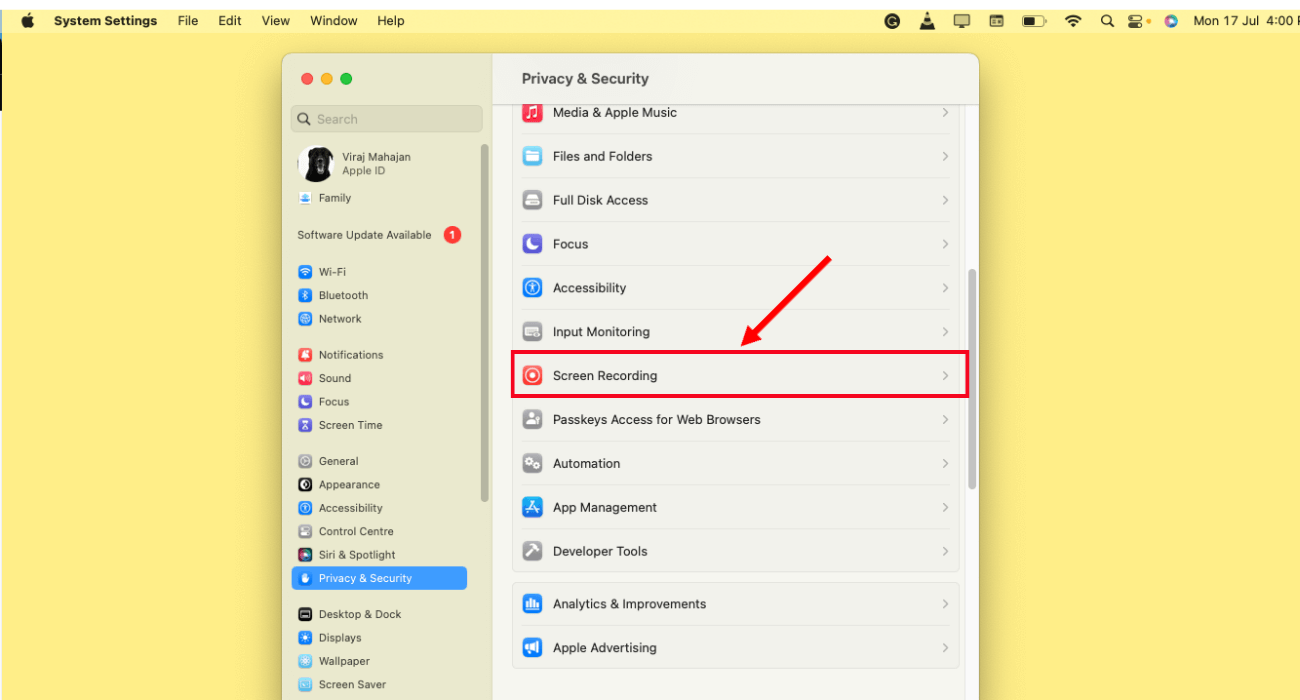
Step 2: Scroll down to locate the 'Screen Recording.' Click to open it.
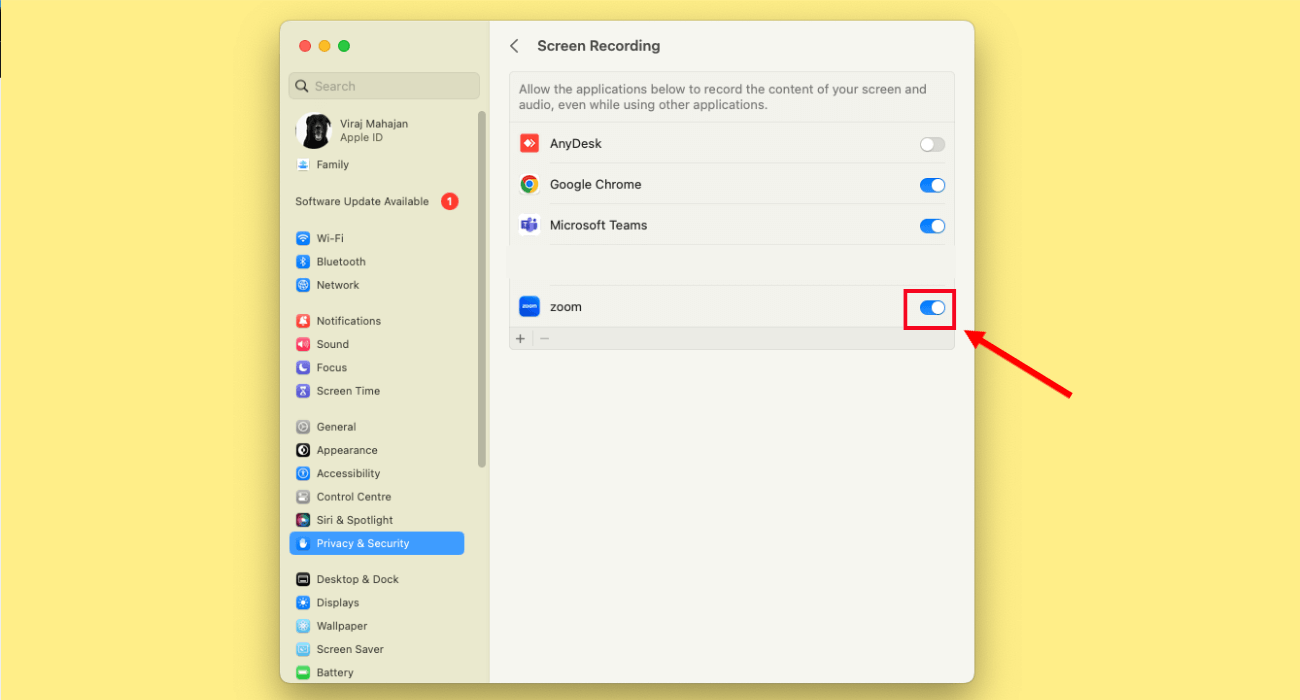
Step 3: Check the option for Zoom, and you'll be allowed to share your screen in Zoom meetings.
How many screens can I share on Zoom at the same time?
The Zoom meeting host can share multiple screens in Zoom webinars. As a host, you can allow multiple attendees to share their screens at the same time. This is a valuable feature that lets you compare documents or other materials provided by the meeting attendees.
However, you'll need to enable the dual monitors option in Zoom app settings to use the feature. Enter the meeting and click the upward arrow next to 'Share Screen.' Enable 'Multiple participants can share simultaneously' to allow multiple screen sharing.
Notta: Your smart AI assistant for productive meetings
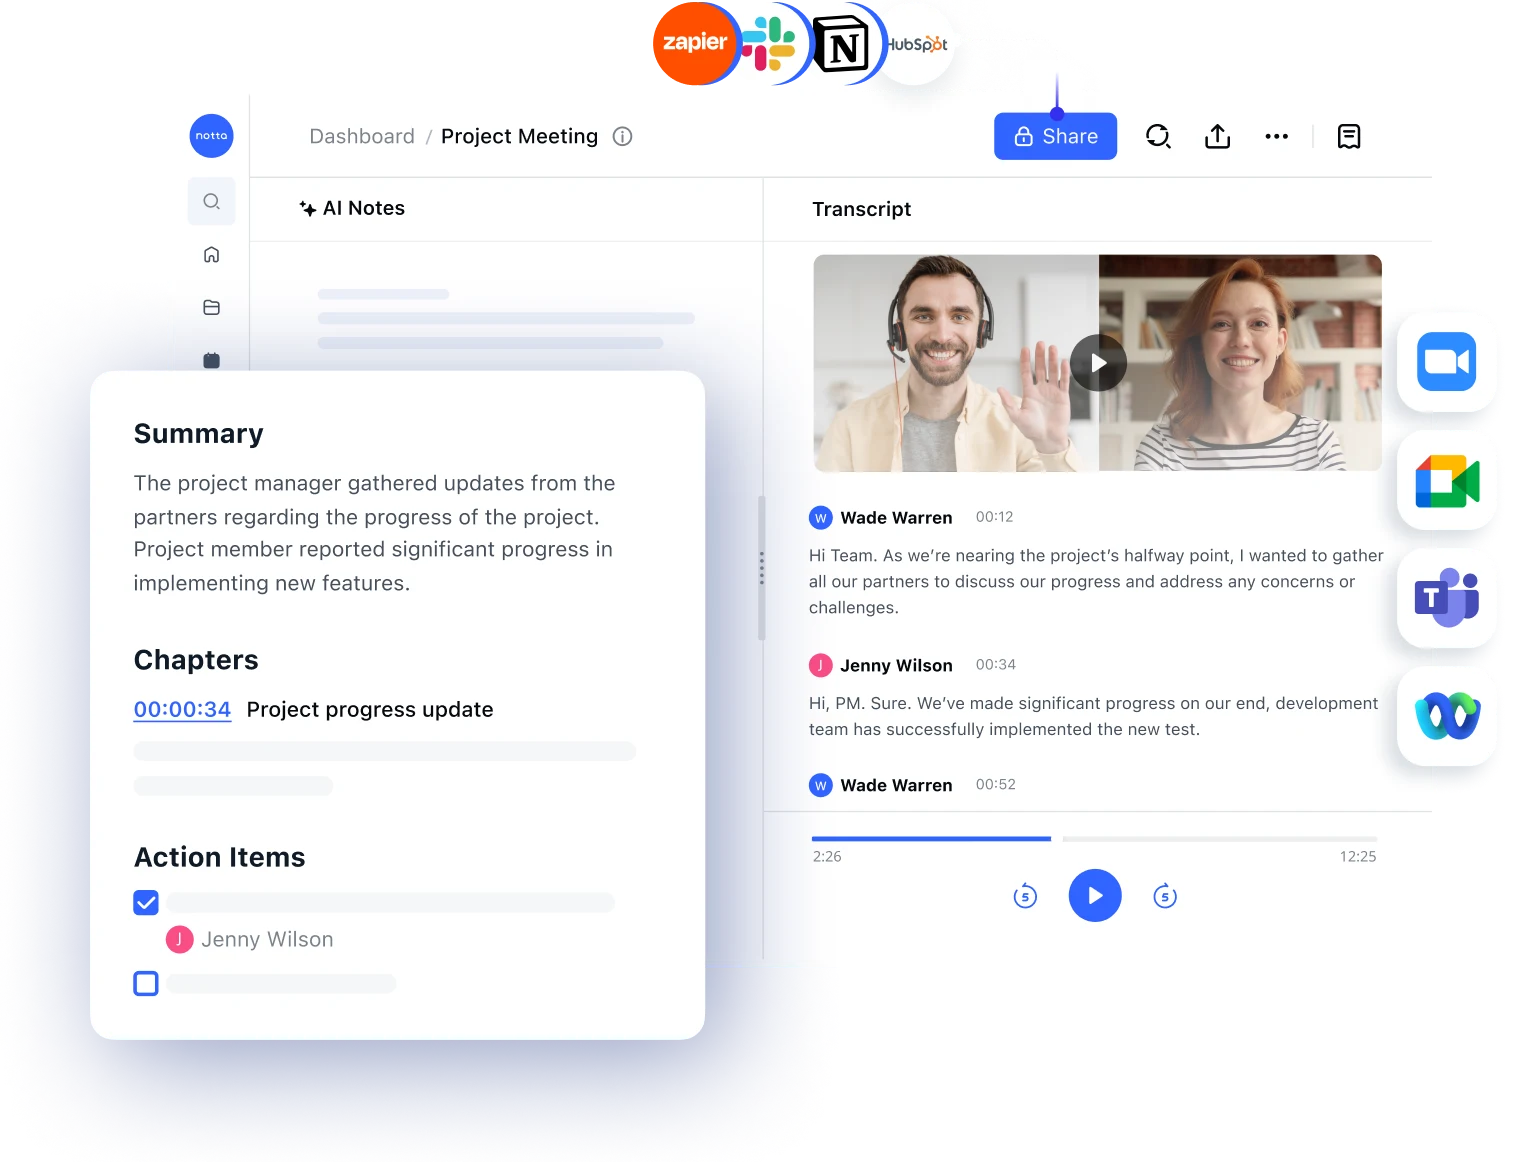
Zoom meetings have become more common than ever. Whether it's scheduling a session with a client or guiding team members on how to complete a task, Zoom is the go-to platform. However, you need an intelligent AI assistant like Notta to transcribe audio to text and improve your meeting productivity.
The voice-to-text software lets users quickly convert meeting audio into readable text format. Hence, you can focus on ongoing conversations instead of manually taking notes. In addition, Notta enables you to record live Zoom meetings, edit text in real-time transcription, and even translate your transcript into 58 languages.
Notta offers the most integrated AI meeting notes, summaries, and action items so nothing gets missed.
Key takeaways
Zoom share screen feature ensures you can seamlessly collaborate with your team and share presentations. The in-built Zoom feature ensures you can share screens or whiteboards to make your virtual sessions more collaborative.
If you want to make your meetings more productive, consider using Notta. It is a powerful tool that lets you record Zoom meetings and generate their transcripts in real-time. It's an easy-to-use recording and transcribing tool that ensures you never miss any information.
If you want to explore the features of Notta, sign up for a free account today.