
How to Use Closed Captions in Zoom Meetings
98% accurate, real-time transcription in just a few clicks. 58 languages and multiple platforms supported.
In modern business, Zoom virtual meetings have become a cornerstone of effective communication and collaboration. Zoom enables remote workers to connect and share ideas regardless of location. However, ensuring seamless communication can be daunting, particularly for individuals with hearing impairments or when confronted with noisy environments.
Fortunately, Zoom closed captioning offers a transformative solution, revolutionizing how we engage in virtual meetings. This in-built feature of Zoom provides real-time captions or subtitles of the spoken in-meeting conversations. In this comprehensive tutorial, we will dive deep into how to use Zoom closed captioning services to foster inclusivity and enhance collaboration in virtual meetings.
Prerequisites for viewing captions in a meeting
The host and participants of the Zoom meeting or webinar can view manual or automated captions of the conversation on their screen. If you want to view captions in your next Zoom meeting, here are a few prerequisites you must consider.
You must install the Global minimum version or higher of the Zoom desktop client for Windows, macOS, or Linux.
The Zoom mobile app for Android or iOS must have a Global minimum version or higher.
You must enable manual or automated Zoom captions.
Important Note: To support automated captioning for languages other than English, like Arabic, Chinese, Dutch, French, and more, install the Zoom desktop client version 5.11.9 or higher.
How to turn on closed captions on Zoom?
Whether you are joining a Zoom meeting from a Zoom desktop client or a web client, follow these simple steps to turn on closed captions and enhance your meeting experience.
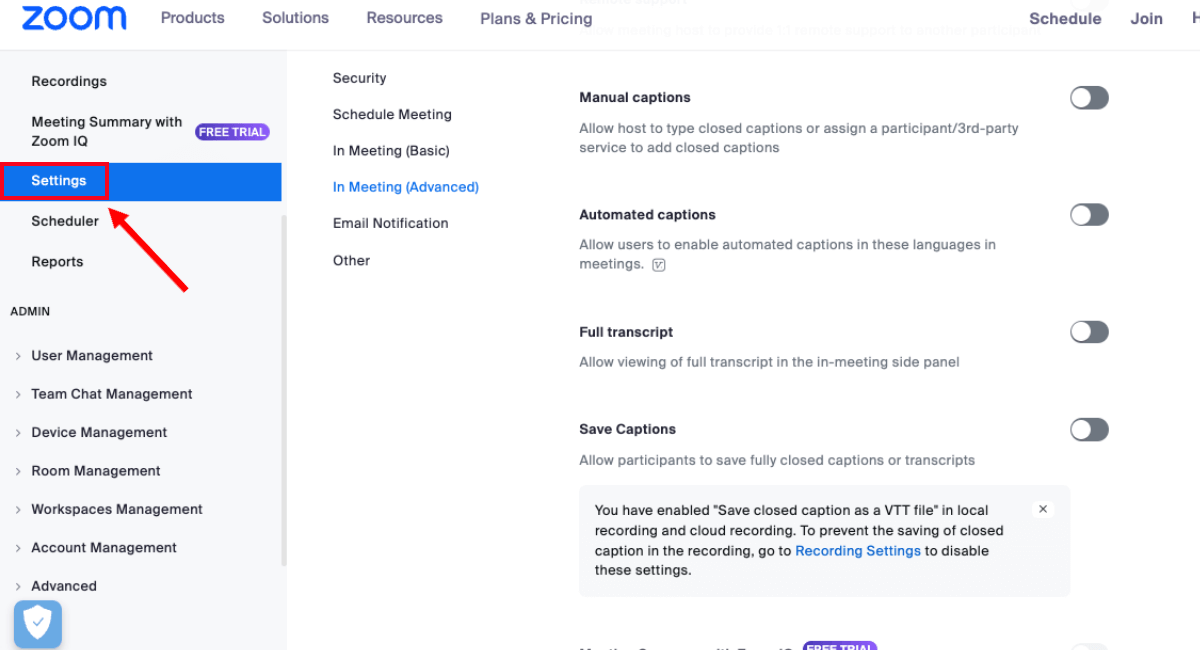
Step 1: Sign in to the Zoom web portal and locate the 'Settings' option in the navigation panel.
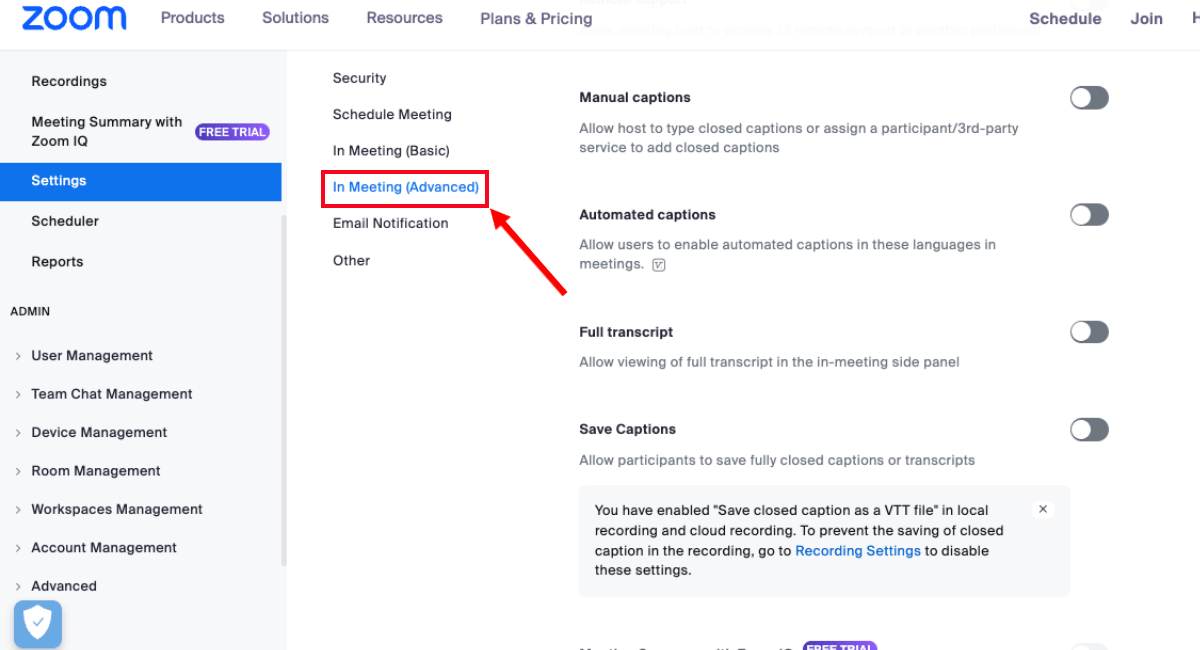
Step 2: In Zoom's 'Settings' menu, go to the 'Meetings' tab and select the 'In Meeting (Advanced)' section.
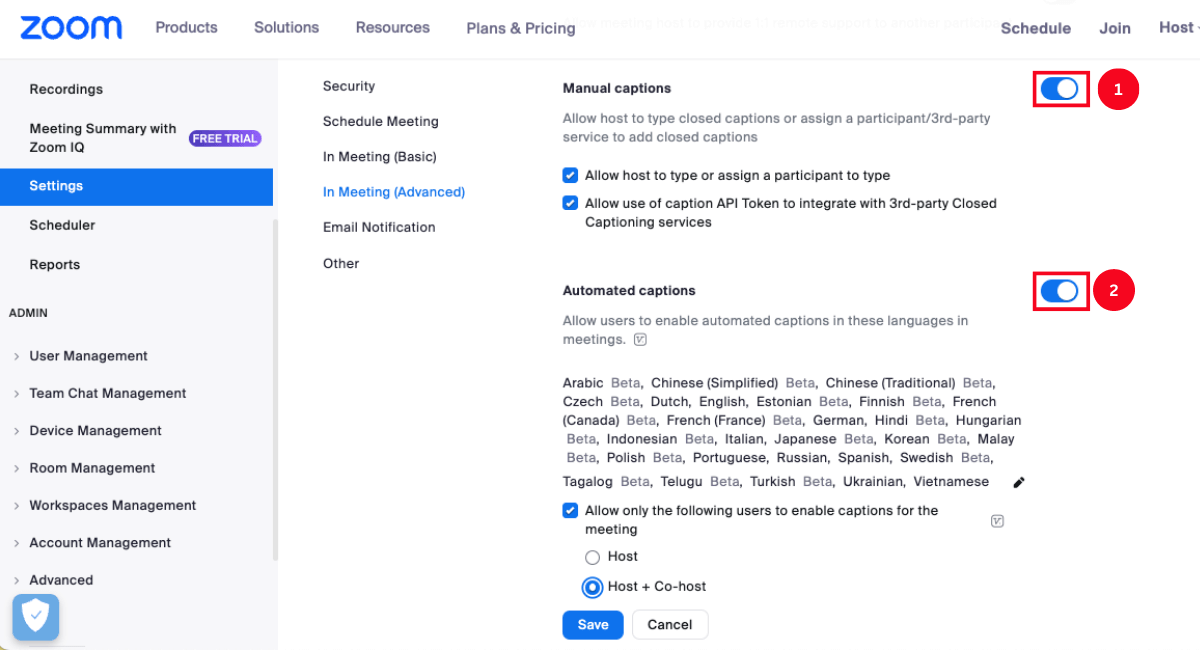
Step 3: Scroll down to find the 'Manual Captions' and 'Automated Captions' options. If they are currently disabled, simply toggle the switch to enable them.
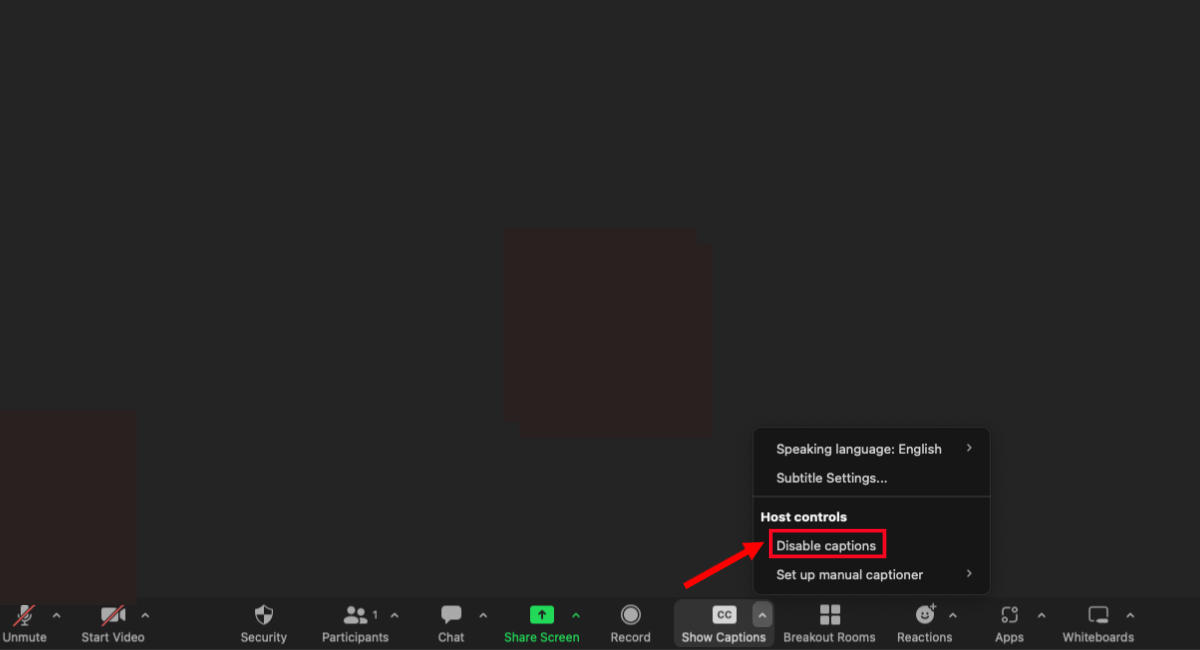
Step 4: Close the 'Settings' tab and join or start a Zoom meeting. Once you enter the Zoom meeting, you will find the 'Closed Captions (CC)' option in the toolbar. Select 'Closed Captions (CC),' and a pop-up menu will appear.
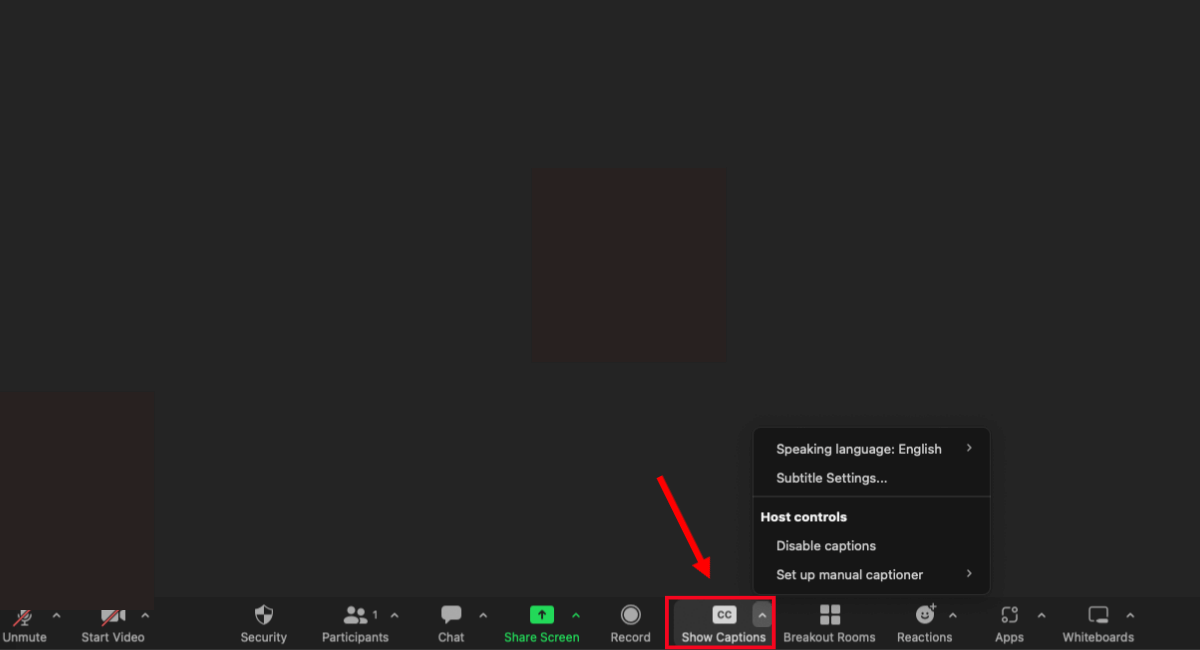
Step 5: Within the host controls, locate the 'Enable Captions' option. By activating this feature, Zoom's closed captioning functionality becomes available to use, allowing you to view captions during the Zoom meeting or webinar. (Note: If you see 'Disable Captions' on the screen, the feature is already enabled.)
Note: If you are joining Zoom meetings using Android or iOS devices, you might not find the 'Closed Captions' or 'CC' option directly on the main screen. To activate captions on your mobile apps, follow these straightforward steps:
Step 1: Join or start the Zoom meeting on your mobile device using the Zoom mobile app. Look for the 'More (...)' option, usually positioned at the screen's bottom-right corner.
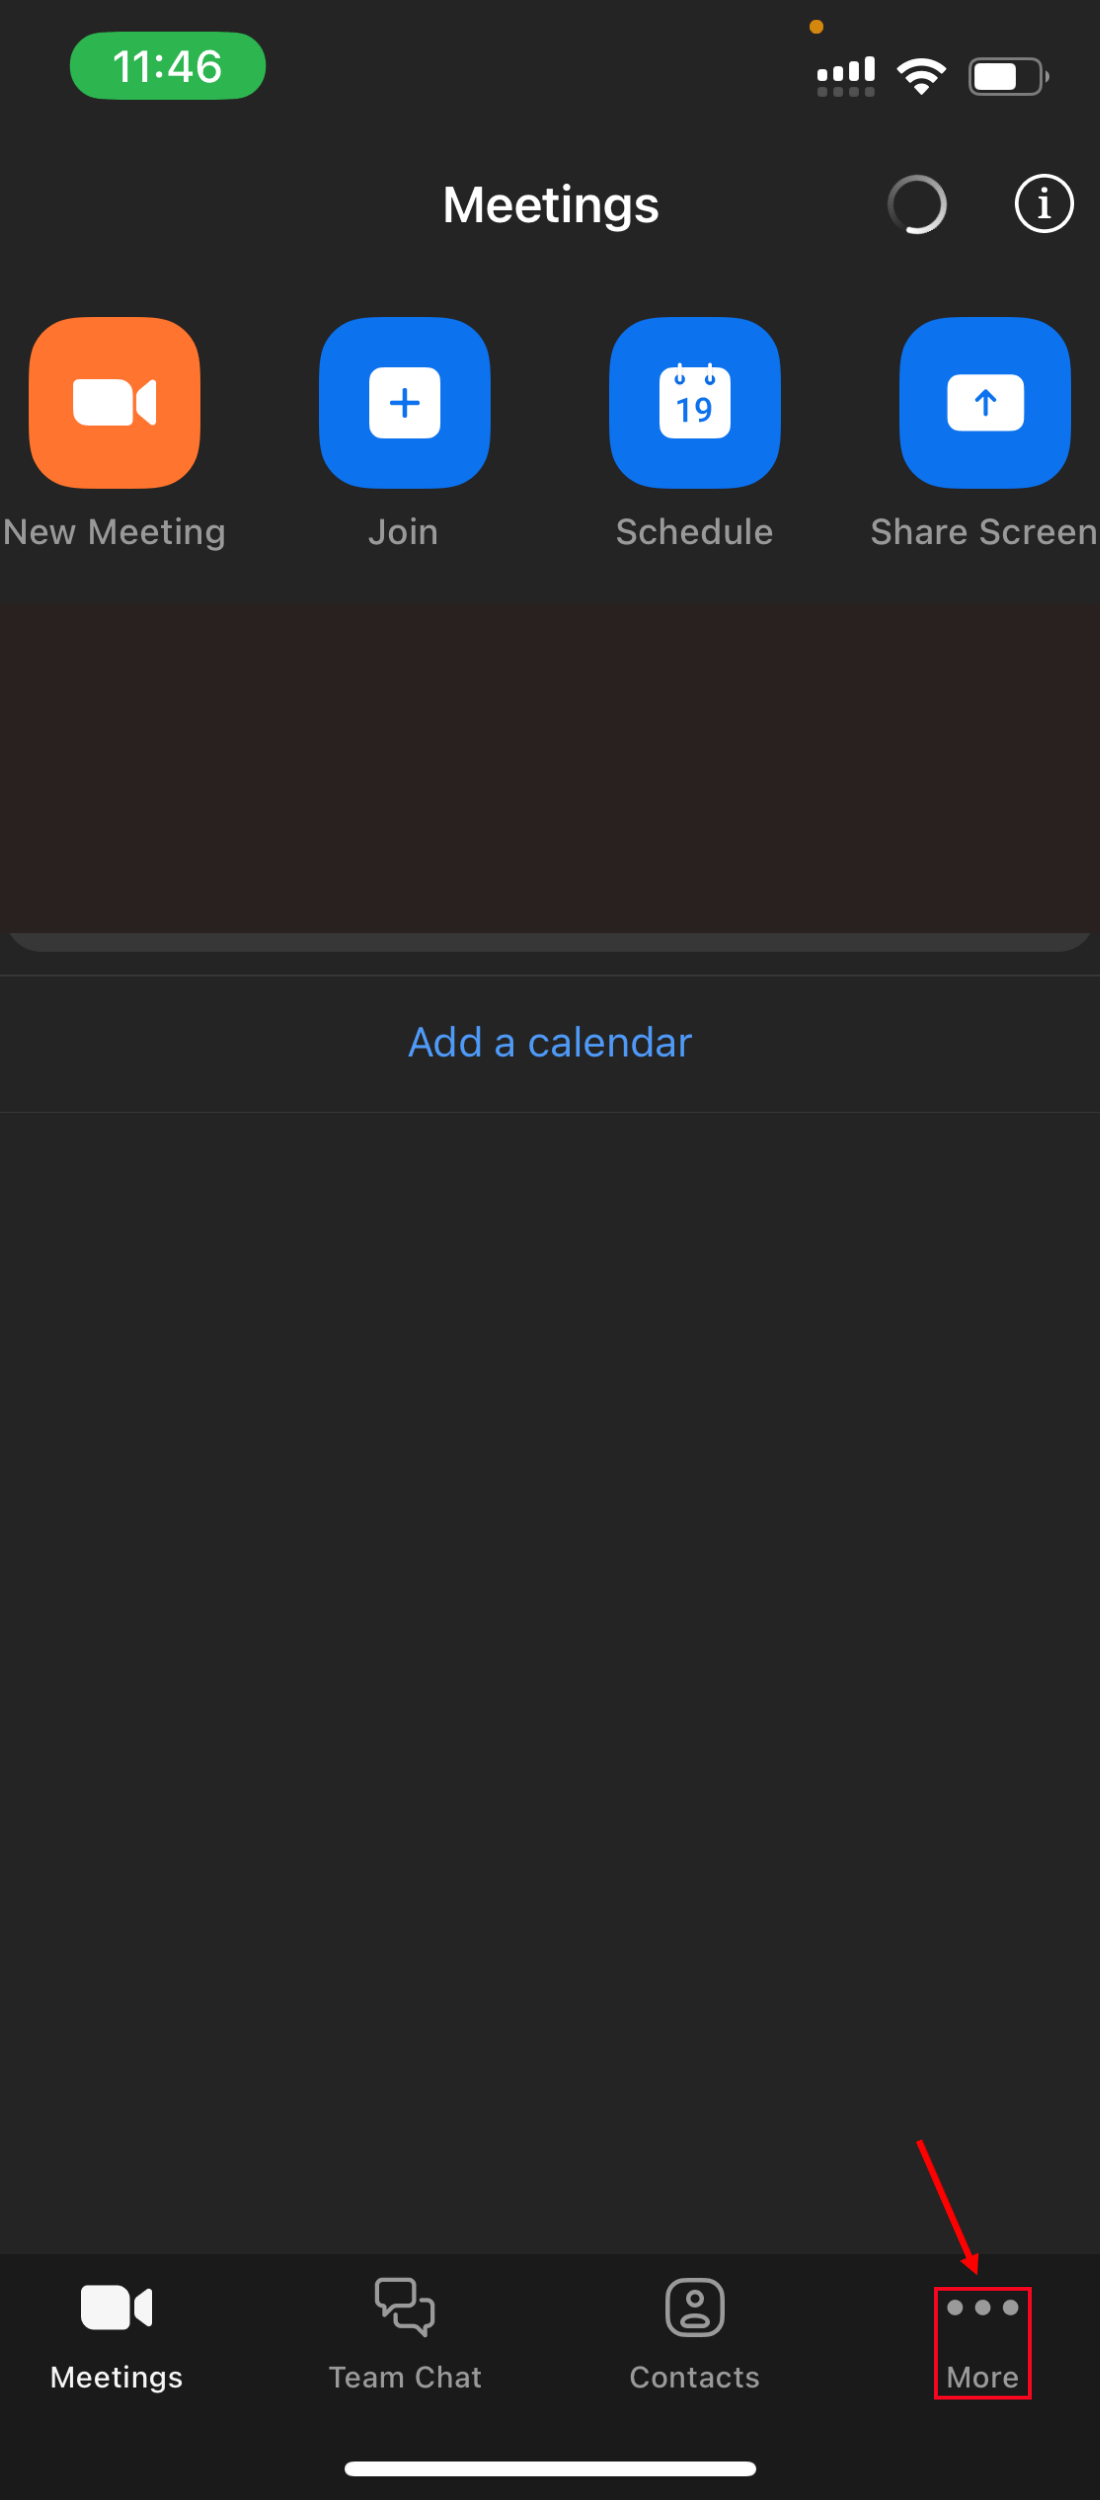
Step 2: Tap the 'More' option, and a pop-up menu will appear. From the menu, select 'Meeting Settings.'
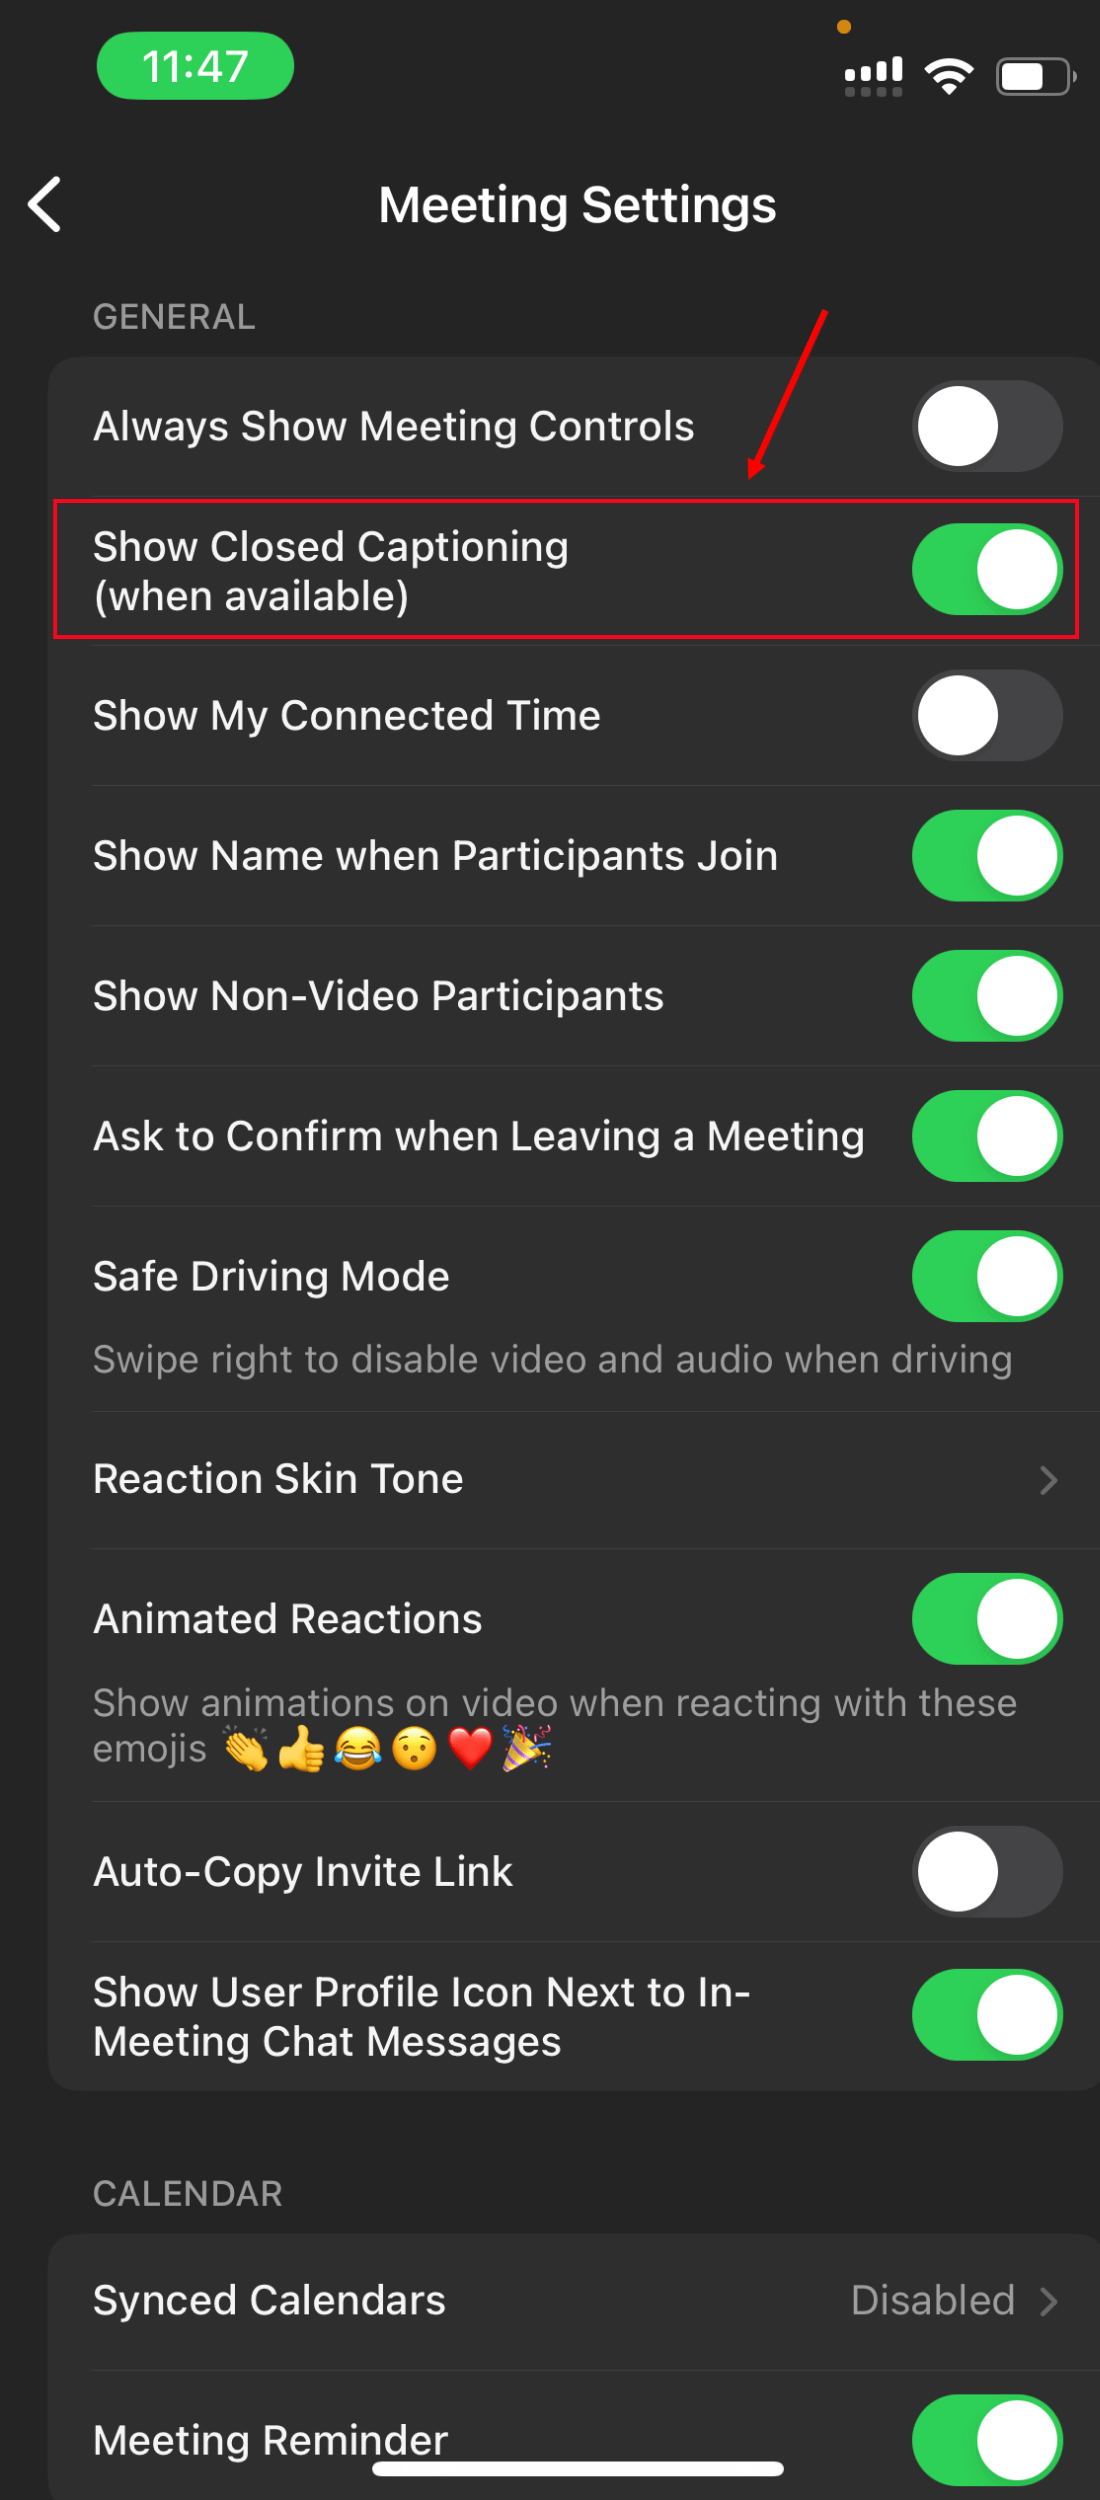
Step 3: Scroll down within the Meeting Settings until you find the 'Closed Captioning' section. Select the toggle switch next to this option to enable the Zoom closed captioning feature.
Options for creating closed captioning on Zoom
There are several options available for creating closed captions in Zoom meetings or webinars. These options include manual captioning, automated captioning (or Zoom live transcription), and integrated third-party closed captioning.
Manual captioning
Manual captioning involves a designated person or participant typing the captions in real time during the Zoom meeting or webinar.
Advantage: This method ensures accurate captions as the captioner can actively listen to and type the content.
Disadvantage: Despite the high accuracy, the manual captioning method involves a slight delay in delivering captions as the captioner needs time to type the content.
Integrated third-party closed captioning
Some external companies offer closed captioning services or tools that integrate with Zoom. With the caption URL, the third-party service streams text from their closed captioning software to Zoom meetings.
Advantage: Many third-party captioning services employ advanced speech recognition technology or professional captioners to generate captions. As a result, you get accurate captions when you use third-party services.
Disadvantage: Some tools require you to have the technical expertise to configure the integration between Zoom and third-party services.
Automatic captioning (or Zoom live transcription)
Zoom has introduced its automatic speech recognition (ASR) system for generating real-time captions during virtual meetings. Zoom live transcription feature automatically transcribes speech and audio during Zoom meetings or webinars into readable text.
Advantage: The built-in feature offers ease of use and is included in all Zoom's plans for free. This method lets the host enable closed captioning directly with Zoom's settings.
Disadvantage: It is worth mentioning that the automatic captioning methods lack advanced customization features and speaker identification options.
With Notta, you can easily generate meeting minutes, turning spoken content into written records with 98.86% accuracy.
How to use manual caption on Zoom?
Whether you're a meeting host or a participant, mastering this feature will empower you to enhance communication, ensure accuracy, and create an inclusive environment for all attendees. Let’s dive into the prerequisites and step-by-step process to enable manual captions.
Prerequisites for enabling manual captions
If you want to enable the manual captions feature during your Zoom meeting, you must have host or admin privileges.
One noteworthy thing is that if the host or admin disables manual captions and enables automated captions, the participants using a Zoom web client older than the 5.9.0 version may not be able to view automatic captions. Additionally, the host needs to use a version of 5.9.0 or higher so that users on version 5.9.0 or higher can view and use automated captions.
How to enable manual captions?
In this manual captioning section, we will learn how to enable manual captions at the account level, for groups, and for your own use.
For account
Here is how to enable closed captioning on Zoom in simple steps.
Step 1: Log into the Zoom web portal and navigate to Account Management > Account Settings.
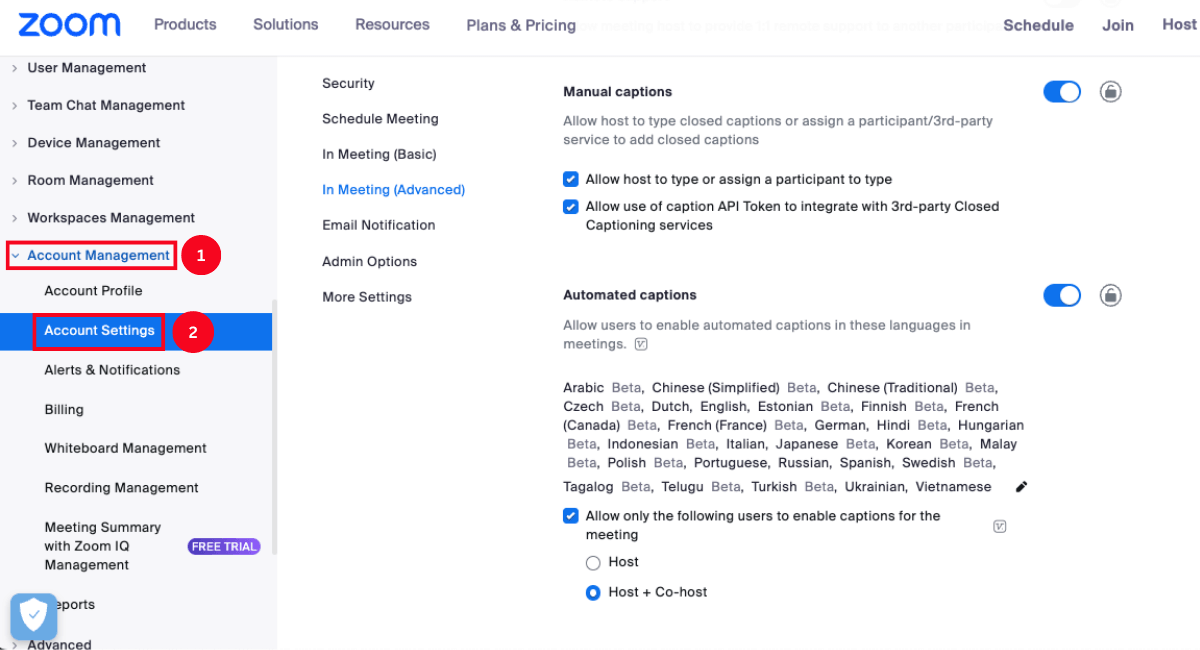
Step 2: Select the 'Meetings' tab and click 'In Meeting (Advanced).'
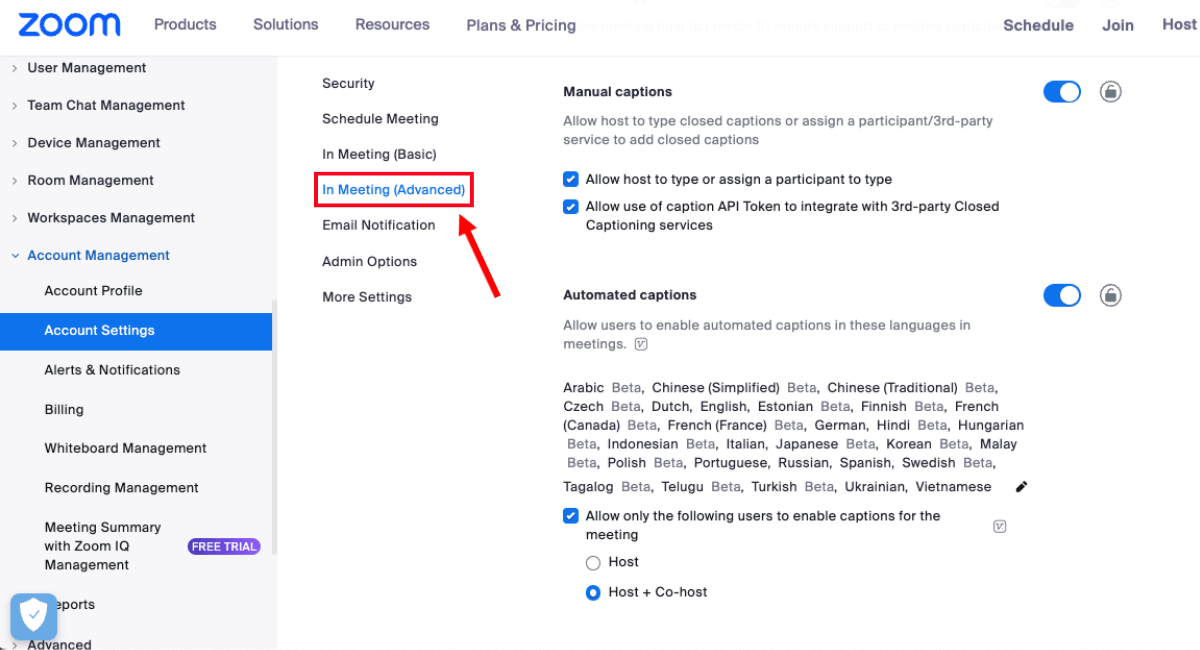
Step 3: Scroll down and find the 'Manual Captions' option and enable it.
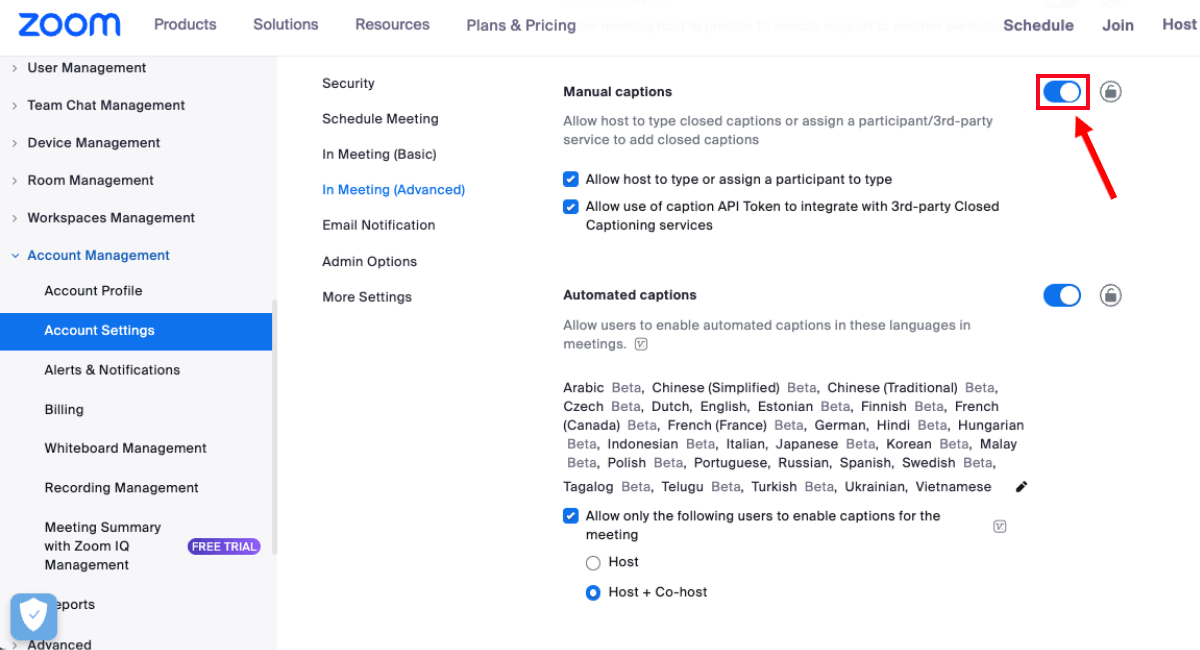
If the verification pop-up appears, click the 'Enable or Disable' option to confirm the new settings.
Step 4: Once manual captions are enabled, a drop-down menu with additional features will appear. Modify the settings as per your requirements and click 'Save.'
Step 5: Click the 'Lock' icon to prevent group users from modifying the settings.
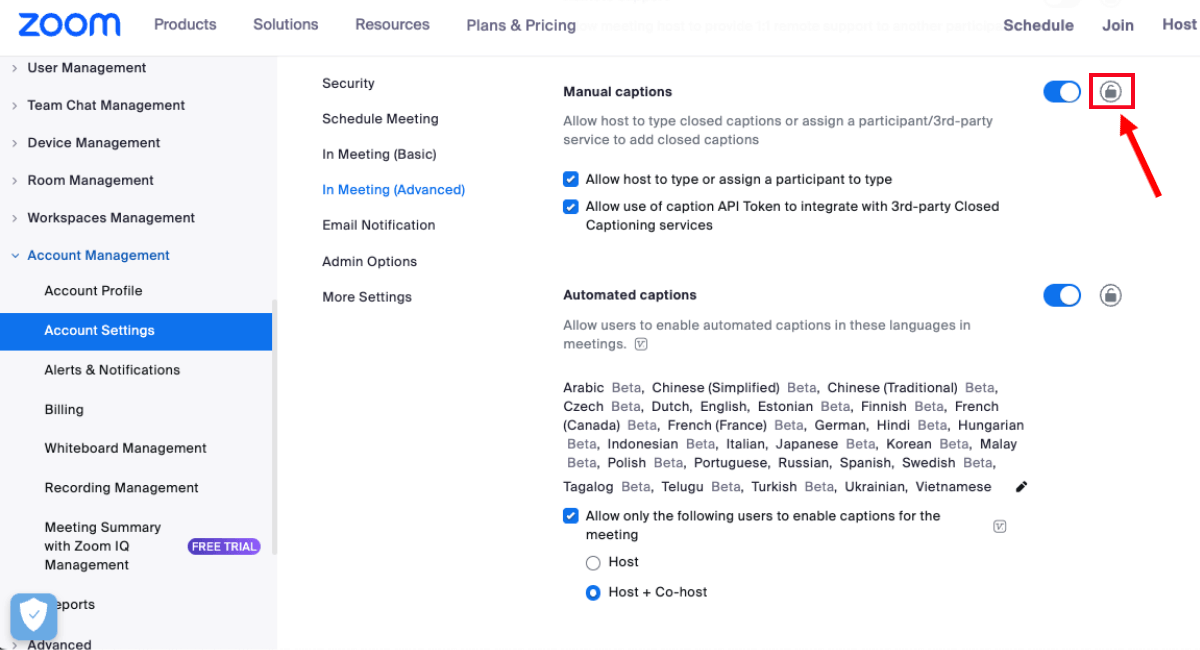
Note: If you want to enable the manual captioning feature for the Zoom meetings, you can navigate to Settings > Meetings > In Meeting (Advanced) > Manual Captions.
For group
If you are the meeting host and want to enable manual captions for a group of users, follow the steps below.
Step 1: Sign in to the Zoom web portal and head to navigation settings. Click 'User Management' and then 'Groups.'
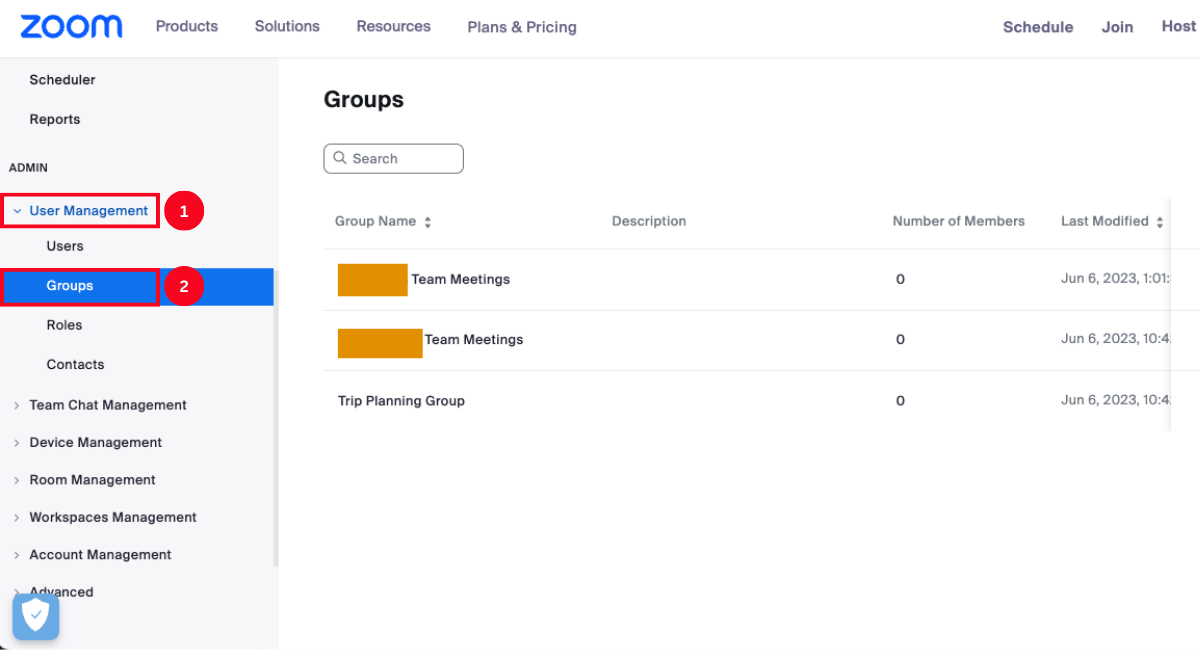
Step 2: A group list will appear, allowing you to choose the applicable group name.
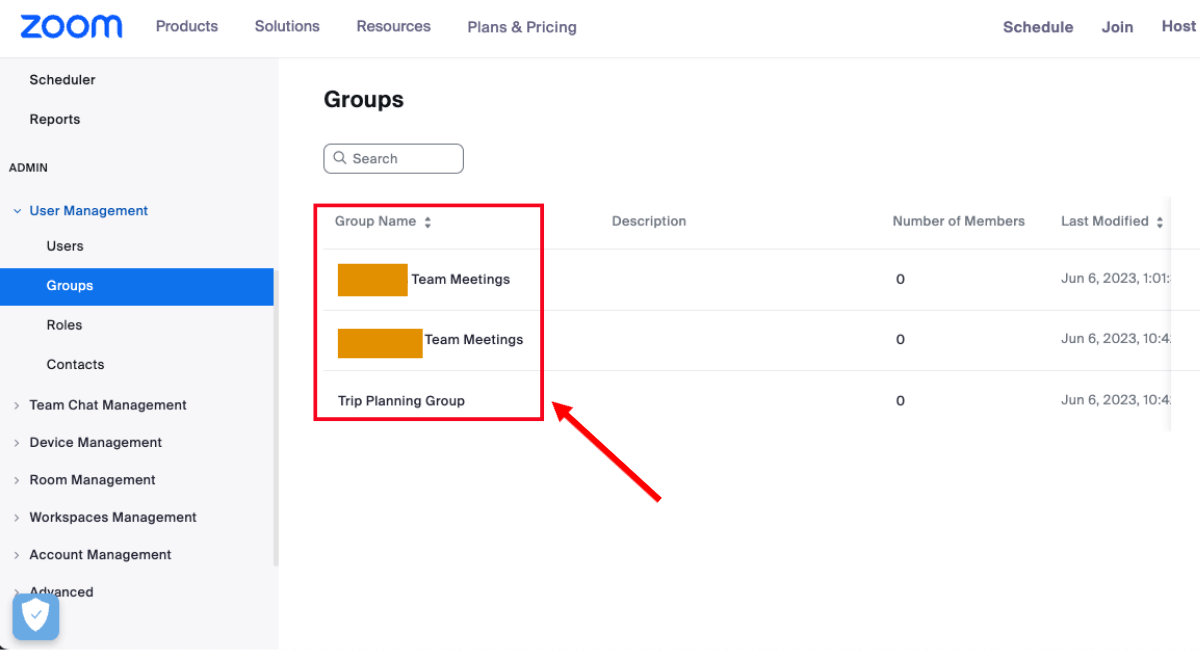
Now you can follow Steps 3 to Step 5, as described in the previous section, to enable manual captions at the group level.
Note: If the enable/disable toggle is grayed out, you will have to change settings at the account level.
How to start manual captions?
Once you have enabled the manual captions, here are a few simple steps to start the feature in your Zoom meeting. Please note that you must host the Zoom session to use this feature during virtual conferences or webinars.
Step 1: Start a new Zoom meeting or join the scheduled one. Hover over the toolbar with 'Show/Hide Captions' as one of the tools.
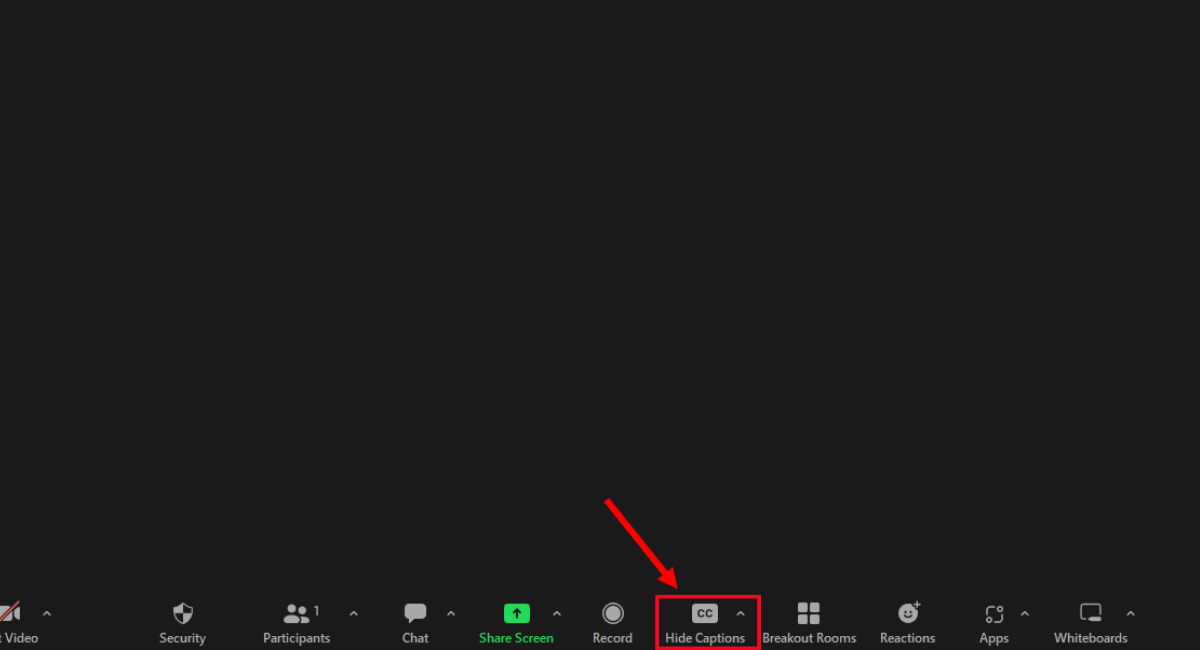
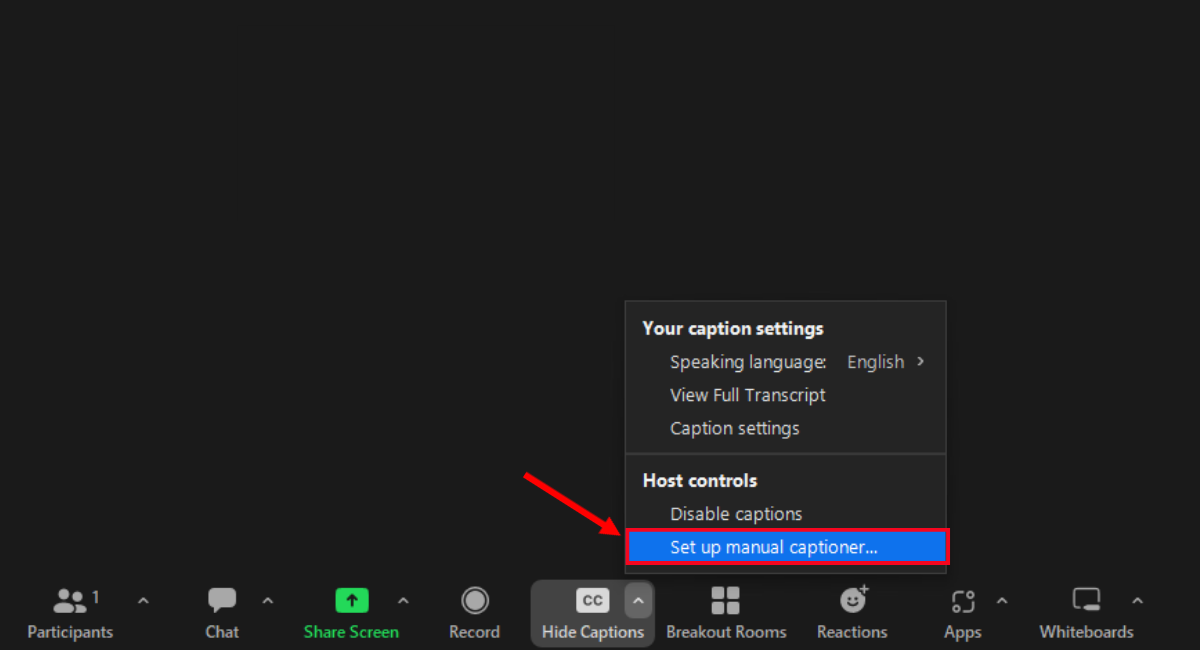
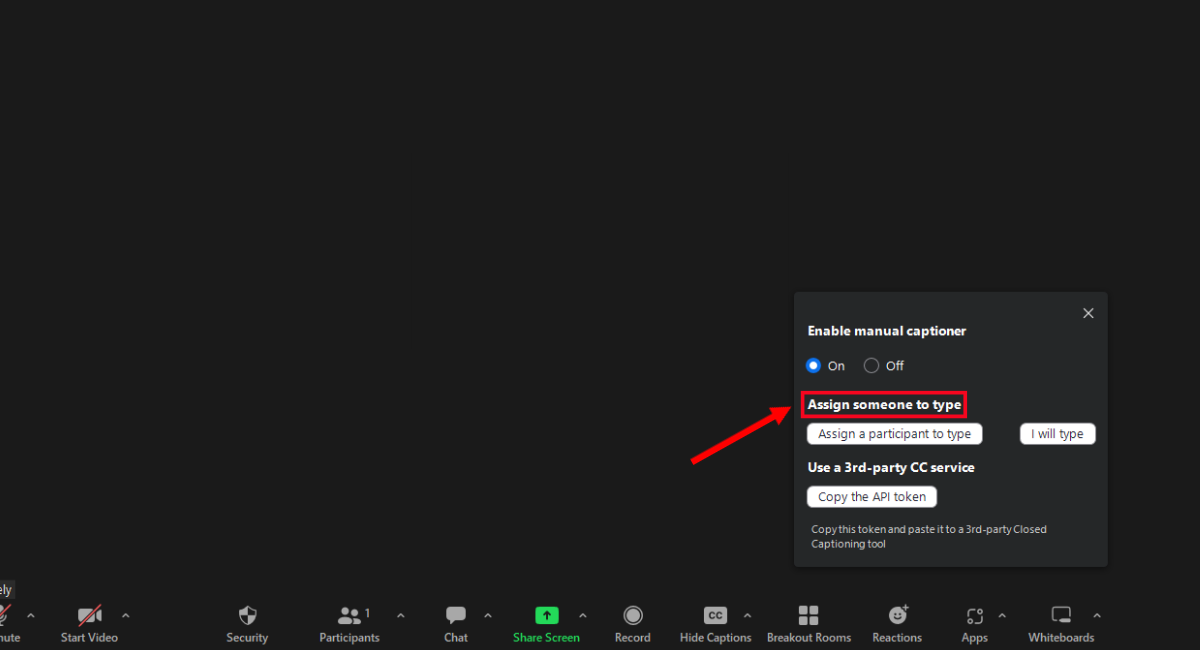
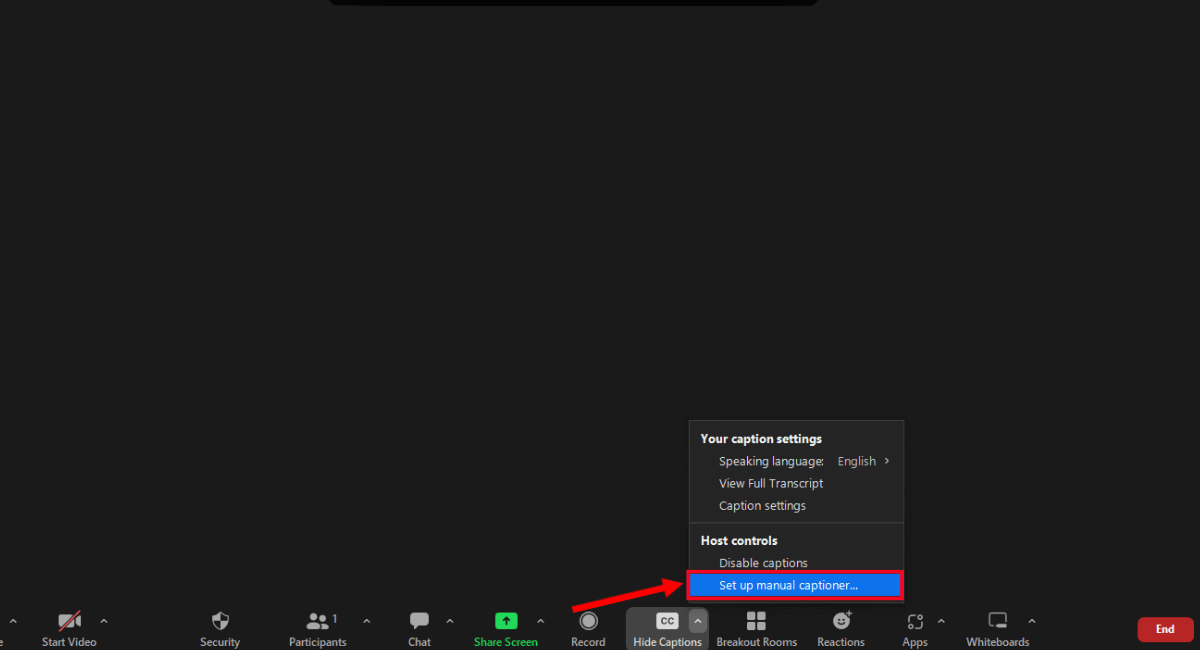
Step 2: Select the CC option and click 'Set Up Manual Captioner' from the menu.
Step 3: Under the 'Enable Manual Captioner,' toggle it 'On.'
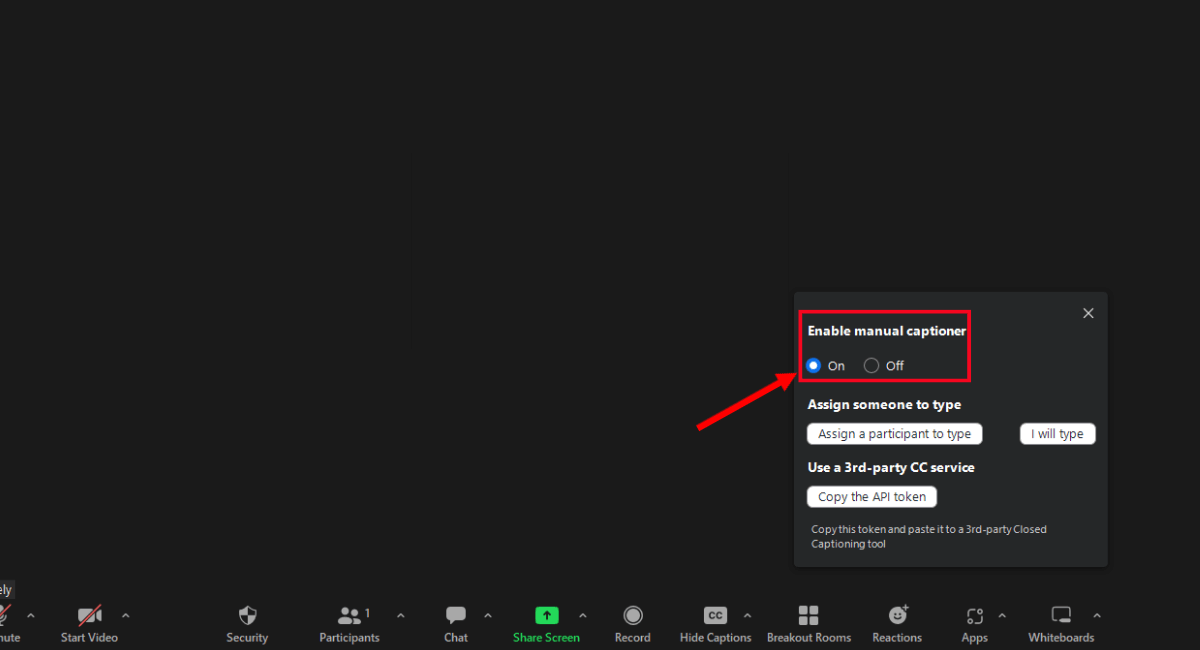
If you want to share captioning rights with one of the meeting participants, select 'Assign Someone to Type.' Alternatively, you can use a 3rd-Party CC service by copying the API token and pasting it to the third-party tool.
How to enter closed captions as a participant?
If the meeting host has assigned you the captioning rights, here are a few steps to type closed captions during the Zoom meeting.
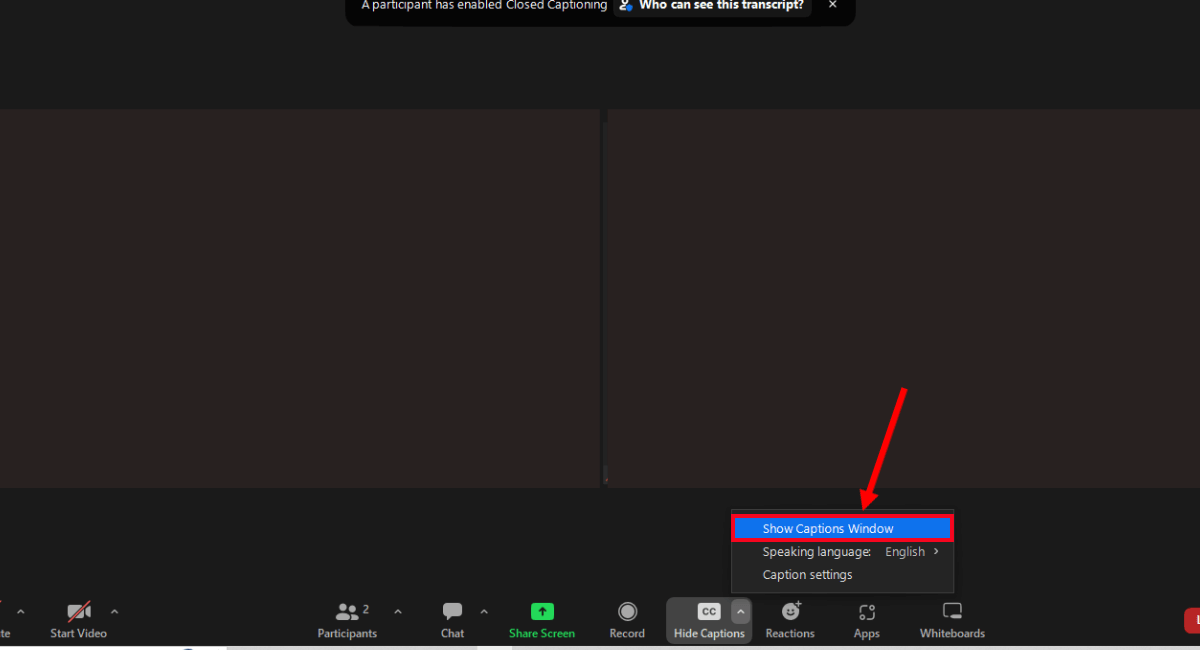
Step 1: Join the Zoom meeting using the Zoom desktop client, mobile app, or web client. Click the 'Show/Hide Captions' icon and then select 'Show Captions Window.'
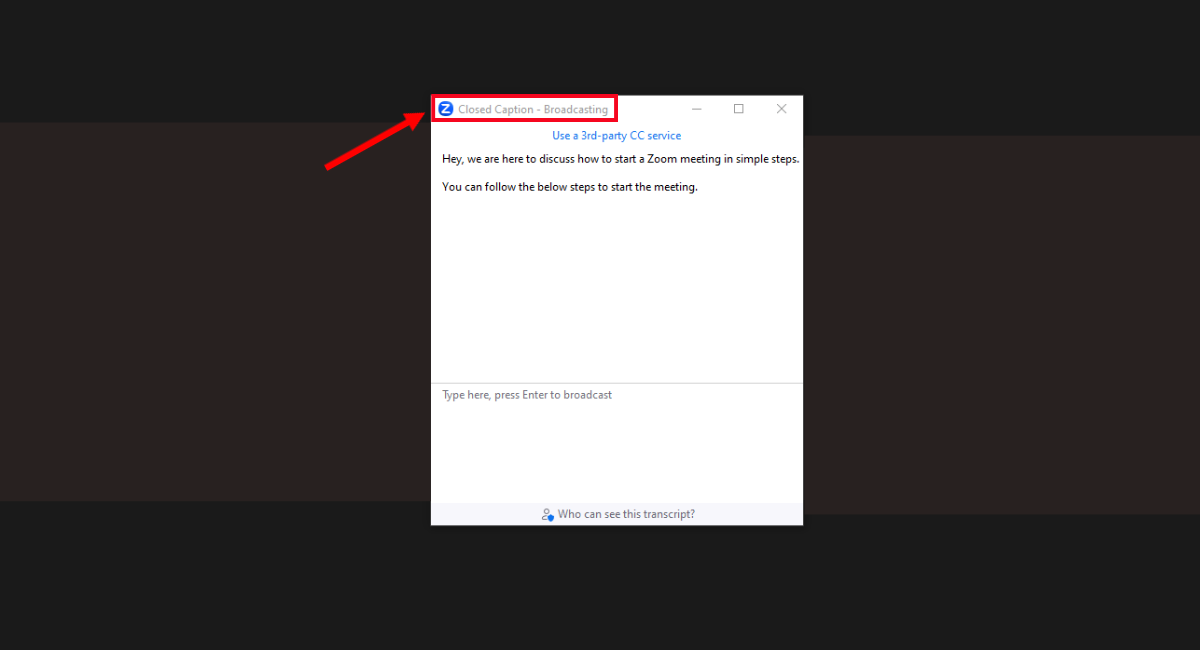
Step 2: A 'Closed Caption - Broadcasting' window will appear. You can type the closed captions in the box and press 'Enter' to submit.
How to use automated captions on Zoom?
Zoom live transcription or automatic captioning is an invaluable feature that utilizes advanced speech recognition technology to provide real-time transcription of spoken words during virtual meetings.
With automatic Zoom captions, participants can effortlessly follow along with the text displayed on the screen, ensuring clear communication and comprehension for all attendees. Here are the prerequisites and processes for using automated captions on Zoom.
Prerequisites for enabling automated captions
Anyone with admin or host privileges can enable automated captions.
Note: Some HIPAA-security-enabled accounts do not have access to automated captions. You can contact the Account Executive to update your HIPAA security agreement to use automated captions.
How to enable automated captions?
Here's how to enable the automated captions during your Zoom meeting.
Step 1: Open the Zoom web portal. Hover over the navigation menu and select Account Management > Account Settings.
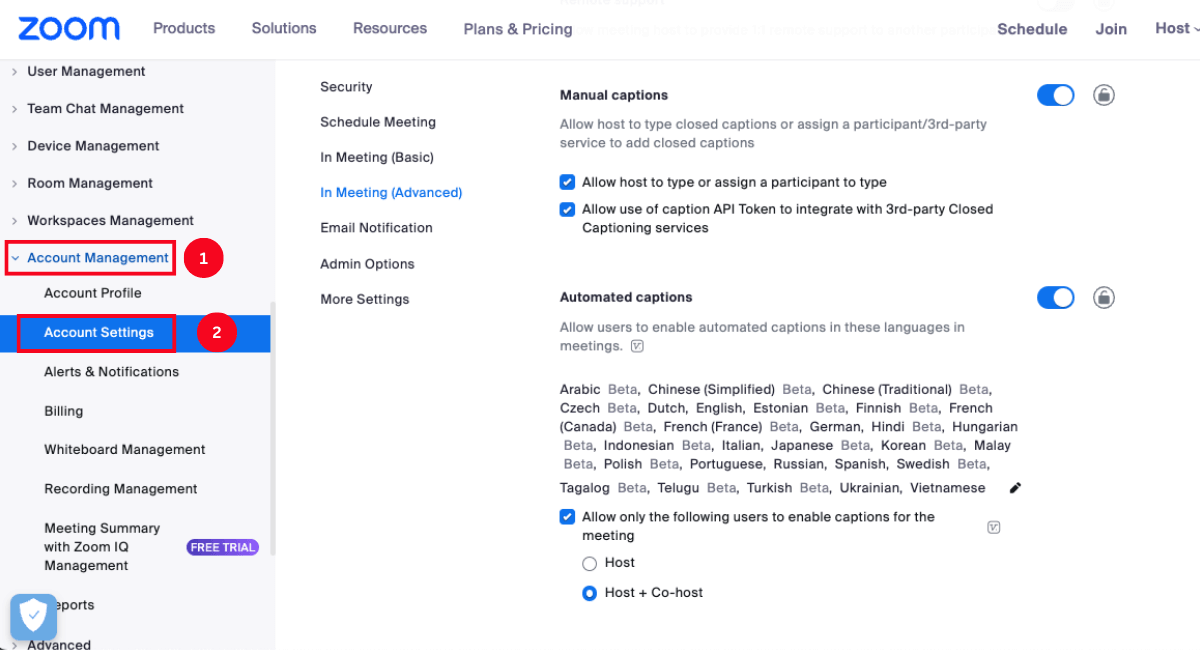
Step 2: Select Meetings > In Meeting (Advanced). Scroll down and click 'Automated Captions.'
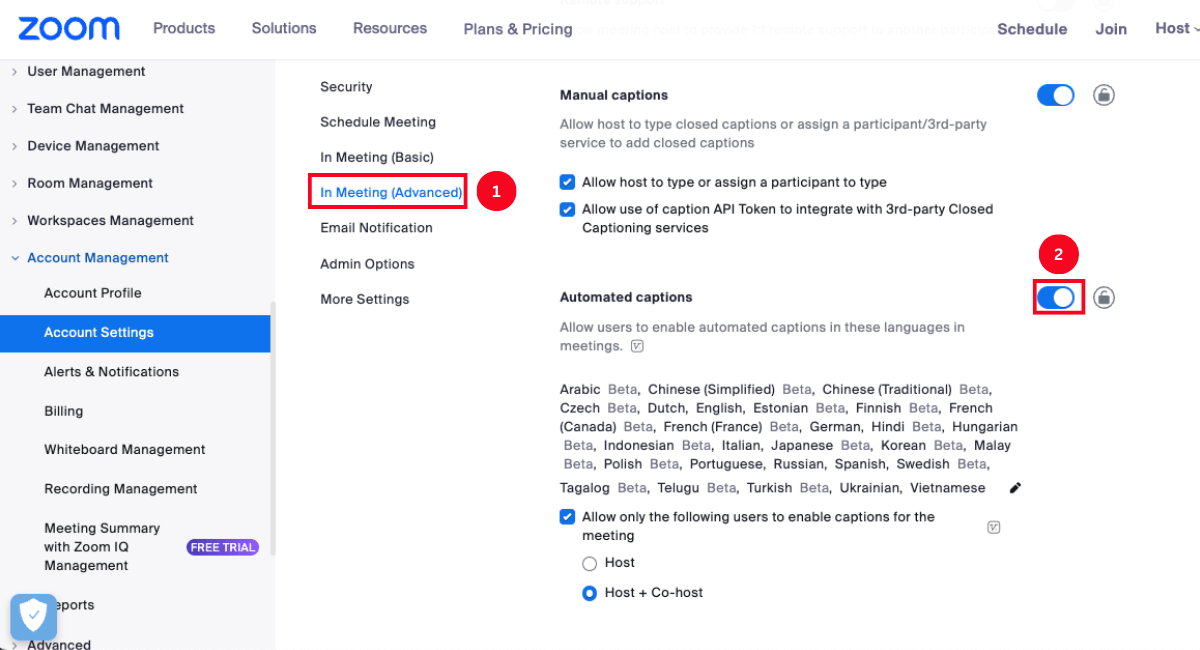
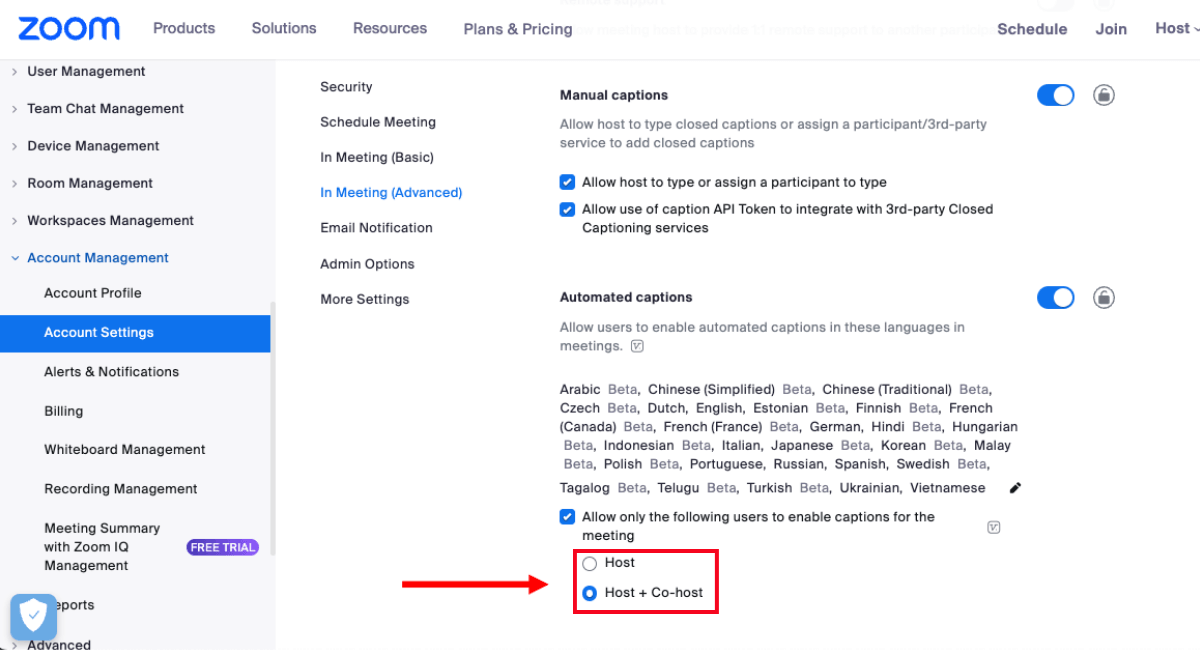
Step 3: Click the checkboxes to enable captions for the host and co-host. A verification dialog box may appear. Click 'Enable' to confirm.
How to start automated captions?
Here's how to start automated captions in your Zoom meeting.
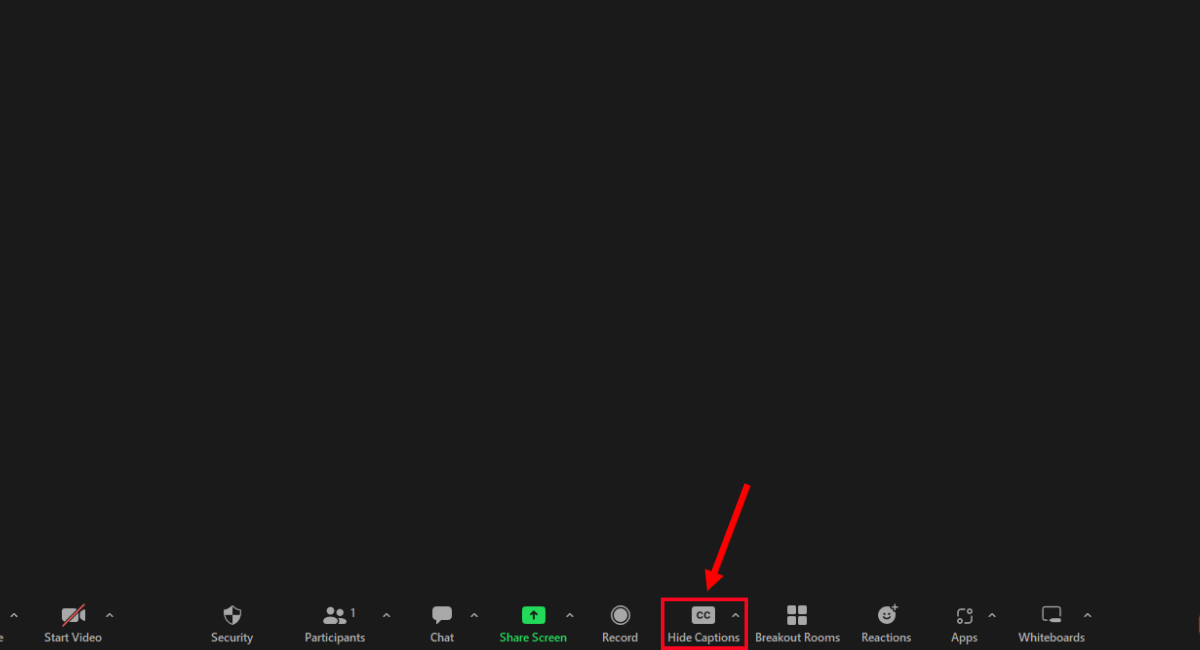
Step 1: Start the Zoom meeting or webinar. In the Zoom meeting controls toolbar, select 'CC.'
Step 2: Under 'Your Caption Settings,' click 'Speaking Language' to choose your preferred one.
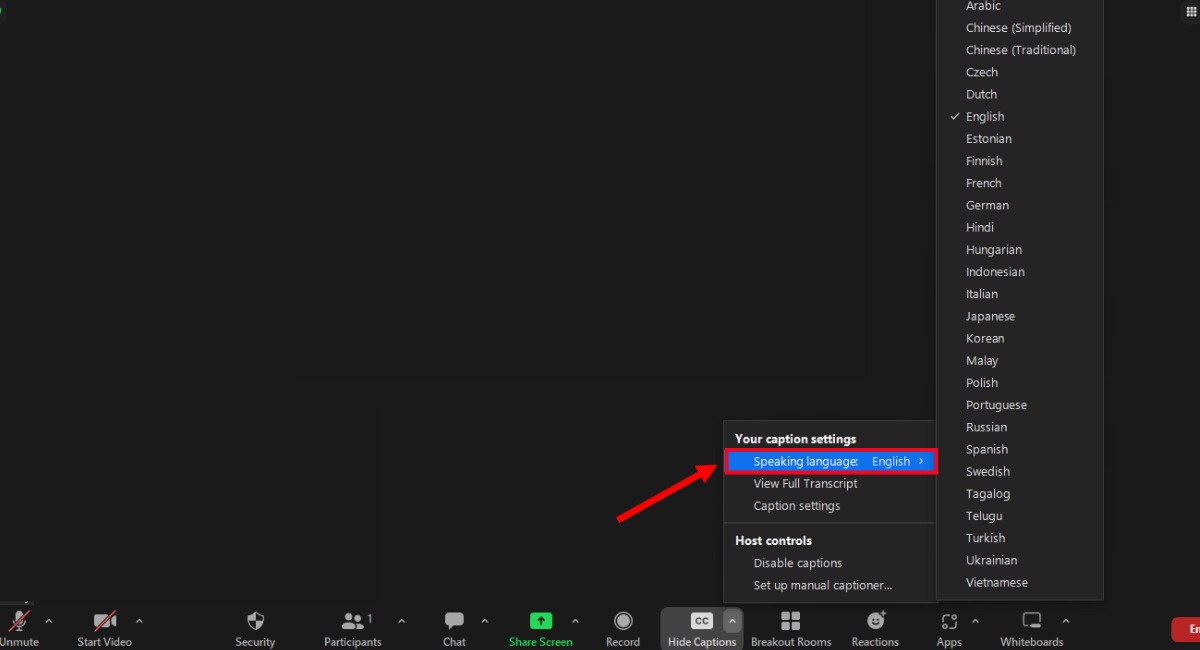
Step 3: Select the language, and a pop-up window will appear. Click 'Save' to continue.
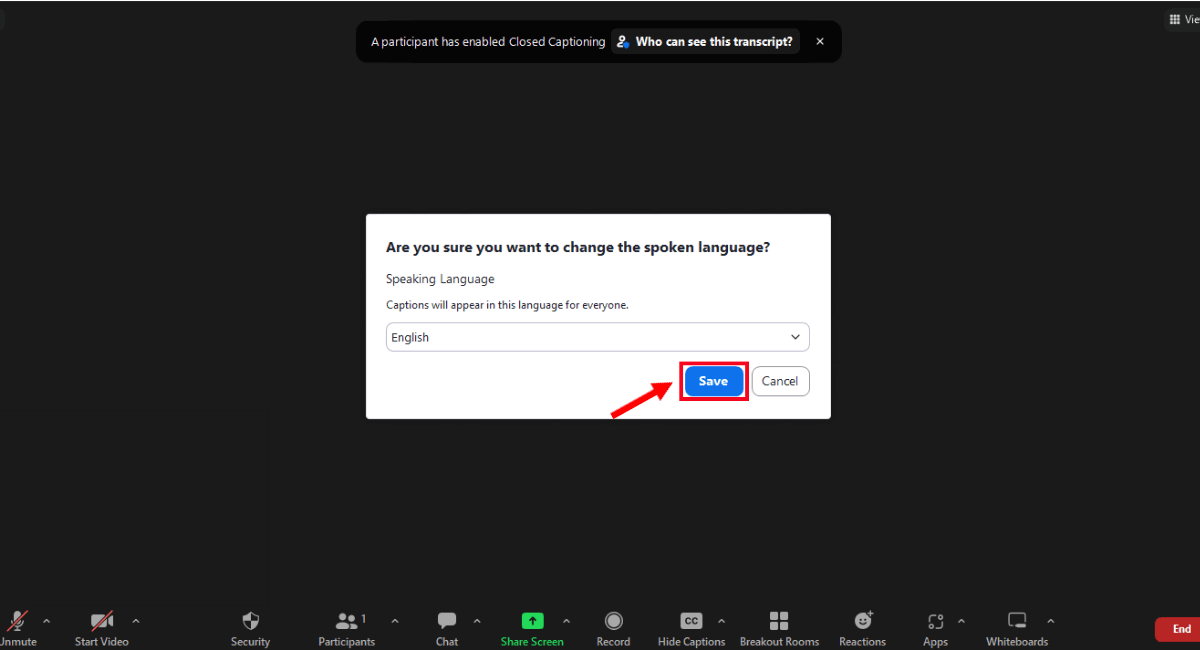
That's it! The host or participants can discuss the topics, and Zoom will automatically generate closed captions.
How to view the full transcript?
Viewing and downloading the full transcript of conversations during Zoom meetings allow the host and participants to save the important points on their devices for later review. Here's a simple step-by-step process to view the full transcript of your Zoom session or webinar.
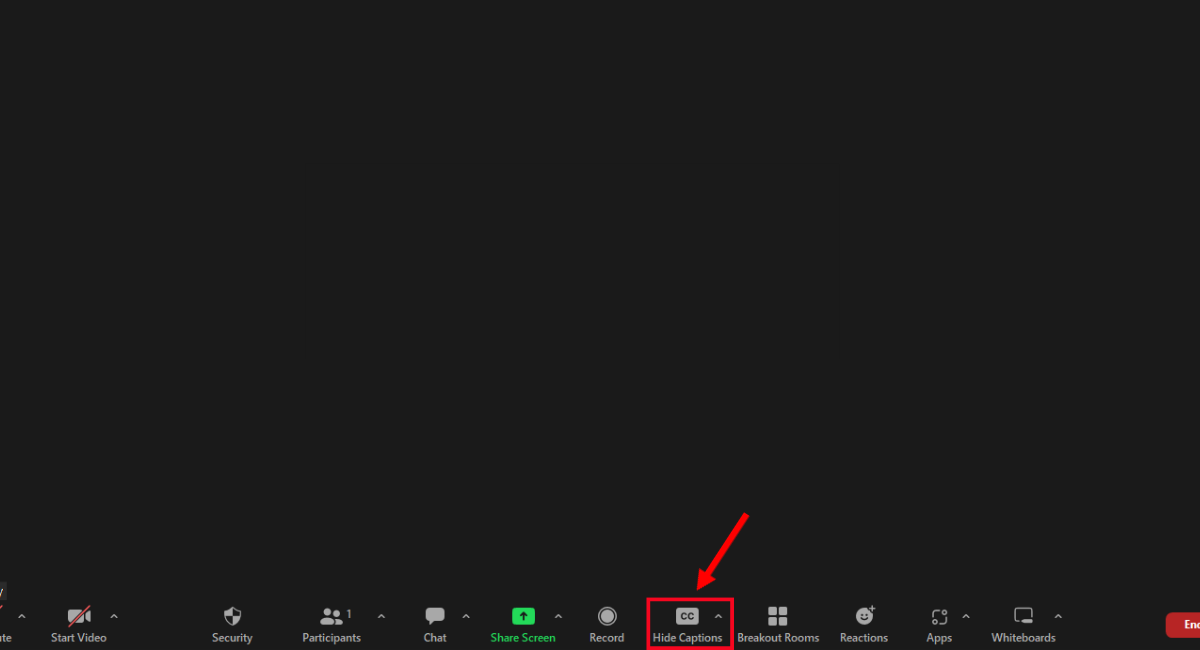
Step 1: In the Zoom meeting toolbar, click on the arrow next to 'Hide Captions.'
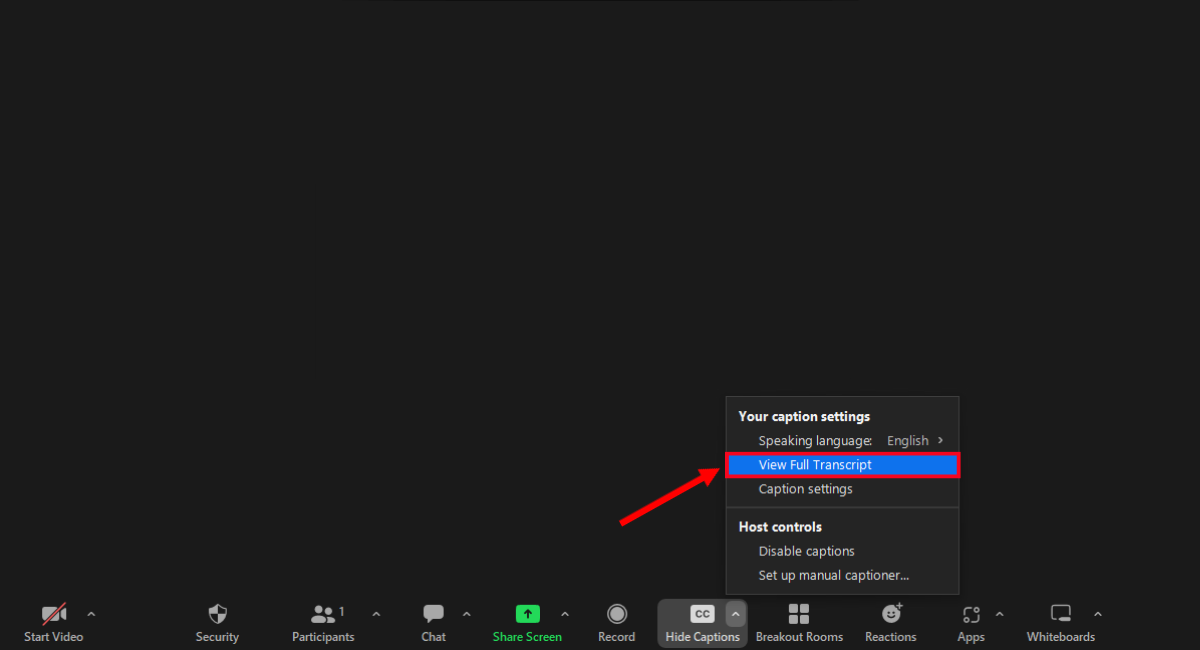
Step 2: Under 'Your Caption Settings,' select 'View Full Transcript.'
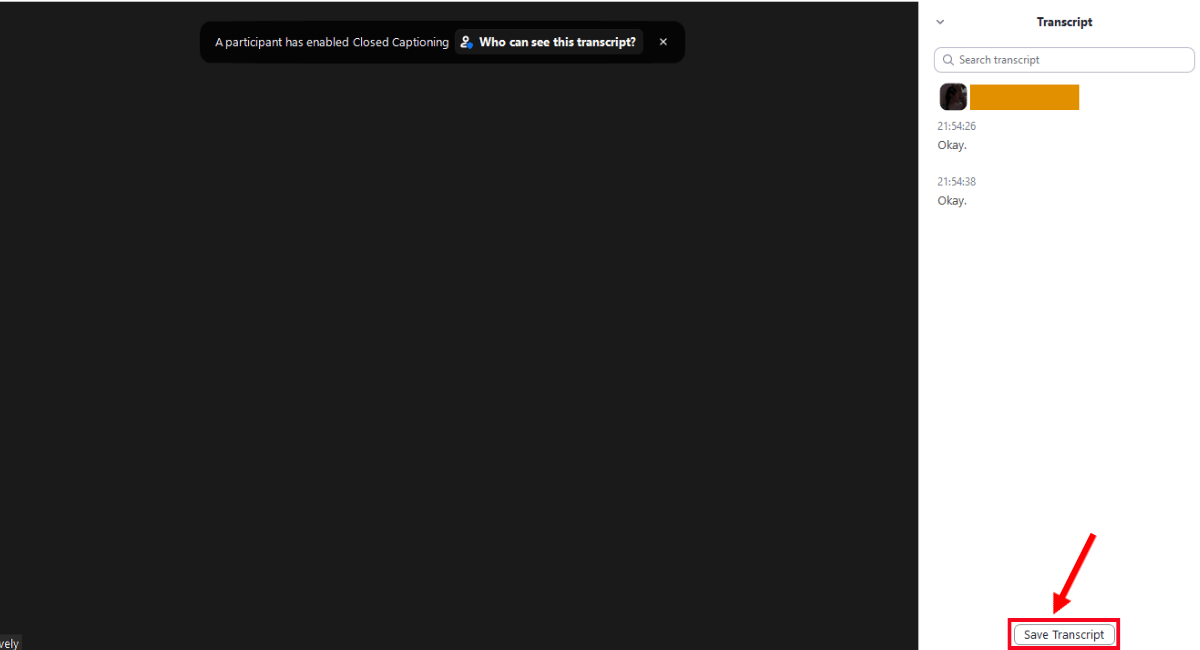
Step 3: A transcription side panel will appear, displaying the full transcript of the Zoom meeting. Click 'Save Transcript' to save the file on your device.
Note: If you cannot see the 'View Full Transcript' option under 'Your Caption Settings,' chances are it is disabled in your Zoom settings. Go to Settings > Meetings > In Meeting (Advanced) and turn on the toggle beside the 'Full Transcript' option.
How to use a third-party closed captioning service?
For organizations seeking specialized closed captioning solutions beyond Zoom's built-in features, third-party closed captioning services come to the forefront. These services offer advanced capabilities, customization options, and professional support to ensure accurate captions in Zoom meetings.
Prerequisites for integrating with a 3rd-party captioning service
Below are a few prerequisites to using third-party closed captioning services.
You should install a Global minimum version or higher of the Zoom desktop client for Windows, macOS, or Linux.
Always enable the 'Manual Captioning' option with 'Allow use of caption API Token to integrate with 3rd-party Closed Captioning services.'
You must provide access to third-party closed captioning services.
How to start with a 3rd-party captioning service?
In order to establish an easy connection with a third-party captioning service, the meeting host or co-host will have to obtain the API token. Below we outline the steps you must follow for integration.
Step 1: Start the Zoom meeting as the host. In the toolbar below, click the arrow next to 'Show/Hide Captions.' Select 'Set Up Manual Captioner.'
Step 2: Click 'Copy the API Token' to use the third-party CC service.
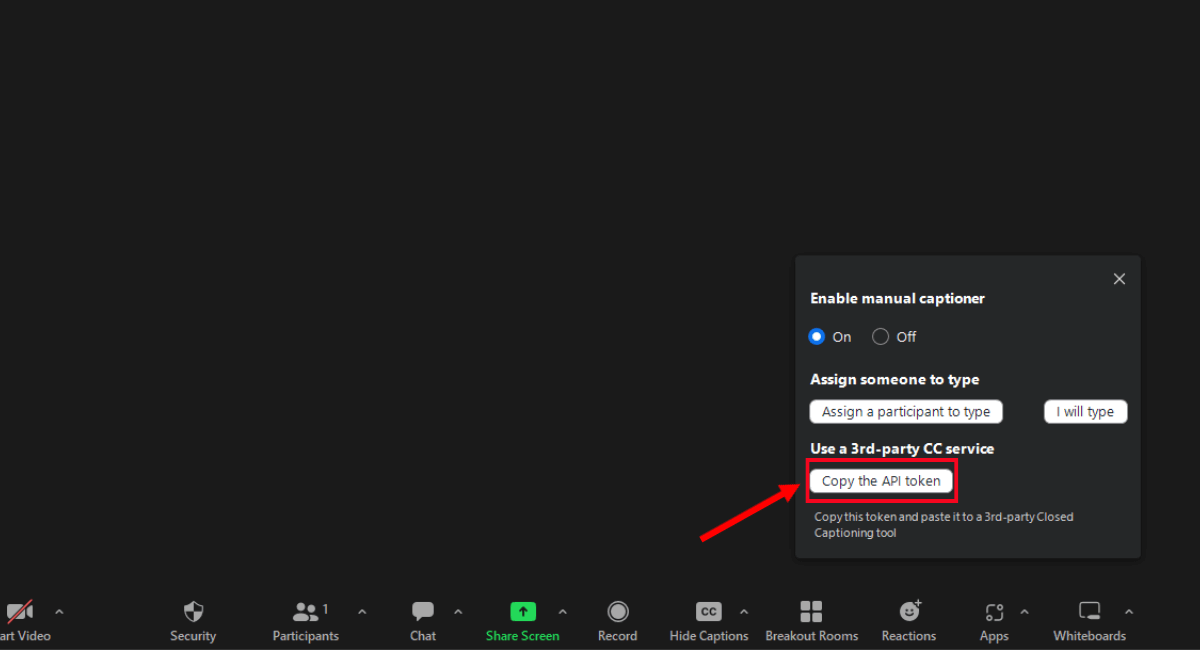
You can paste the copied API to the closed captioning tool you are using to confirm the integration.
FAQs
What does CC mean by caption?
CC stands for closed caption, which is a text representation of the audio content in a video or live event. Unlike open captions, the host or participants of the Zoom meeting can turn off the closed captions as and when required.
Does Zoom charge for closed captioning?
No. Zoom offers a free in-built auto-captioning feature for all accounts. Anyone with a Zoom account can use closed captioning for free.
How do I transcribe a Zoom video?
With the rise of Zoom virtual meetings, the need for real-time recording and transcribing software has become more critical than ever. Luckily, several tools are available to quickly transcribe a Zoom video.
One feature-rich recording and transcribing tool for Zoom meetings is Notta. The real-time transcribing software streamlines the process of generating transcripts for videos with a high accuracy of 98.86%.
Notta AI meeting assistant records, transcribes, and summarizes meetings so everyone can stay engaged without missing important details.
Final thoughts
Zoom's closed captioning service offers a valuable solution to ensure inclusive and accessible communication during virtual meetings. Following the steps outlined in this Zoom closed captioning tutorial, you can easily enable and utilize closed captions, fostering better understanding and engagement among meeting participants.
Additionally, live captioning services like Notta provide an excellent alternative for those seeking advanced features and customization options. Notta offers a recording and transcribing tool that seamlessly integrates with Zoom, allowing you to easily capture and transcribe meeting discussions. Sign up for a free Notta account to record Zoom meetings and transcribe them in real time.