Read more: Is It Illegal to Record Someone Without Their Permission?
How to Record Zoom Meeting Without Permission [3 Easy Ways]
Saving time and effort with Notta, starting from today!
If you're used to hosting Zoom meetings, you already know that the software allows you to record your online sessions. So, after the meeting, you can share it with whoever wants a copy. But, unfortunately, it's a different ball game when you're a participant.
Zoom does not allow participants to record meetings without the host's approval, which can be frustrating. However, there is a workaround to this restriction; you can record and transcribe Zoom meetings without seeking the host's permission.
So, if you've been wondering how to record your meeting on Zoom as a participant, this article is for you. Here, you'll learn everything you need to know about recording Zoom sessions on Mac and Windows without the other participants' knowledge.
Can you record a Zoom meeting as a participant?
Participants can only record Zoom meetings after requesting and receiving the host's authorization. Before your host grants you recording privileges, they'll have to take these steps:
Navigate to controls at the screen's center and click on "participants."
Scroll to your name in the participant's menu and click "More" next to your name
Select "Allow Record"
If your host permits you to record a Zoom session, you'll receive a notification. You'll also find a record button at the bottom screen. This button wouldn't appear if your host didn't grant you recording privileges.
Here's how to record a Zoom meeting after getting permission from the host:
1. Choose a folder on your desktop to save your recorded file before entering the meeting. You can do this by navigating the "Recording" tab from Zoom's "Home" tab.
2. Enter the meeting and click on the "Record" button. You'll find it at the bottom of the screen.
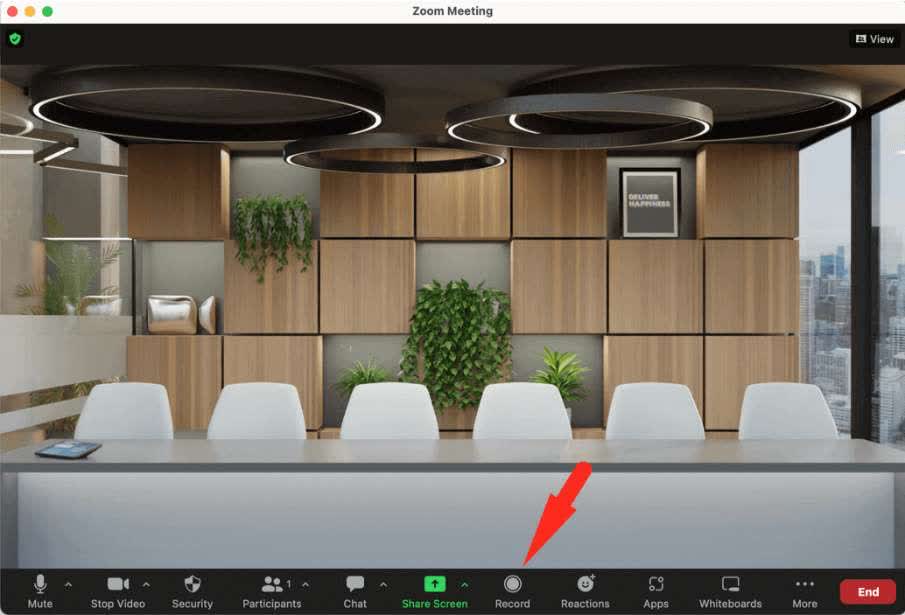
3. On the screen's upper-left corner, you'll find a "Recording" icon that shows that the recording is in progress. You can pause and continue the recording with the buttons on the screen's top or bottom.
4. After recording, click the "Stop" button. It'll automatically save the recording to your computer.
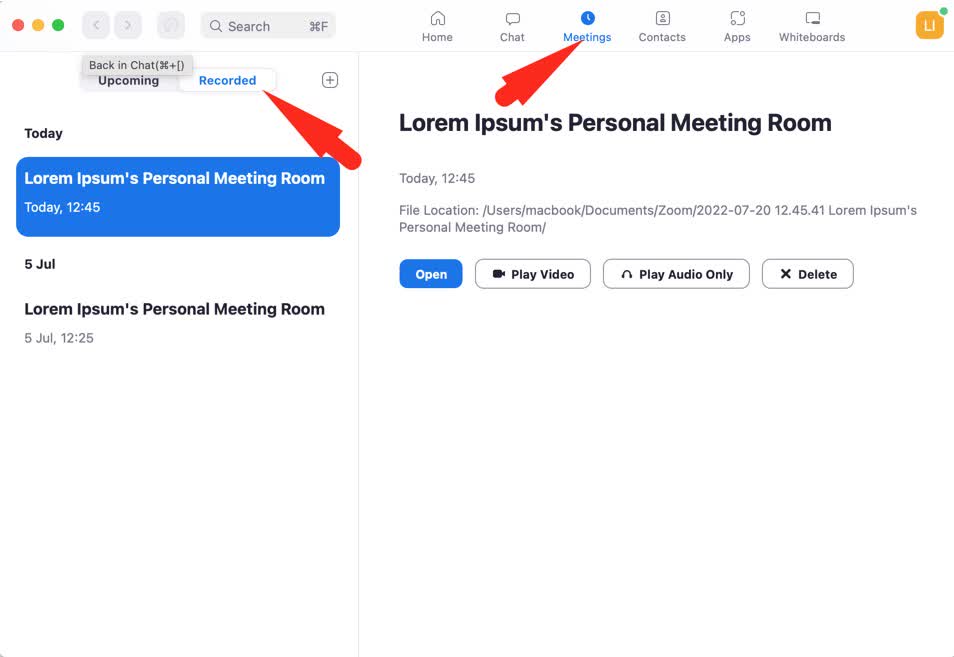
5. To access the recorded file, navigate the "Recorded" tab from the "Meetings" tab. Zoom allows you to rename any files you record and share them via email.
Note that when you start recording, an icon will appear next to your name and will be visible to everyone participating in the meeting.
Notta AI meeting assistant records, transcribes, and summarizes meetings so everyone can stay engaged without missing important details.
How to record a Zoom meeting without permission on Windows
Let's face it: sometimes, asking your host for permission to record the meeting isn't an option you'd love to explore. Fortunately, recording Zoom without permission is possible if you're using Windows.
There are different methods to achieve this depending on whether you're using Windows 10 and above or other Windows devices.
You can record Zoom meetings without the approval from your host using the built-in Xbox Game bar. Unfortunately, this is only available to users of Windows 10 PC and higher versions.
Here's how to record a Zoom meeting without permission on Windows 10 PC:
1. Open Zoom and simultaneously click on the Windows logo + G keys. This opens the Xbox Game Bar on your computer.
2. Next, navigate to the "Show All Captures" bar and click "Record." You'll find the "Show All Captures" bar on the screen top-left after the recording screen pops up.
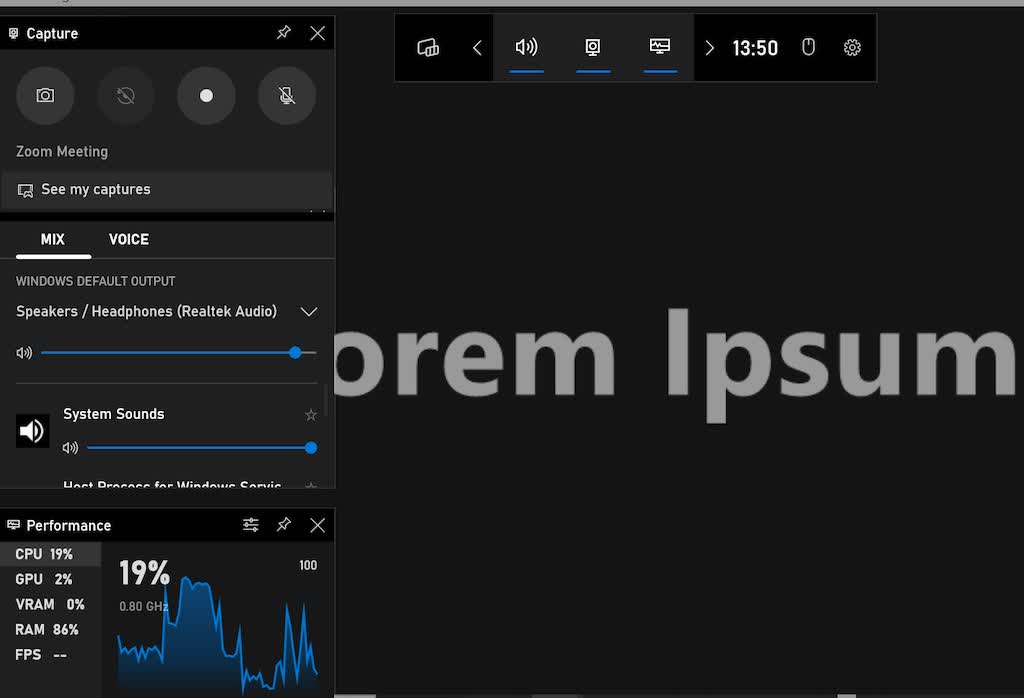
3. As an alternative to step 2, you can press Windows + Alt + R to commence screen recording. But don't minimize or maximize the window, as doing so will automatically stop your recording.
4. After the meeting, click on "Stop" to end the recording.
5. Go to "Videos" and then "Captures" on your PC to assess your recorded video.
Note: You can't use the Xbox Game bar to record Zoom sessions on lower versions of Windows 10. Luckily, there is a way out — you can use any screen recording tool of your choice.
How to record a Zoom meeting without permissions on Mac
If you're a Mac user, like Windows users, you too can record Zoom meetings secretly with two methods — Mac's screen recording feature or a screen recording software of your choosing.
Here's how to record a Zoom meeting without your host's approval using your Mac's screen recording feature:
1. First, go to your Mac's application folder and open QuickTime Player.
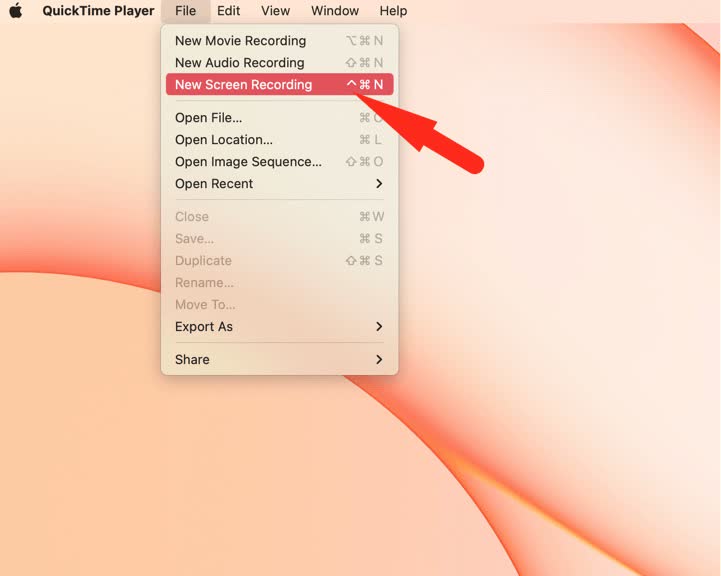
2. Then, from the QuickTime Player's menu bar, navigate to File and click on New Screen Recording.
3. Go to "Options" to select your preferred microphone and click on "Record." Your Zoom meeting will start recording. Note that you can choose to record only a part of the screen.
4. Click on the recording icon in QuickTime Player's menu bar to stop recording. After hitting the recording icon, the software will open your video, and you can edit, save, or share it.
How to record a Zoom meeting secretly with Notta
One screen recording tool for Zoom sessions that stands out is Notta. Notta has a free and paid version with numerous amazing features like real-time transcription. Its screen recorder also offers and is highly beginner-friendly.
Here's how to screen-record Zoom meetings without permission from your host using Notta:
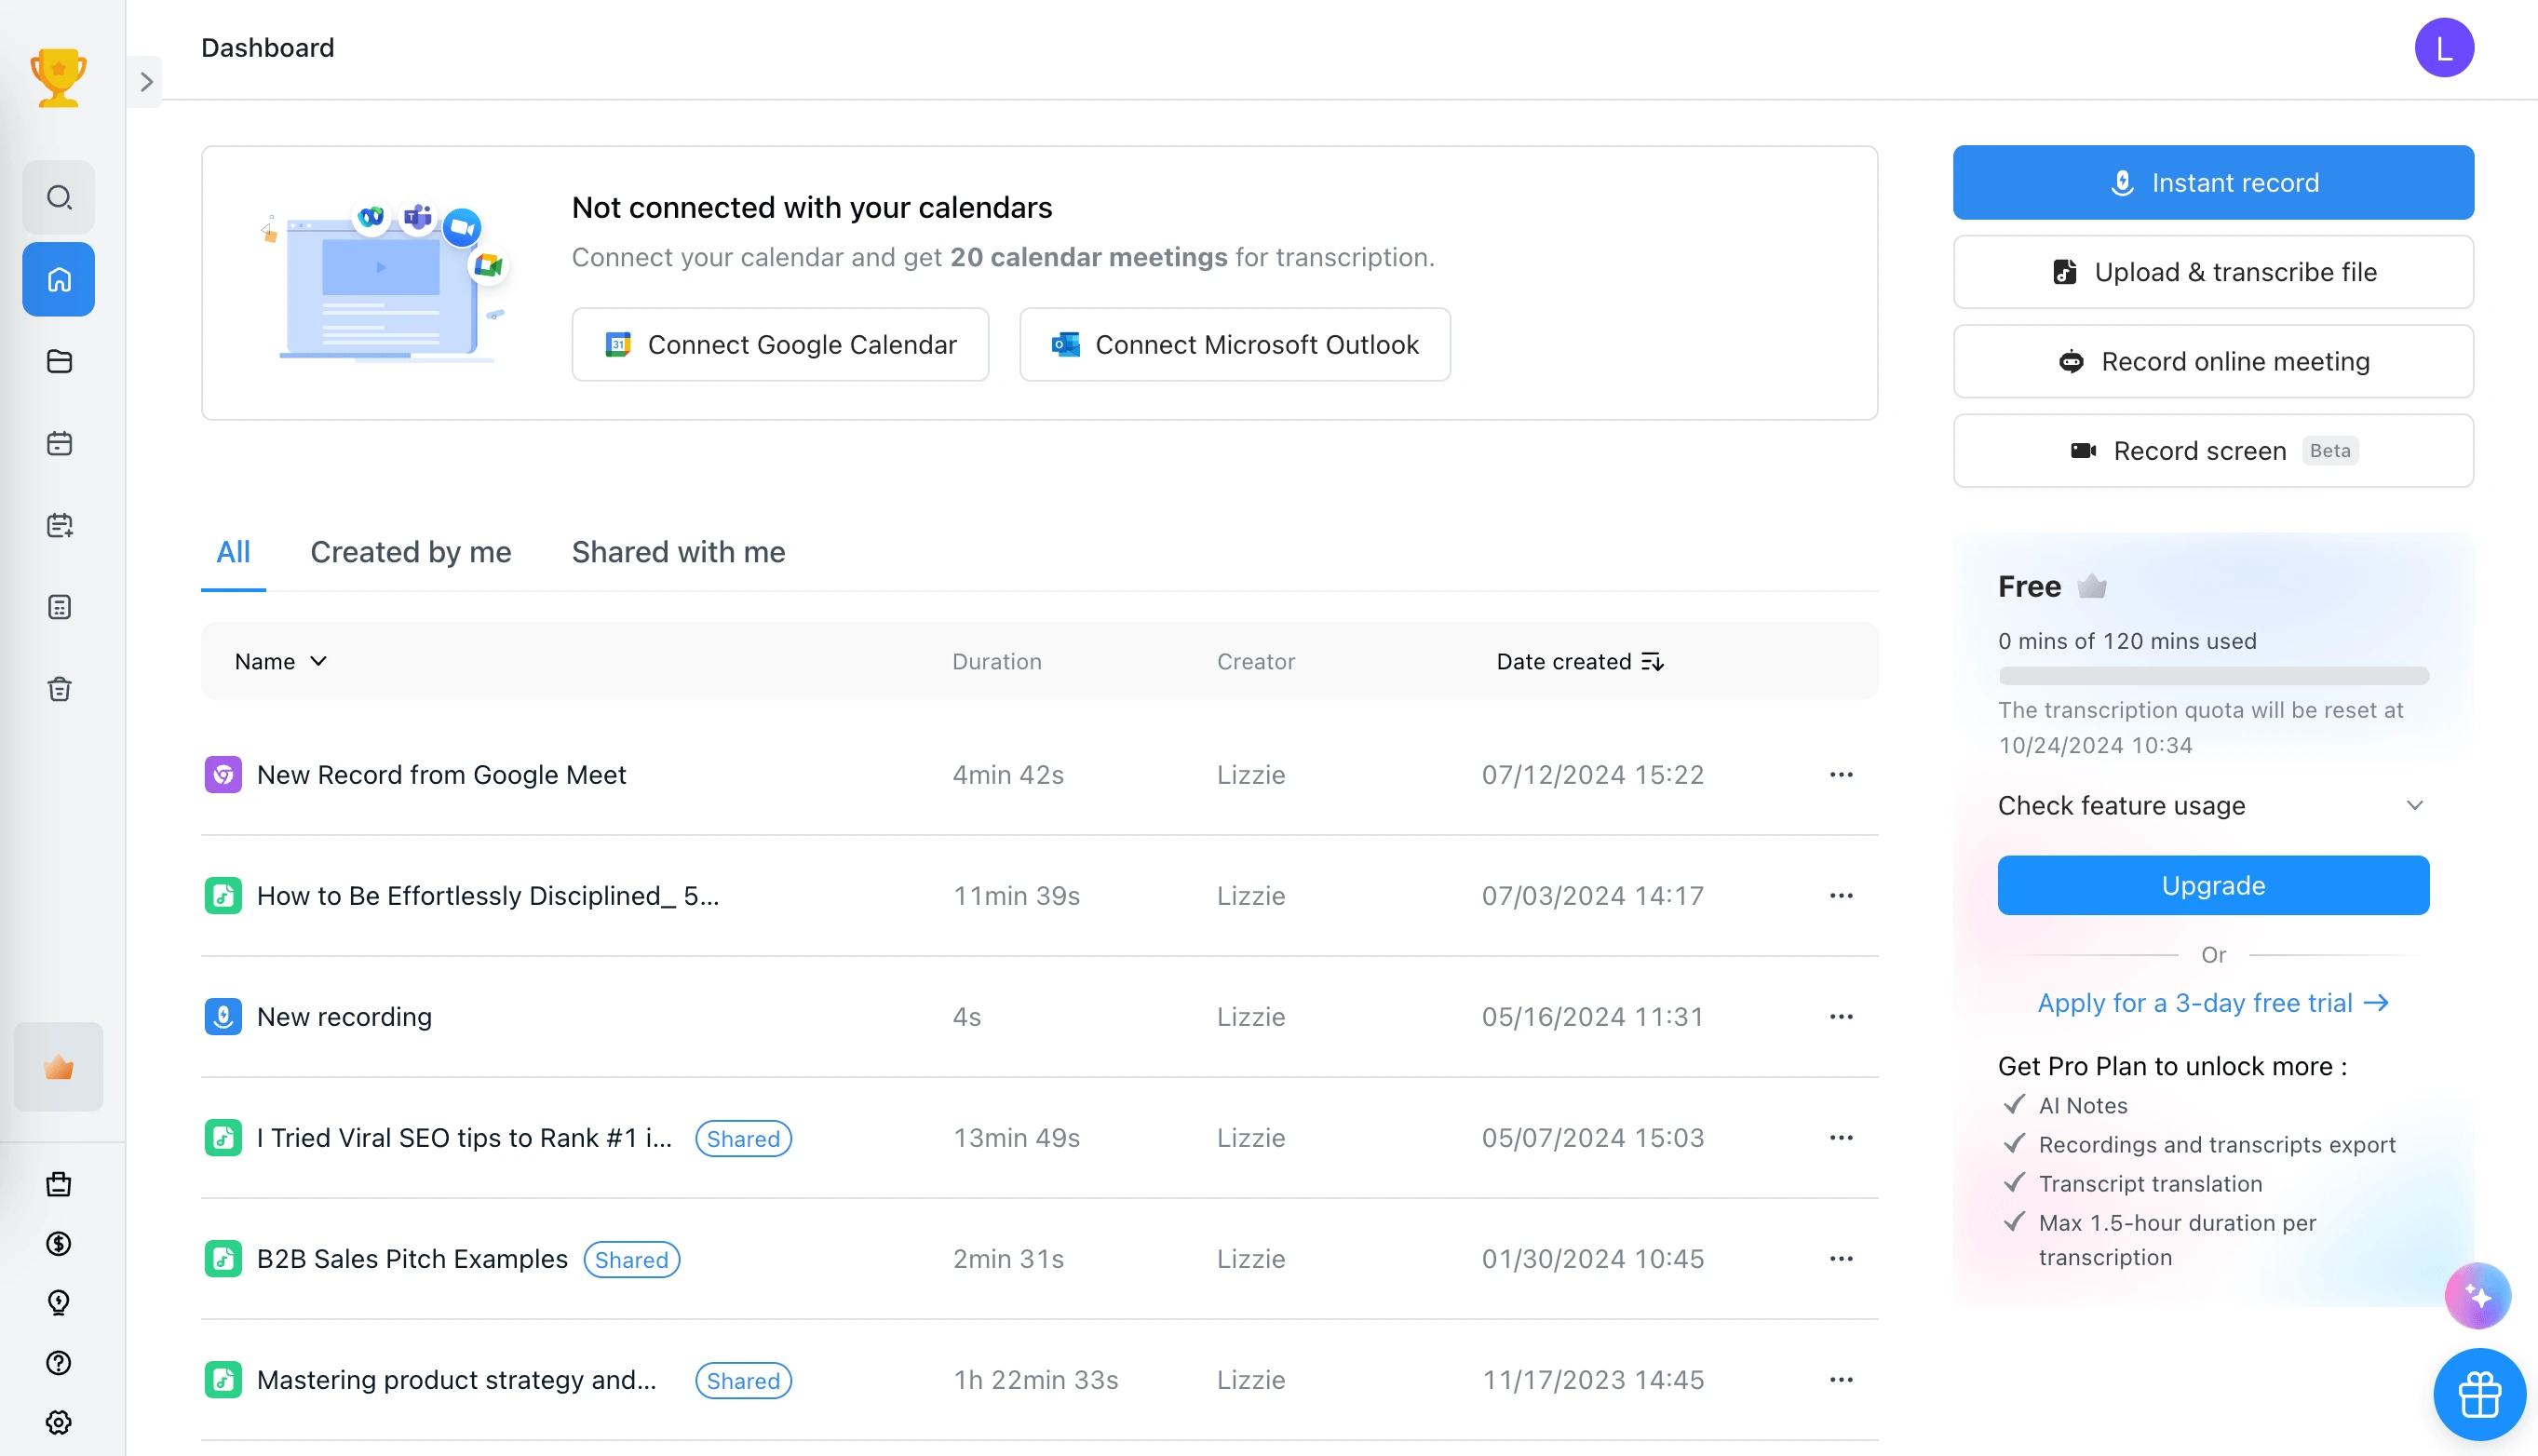
1. Open Notta and choose 'Record screen' mode. This ensures that you can capture everything on your desktop or browser screen.
2. Check what you want to capture: webcam, screen, or everything at once, and click ‘Allow’ to give access to your screen, camera, and/or microphone. Don't forget to choose the transcription language for the meeting you want to record.
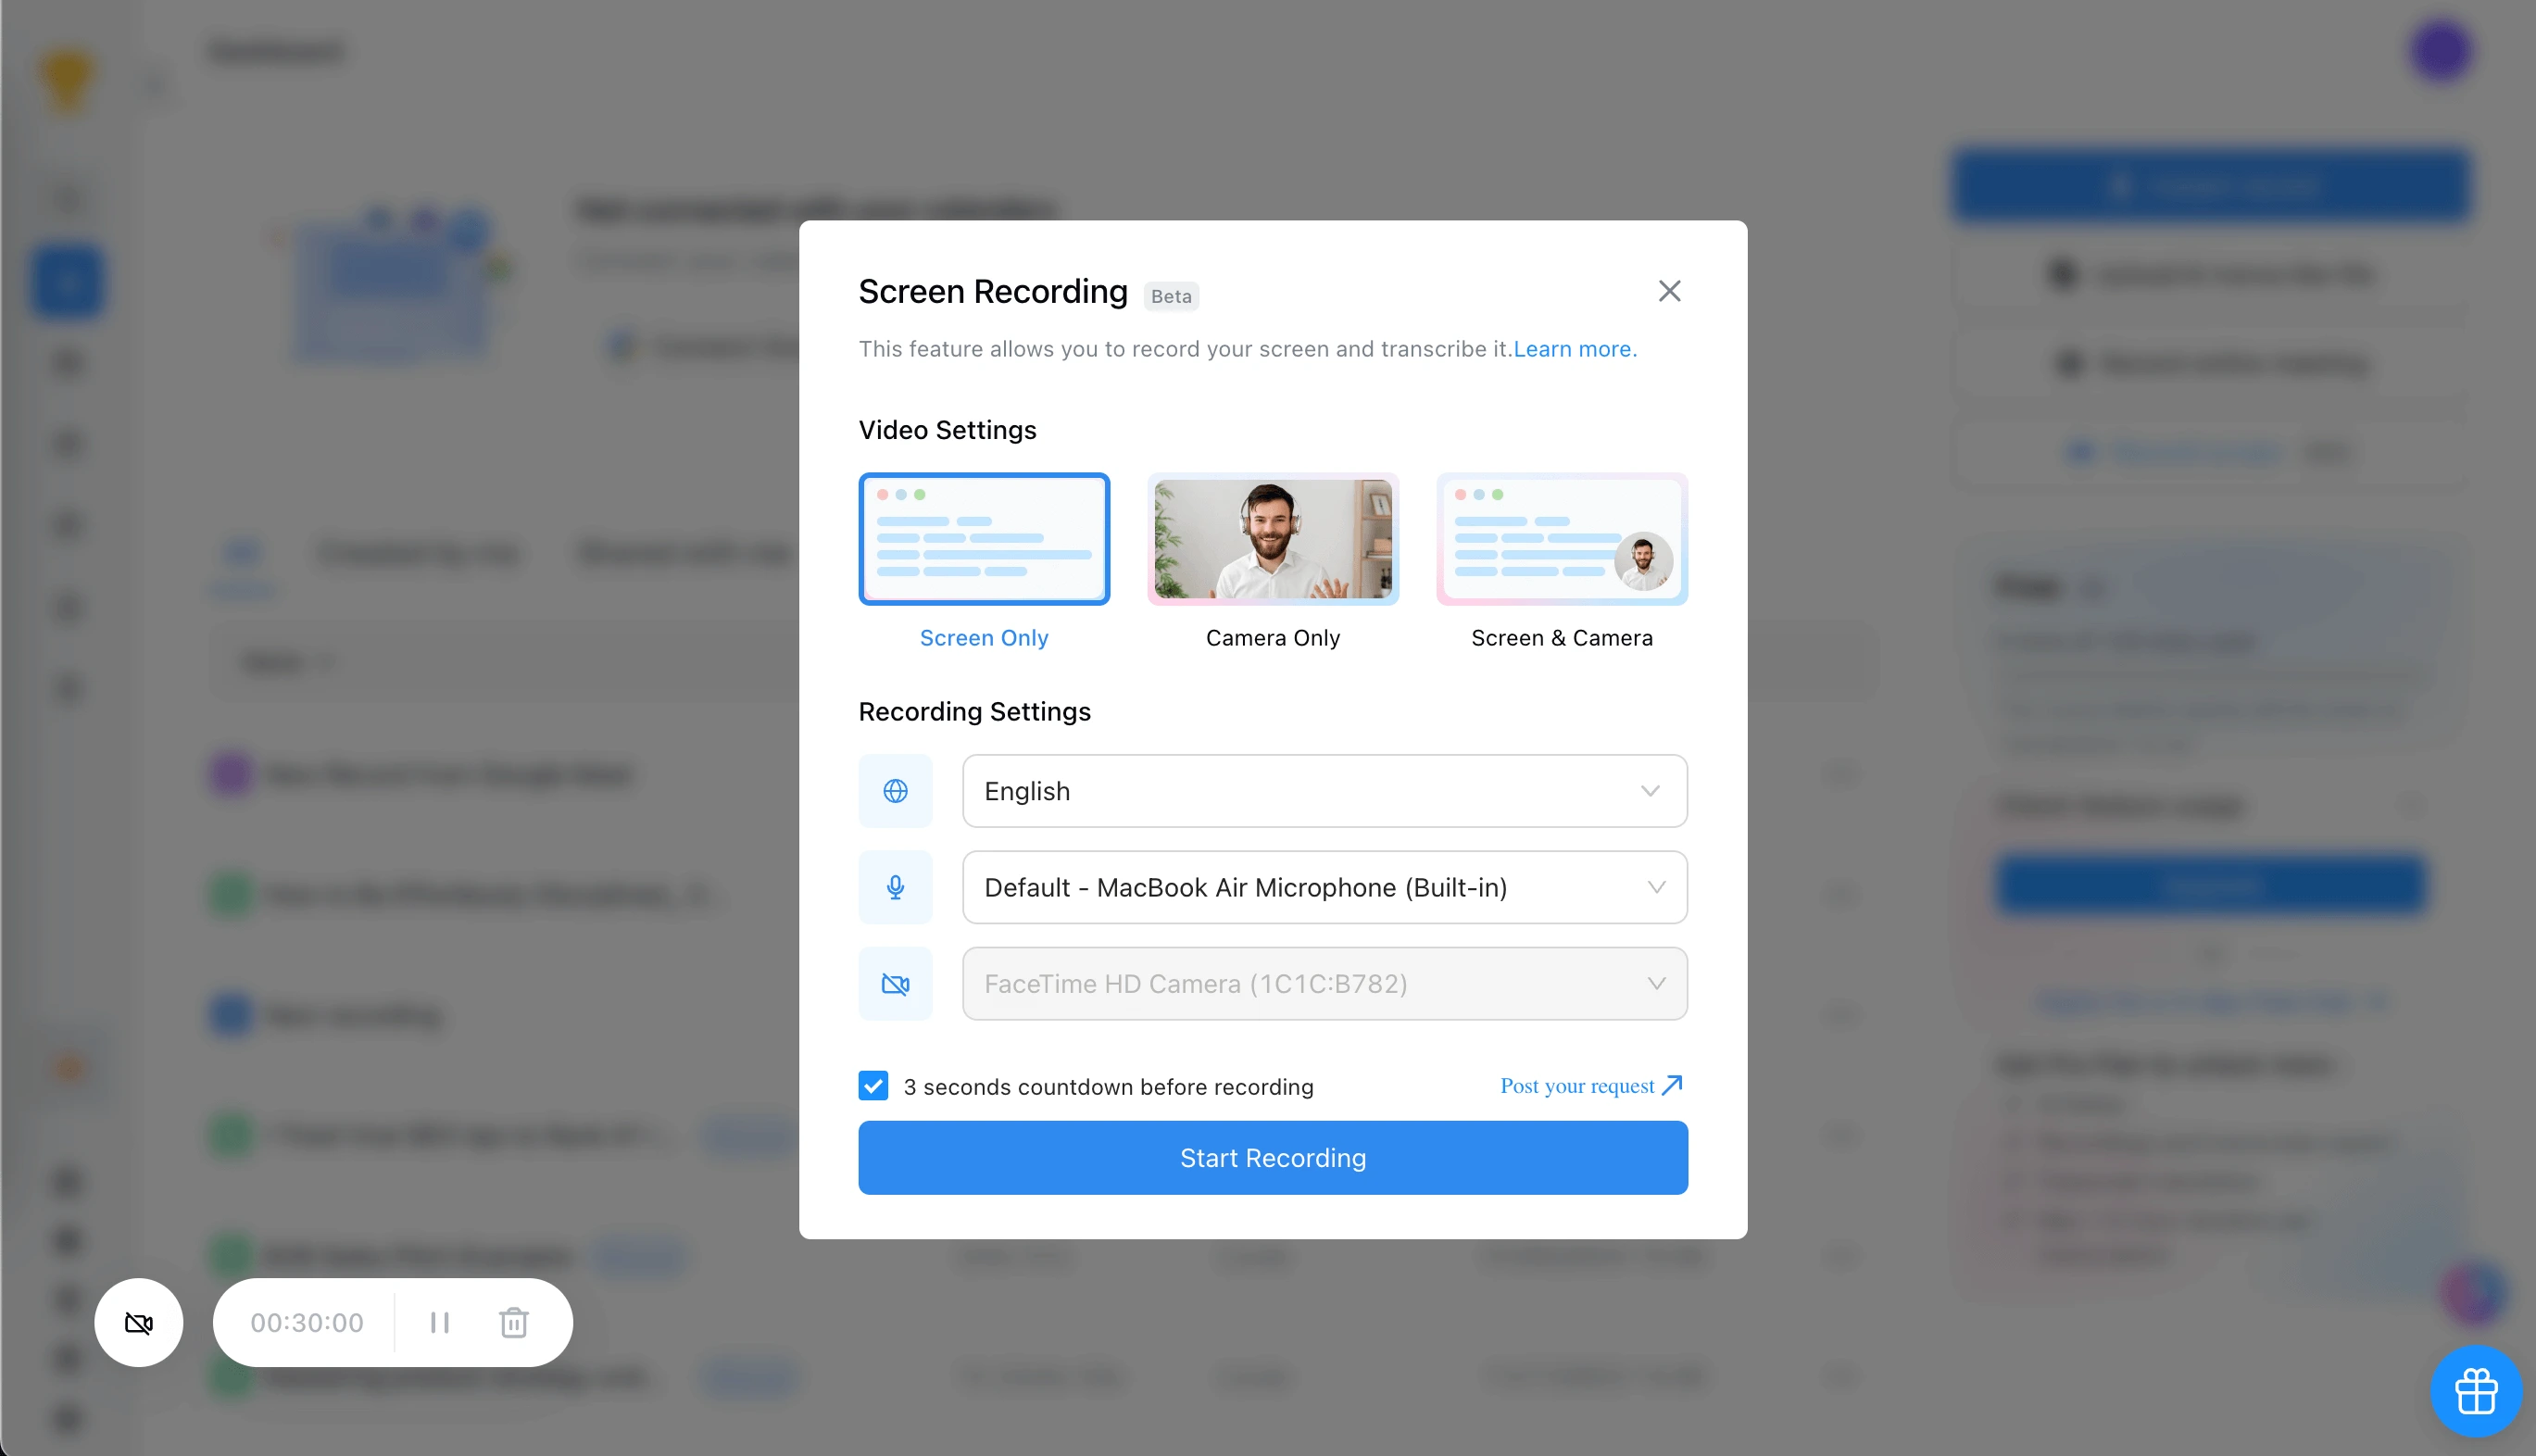 3. Click "Start Recording" and choose what to share: Browser tab, window, or the entire screen. Once confirmed, click "Share."
4. Once done, select the 'Stop Sharing' button available at the bottom of the page. You can download the recording and transcript from Notta.
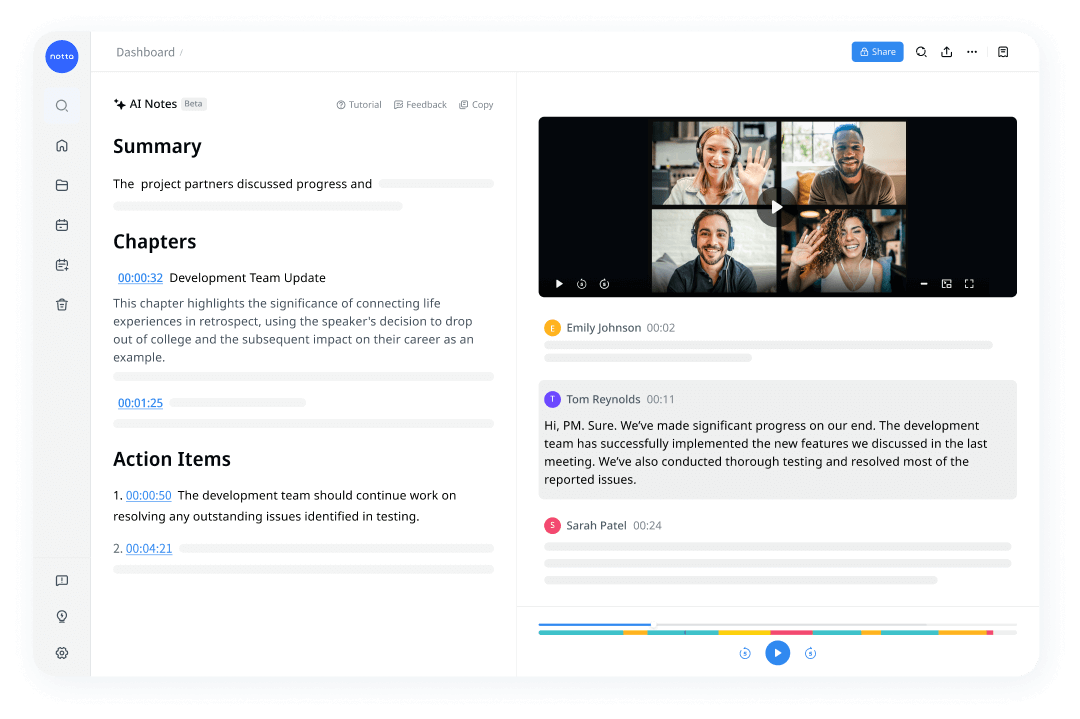
Record, transcribe, summarize, and share meeting conversations with one simple click.
Extra tips: Is it legal to record a Zoom meeting without permission?
The legality of recording Zoom meetings without permission depends on your state's wiretapping and recording laws. For example, if you're in a one-party state like North Carolina, you can record your Zoom conversation with the consent of only one participant. However, in a two-party consent state like Pennsylvania, California, and Florida, all the participants in the session must give their consent.
Generally, Zoom will always notify participants of a call recording whenever any participant hits "Record." If you're using a third-party recorder to record your Zoom calls, it's essential to keep these laws in mind. This is because failing to get consent in a state where it is required will attract legal consequences.
Make every word count with Notta
You can now record Zoom sessions on your Mac or Microsoft PC without your host's permission. But be careful with this, and consider the wiretapping laws in your state before recording a Zoom call secretly.
Are you wondering how to transcribe your Zoom calls in real-time, too? Then check out Notta, my transcribing app of choice. It has excellent edit/mark transcript and live stream text sharing features you won't find on any other software.
FAQs
Will other participants be alerted if I record the Zoom Meeting?
Regardless of the device you're using, Zoom will notify all the participants in your meeting once you hit "Record." It does this through the "Recording" sign on a red box on the screen. If the participants object to your recording, you wouldn't be able to access the video recording after your discussion.
However, you can record Zoom meetings without alerting the participants by using third-party programs or your device's in-built screen recorders.
How do I block participants from recording the Zoom meeting?
As a host, you can prevent participants from recording your meeting during sensitive discussions. First, a participant can only record the session in the application if you permit them.
To withdraw the permission at any time, click on Participants > More and then Forbid Record. However, note that you can't stop a participant from recording if they're doing so outside Zoom.
Can I convert the Zoom recorded file?
Zoom automatically converts recorded videos to MP4 files after recording. But this process may fail due to an interruption. If you wish to transform the recording manually, click on "Recorded" from "Meetings." Then, choose the preferred file and select "Convert."
What's the best third-party software for recording Zoom sessions?
Choosing the best third-party software s relative because it depends on your unique needs. What you need to know is that you can use any third-party screen recorder to record your Zoom meetings. However, test the software to ensure it's compatible with your device before the meeting.
How to transcribe my Zoom meeting?
You can transcribe your Zoom meeting with an accuracy rate of up to 95% using Notta. Notta's main features include real-time transcription, live stream text sharing, export files, edit/mark transcript, etc.
Here's how to transcribe your Zoom meeting with Notta:
1. Locate your Zoom recording by signing in to Zoom
2. After clicking "Sign in," click on "Recordings" on the left panel. Your recording will be here if you're creating Zoom Cloud Recording transcripts. Click the "Down Arrow" next to the recording and then "Download."
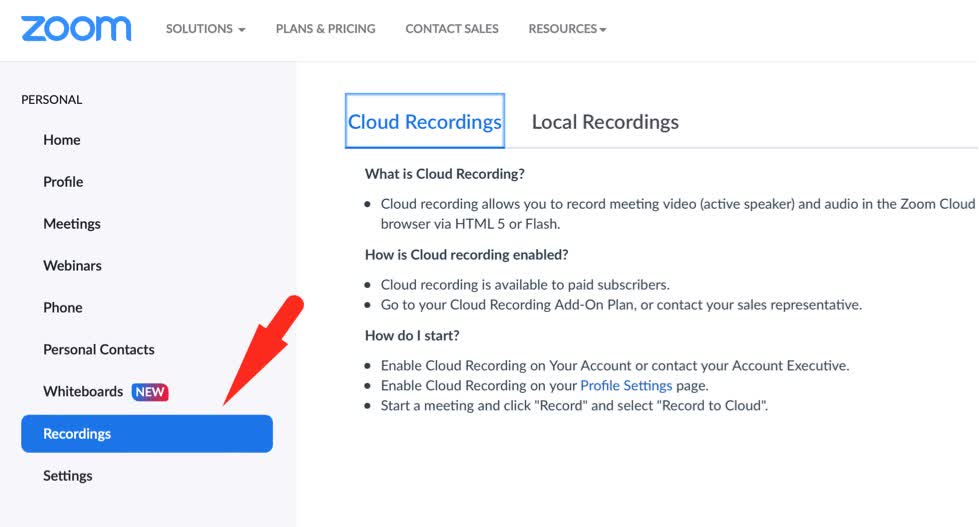
3. If you don’t have a Zoom Cloud account, click "Local Recordings." Next, navigate to the recording you wish to transcribe, and on your screen's right side, click "Open."
4. Click "Open zoom.us" on the pop-up window that appears.
5. Copy and paste the .m4a audio file somewhere you can find it, then click "Import Files" from your Notta dashboard.
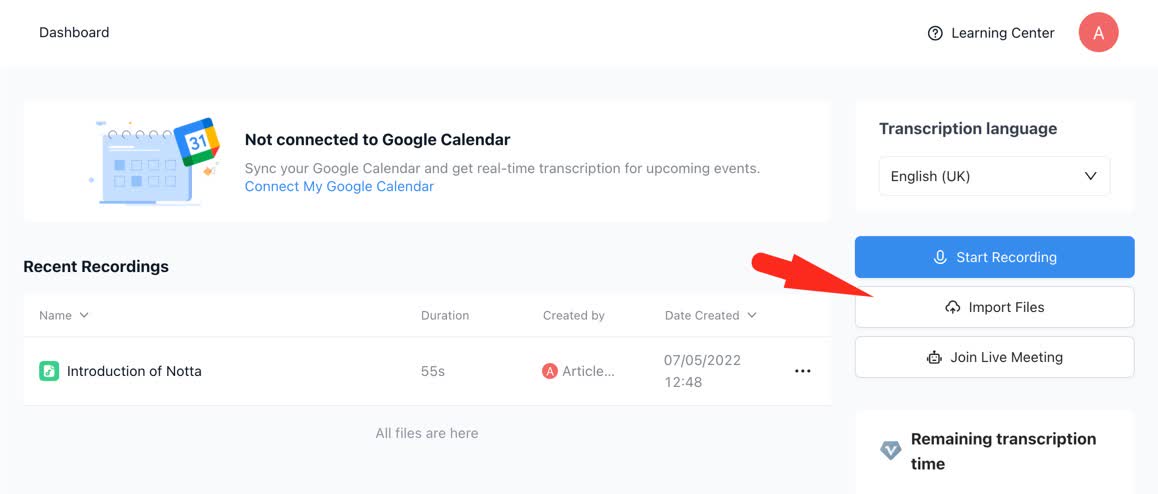
6. Drag and drop your .m4a file into the box.
7. Click "Close" and click on your transcript.
Congratulations, you now have your Zoom transcript!