Where do Voice Messages Save on iPhone?
98% accurate, real-time transcription in just a few clicks. 58 languages and multiple platforms supported.
How to stop your iPhone audio messages from vanishing—and keep them forever!
The problem:
You receive an important or touching audio message on your iPhone. Later, you decide you’d like to listen to it again.
You tap the Messages app, expecting the audio message to be there, but (to your dismay), it’s already vanished.
Apple has expired your audio message!
The solution:
In this article, I'll explain how you can stop your audio messages from disappearing and how to export them out of the Messages app to use elsewhere.
But first, let's review some basics:
How to listen & reply to your audio messages?
By default, the iPhone is set up to play all incoming audio messages using a feature called ‘Raise to Listen.’
It’s incredibly simple to use:
To listen to a message, raise the iPhone to your ear.
To reply, raise it again.
If you want to disable the feature, go to:
‘Settings’>’ Messages’
Toggle off>‘Raise to Listen.’
Audio messages will play when you tap on the triangular play icon.
You can respond to a message by tapping on the soundwave icon inside the message reply field.

Unlock the power of seamless voicemail transcription with Notta on your iPhone. With Notta, you can easily access, transcribe, and manage your voice messages.
How to save iPhone audio messages?
You can save any audio message you’ve received on your iPhone by using one of these simple methods:
The ‘Keep’ button
Navigate to the voice message in the Message app.
If you look at the audio, you will see the word ‘Keep’ written in blue directly below it.
Tap the text to save the audio.
Doing this will ensure it remains visible for as long as you have that message thread on your iPhone.
If your iPhone messages are synced via iCloud, you can access your audio messages across all your Apple devices.
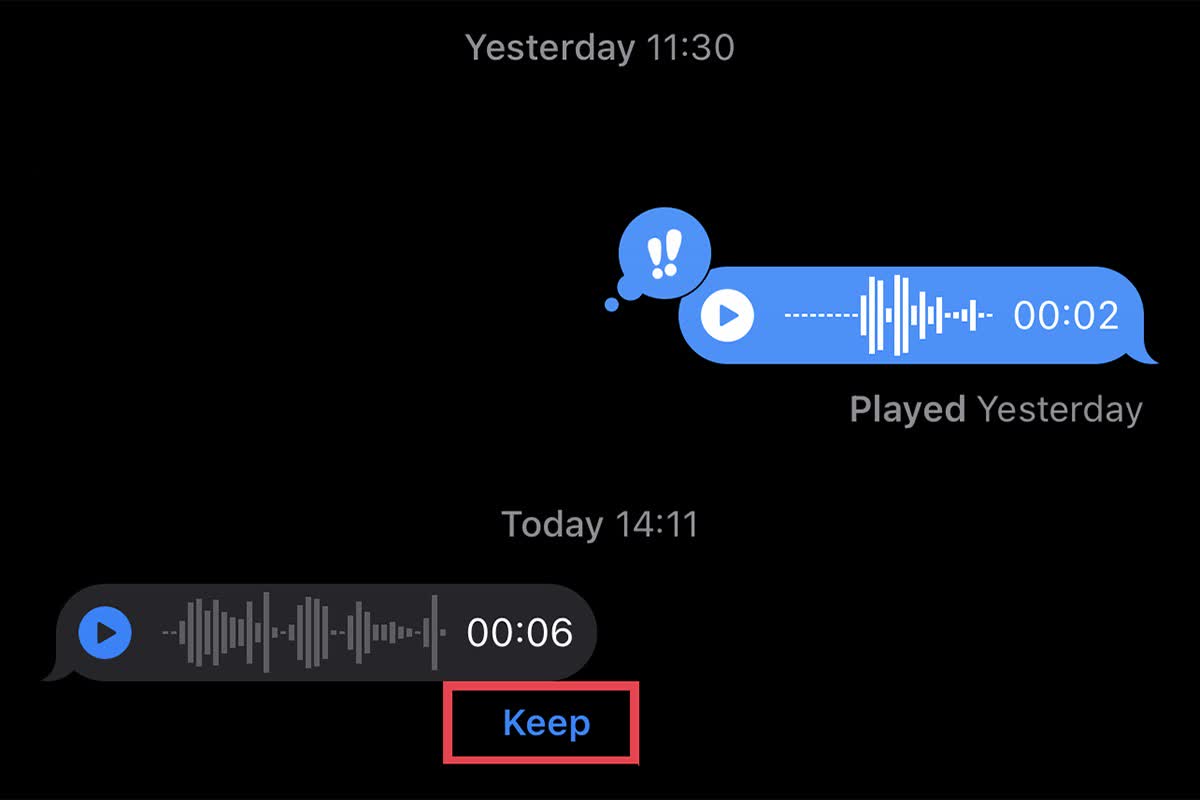
The disadvantage of using ‘Keep’ is that it’s easy to forget to save the file, and you need to remember to save each message to prevent it from expiring.
By default, messages expire 2 minutes after you listen to them. Once they do, there’s no way to retrieve them.
A better alternative to separately saving each message is to head into the iPhone ‘Settings’ menu and remove the time limit altogether.
This simple change will ensure you can keep your audio messages available indefinitely.
Here’s how:
How to change the default audio message settings?
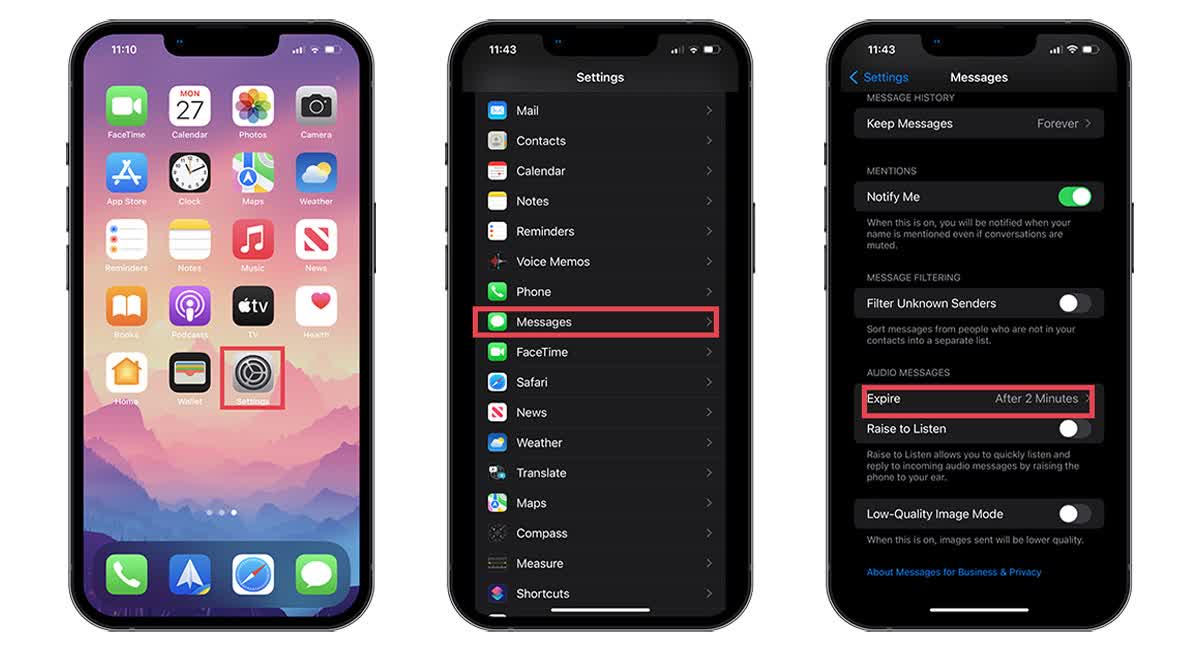
Tap the ‘Settings’ icon on your iPhone home screen.
Scroll down until you see the ‘Messages’ icon. Tap it to enter the sub-menu.
Scroll down to ‘Audio Messages’ and tap to enter the ‘Expire’ tab.
Change the expiration option to ‘Never.’
Where are audio messages saved?
If you have an iOS version earlier than iOS 12, your saved audio files will be in the Voice Memos app.
To access them:
Open ‘Messages.’
Locate the audio message you want to save.
Long-press it.
Tap ‘Save.’
Your audio messages will now be visible inside the Voice Memos app. Audio messages in Voice Memos are relatively easy to move, archive, and share.
Unfortunately, Apple has slightly nixed that option in subsequent versions of iOS.
Audio messages on iOS 12 & later
Voice messages received on iPhones running iOS 12 and beyond behave as if they were secret messages delivered to agents in a ‘Mission Impossible’ movie! 🕵
Unless you save them, they automatically ‘self-destruct’ 2 minutes after listening to them!
This process is designed to save storage space and protect your privacy. However, that consideration won’t resolve your frustration when you lose an important audio message because you forgot to save it!
Exporting voice messages using the Notes app
Ultimately, neither the ‘Keep’ function nor housing your audio voice messages inside the Messages app may be the solution you’re seeking.
What if you want to move your saved audio files outside of the Messages app altogether?
Perhaps you want to use the messages creatively, or maybe, you’d like to archive them on a secure drive that only you control.
Fortunately, this is relatively simple to do.
You’ll begin by using a Long-Press inside the ‘Messages’ app.
Here’s how it works:
Long press on the audio message you want to export/share. This action brings up a secondary menu.
Now, select the ‘Copy’ function to copy the audio file to the iPhone’s clipboard.
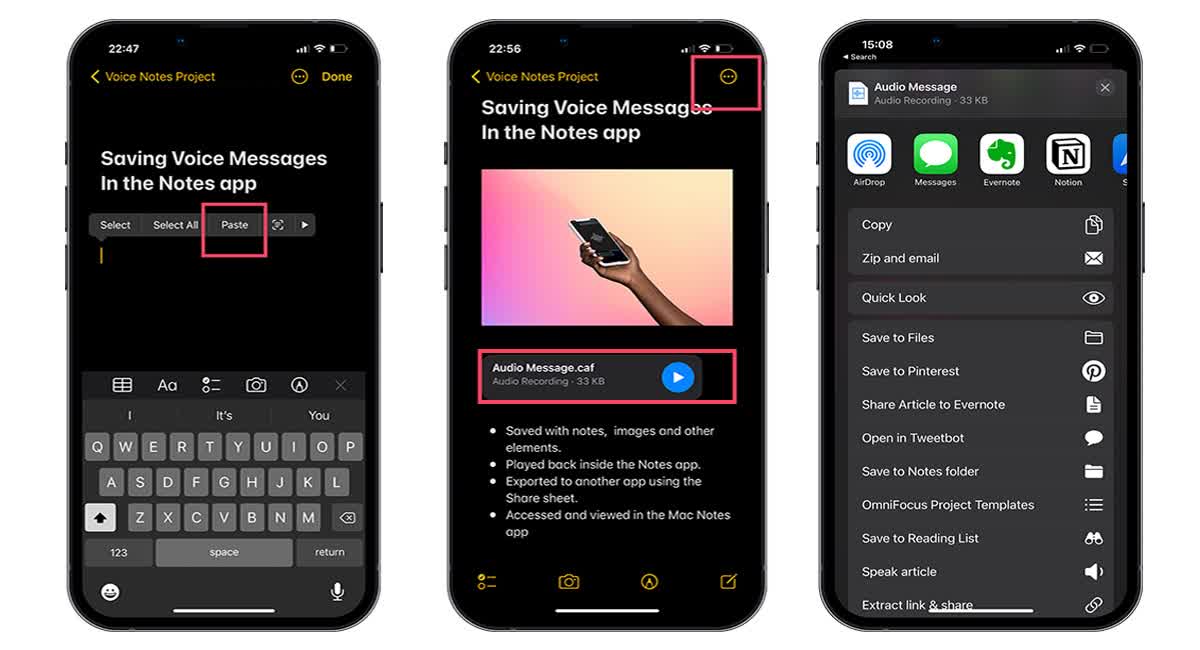
Next, launch the ‘Notes’ app & create a new note.
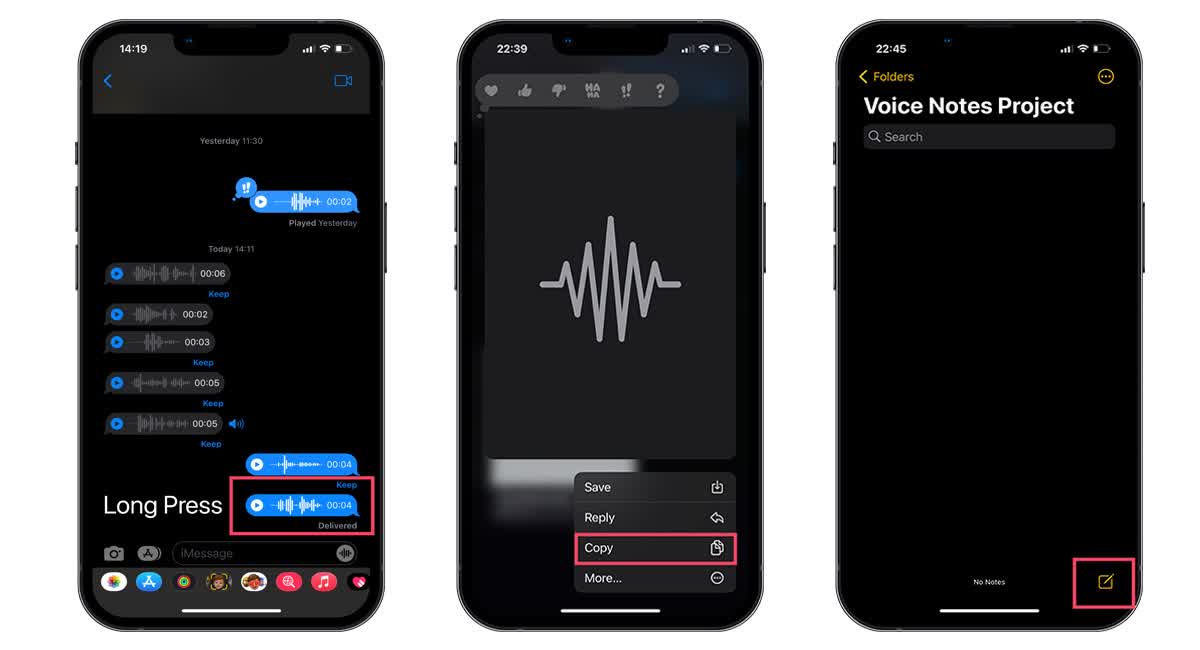
Tap the new note you created and select ’Paste’ from the pop-up menu to copy your audio file into it. Your audio message will be pasted into Notes as a .caf file.
‘Long- Press’ on this audio file, OR tap in the top right-hand corner. Either of these actions will allow you to access your iPhone’s share options.
You can now share the audio file with various apps and services.
Fed up with slow documentation? With Notta, you can record and access error-free transcripts seamlessly synced across all your devices.
FAQs
Where do saved messages go on my iPhone?
All saved messages are stored on iOS 12 and later in the Messages app.
But, if you’re running a version of iOS earlier than version 12, they will be stored in the Voice Memos app.
How do I know when someone has heard my audio message?
Once the person you sent the audio message to has listened to it, the word ‘Played’ will appear underneath the message.
If they save the message, you will receive a notification informing you.
NB: This notification also appears if they have used ‘Settings’ to override the default message expiry time.
Can I unsend a voice message on my iPhone?
No.
You cannot delete an audio message once you’ve sent it to someone else. Deleting it from your device will not affect its existence on theirs. Instead, you’re better advised to delete the message before sending it.
Conclusion
We hope you now feel more confident using your iPhone’s audio messaging capabilities. Voice messaging is a super helpful way to communicate with your contacts when you don’t have time to type a long reply.
Don’t forget to check out Notta’s free Chrome extension. It’s a great way to record and transcribe audio to text on the web. Having transcripts of all the YouTube videos and tutorials you watch is a wonderful way to help you remember what you learn!