
How to Use Speech to Text in Windows 10/11
98% accurate, real-time transcription in just a few clicks. 58 languages and multiple platforms supported.
Windows is one of the most used operating systems thanks to its cutting-edge technology and ease of use. One of its many accessibility features is the speech-to-text tool.
This feature allows you to dictate words anywhere you can type them. While it is true that voice typing has been included in the old versions of the OS, like Windows 7, only a few people know how to explore its full benefits.
Luckily, using Windows speech to text is pretty straightforward, and you only need a detailed guide such as this to help you get the hack of things.
So, if you want to maximize the benefits of dictation on Windows 10/11, read this article till the end, as we have added some perks in the later sections.
How to enable Windows speech recognition?
Windows speech recognition is a free built-in feature on your computer. It is a complete package on its own and does not require downloading additional software.
It is also the basis for using dictation on Windows 10 and 11. So, before you can start using the voice-to-text feature on your PC, you need to follow the steps below to enable Windows speech recognition:
Press the ‘Windows’ key + ‘I’ to open the Settings app.
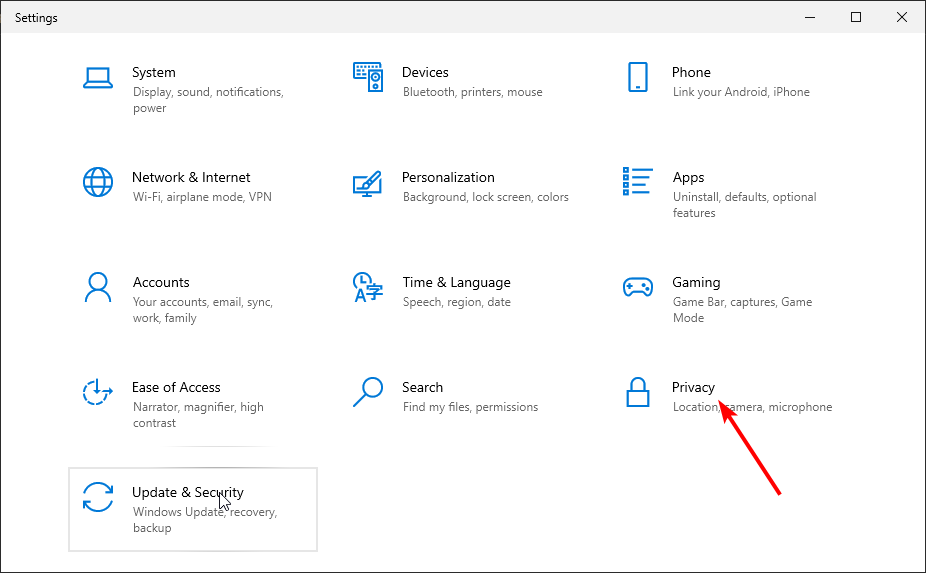
On Windows 10, select the ‘Privacy’ option.
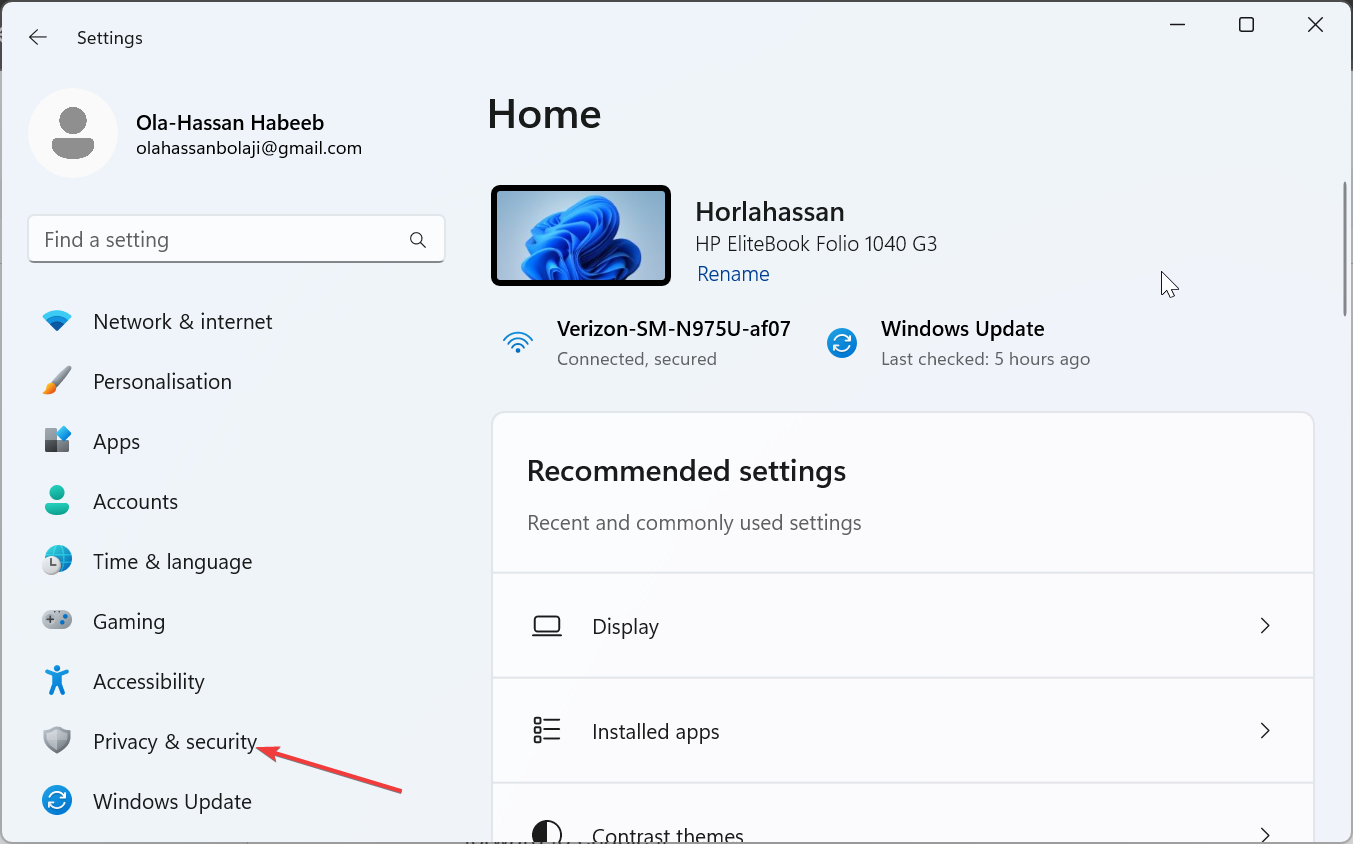
 Select ‘Privacy & security’ in the left pane on Windows 11.
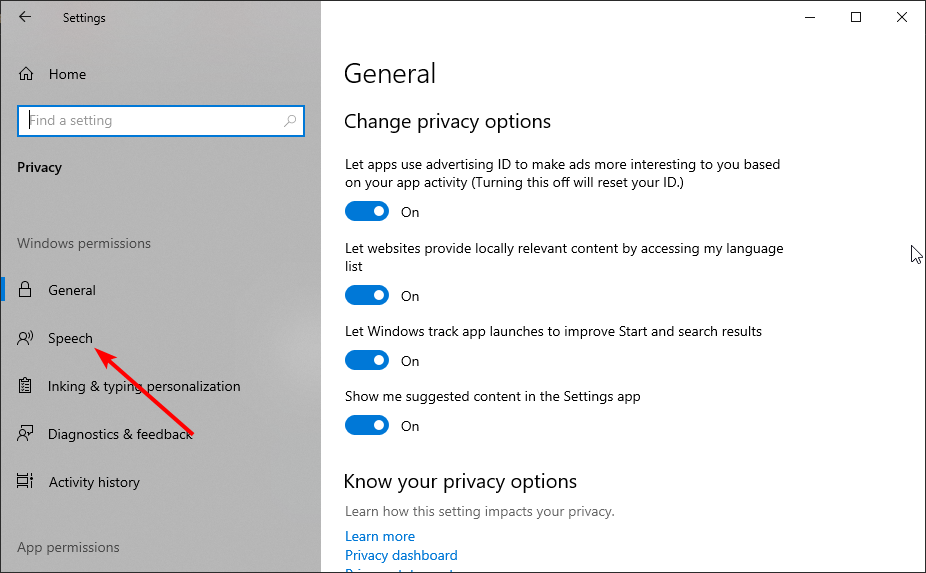
Now, select the ‘Speech’ option in the left pane on Windows 10.
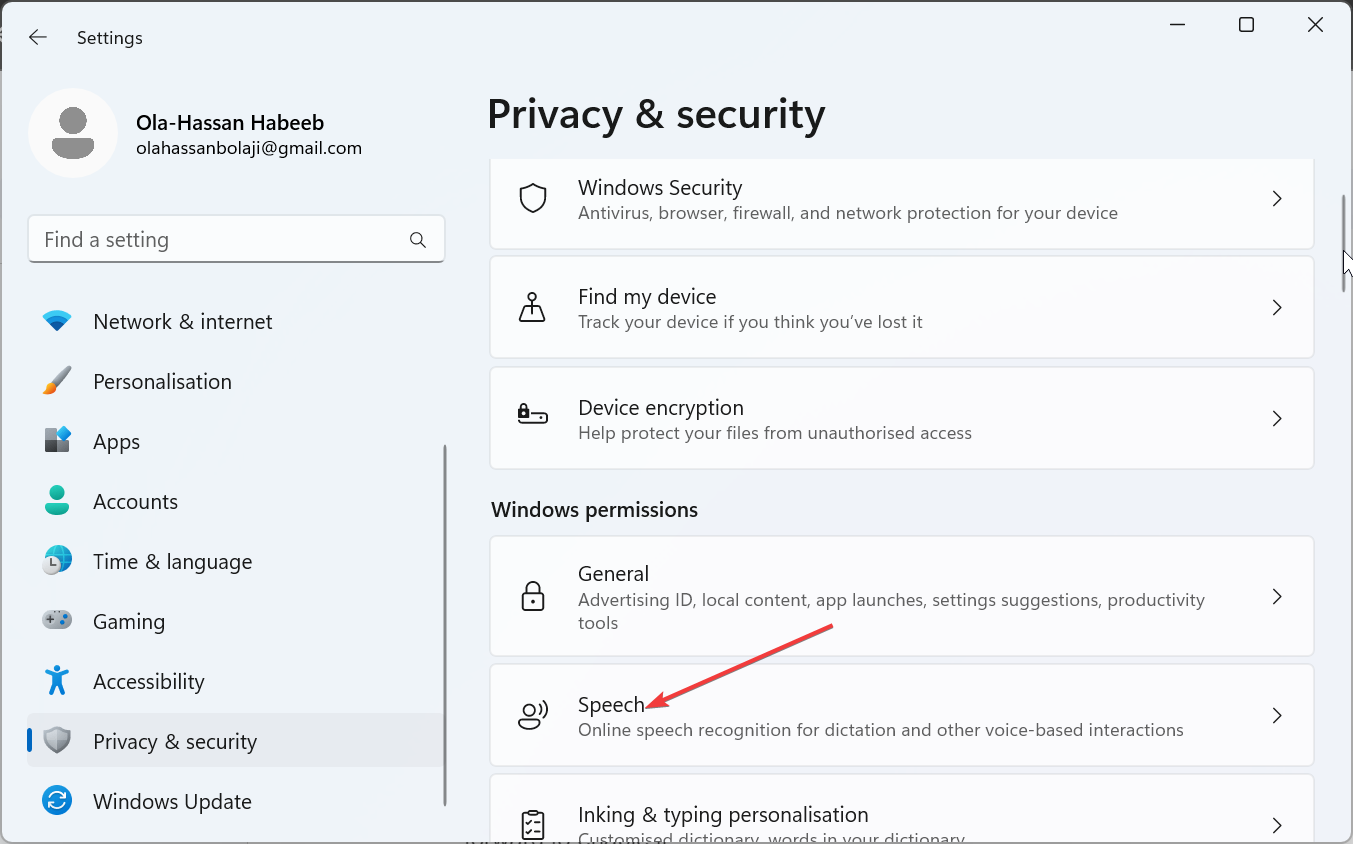
 You will find it on the right of Windows 11.
Finally, toggle the switch under the ‘Online Speech Recognition’ section forward to enable it.
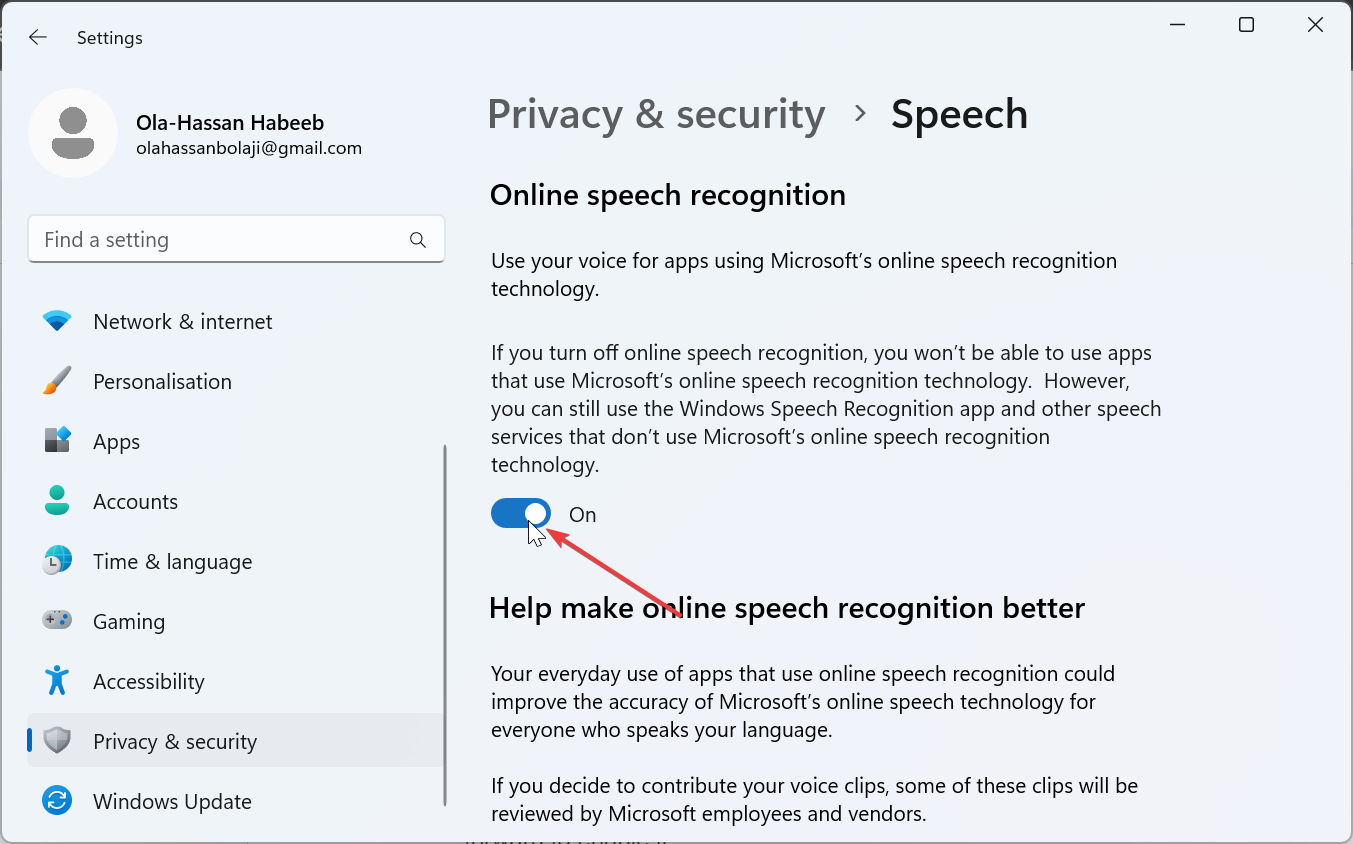
After completing the steps above, you can use voice typing on Windows 10 and 11.
Notta can convert your spoken interviews and conversations into text with 98.86% accuracy in minutes. Focus on conversations, not manual note-taking.
How to use voice typing in Windows 10/11
Before using speech to text on Windows 10 and its equivalent - voice typing - on Windows 11, let's look at the languages the feature currently supports.
At the time of writing, dictation commands are only available in US English on Windows 10. However, you can still dictate some basic texts, symbols, numbers, and letters in the following languages:
Simplified Chinese
English (Australia, Canada, India, United Kingdom)
French (France, Canada)
German (Germany)
Italian (Italy)
Portuguese (Brazil)
Spanish (Mexico, Spain)
The languages above - US English inclusive - are also supported on Windows 11. However, Windows 11 has a longer list, which includes languages like Bulgarian, Croatian, and Dutch.
You can check the full list on the Windows 11 voice typing supported languages page. If your language appears on the list, you can proceed to the steps below to start using the voice-to-text feature:
Open the application you want to type on and place your cursor on the line where you want the text to be.
Press the ‘Windows’ key + ‘H’ to launch the voice typing feature.
On Windows 10, a rectangular box should appear at the top of the page with a Listening… prompt.On Windows 11, a square box will appear at the bottom of the page with the same Listening… prompt.
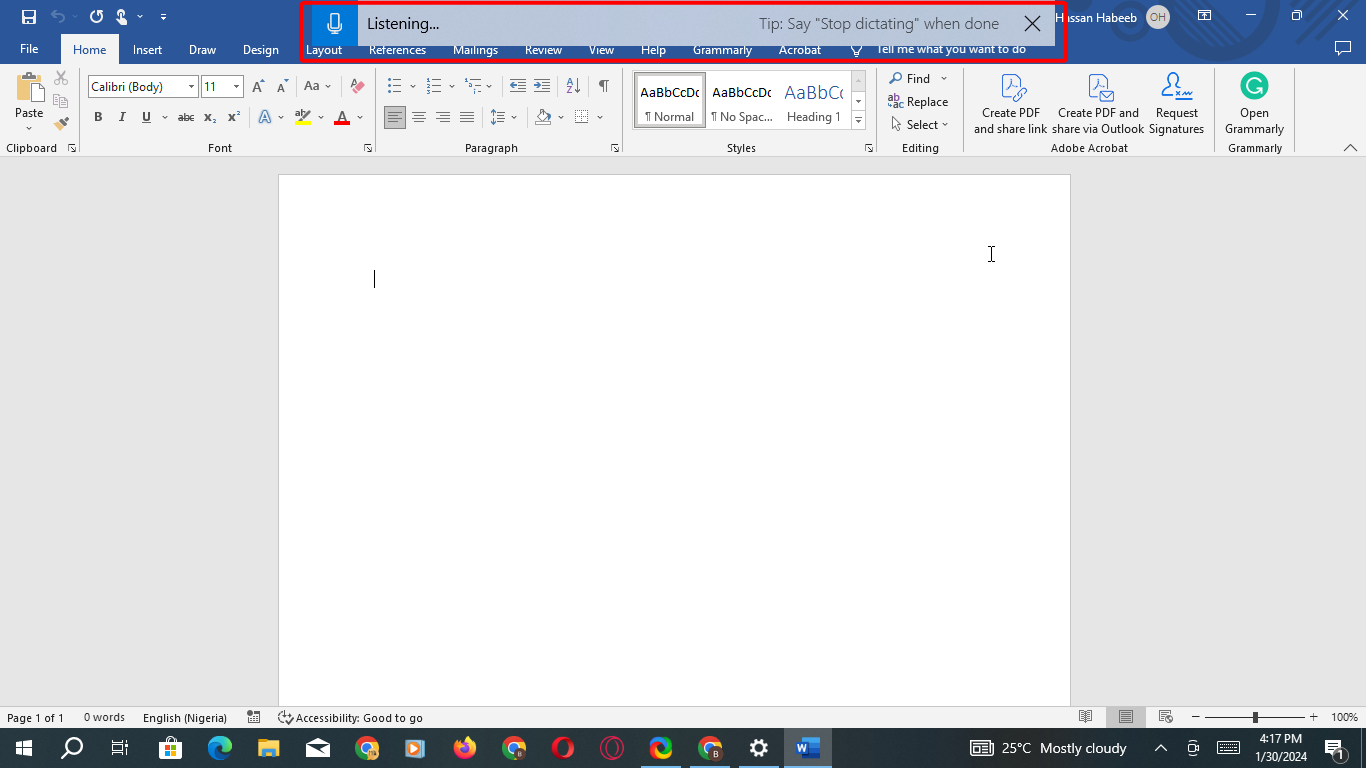
Now, you can start dictating, and the texts will appear on your screen.
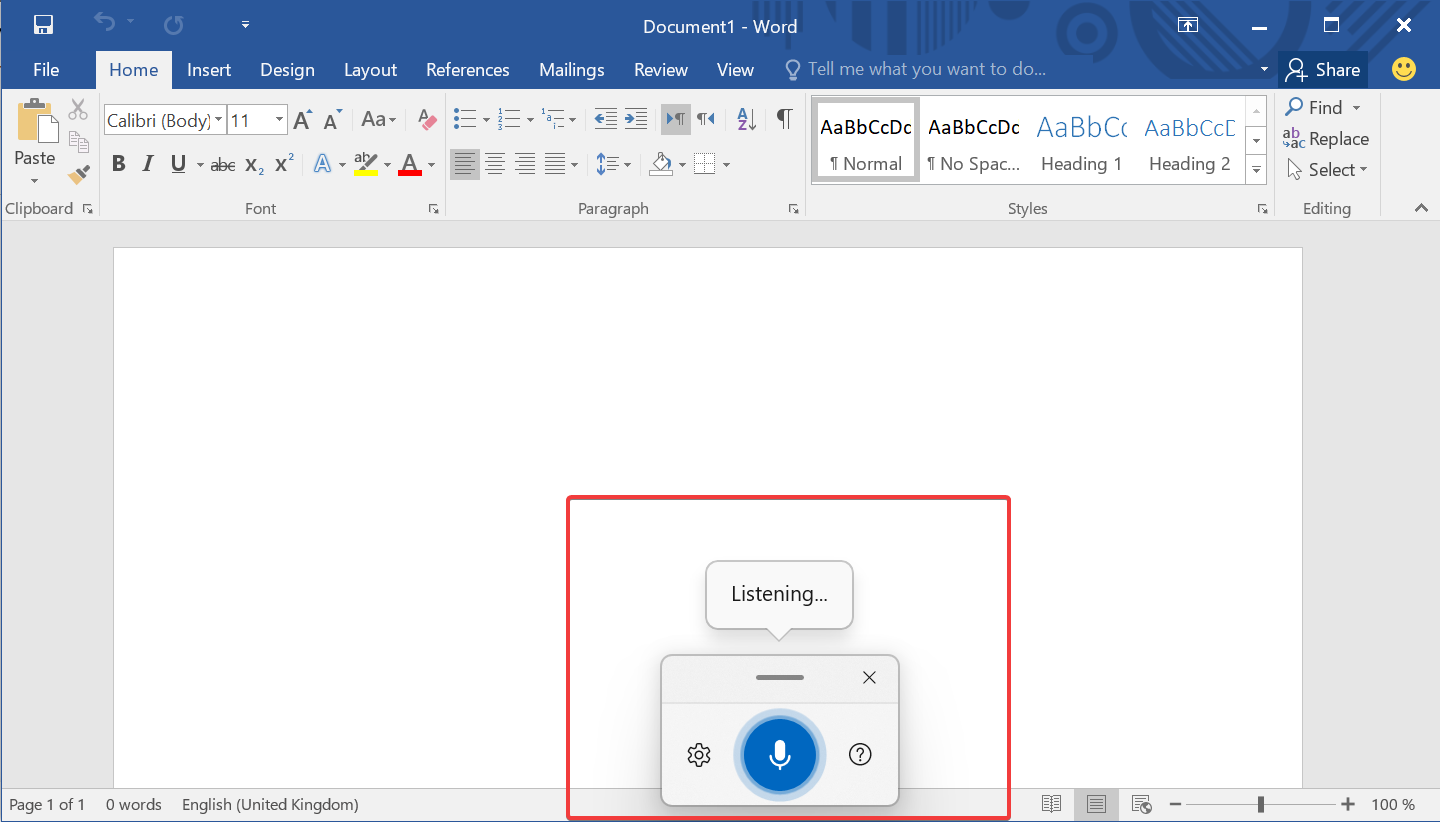
Finally, to disable the voice-to-text feature when you are done, just say “stop dictation” or pause for some time.
Common speech recognition commands
To fully enjoy the Windows speech to text feature, you need to know the commands for performing different tasks.
Below are some of the basic commands you cannot do without:
Dictation commands
| To: | Say: |
| Add a new line in a document | New line |
| Add tab | Tab |
| Place your cursor before a certain word | Go to word, e.g., Go to House |
| Add a new paragraph | New paragraph |
| Put the cursor after a specific word | Go after word, e.g, Go after pen |
| Insert the literal word (e.g., to add the word “period” and not the punctuation mark full stop) | Literal word, e.g., Literal period |
| Jump to the beginning of the current sentence | Go to the start of the sentence |
| Don't add a space after the next word | No space |
| Jump to the start of the current document | Go to the start of the document |
Punctuation commands
| To insert this: | Say: |
| . | Period; Decimal point; Dot; |
| , | Comma |
| ? | Question mark |
| : | Colon |
| ; | Semicolon |
| ! | Exclamation mark; Exclamation point |
| @ | At sign |
| “ | Open double quote, Open quote |
| ( | Open parenthesis; Open paren |
The above are the basic commands for voice typing on Windows 10 and 11. To explore more, check the official Windows speech recognition commands page.
Best alternative to Windows voice-to-text
The speech-to-text feature on Windows is an excellent addition that makes typing easy. However, like every free tool and feature, it has its downsides.
Among these shortcomings is the low number of supported languages on Windows 10. Also, some users complain that the feature just stops working abruptly.
Luckily, there are dedicated dictation tools you can use in place of Windows dictation. One such tool is the ever-reliable Notta software.
Notta is an advanced transcription app that uses machine learning to convert speech to text. It allows you to dictate using its audio recording feature and transcribes it to texts in real-time. Also, you can edit the transcription to your taste while dictating.
What's more, Notta supports a remarkable 58 languages and allows you to transcribe audio to text from different sources, like YouTube and Google Drive, recordings from your devices, and even from live meetings on platforms like Google Meet, Zoom, and Teams.
Notta just about revolutionizes the process of converting voice to text.
Below are the steps to follow to convert speech to text on Notta:
Launch your browser and sign in to Notta to enter your dashboard.
Click the dropdown under Transcription language and choose your language.
Now, click ‘Record an audio.’
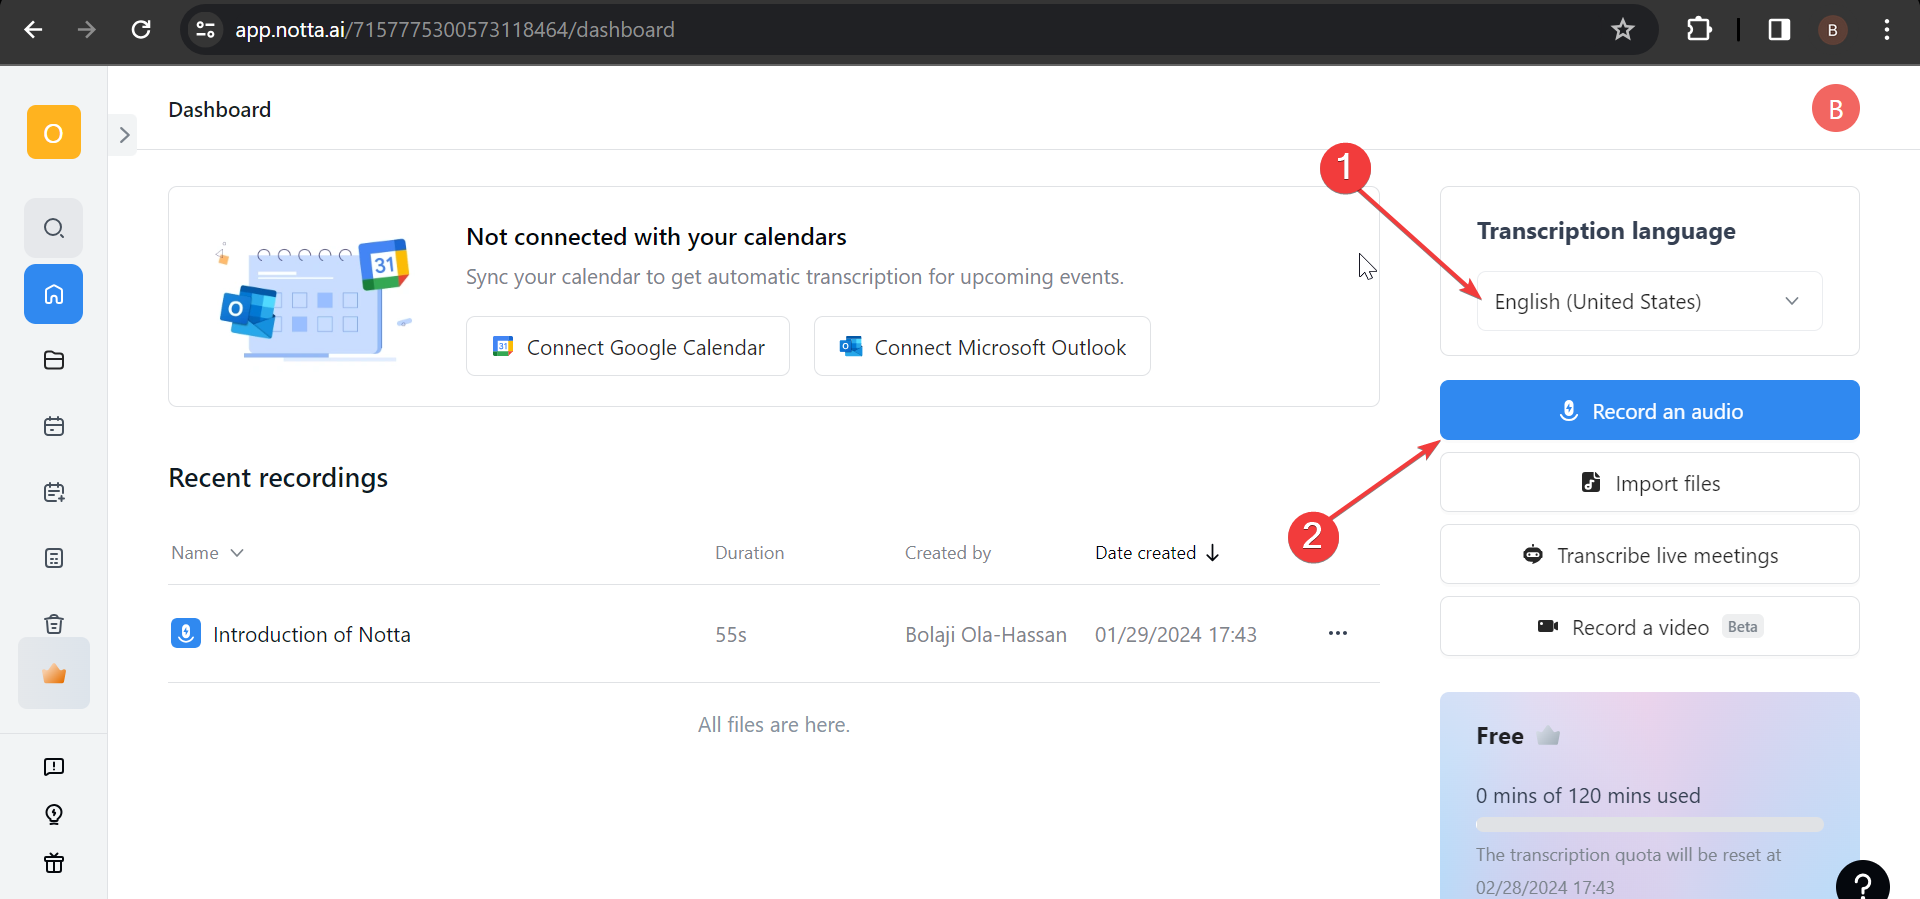
Click the 'Allow' button if you are notified that Notta wants to use your microphone.
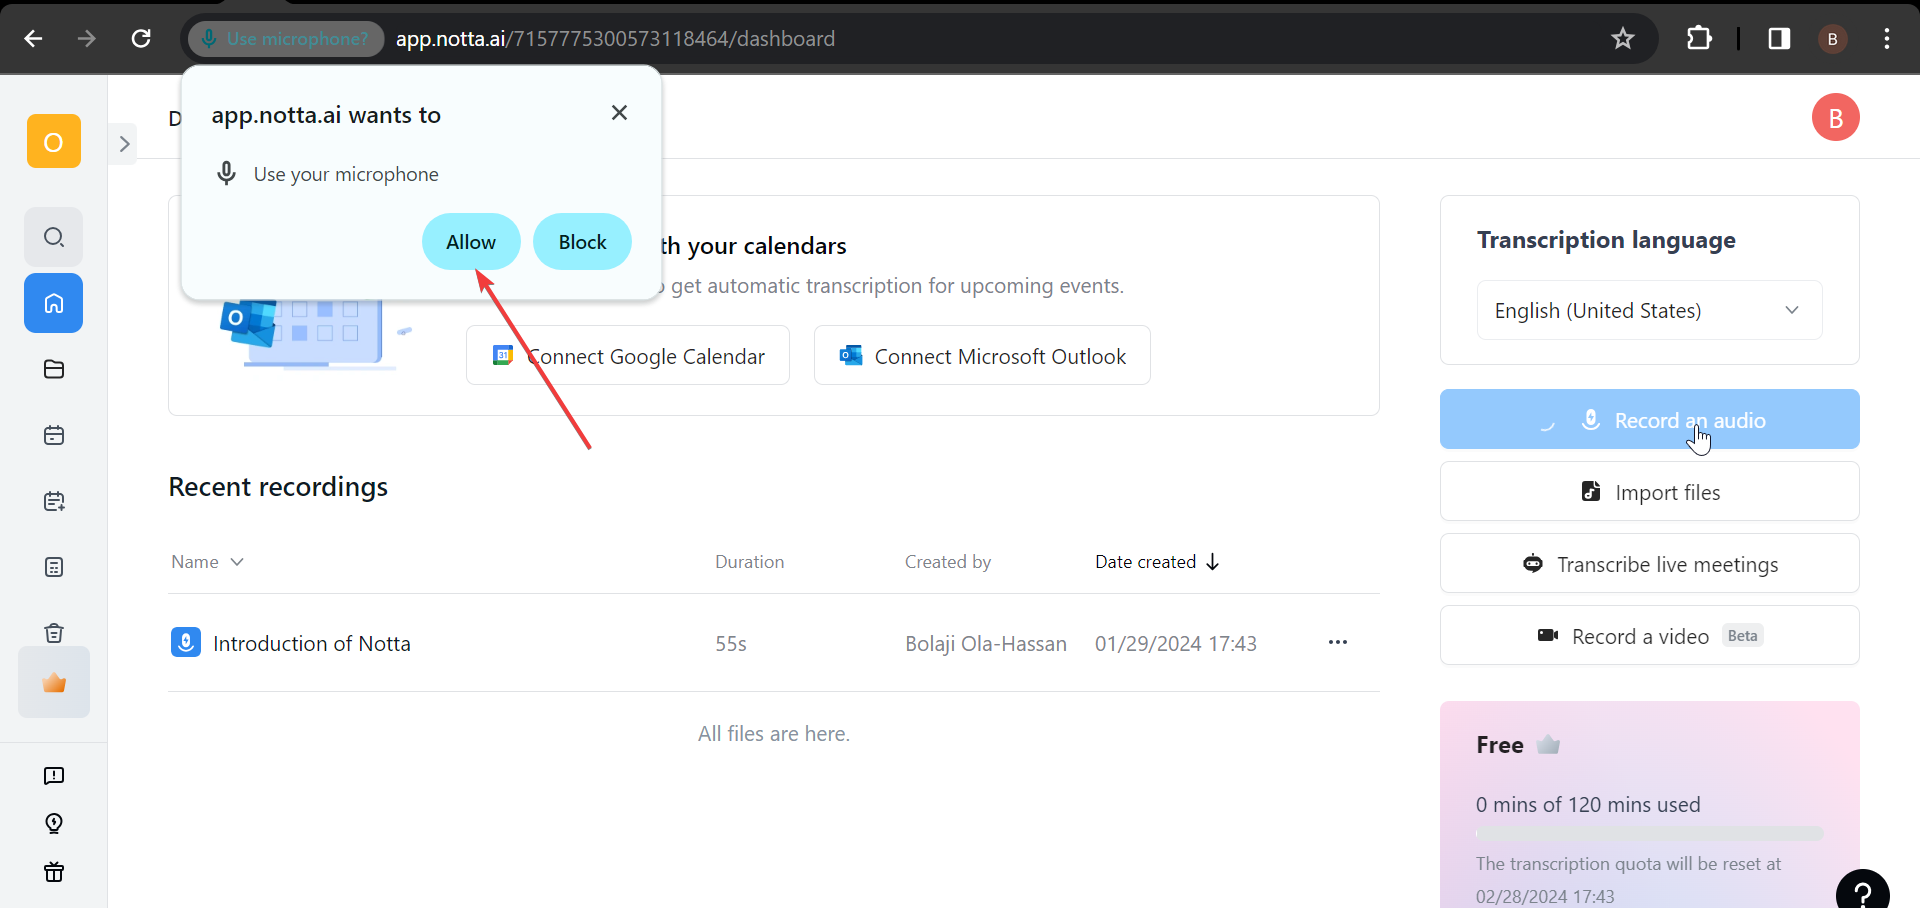
Finally, speak clearly, and Notta will convert your speech to text in real-time.
Use Notta's AI transcription tool to quickly and easily transcribe audio and videos. We guarantee accuracy and ease of use.
Bonus: Fix Windows voice typing not working
Sometimes, voice typing on Windows 10 and 11 might work differently than expected. If this is the case on your device, try the troubleshooting steps below:
Check your internet connection.
Check your connection if you are using an external microphone.
Press the Windows key + Spacebar to select the correct input language.
Ensure your language is on the list of supported languages.
If these do not work, try the advanced fixes below:
Ensure your microphone is selected
Press the ‘Windows’ key + ‘I’ to open Settings.
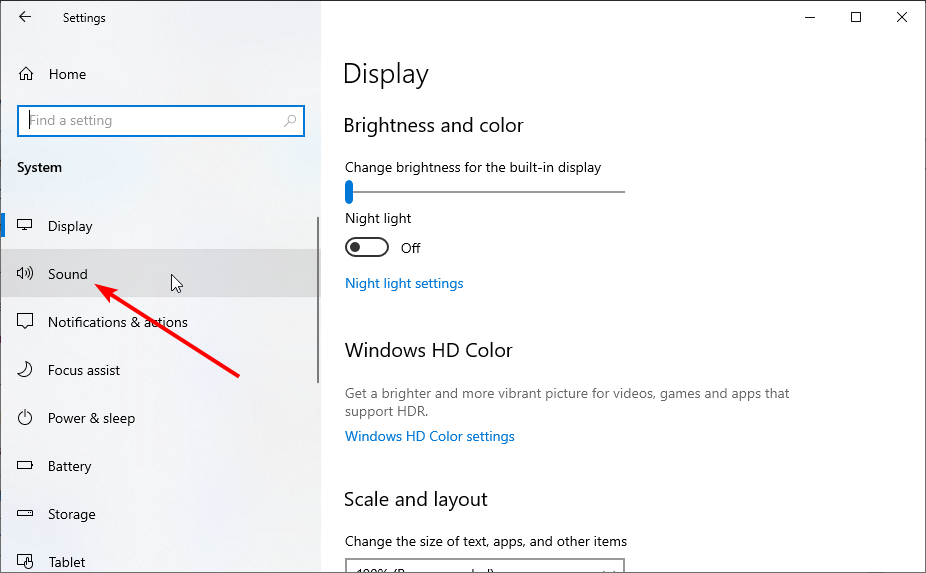
Select the System option.
Now, choose ‘Sound’ on the left pane on Windows 10.
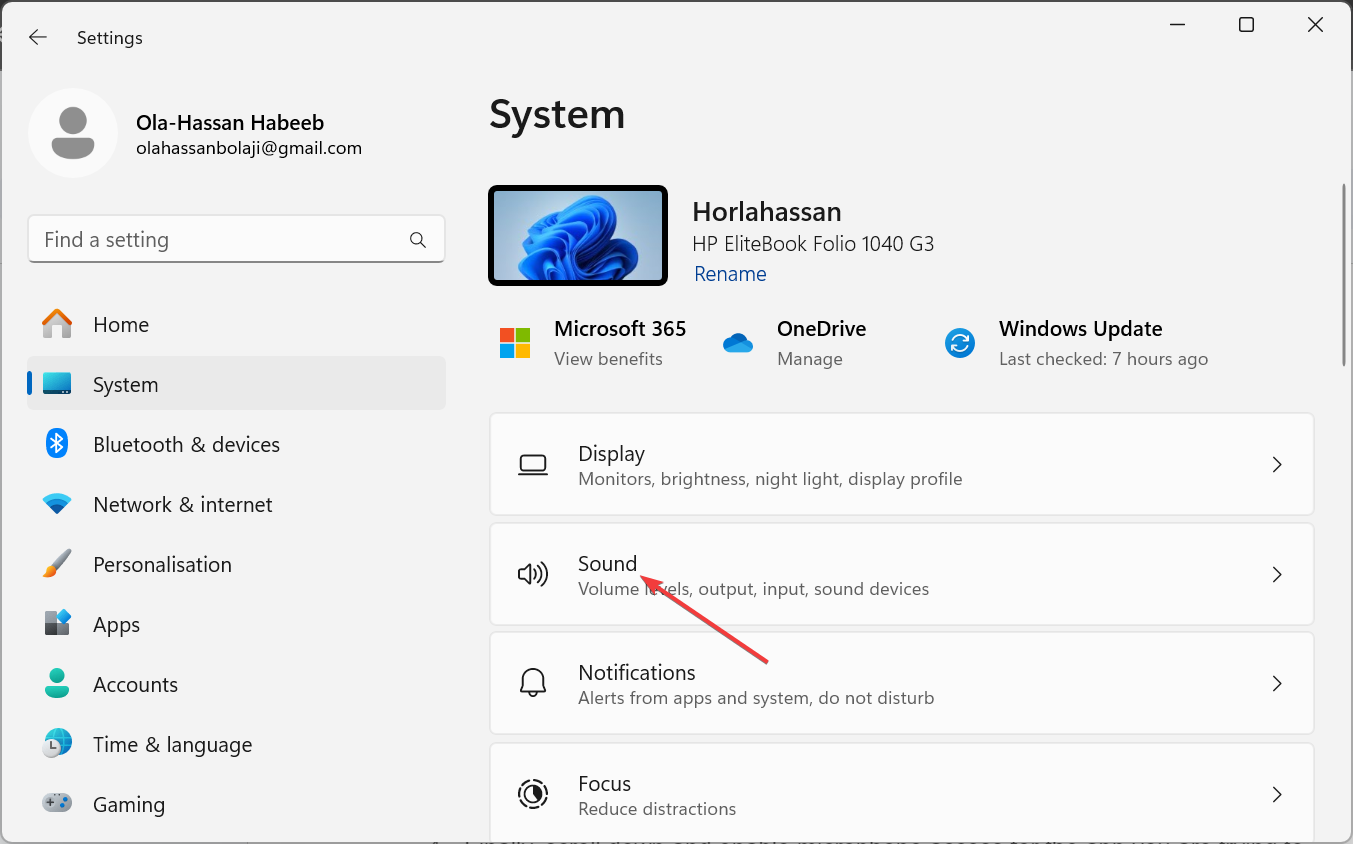
 The option will be on the right of the Windows 11 System Settings.
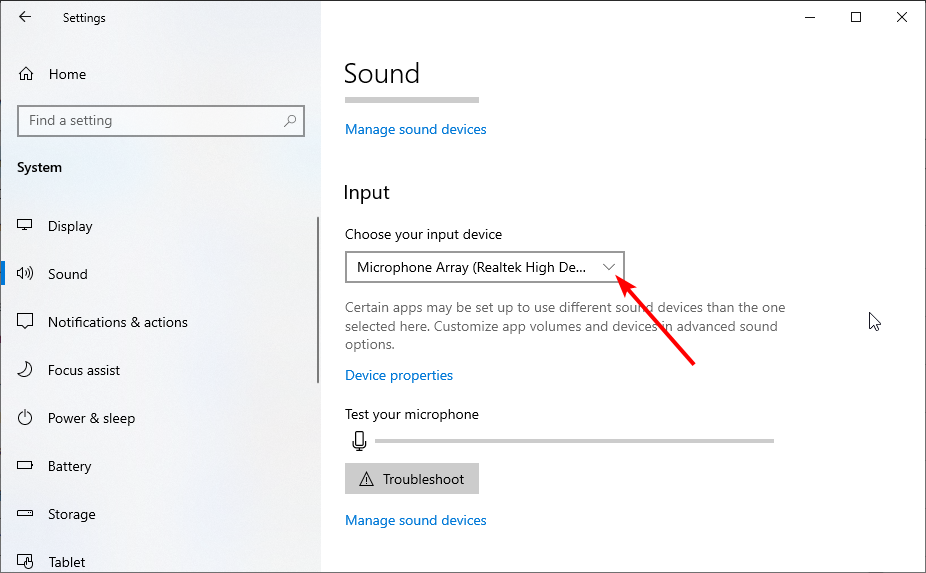
On Windows 10, click the dropdown under ‘Choose your input device’ under the Input section.
Click ‘Choose a device for speaking or recording’ under the Input section on Windows 11.
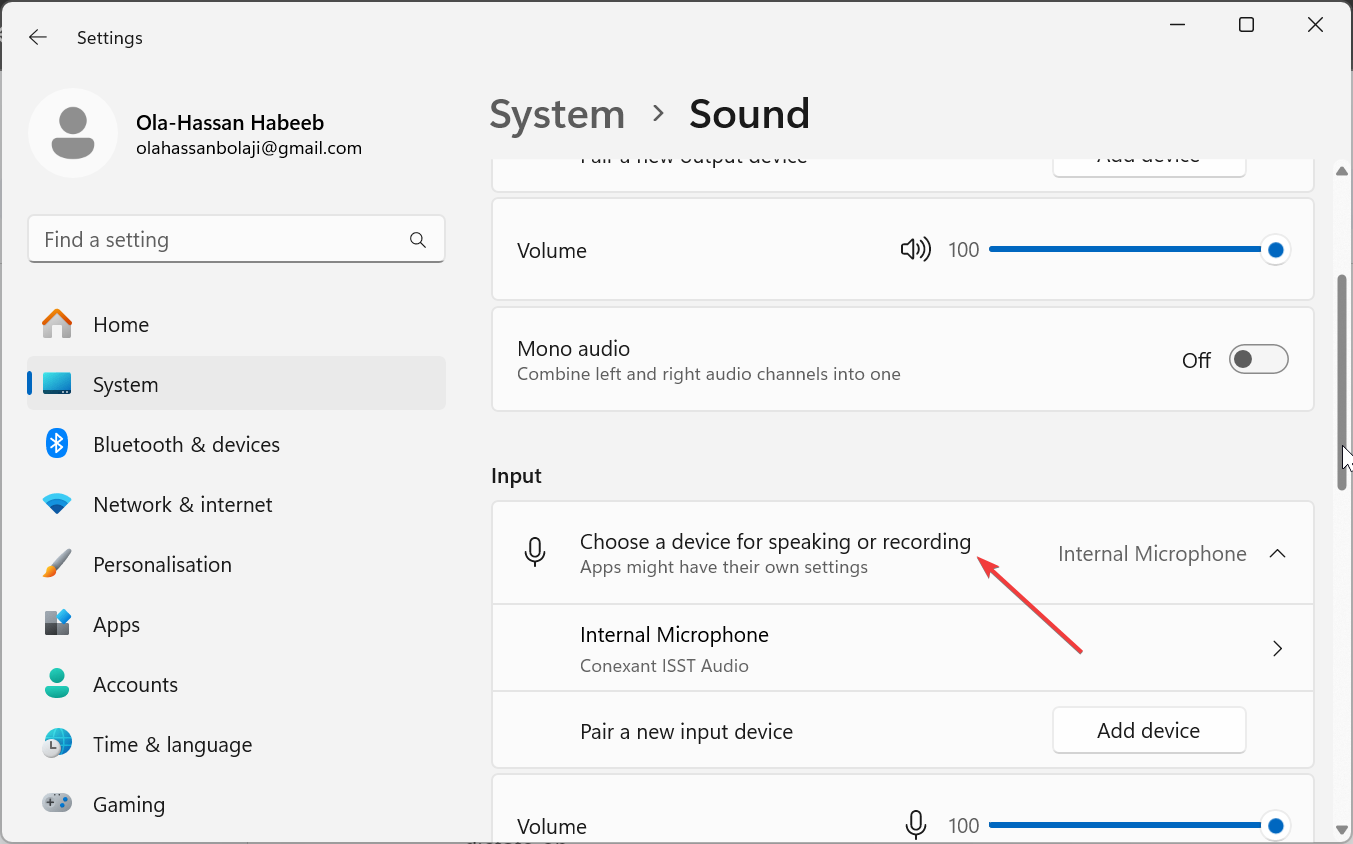
Finally, select your microphone.
Grant Microphone access
Press the ‘Windows’ key + ‘I’ and select ‘Privacy’ on Windows 10. On Windows 11, select ‘Privacy & security’ in the left pane.
Choose the ‘Microphone’ option in the left pane on Windows 10.
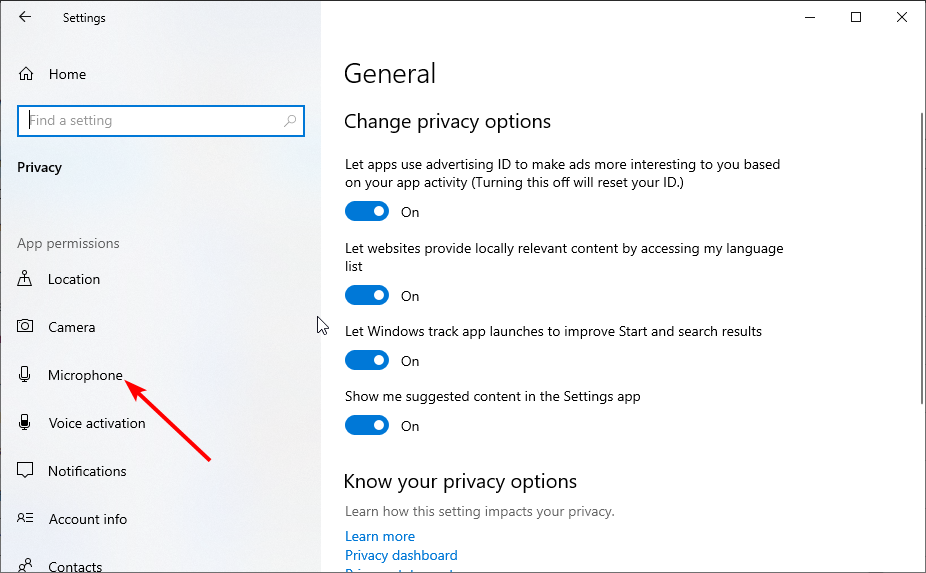 The option will be in the right pane on Windows 11.
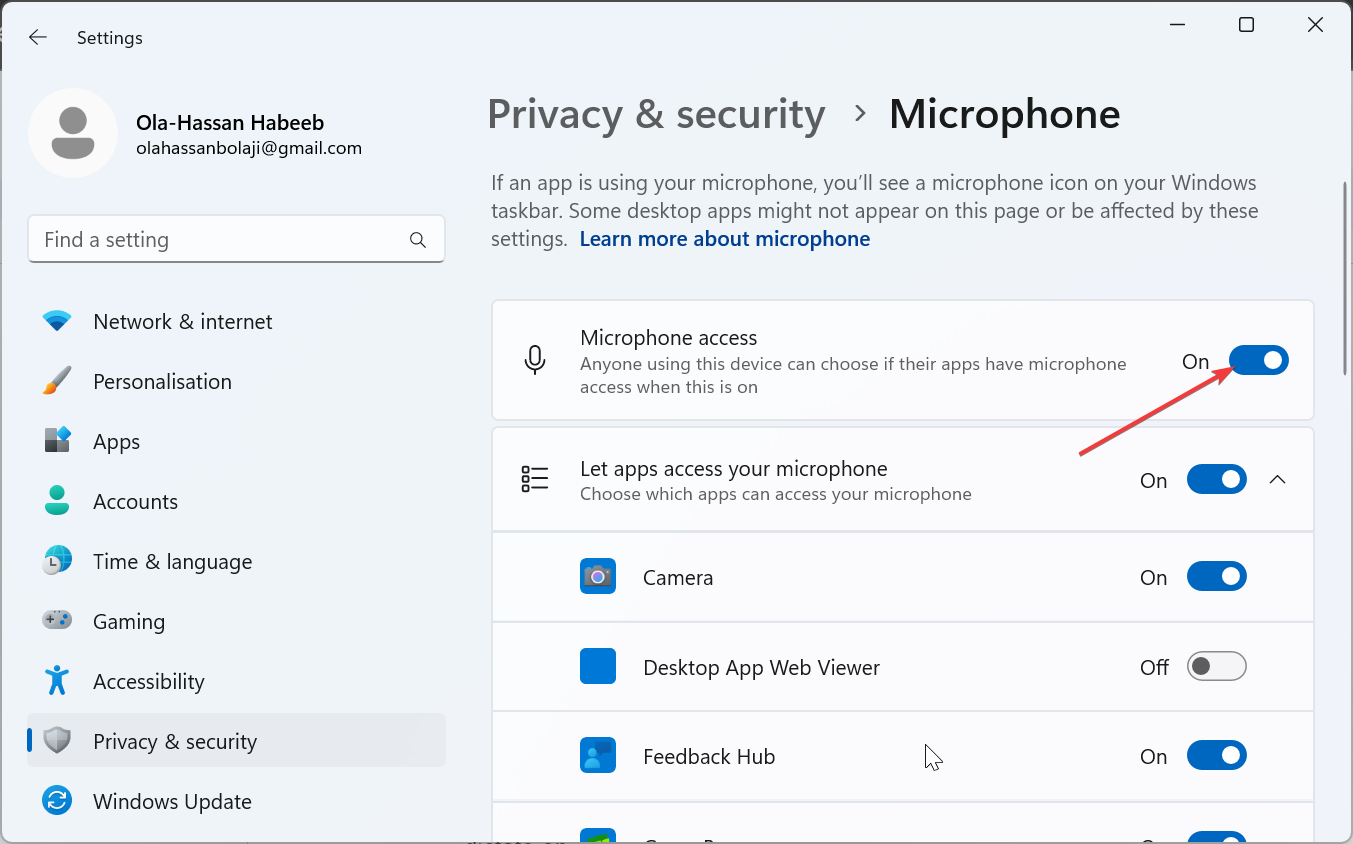
On Windows 10, toggle the switch under ‘Allow apps to access your microphone’ forward to enable it.
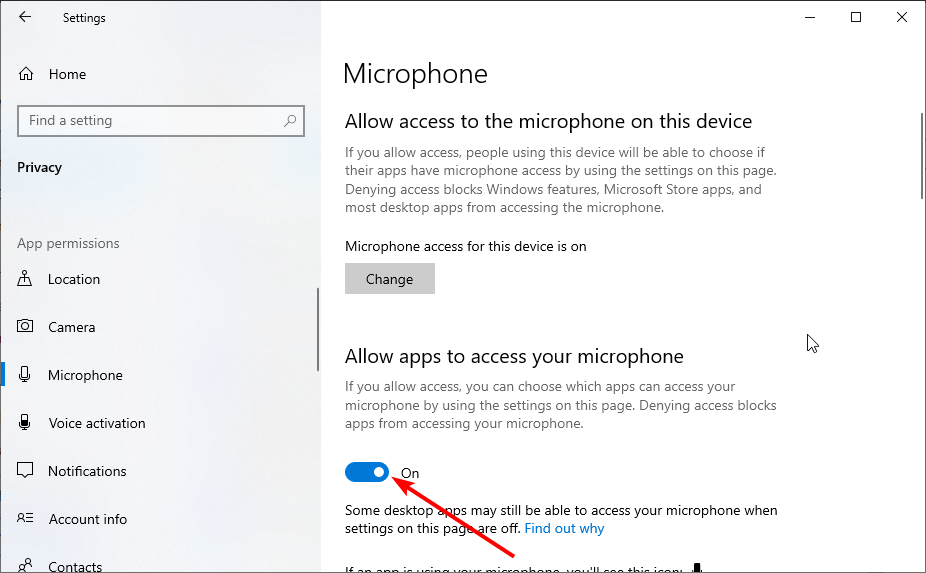
Toggle the switch before the ‘Microphone access’ option forward on Windows 11.

Finally, scroll down and enable microphone access for the app you are trying to dictate on.
Use voice-to-text to save time
Typing is undoubtedly one of the most performed activities on Windows. Fortunately, with the Windows speech to text feature, you do not have to endure the stress of always using your keyboard.
While this free feature is excellent in its own right, like every free tool, there is still room for improvement. To cover for these downsides and enjoy a better dictation experience, you can try to use a more professional tool like Notta. This tool can help you automate most of your dictation tasks, saving time and stress!