
How to Cancel a Zoom Subscription in Simple Steps
Unlock the power of AI — Notta's meeting assistant records, transcribes and summarizes meeting minutes with one click.
If you have ever attempted to cancel your Zoom subscription, you may know the frustration of finding the elusive "Cancel Zoom Subscription" option. It can be painstaking and overwhelming when you are skeptical about where to begin or how to navigate the process smoothly.
Fortunately, this detailed step-by-step guide can help you quickly cancel your Zoom Pro subscription or any paid add-ons. Whether you're using Zoom's desktop application or accessing it on iOS or Android devices, we'll show you how to cancel a Zoom subscription and even request a refund in a few simple steps.
We will also discuss how apps like Notta can help you record high-quality Zoom meetings and streamline the process of transcribing them into valuable text.
Steps to take before canceling subscription
Below are certain prerequisites you must meet before canceling a Zoom Pro subscription or any add-on service.
You cannot access the files or data stored in your Zoom account once you cancel your subscription. Therefore, it's ideal to download and save the files on your device beforehand.
If you have a monthly Zoom subscription, you can cancel it anytime. However, annual subscribers must cancel at least 30 days before the end of the Zoom subscription period to avoid auto-renewal.
Paid Zoom users may be eligible for a refund. You can contact Zoom customer support to learn about eligibility and claim a refund for cancellation.
Note: Zoom offers a 7-day or 30-day trial to its monthly or annually subscribed users, respectively. If you wish to cancel your Zoom Pro subscription's trial version, we recommend canceling it before the auto-renewal date.
How to cancel a Zoom Pro subscription?
Let us learn the simple steps to end your monthly or annual subscription using the Zoom web portal.
Step 1: Sign in to Zoom via the web portal.
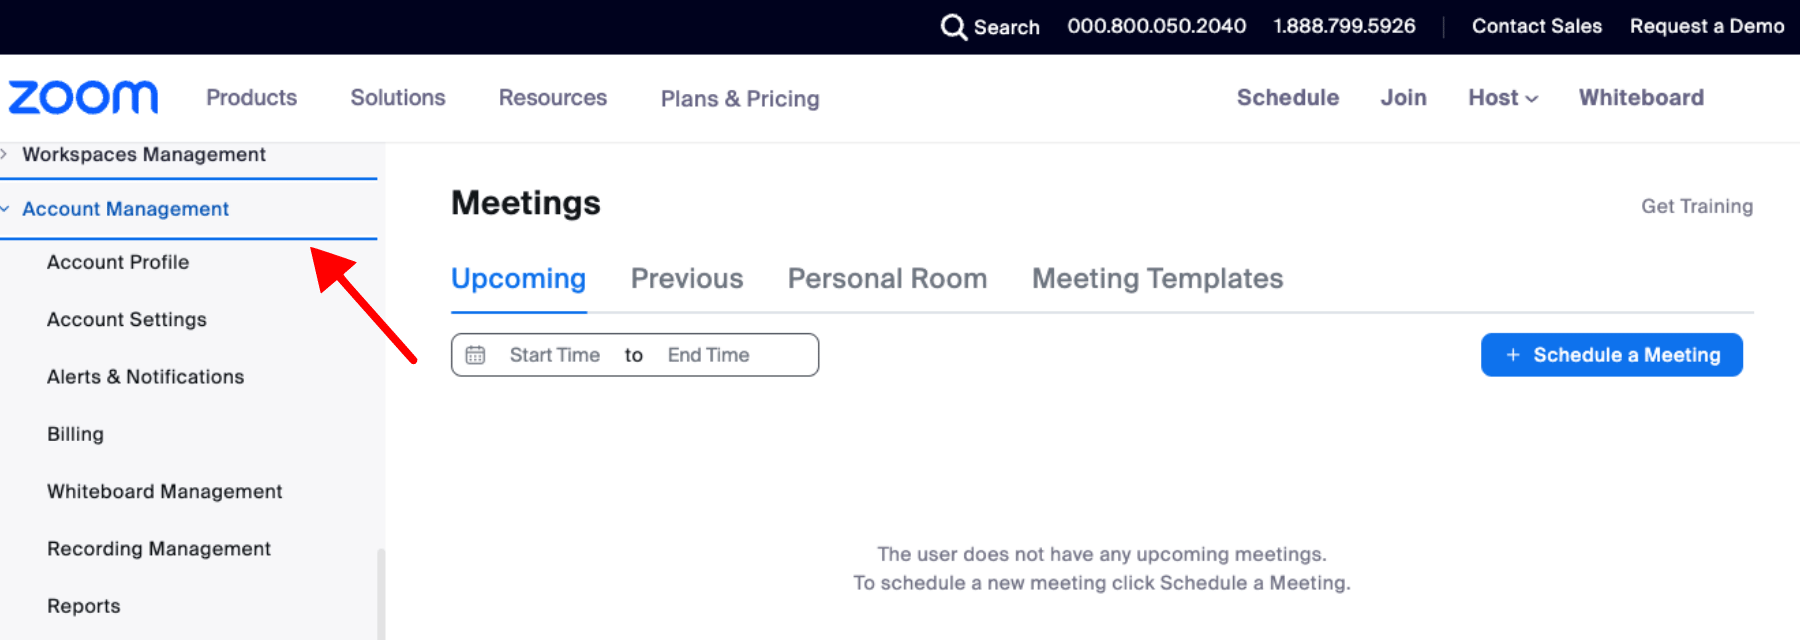
Step 2: In the navigation panel, select the 'Account Management' tab. A drop-down menu will appear.
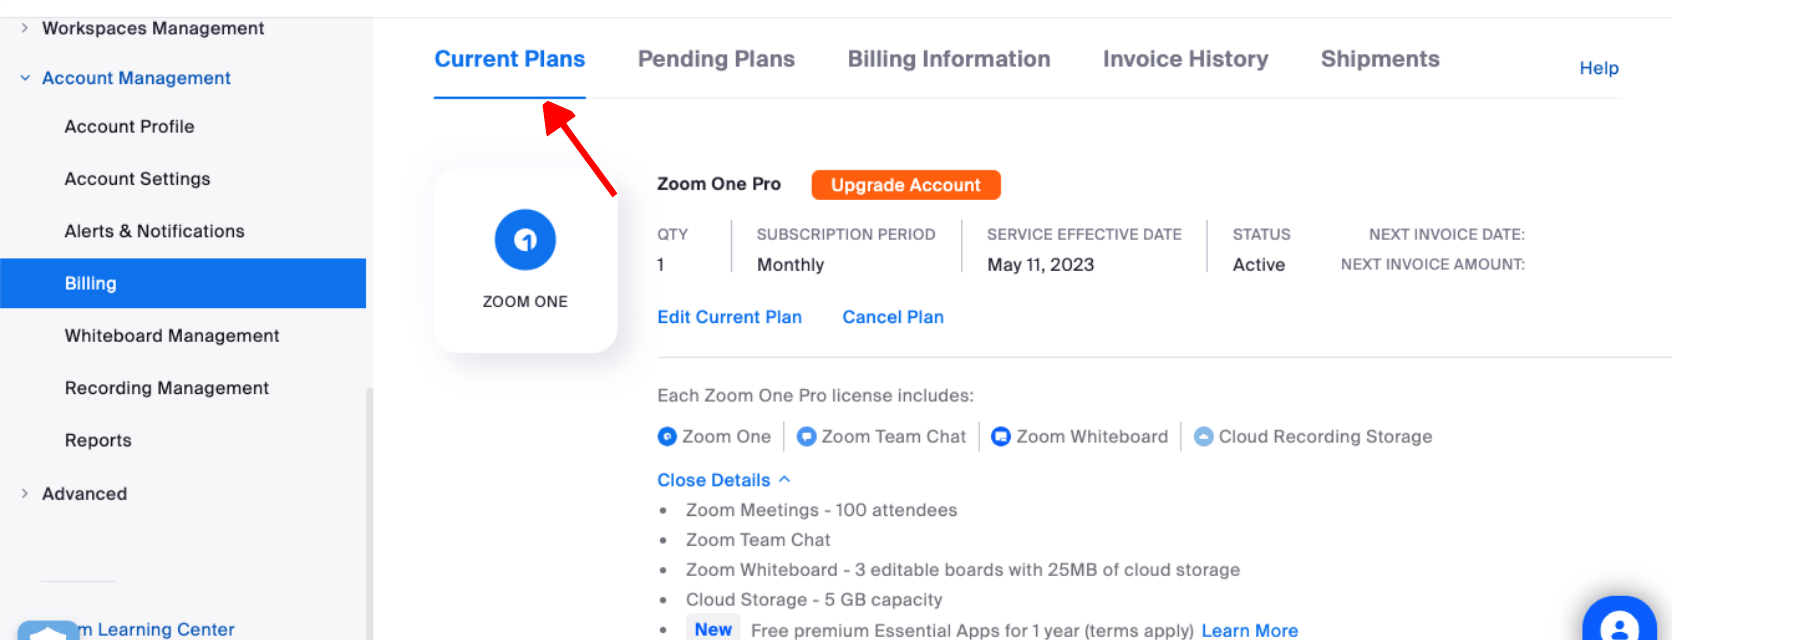
Step 3: Click 'Billing' and then select 'Current Plans.'
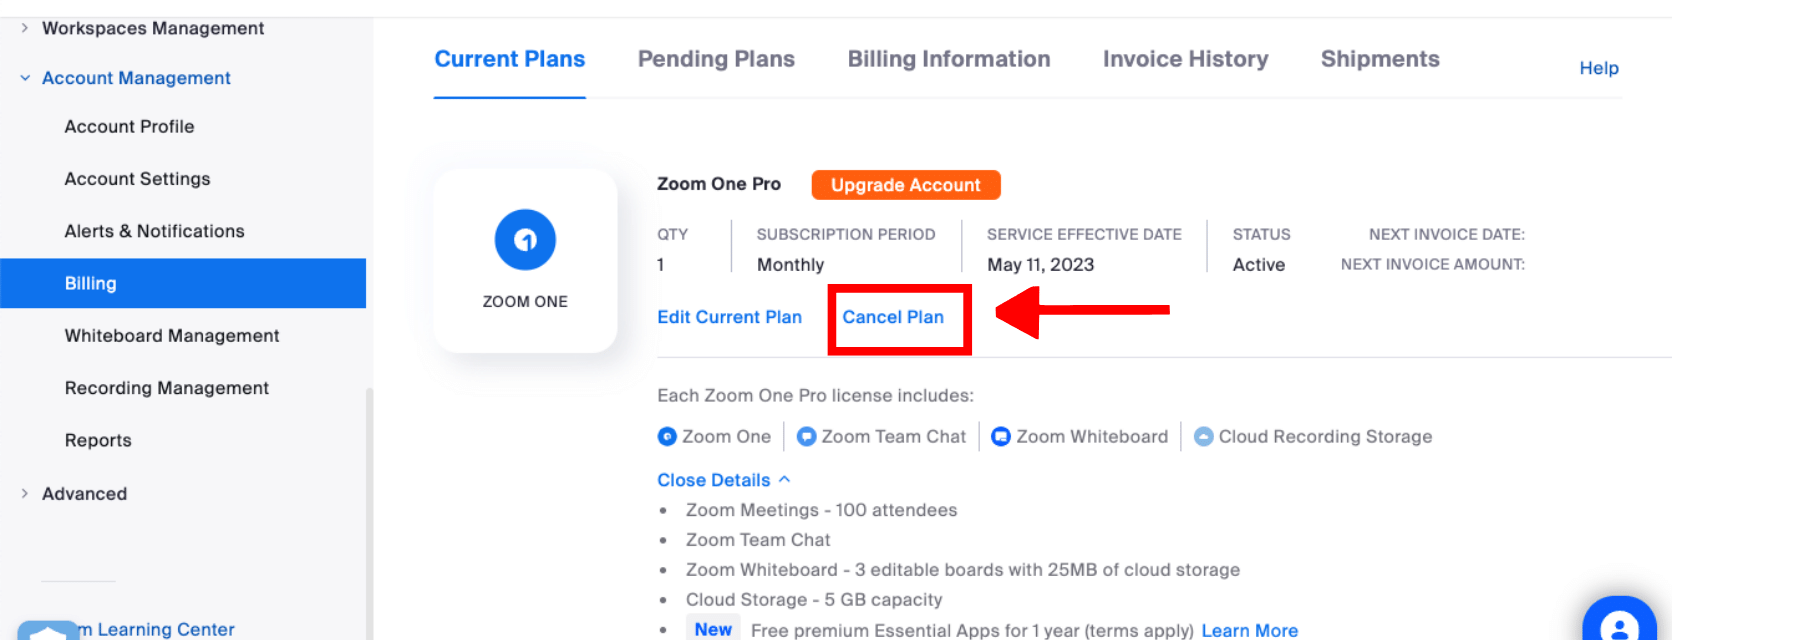
Step 4: Find the Zoom plan you want to cancel and select 'Cancel Plan' to stop auto-renewal.
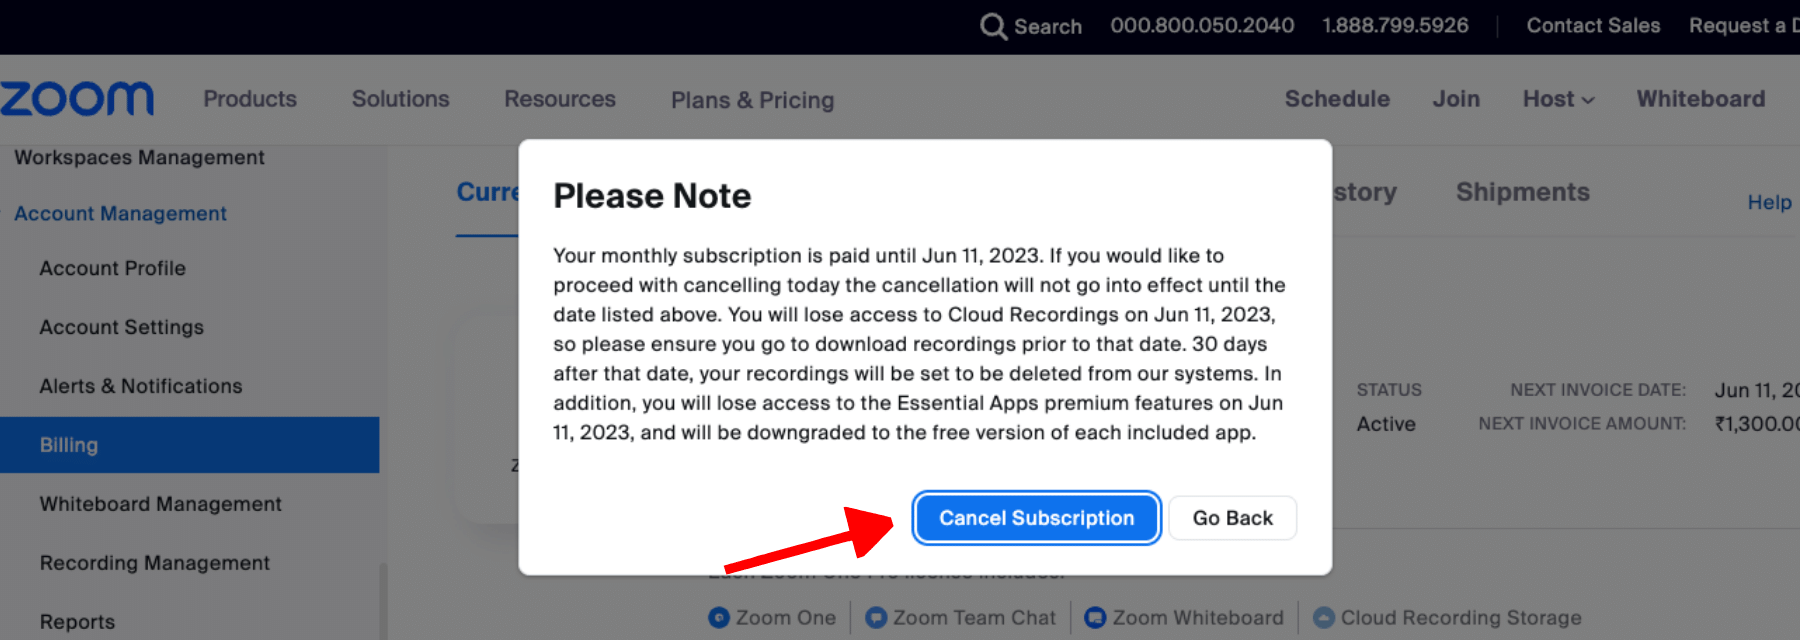
Step 5: Confirm the cancellation by selecting 'Cancel Subscription.' A pop-up will appear indicating the last date of your billing cycle.
Note: If you see the 'Contact Sales' rather than the 'Cancel Subscription' option, you'll have to contact Zoom's sales team in order to proceed with your cancellation process.
Step 6: Provide feedback as to why you want to cancel your Zoom subscription and click 'Continue.'
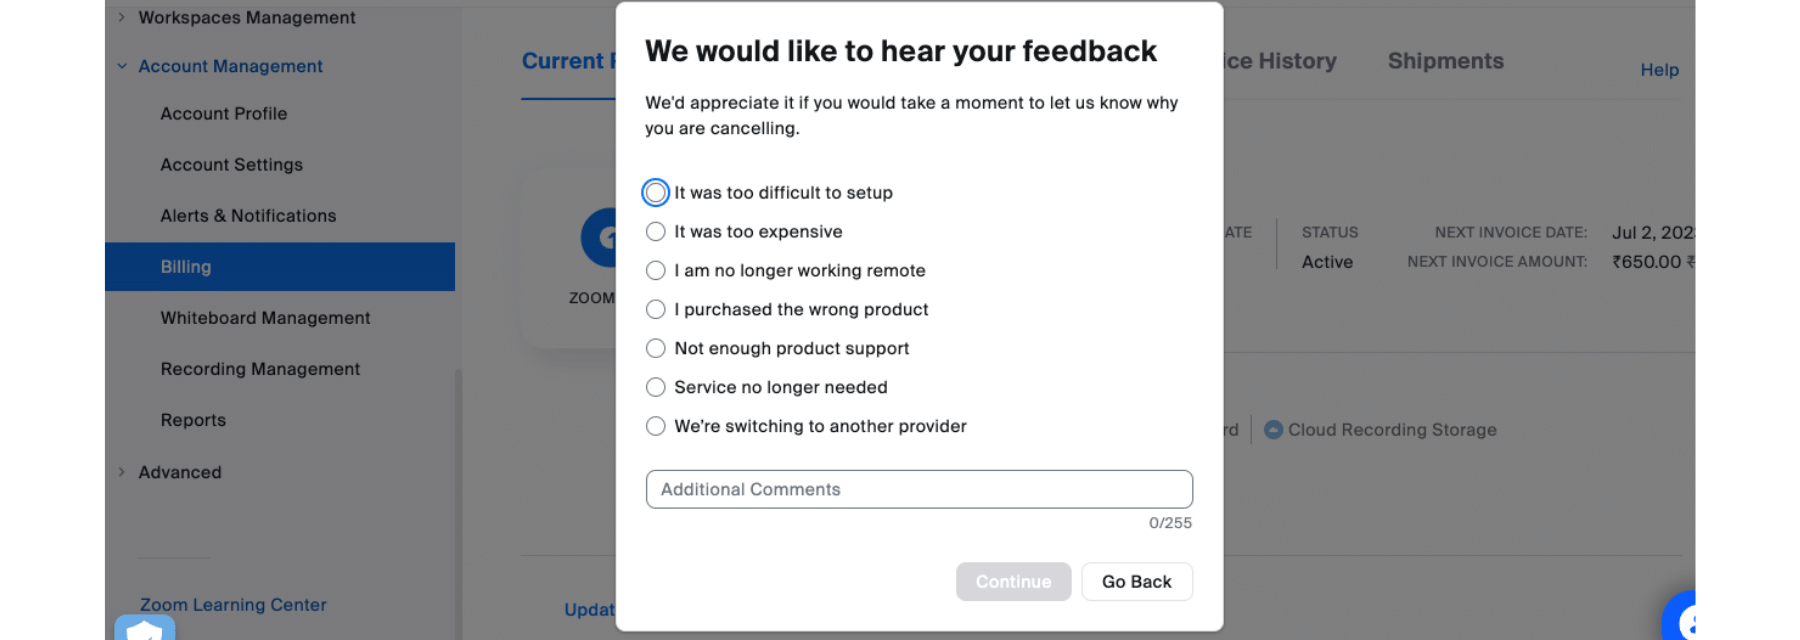
Ultimately, your plan status will change to 'Canceled,' eliminating the need to pay for a Zoom subscription. However, it's worth noting that you will still have access to your Zoom paid plan for the remaining billing period.
How to cancel a Zoom add-on subscription?
Now that you know the process of ending your Zoom subscription (paid), here are three simple steps to avoid paying for Zoom add-on services.
Step 1: Sign in to the Zoom web portal.
Step 2: Head to the navigation menu and select Account Management > Billing.
Step 3: On the 'Current Plans' tab, find the add-on service you wish to cancel. Select 'Cancel Plan' to stop auto-renewal for the particular Zoom add-on.
How to cancel a Zoom subscription on Google Play?
If you are using Zoom Pro on your Android phone or tablet, you'll need to cancel the subscription via Google Play Store. Here is how you can end Zoom's paid plan in simple steps.
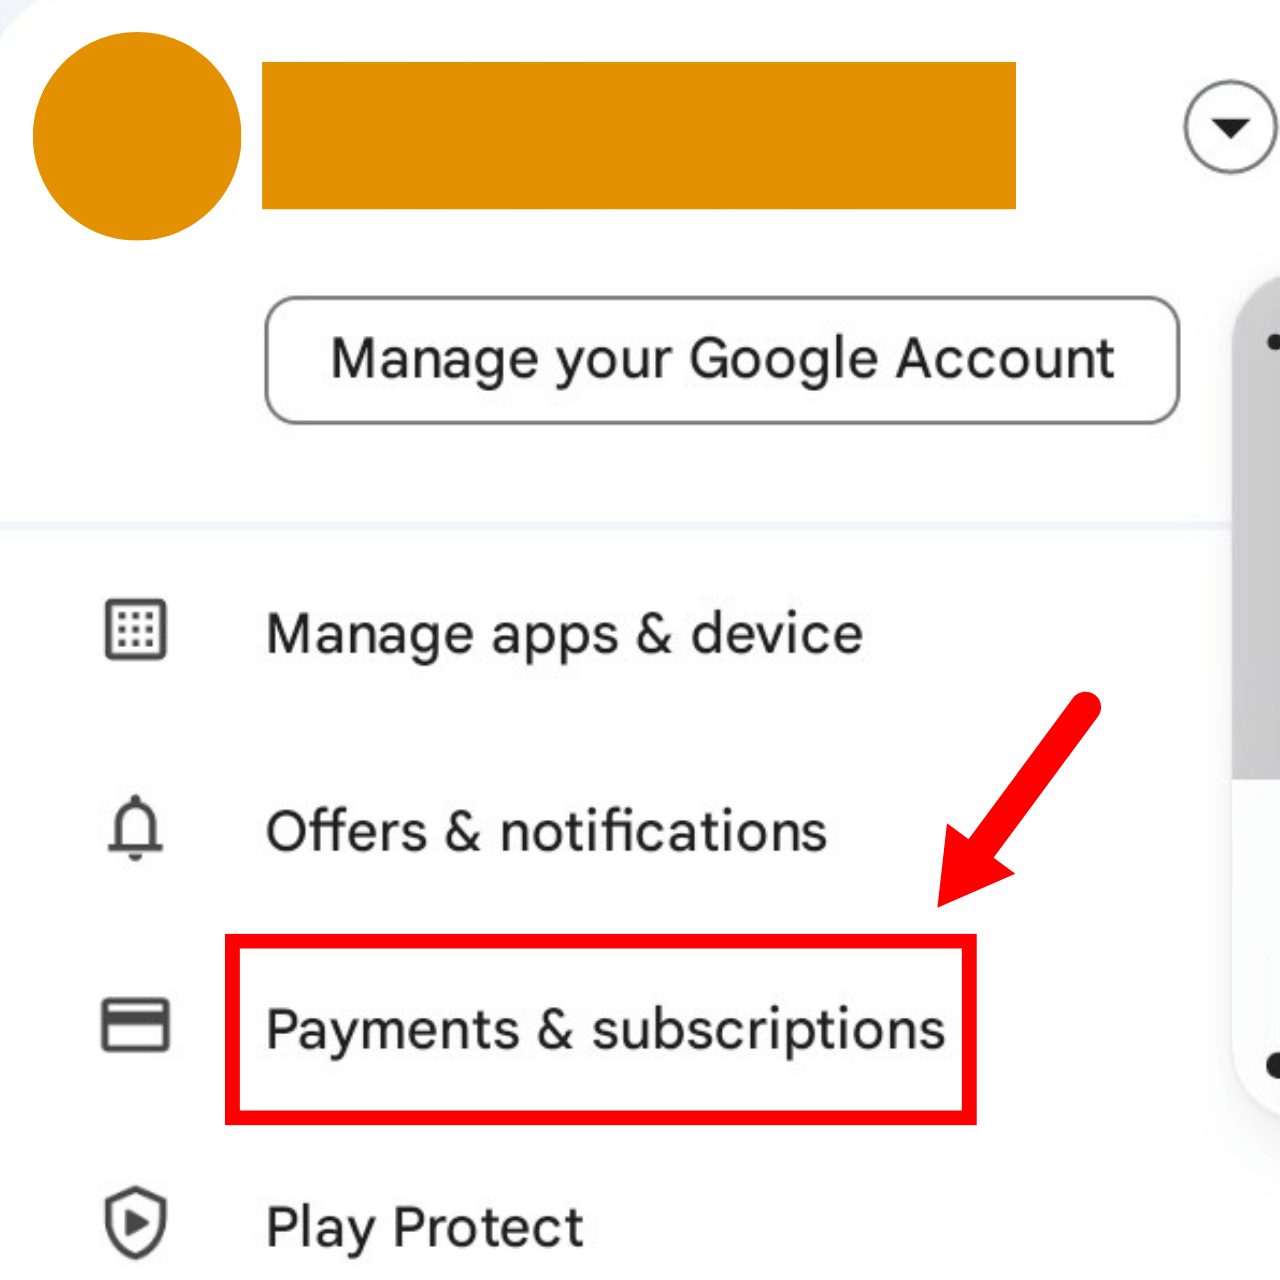
Step 1: On your Android device, access the Google Play Store and select 'Payments & Subscriptions.'
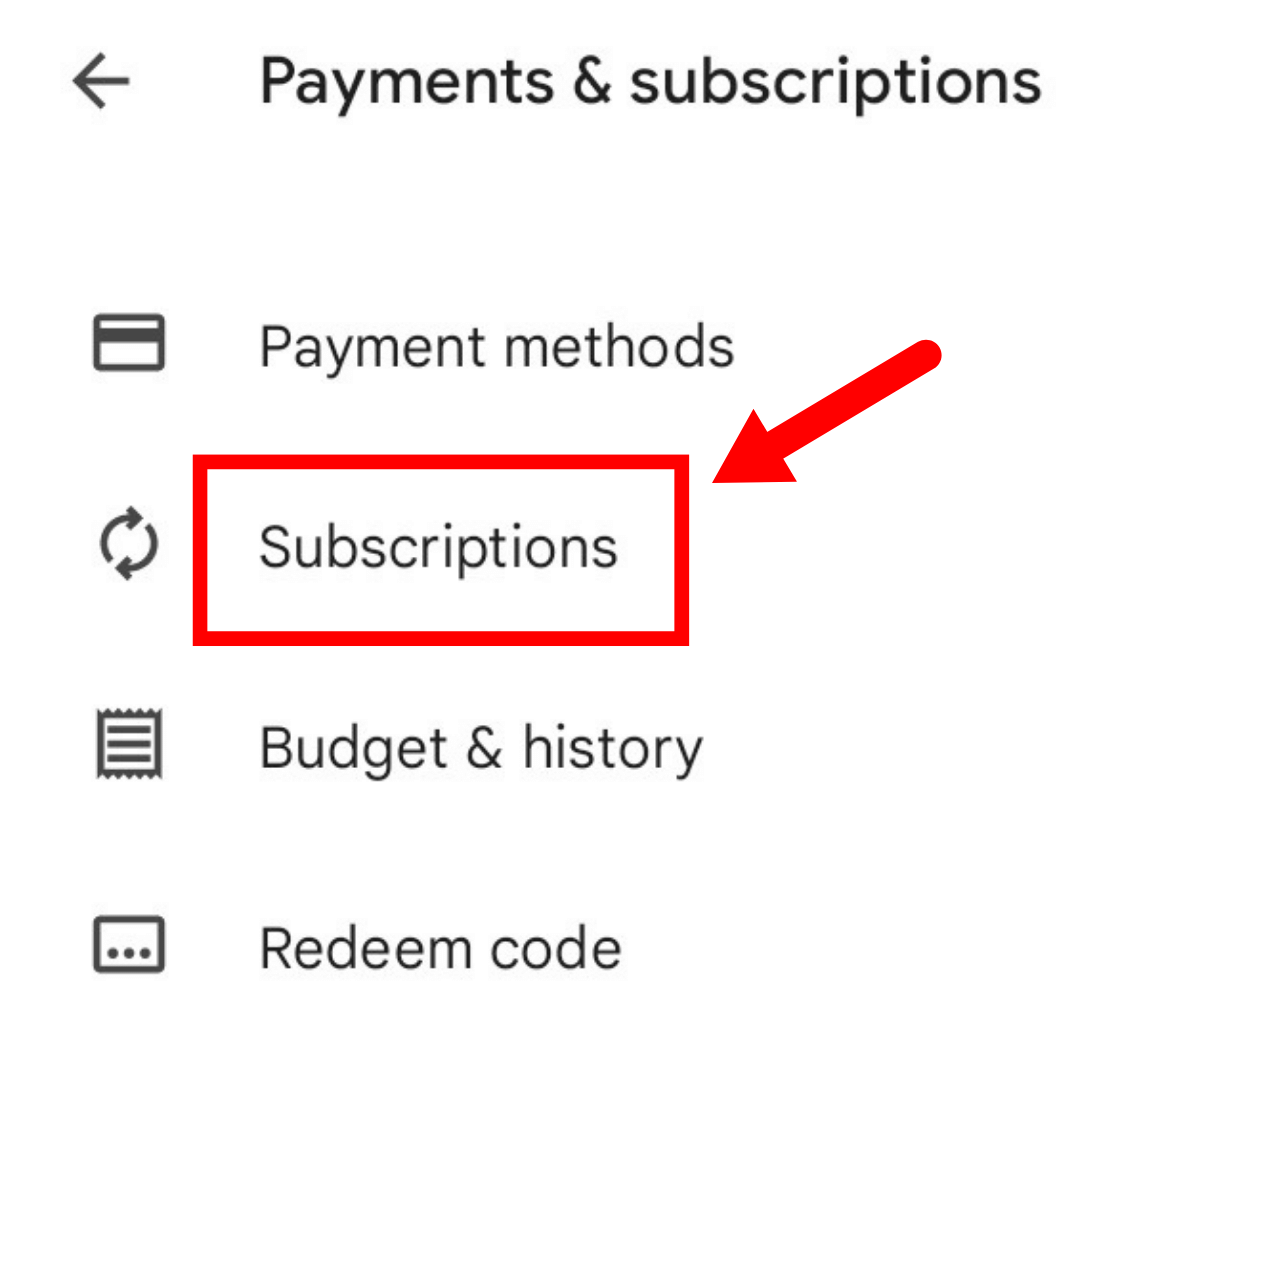
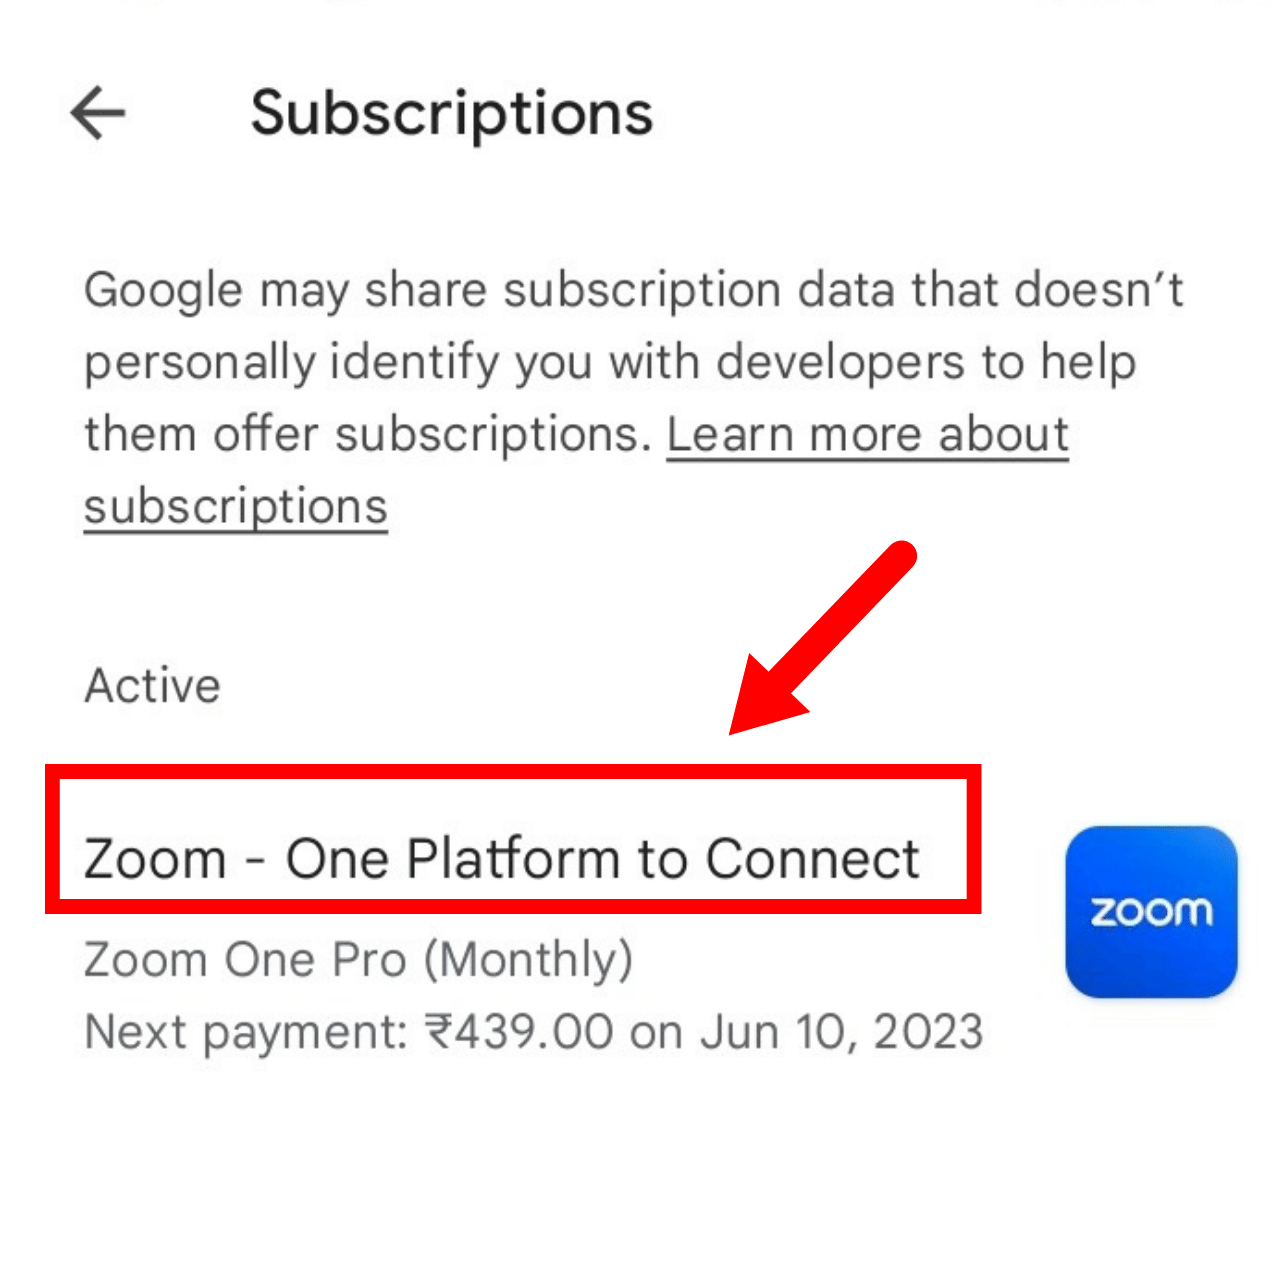
Step 2: Select 'Subscriptions' and click 'Zoom Subscription.'
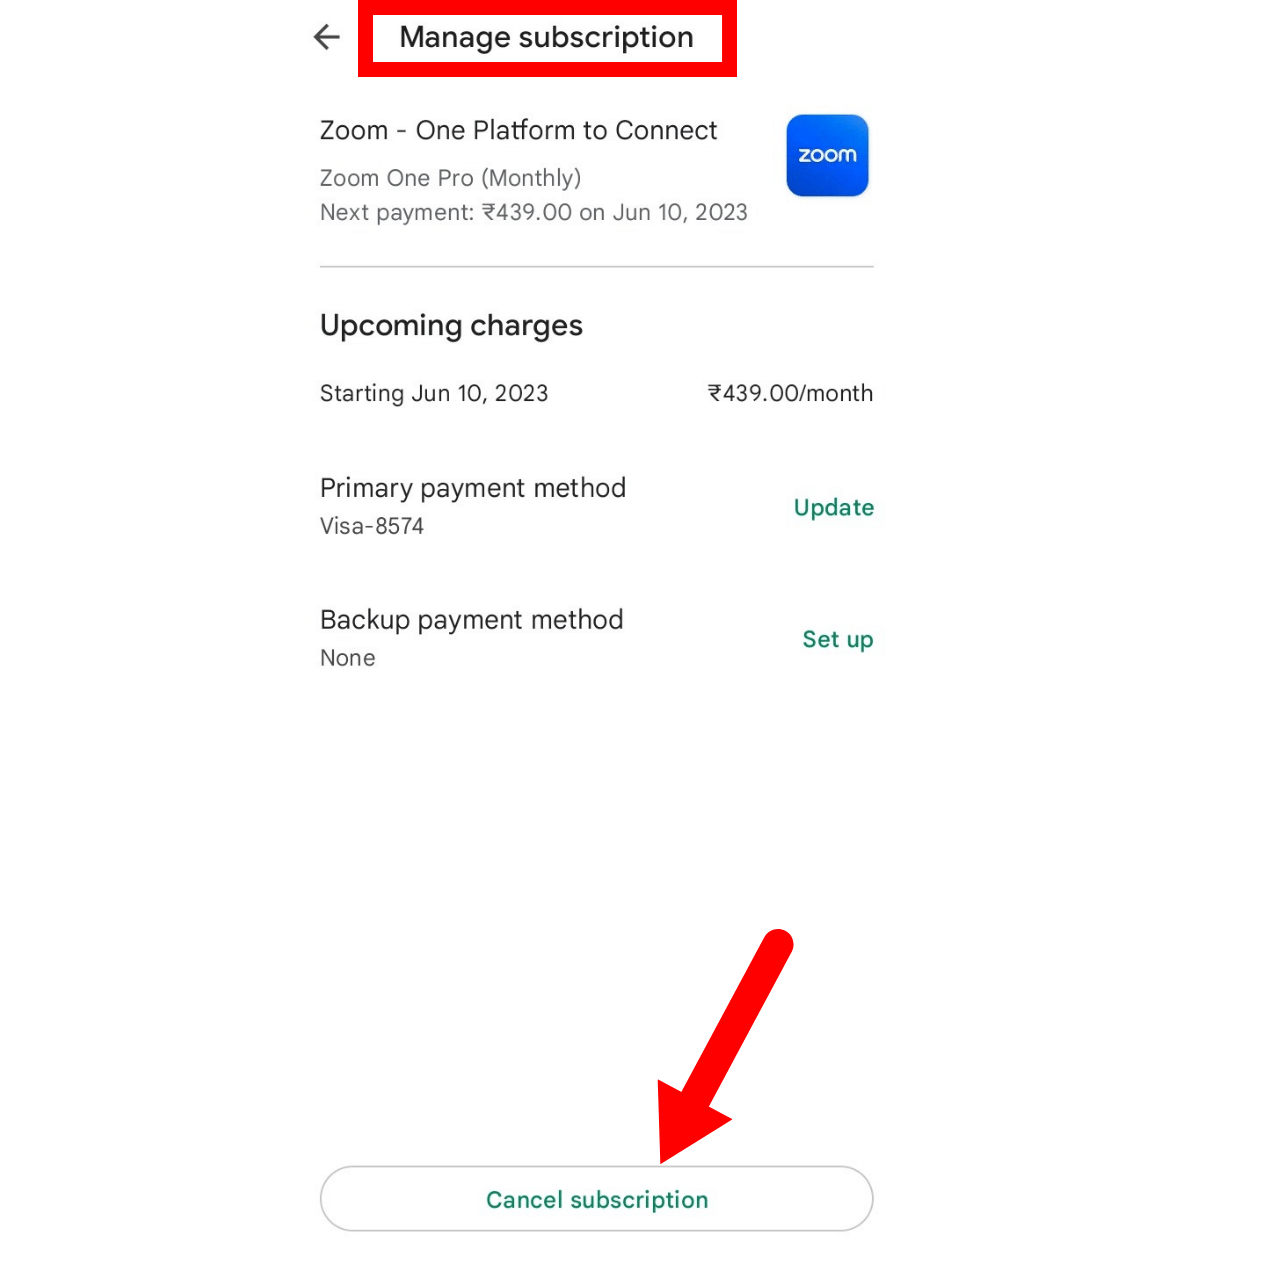
Step 3: Click 'Manage' to find your subscription details.
Step 4: Tap 'Cancel Subscription,' and a confirmation message will appear.
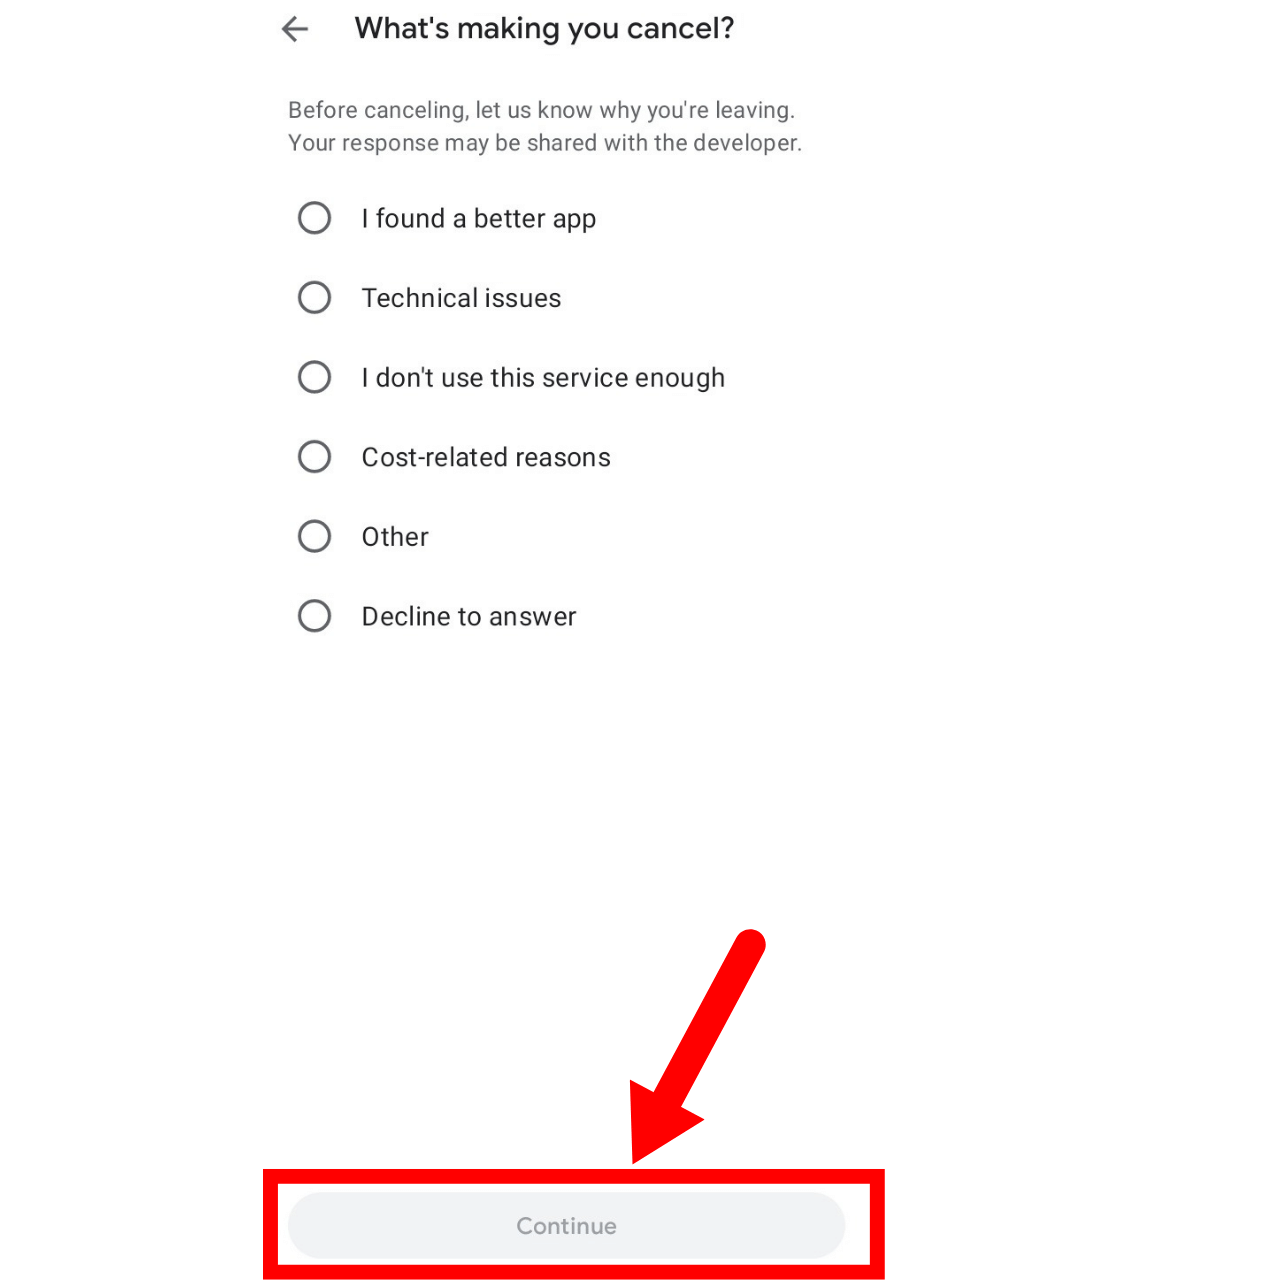
Step 5: Select why you want to cancel the subscription and click 'Continue' to confirm the Zoom Pro cancellation.
How to cancel a Zoom subscription on the App Store?
Similar to Android devices and desktop versions, canceling a Zoom Pro subscription is straightforward on the App Store. Let us learn the simple steps to cancel a Zoom subscription on iOS devices.
Step 1: Open the App Store and head to 'Subscriptions.'
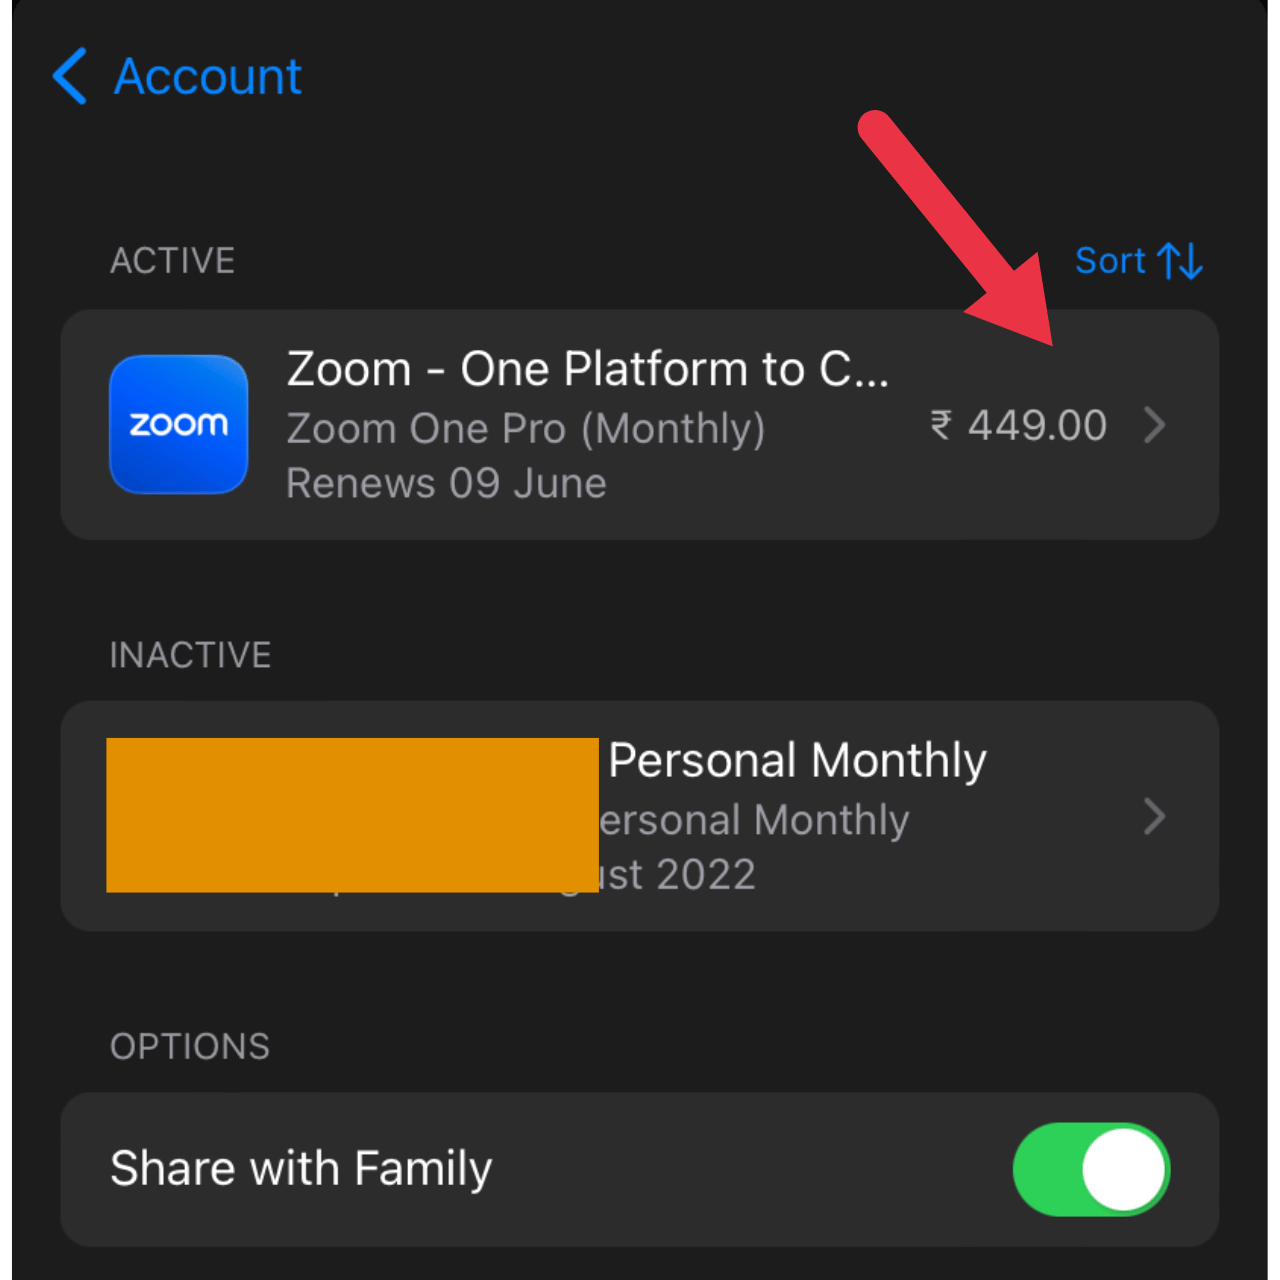
Step 2: Select 'Zoom Subscription' and click 'Cancel Subscription.' This will cancel your Zoom Pro subscription and future auto-renewals.
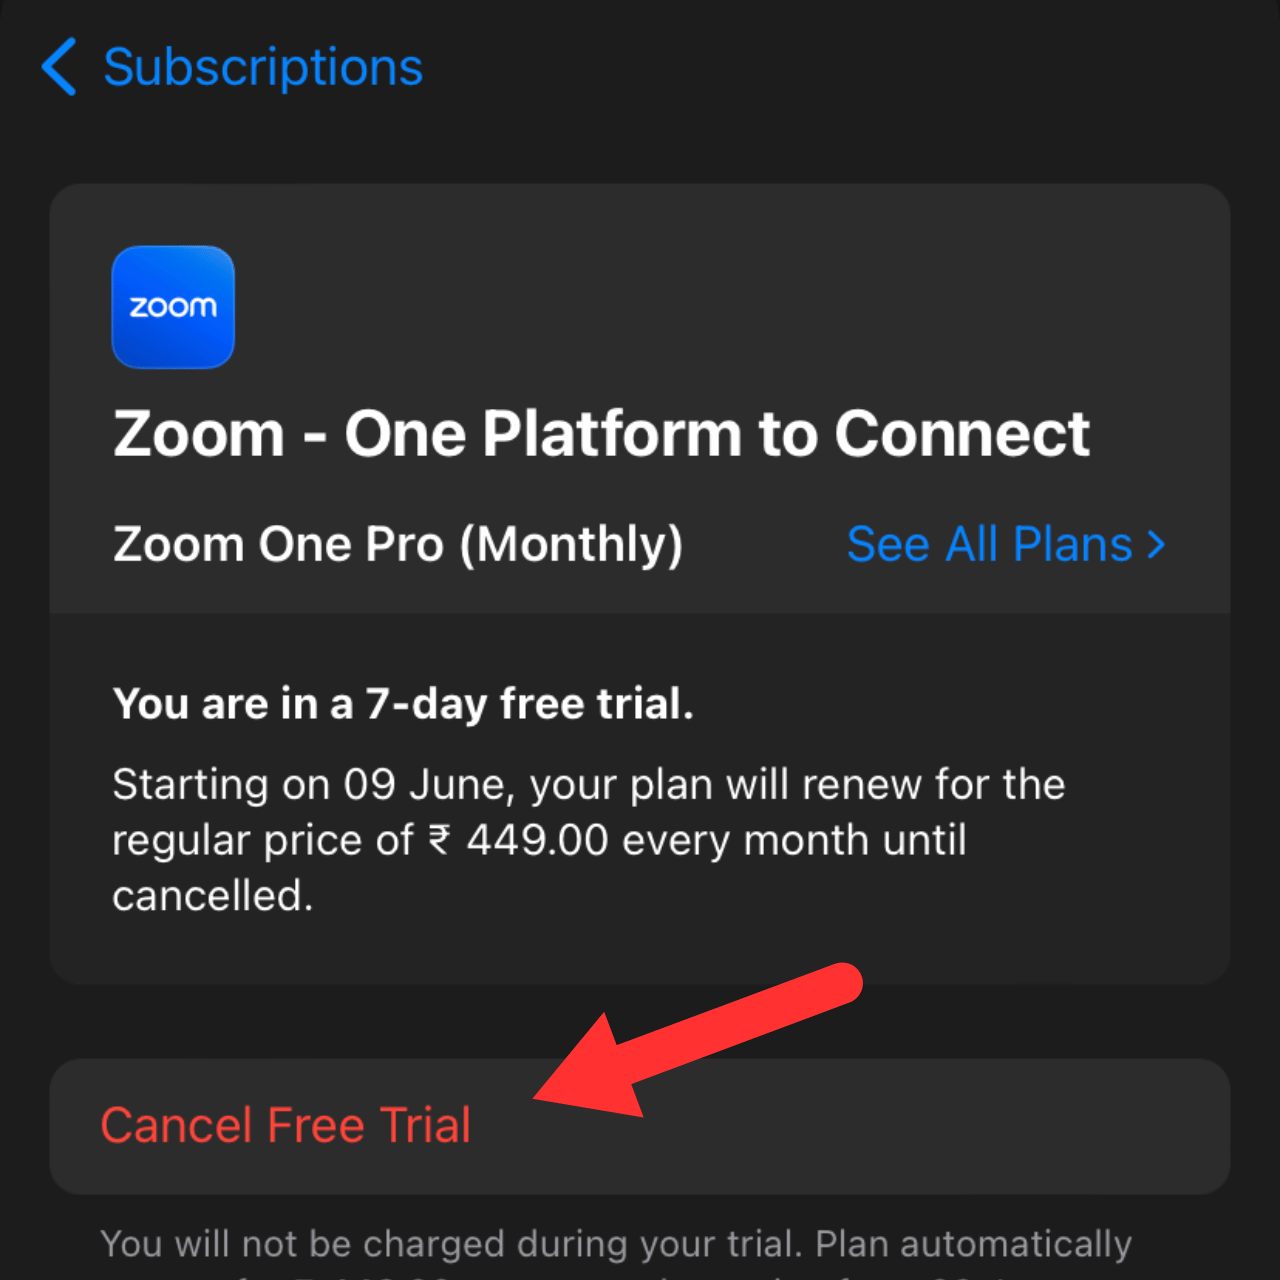
As with the web version, you will have access to the Zoom Pro benefits until the last day of your billing cycle on Android and iOS devices.
Note: You can reactivate your Zoom subscription anytime before your renewal date.
FAQs
Can I cancel my Zoom subscription at any time?
Yes. You can cancel your Zoom subscription anytime by carefully following the simple steps mentioned in the above sections.
How do I get a refund from Zoom?
If your Zoom Pro account is eligible for a refund, you can easily request it while canceling your subscription.
Sign in to the Zoom web portal and click Account Management > Billing.
Under the 'Current Plans' tab, click Cancel Plan > Dispute Charges. (Note: Here, you can also check the refund amount.)
Read the refund terms and then select 'Cancel and Refund.'
Note: You must submit the request within 30 days of renewal to be eligible for a refund.
What will happen if I delete a Zoom account?
When you delete a Zoom account, all the data associated with it is permanently removed. However, it will differ depending on whether you use Zoom basic vs. licensed accounts.
For instance, you can directly delete your Zoom account if you are using the basic plan. On the contrary, paid Zoom users must cancel their subscriptions before deleting their accounts.
How to record Zoom meetings on a free plan?
Recording Zoom meetings is easy when you have Notta by your side. You can easily add the AI-powered bot to your live Zoom meetings, and it will record and transcribe them for you in real-time.
Below are the steps to record and transcribe live Zoom meetings in a free plan using the Notta AI bot.
Step 1: Join the Zoom meeting and select 'Participants.'

Step 2: On the screen's left side, select 'Invite.'

Step 3: Click the 'Copy Invitation' link.

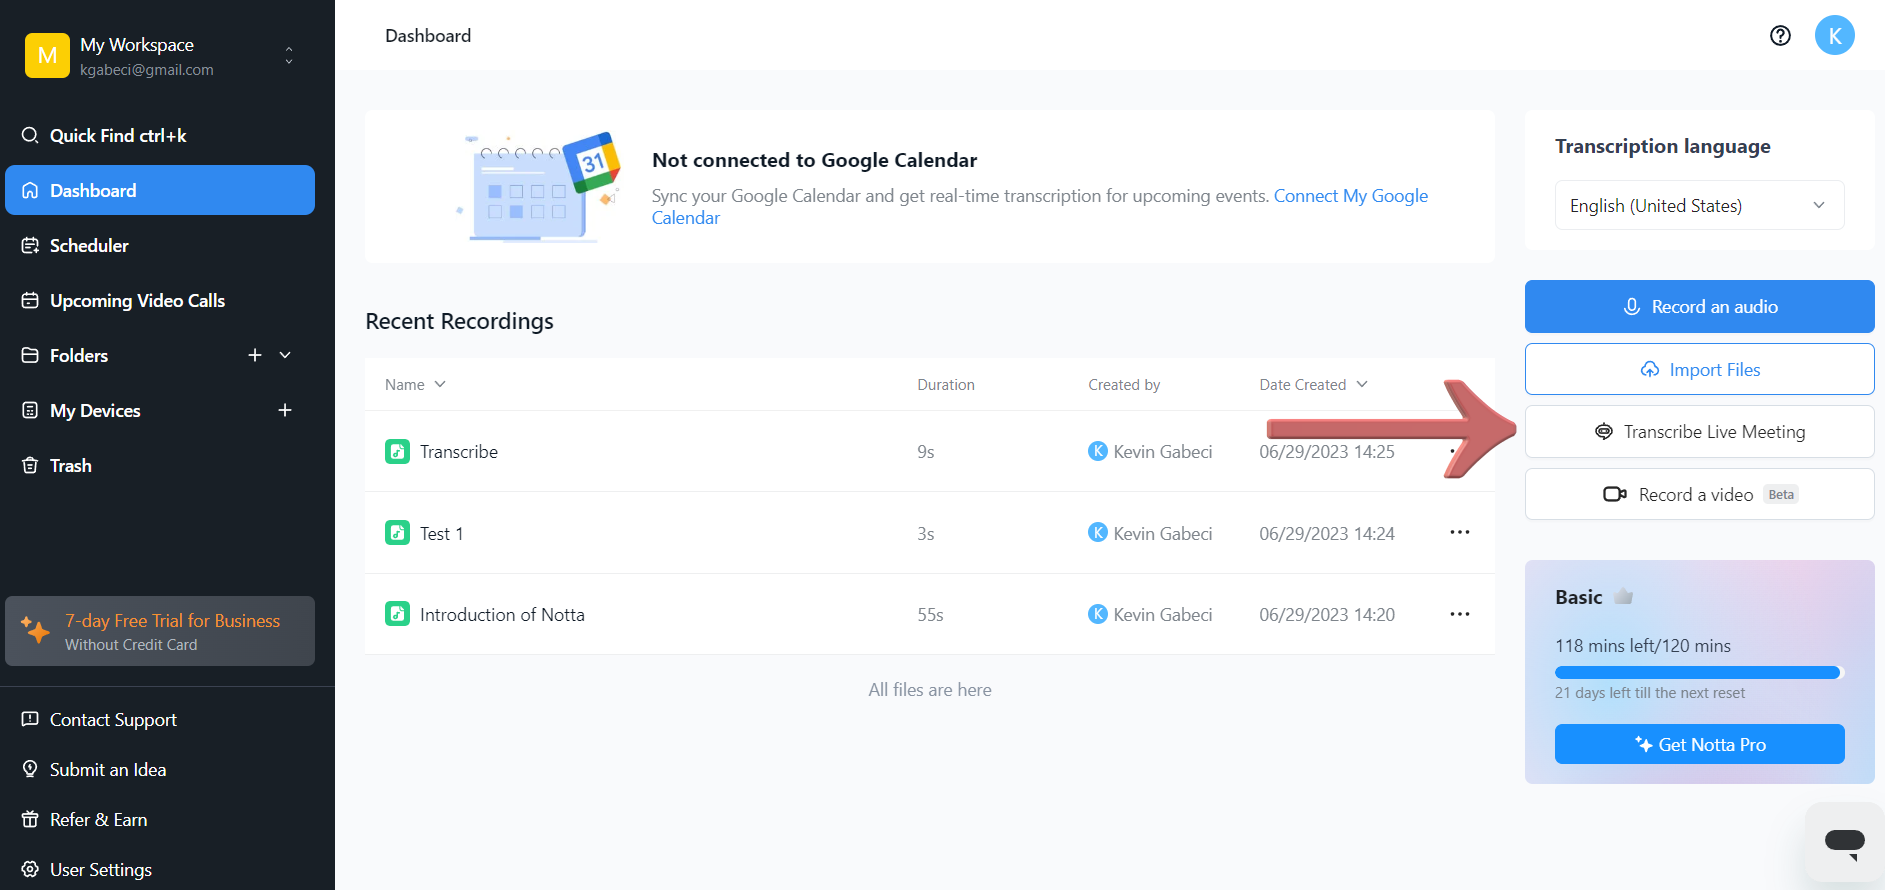
Step 4: Now go to your Notta Dashboard. On the screen's left panel, select 'Transcribe Live Meeting.'
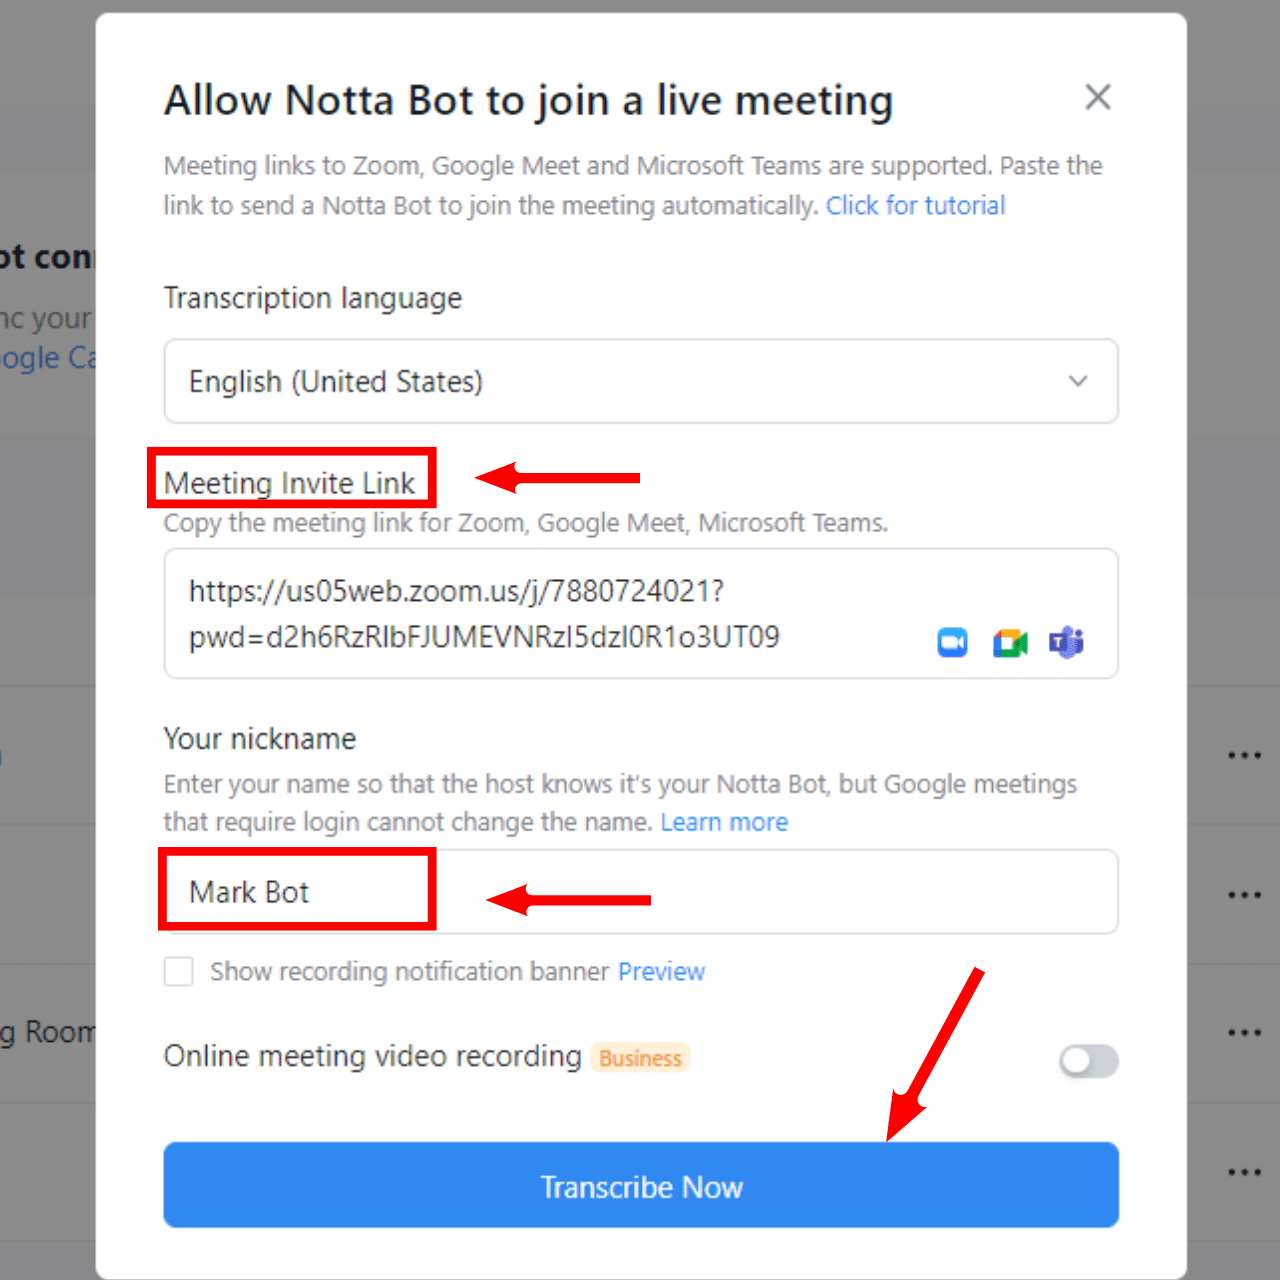
Step 5: A window will pop up. Paste the copied link in the 'Meeting Invite Link' section. Give your Notta bot a nickname, and select 'Transcribe Now.'
Step 6: Your Notta bot will enter the meeting to record and transcribe it.

Step 7: Go to your Notta dashboard to see the live transcript. Select transcribing to view the meeting transcript in real time.

Step 8: Click the 'Stop' icon to leave the meeting.
The recorded and transcribed Zoom meetings will remain in the Notta dashboard for later review. The best part about Notta is that it supports 58 languages and transcribes recordings with high accuracy, ensuring you never miss any important meeting detail.
With Notta, you can easily generate meeting minutes, turning spoken content into written records with 98.86% accuracy.
Key takeaways
Canceling a Zoom subscription may seem challenging at first glance. However, following the step-by-step procedure mentioned in this guide can help you quickly cancel a Zoom subscription or any add-on on Zoom's desktop client, iOS, and Android devices.
If you are interested in recording Zoom meetings while you are on the free plan, consider using Notta. It's an excellent recording and transcribing AI-enabled tool to record high-quality Zoom meetings and transcribe them in real-time. Sign up for a free Notta account today to explore its features.