Sidenote: Not everyone can access the Microsoft Teams Admin Center. Ideally, this is reserved mainly for the IT department. Therefore, consult your organization's IT department if you encounter a problem accessing the admin panel.

How to Enable Transcription in Teams
Unlock the power of AI — Notta's meeting assistant records, transcribes and summarizes meeting minutes with one click.
The past six years have been an upward and downward battle for Microsoft Teams. One of its most significant achievements during this period is its improvements to online meetings.
Now, meetings in Microsoft Teams are more productive, inclusive for people who are hard of hearing, and engaging for users with different language proficiency.
So, how can you benefit from this new feature?
Here is a quick guide on how to enable transcription in Teams.
List the two different ways
There are two different methods to record and transcribe your meetings and calls in Microsoft Teams:
Using the Microsoft Teams Admin panel- This is only possible when using the desktop app and on team accounts under approved licenses.
Using a command in the PowerShell command center- You need to install the PowerShell Teams module and connect it to your account. Either use a global or team service administrator account to bypass all limitations.
How to enable transcriptions from Microsoft Teams Admin Center
Turning on the transcription setting in the Microsoft Teams admin center is a three-step process.
Log in to your team account and visit the admin center.
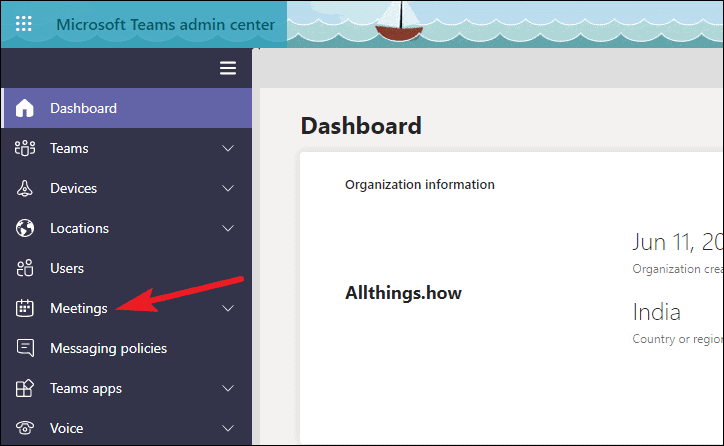
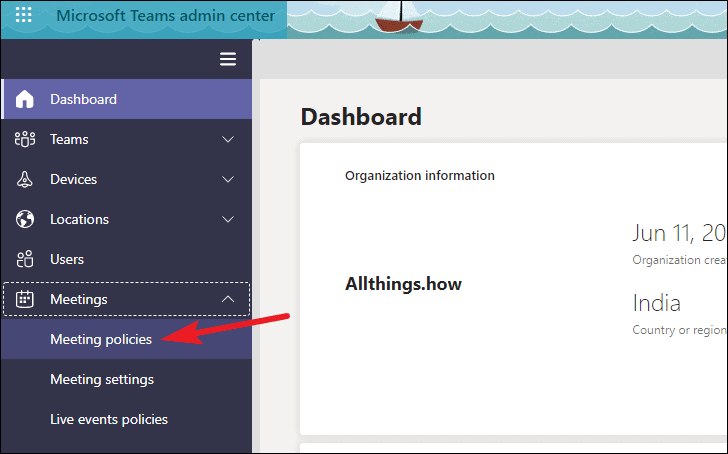
2.Click on ‘meetings’ and select ‘meeting policies’ in the drop-down section.
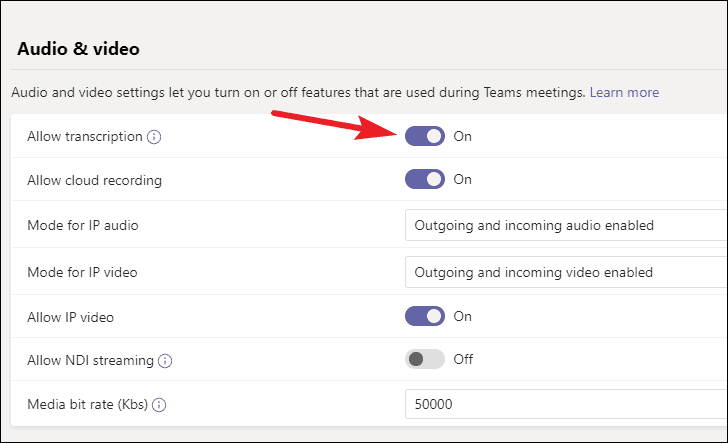
3. Scroll down to the audio and Video settings and toggle the button under ‘Allow transcription.’
How to customize your transcription settings
Now that your Microsoft Teams meeting transcription settings are on, you can further customize your settings to allow selective or organizational transcription.
As an admin, you can enable transcription for the entire organization. To do this, click on ‘Global (Org-wide default).’
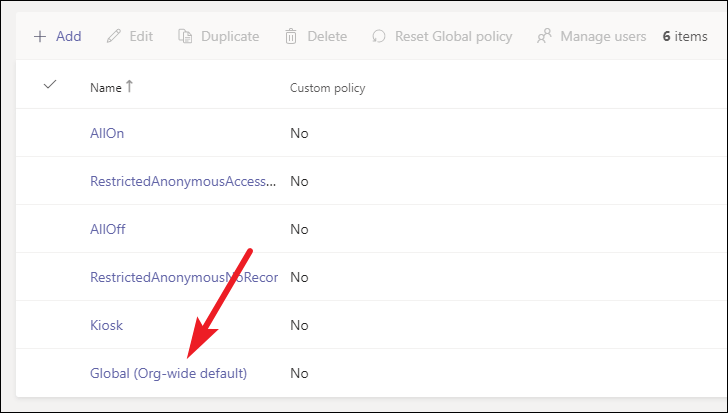
For selective transcription, you can create a custom policy that limits the number of users accessing the transcription function.
To do this:
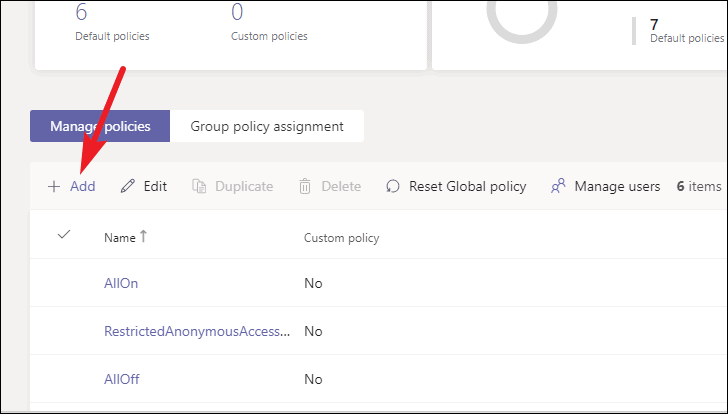
Click on the ‘Add’ button on the ‘Meeting Policies’ page
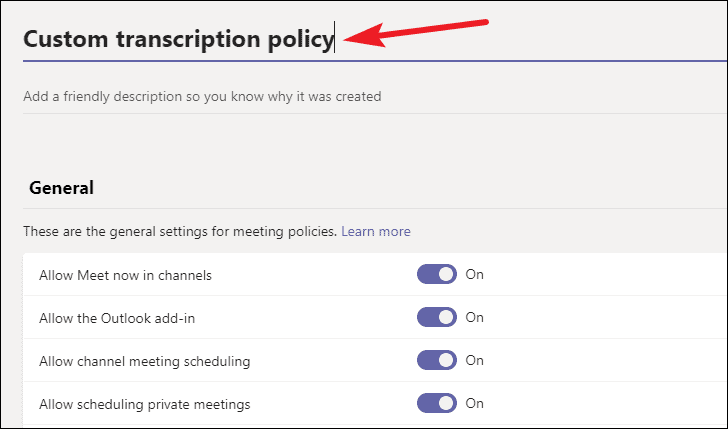
2. Give the new policy a new name and save it
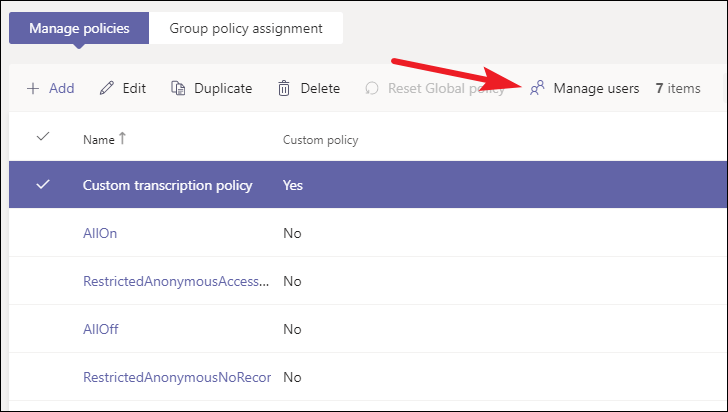
3. Assign new users to the policy by clicking the ‘Manage users’ icon on the top right corner of your screen. This will open a window pane on the right side of the screen where you can search for the members or groups you want to include in the new policy.
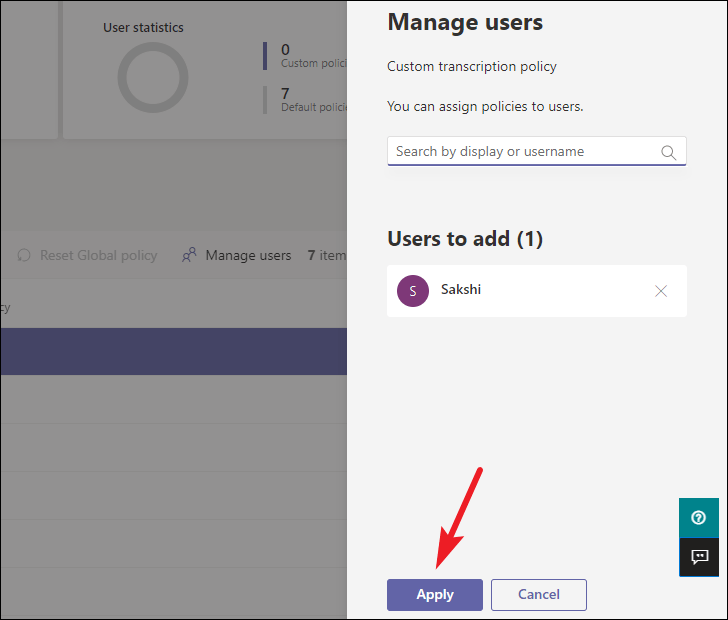
4. Once done, click on the ‘Apply’ button
With the new policy already set, you can either:
Allow transcription to the whole organization and only add the users you don't want to get the function to the new policy.
Grant transcription access only to the users and groups you add to the new user policy.
Notta offers the most integrated AI meeting notes, summaries, and action items so nothing gets missed.
How to enable real-time captions
Microsoft Teams leverages Microsoft Automatic Speech Recognition (ASR) technology to generate live captions at the bottom of your meeting window. The ASR technology is automated, meaning no one can access the audio or transcript after the meeting.
The generated caption data is deleted automatically at the end of the meeting. To enable this:
Start your Microsoft Teams meeting.
Navigate to the meeting control section and click the ‘More Actions’ button depicted by three ellipses (...).
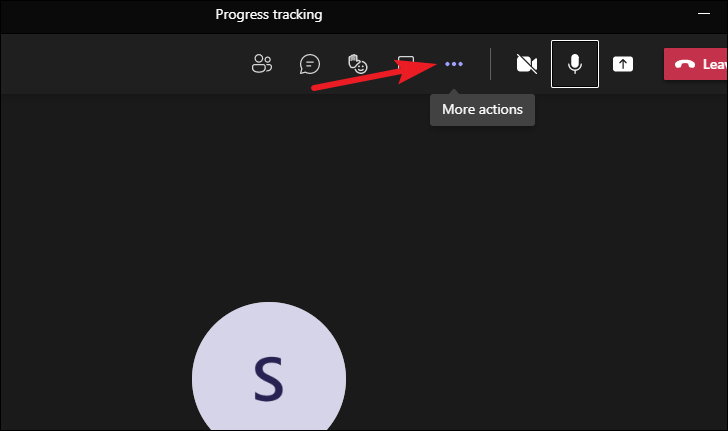
3.Under ‘Language and speech,’ select the ‘Turn on live captions’ option.
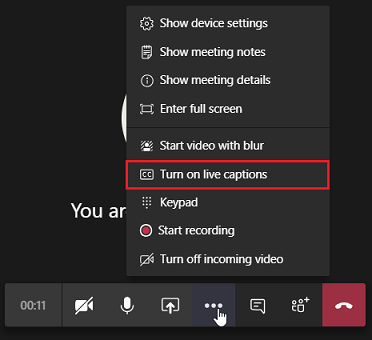
Microsoft Teams allows desktop users to change the live-captioning language as the meeting is ongoing. To do this, click on the ‘Settings’ icon at the right side of the captions and choose the ‘Spoken language.’
The above step does not translate the caption. Instead, it helps the speech text engine provide better results.
Still, it's possible to provide translated captions for your live meetings. Click on the ‘Settings’ icon and select ‘Caption Language.’ Then, choose the language you want the captions in.
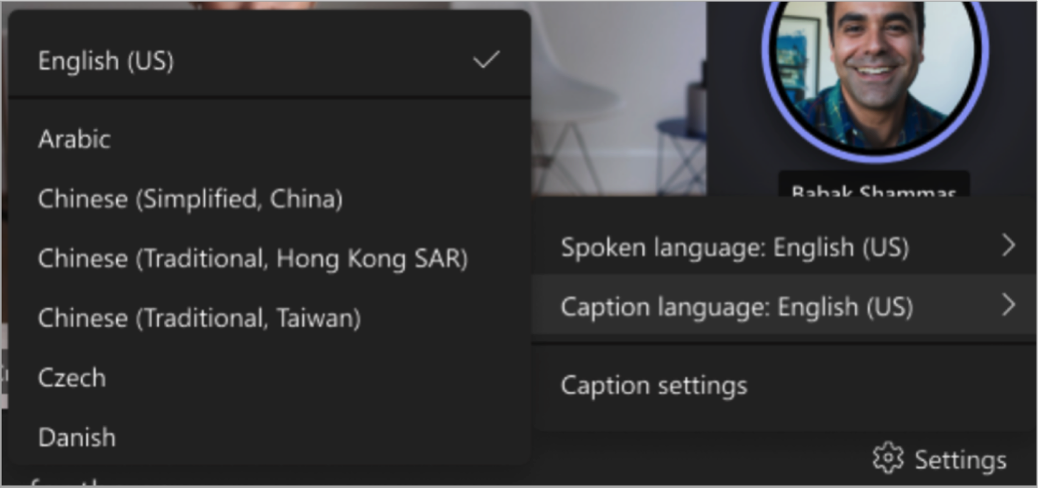
Please note switching the spoken language is only possible for users with Desktops. Also, the changes you execute above will affect all the meeting participants.
Another way to generate real-time transcription is using a Microsoft Teams CART service. Communication access real-time translation (CART) is a trained captioner that listens to audio in real time and converts it from speech to text.
The benefit of using a CART service to the computer-generated captions by Teams is that:
Highly accurate
Readily available for all users, including GCC.
To use this service:
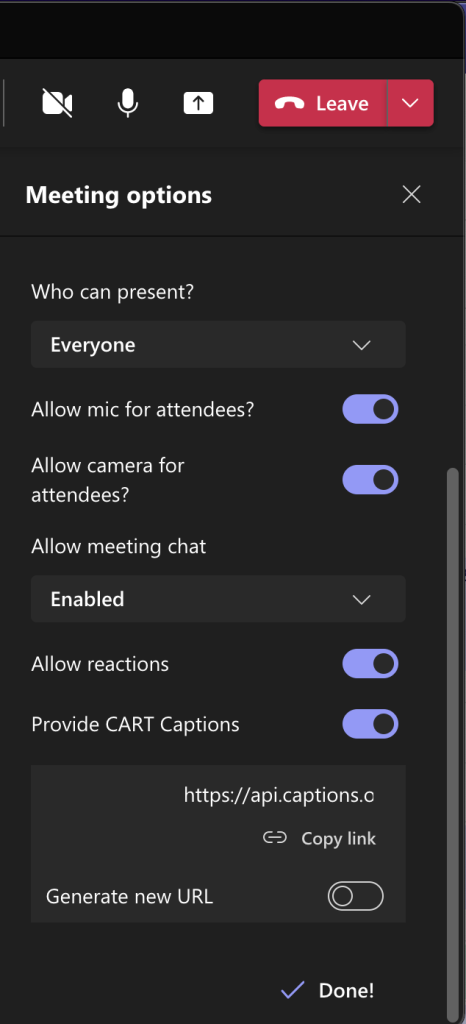
Start your meeting and click ‘Meeting options.’
Toggle on the ‘Provide CART Captions’ to turn it on and generate the CART URL.
Provide the generated URL to a CART captioner to accurately transcribe the meeting.
Microsoft Teams can also generate real-time transcriptions of meetings. To use this feature;
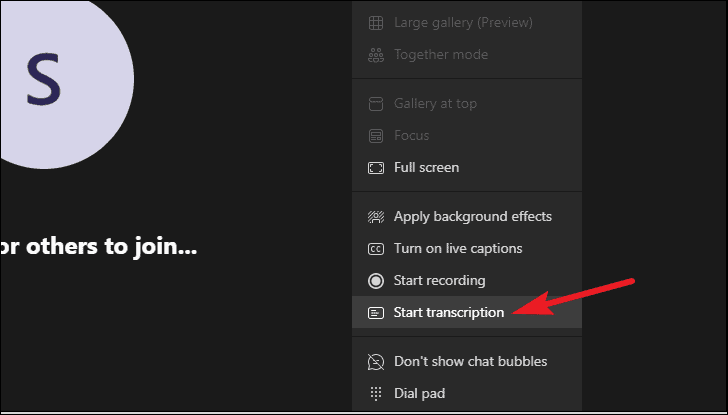
Click on the ‘More Action’ button on your meeting toolbar

2. In the drop-down bar that appears, click on ‘Start transcription.’
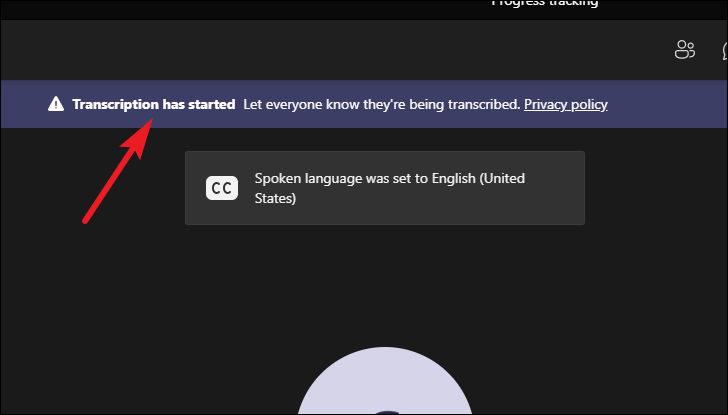
3. A notice will appear on-screen notifying the meeting attendees that transcription is taking place. Remember, every team member attending the meeting will get a notification at the start and end of the transcription process.
The Microsoft Teams transcription panel will appear on the right of the screen. You can open and close it at any time, depending on your preference.
How to enable transcriptions with PowerShell
When using PowerShell, you can start and stop transcriptions using command prompts such as the Start-Transcript cmdlet and Stop-Transcript cmdlet in the teams meeting policy environment.
The CsTeamsMeetingPolicy environment is where administrators can change the settings of a meeting or determine who gets access to what. It's one of the best secure ways to transcribe a sensitive meeting or call since PowerShell provides a forensic record of its use.
You can tell who accessed the system and what they did to the transcript. It’s also valuable for helping you identify the errors that may occur during the transcription process. Unfortunately, it's one of the most underutilized processes.
To configure transcription settings using PowerShell, access the TeamsMeeting Policy environment and use the command below:
Set-CsTeamsMeetingPolicy -Identity <policy name> -AllowTranscription $
According to the new global policy change, an admin can allow global users to access the transcription function or configure the command to affect an assigned policy with a select number of users. This then limits the transcription to the users under the policy.
PowerShell will show you the number of people with Microsoft Teams transcription access.
The users under this policy will then get real-time and post-meeting transcriptions and captions. Only an admin can adjust the policy assignment using a command. They can add or reduce users in the policy or remove the policy assignment.
Say goodbye to tedious note-taking and hello to seamless meeting transcriptions with Notta AI meeting assistant.
How is transcription different from live captions?
As seen above, Microsoft Teams can generate real-time transcriptions and Live captions. But the two are not the same.
Here is a table that can help you distinguish between the two:
| Transcription | Live Captions |
|---|---|
| The transcripts are downloadable | Captions disappear as the meeting continues |
| The only supported language is English | It is in the language spoken during the meeting |
| Includes the name of the speaker and timestamps | It does not have timestamps or the name of the speaker |
| Transcription is only available for business team accounts | Live-captioning is available in personal and business accounts |
| Transcription can only happen for scheduled meetings | Live captions can occur in all live meetings |
How to start/ stop transcription during a call?
In Microsoft Teams, the transcription setting may not be automatic for all meetings or calls. If your call has already begun, you can still activate your transcription by following the steps below:
Click ‘More Actions’ in your meeting Control section. This will appear as three ellipses (...).
Select ‘Start transcription’ from the drop-down menu.
Repeat the same steps to stop the transcription process, but this time choose 'Stop transcription.'
Read next: how to write meeting notes in Teams
How to download and share transcripts?
Both admins and meeting participants can access the recording and transcripts of a just-ended call. It does not matter if the admin is not the host since these files fall under tenant-only content.
To access and download the transcripts, you need to follow three steps:
In your Teams dashboard, go to your ‘Calendar’ in the navigation tab on your left.
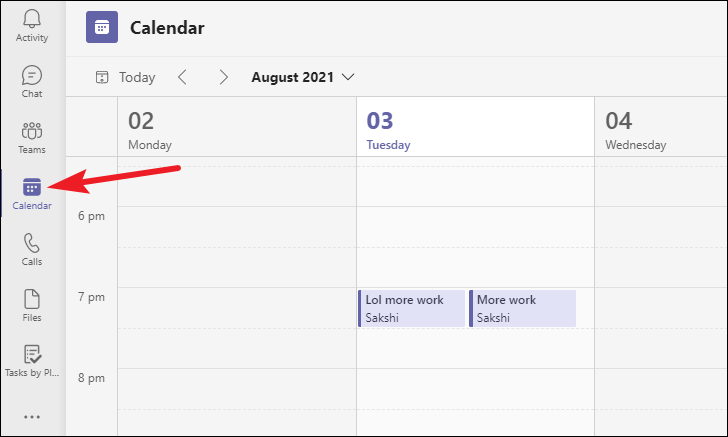
2. Identify the scheduled meeting you want to download transcripts and click on it.

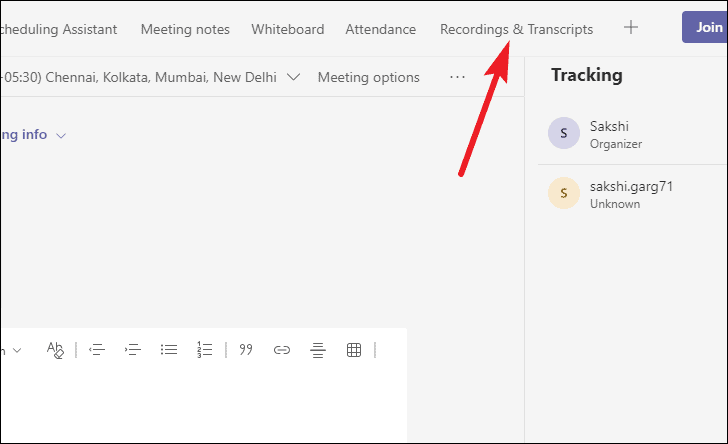
3. Click on ‘Recording and Transcripts’ in the top right corner of the meeting event's page to download the transcript.
N.B: You can only download the transcript as a .vtt or .docx file. Although any meeting participant can access these files, the download is only possible until the meeting organizer deletes the files.
How to hide your identity in transcriptions?
Microsoft Teams allows you to protect your privacy during meetings by automatically hiding your name in the meeting transcripts. However, you can only change this setting before a session begins.
To do this:
Log in to your Teams account and Click on the ‘Settings and more’ icon on the left side of your profile icon.
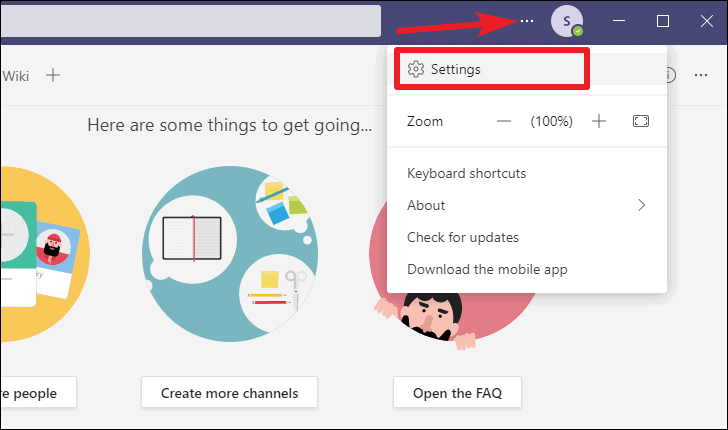
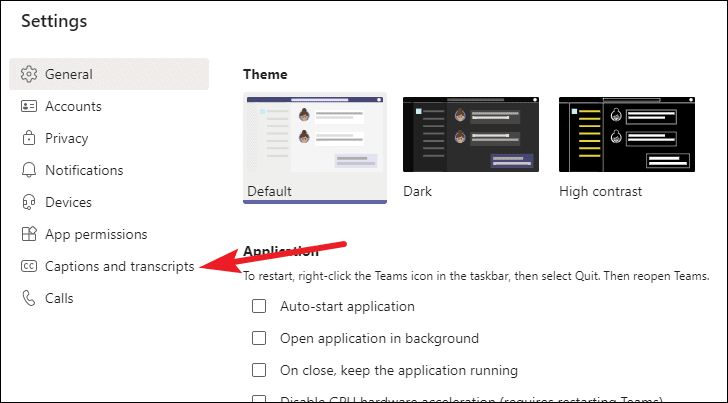
Click on the ‘Settings’ option and select ‘Captions and transcripts’ on the left side of the navigation page.
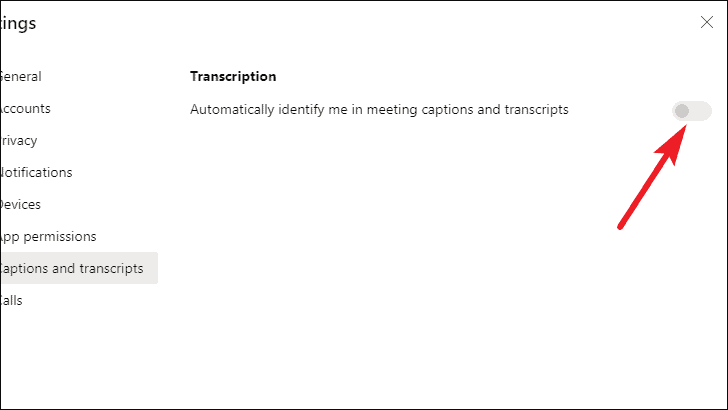
Here, you will find the option for Teams to identify you in every meeting automatically. By default, this option is always on. Toggle the button to turn it off.
Why use transcripts?
Depending on the purpose of your call or meeting, there are several reasons why a transcript may be of importance to you. A few notable examples include:
Professional note-taking
Transcripts are verbatim records of a meeting. You can review them to find out what happened in a gathering if you could not attend or identify any critical detail you missed.
It also allows you to re-distribute your time to other things, especially if you have a busy schedule.
Collect customer data
A meeting transcript can be a wealthy source of client feedback. When discussing the problems a client is facing, a transcript provides a much-needed reference your team can use to craft solutions.
At the same time, by storing these transcripts safely, sales reps can track down conversations with a client and identify their level in the sales funnel. This allows for a much better sales experience.
Compliance records
If you need a legal reference, transcripts can provide the cover you need. These meeting records can track what was said and by whom, providing the evidence you need to solve disagreements or disputes.
Accessibility and inclusivity
If you want your calls or meetings to be accessible to people who are hard of hearing, you need to activate transcriptions and live captions. This will allow all the meeting attendees to keep track of the conversation and understand what's happening.