How to Record Google Meet Calls on Any Device (4 Steps)
Unlock the power of AI — Notta's meeting assistant records, transcribes and summarizes meeting minutes with one click.
Google Meet is a free online video-communication service hosted by Google that is ideal for people of all professional backgrounds, students, and individuals looking to stay connected.
Recording a Google Meet session is a usual practice now because it provides many benefits, from sharing a work meeting with a colleague who couldn’t attend the meeting to referencing a lecture and creating notes or transcriptions later on.
Today, we’re sharing multiple ways that you can easily record a Google Meet call on your computer, smartphone, and much more. Without further talking, let's begin.
Who can record a Google Meet call?
Currently, Google Meet doesn’t offer a recording feature to everyone. There are two requirements to be met if you want to record a video meeting.
Firstly, your team will have to be registered to the following Google Workspace editions:
Essentials
Enterprise Starter, Essentials, Standard, or Plus
Business Standard or Plus
Workspace Individual Subscriber
Education Plus (Starting on January 10, 2022, all customers using Google Workspace for Education Fundamentals or Standard will no longer have access to the recording feature in Google Meet.)
Teaching and Learning Upgrade (Available to users having a "Learning and Teaching Upgrade" license)
Secondly, you should either be the meeting host, co-host, or within the same organization as the host, or you should be granted recording access by the Google Workspace administrator.
Note: You can only record Google Meet calls through the Google Meet app on a PC. Mobile devices are not eligible for this feature.
What can you record in Google Meet?
When you record a Google Meet session, the following parts of the Google Meet session are saved in the recording:
The active speaker
Anything the active speaker is sharing on-screen, such as a Google Doc, Slides, or Sheets
Chats during meetings
What's not recorded:
Live captions
Other open windows
Notifications
How to record a Google Meet on a laptop?
If you’ve met all the requirements above, simply sign in to your Google Meet account and follow the steps below to record Google Meet as the meeting host or participant.
1. Start or join a Google Meet call.
2. At the bottom right of your screen, select the Activities icon > Recording.
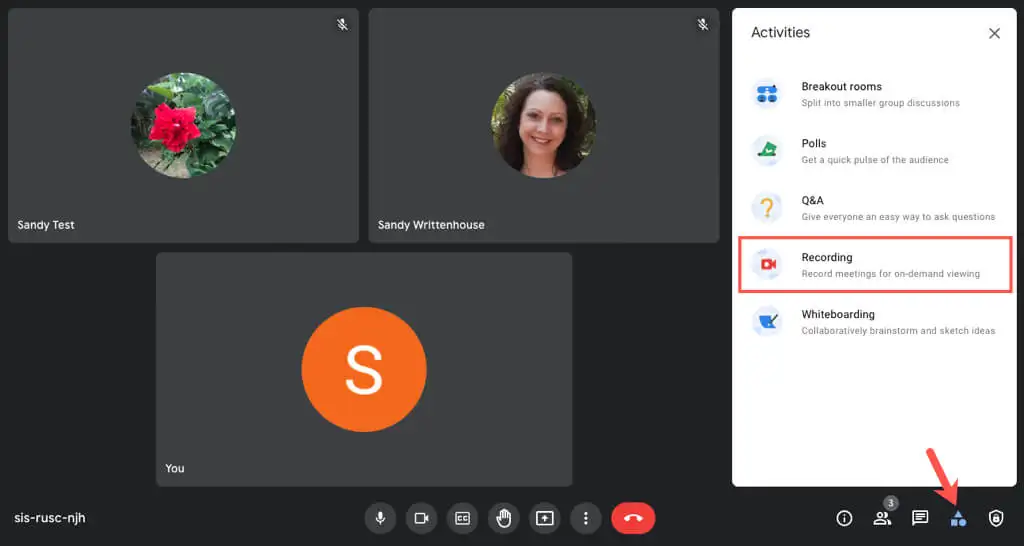
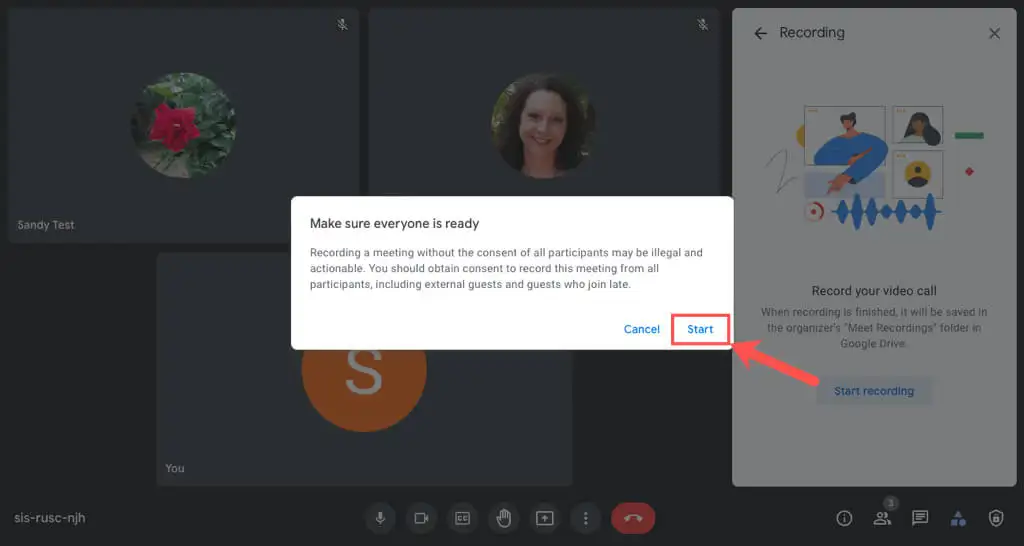
3. Click on Start Recording. A new window will open to let you confirm; click Start.
Your recording will begin in a moment. After the recording starts, all participants will be notified, and a record icon will be displayed on the top left of the screen.
4. To stop a recording, click the Activities icon again and then choose Recording > Stop Recording. Nonetheless, the recording will stop automatically once the meeting ends.
The Google Meet software will automatically save the recordings to the meeting organizer’s Google Drive inside the Meet Recordings Folder.
Additionally, a recording link will be sent to the person who started the recording and the meeting organizer via email or attached to the Google Calendar if the meeting was scheduled.
Notta AI meeting assistant records, transcribes, and summarizes meetings so everyone can stay engaged without missing important details.
How to record and transcribe a Google Meet automatically?
Recording online meetings has become necessary for many organizations as a recording provides a reliable source of information. Unfortunately, as we have pointed out, Google doesn’t empower all GMeet users to do so.
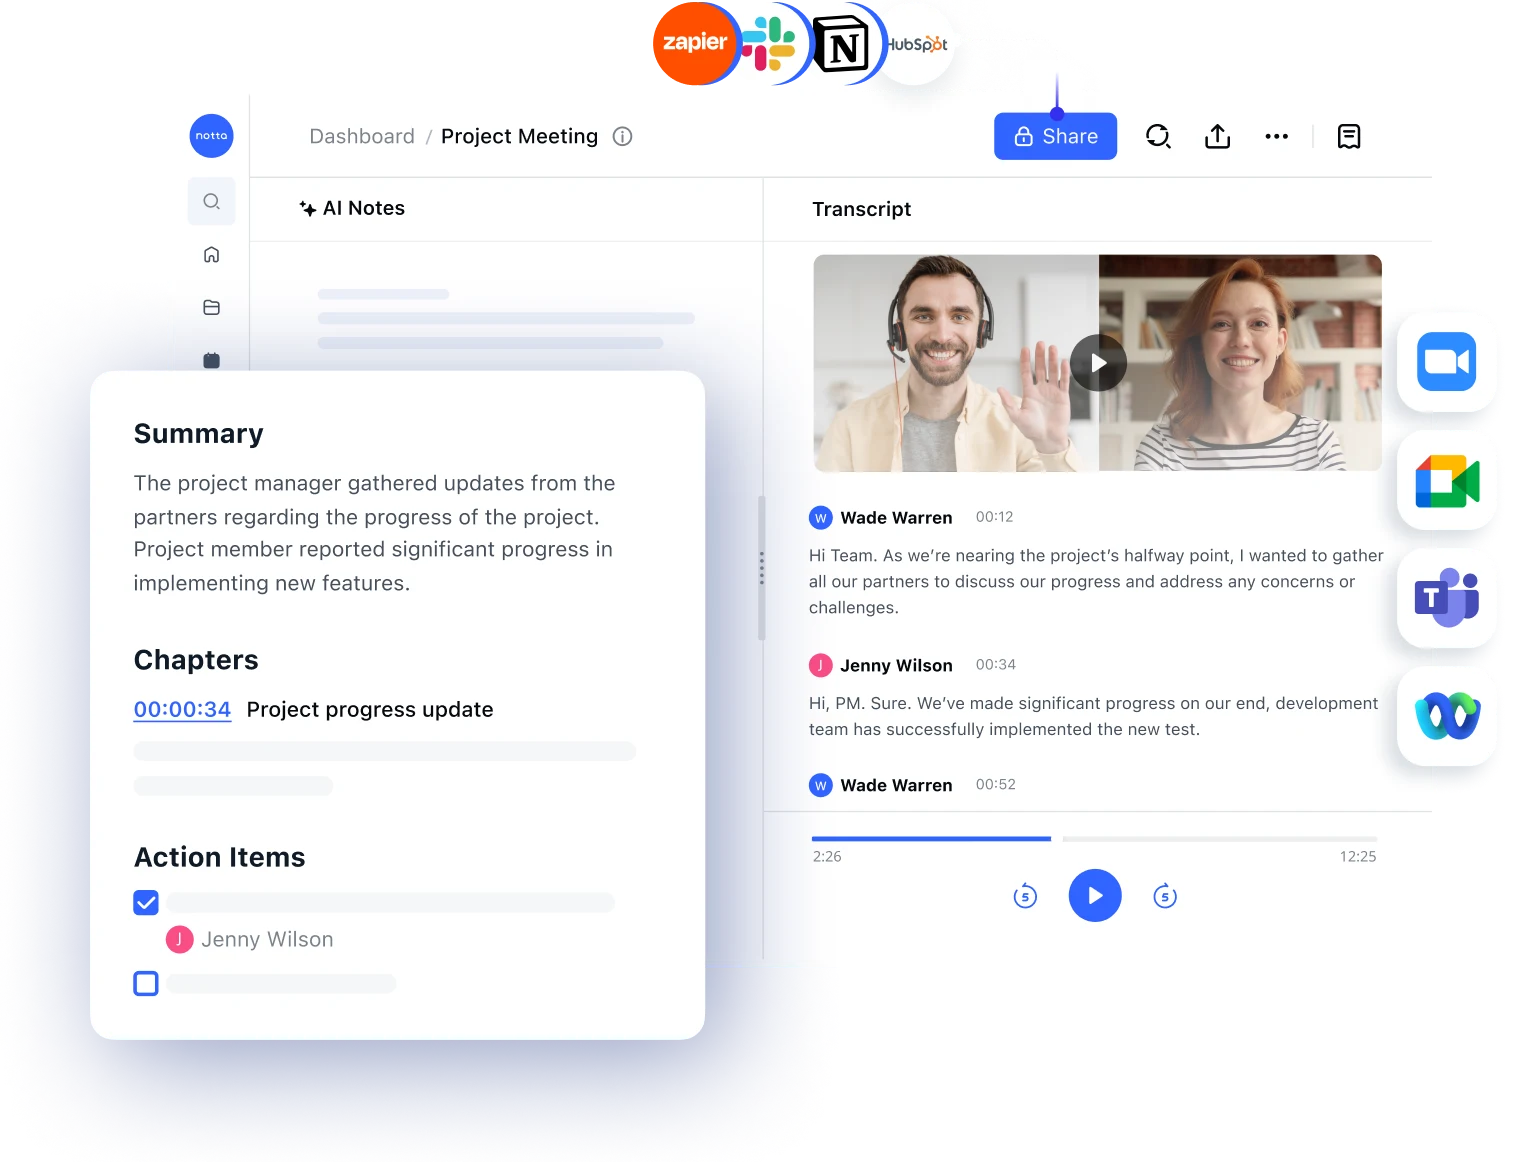
However, this one simple way to record any Google Meet calls as a participant without requiring permission from the Admin: using a meeting recording software like Notta. It will send a bot in to record the audio and video in quality, and you can download and share the meeting recording with others easily afterward.
What's better, Notta will automatically convert all conversations to text in real-time using AI, so you can stay engaged in the conversation without worrying about missing any details.
Steps to record a Google Meet call using Notta:
1. Log into your Notta account and go to the main dashboard.
2. Click ‘Record online Meeting’ on the right sidebar, and a new window will pop up. Enter your Google Meet URL and click ‘Transcribe Now.’
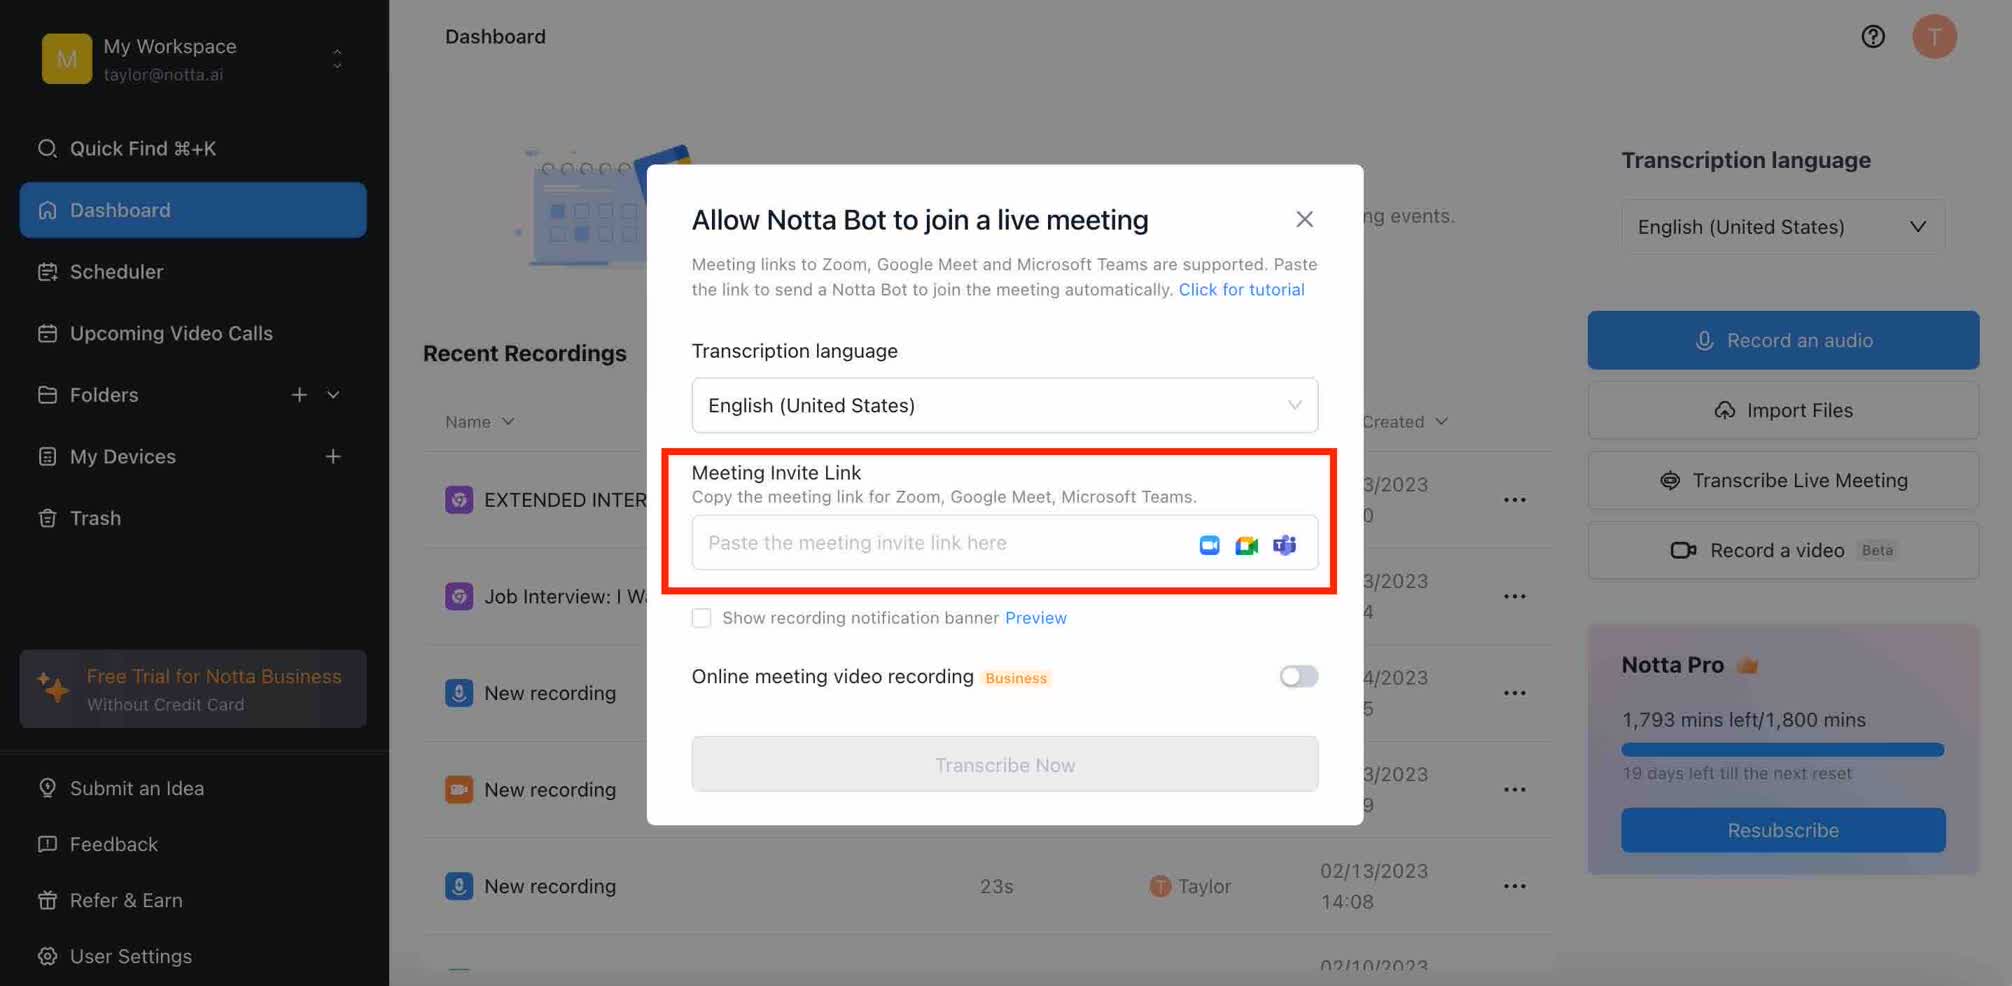
3. Go to your Google Meet call and click ‘Admit’ to allow the Notta Bot to join the meeting.
4. Return to the Notta dashboard and you will see a live transcription, open it and you'll view the transcript in real-time as the meeting continues.

How to record a Google Meet on mobile devices
Since the GMeet recording feature is only available on computers, you’ll need a different way to record Google Meet on mobile devices. Fortunately, there are built-in tools you can use to record a Google Meet video, whether you are using an Android or iPhone.
Record a Google Meet meeting on Android phone
Join the Google Meet meeting via a shared invitation link.
2. Swipe from the top of the screen and turn on the Screen recorder. Accept its request for access to your device.
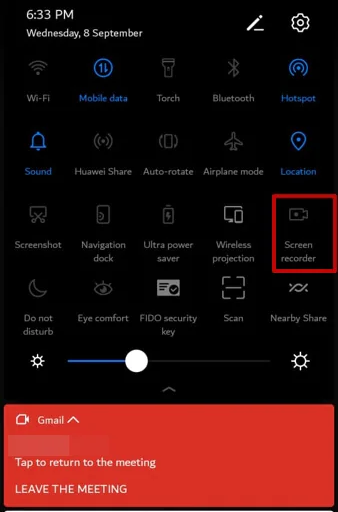
3. Tap on the microphone's symbol to record any screen activity with audio.
4. Once the meeting ends, tap the red Recording icon to stop it. Then you will find the meeting recording in the gallery.
Record a Google Meet on iPhone
iPhones also have a built-in screen recorder that enables you to record Google Meet sessions. Follow the below step-by-step instructions to get started.
Open the Google Meet application and join the meeting you want to record.
2. Swipe from the bottom of your iPhone's screen to access its Control Center, then press the Record button (red circle).
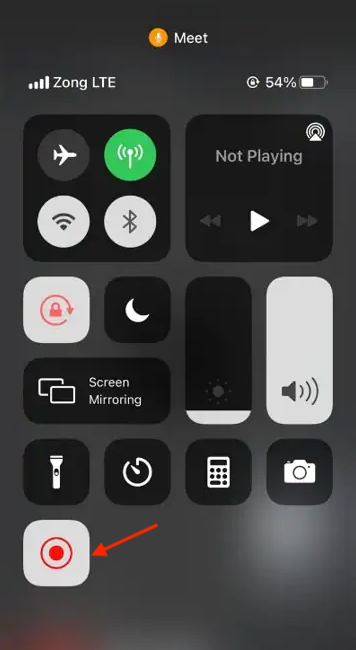
3. Tap on Start Recording, and the recording is on the go. The recorded file will automatically be saved in the iPhone's gallery when you stop screen recording.
Record a Google Meet on the phone using third-party tools
One of the best ways to record Google Meet sessions on mobile devices is by using the free Screen Recorder - XRecorder app. This app records both video and audio on Android and iOS mobile devices.
Download the Screen Recorder - XRecorder app onto your mobile device by searching for it in the Google Play Store.
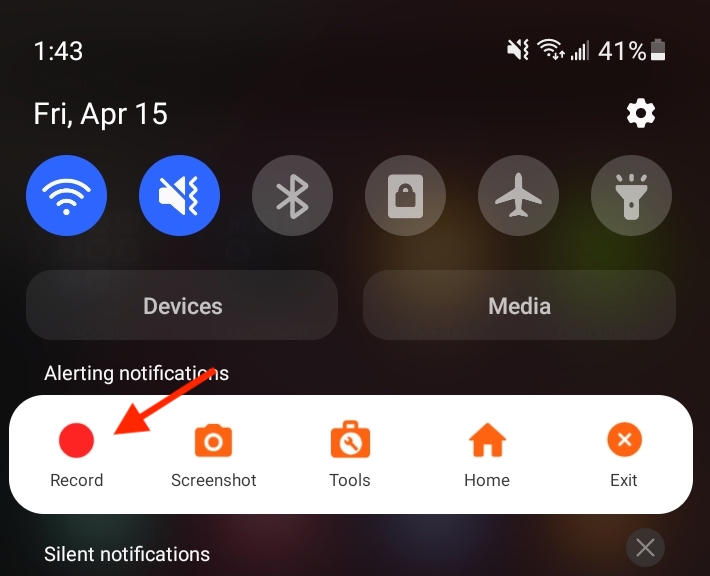
Once the app is installed, it will show a quick menu in the pull-down menu from the top. Click ‘record’ to start recording your screen, then open your Google Meet session.
How to play, share, download, or save Google Meet recordings
Interested in sharing your Google Meet recording with a coworker, friend, or fellow student? Check out the three following ways that you can share your recording.
In Google Drive
If you create a recording through Google Meet directly, it’ll automatically save a copy of the recording to your Google Drive. Google Drive makes sharing and downloading your recording easy.
Locate your recording file in your Google Drive account.
Left-click the file to bring up options for sharing and downloading the file.
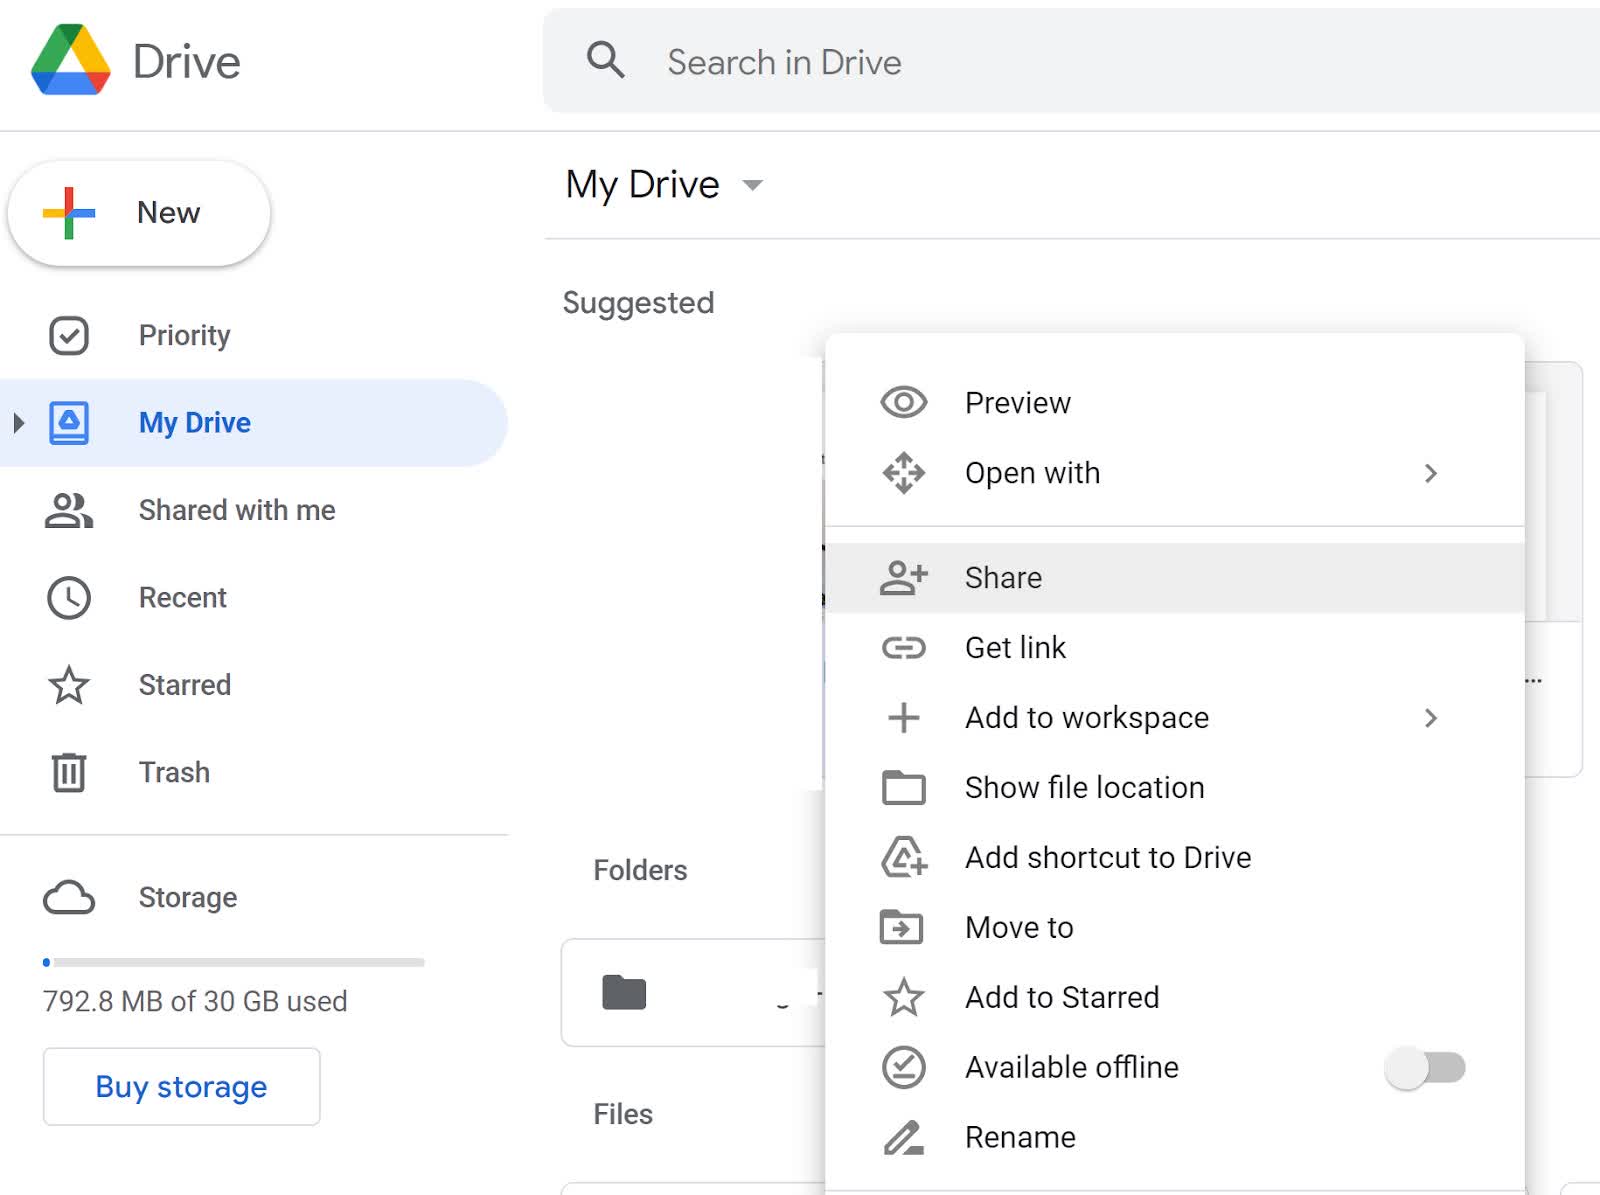
Click ‘Share’ for options to send the recording to another Google account, such as your coworker’s Gmail account. Otherwise, you can click ‘Get link’ to make a link for the recording to be shared with others or downloaded.
Share with a Link
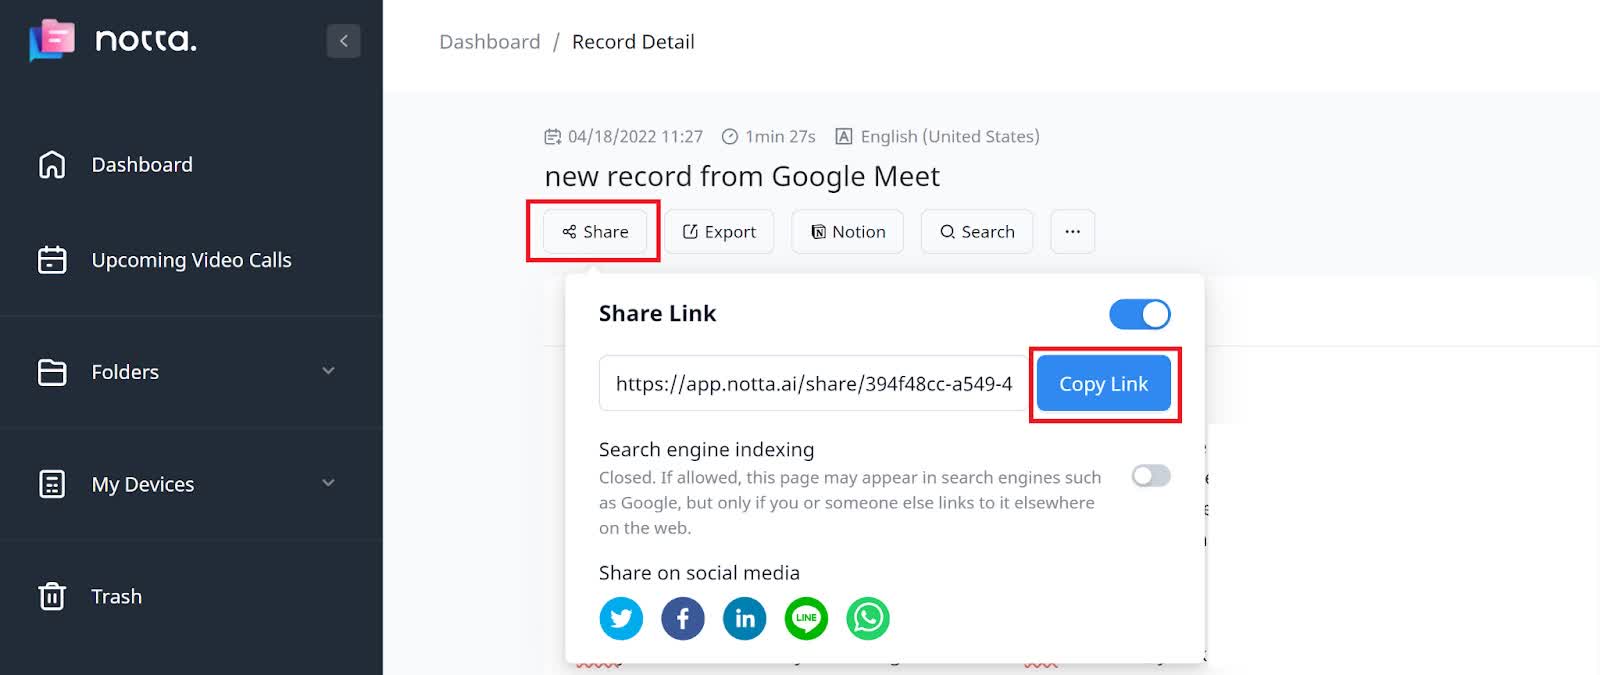
To share a Google Meet recording through a link, go to your Notta dashboard and click on your Google Meet session recording. Then, click ‘share’ and ‘copy link,’ located underneath the recording title.
Run productive video meetings with Notta
Recording a Google Meet call is great for reference, sharing with your coworkers or classmates, and creating transcriptions or online content. Google Meet’s recording feature is the easiest way to record a Google Meet call. However, it requires access to be granted by a meeting organizer and a premium Google Workspace membership.
If you don’t have these options, third-party software is a great option. We strongly recommend Notta for high-quality, automatic audio recordings and transcriptions and Vmaker for video screen recording. Both are easy to use and free options.
Are you ready to level up your note-taking processes on Google Meet? Try Notta for free today!
FAQs
Do you still have questions about how to record Google Meet events from your device? Our FAQ section will cover the most concerning questions to solve your problems.
Why can't I record on Google Meet?
First, you need to confirm that you meet the requirements to record Google Meet.
Your team has the required Google Workspace editions, and the Admin has allowed for meeting recording.
You are the meeting organizer or have permission from the organizer.
You’re using a desktop device.
Additionally, if you have an outdated version of the G-suite edition, it would be best to upgrade it to a workspace edition. This update might get you the recording feature since the recording function expired on all G-suite accounts on Sep 30, 2022.
If all the above suggestions are not working, try troubleshooting the issues. Click here to learn more about troubleshooting the problems with meeting recordings.
Why is there no record button on Google Meet?
This problem is the same as “can’t record on Google Meet”.
You also need to check the requirements for Google Meet recording and get the necessary permission.
How much does Google Meet usage cost?
Google Meet does not charge people to create and join calls; only a Google account is needed. (If you already registered for a Gmail email address, you won't have to create a new Google account.)
Still, certain Google Meet features are only available via a paid subscription to the G-suite application. Some of these additional features provided by the G-suite include:
● 24/7 online support
● 300 hours' worth of meeting length
● International dial-in of phone numbers
● Saving the meeting recordings into Google Drive
How do you turn on/off Google Meet recording?
This feature is only available to a user registered as a Google Administrator Account. Yet, here is the method to utilize this feature:
Go to the console page of the Google Admin.
Click on Apps, then Google Workspace, and then Google meet.
Next, click the Meet video settings and click on the record button.
Here, you can uncheck or check the option. This action will determine if attendees can record the meetings or not.
Finally, click Save to disable or enable the Google Meet video recording feature.
How to confirm you are recording a Google Meet call?
A recording indicator tends to appear at the top-left corner of the Google Meet Window when recording.
Remember, all meeting participants will be notified when someone is recording the meeting. Hence, it is courteous to inform them beforehand; do not assume they will all be okay if you don't alert them first.