How to Record The Screen on Your iPhone & iPad (with Sound)
98% accurate, real-time transcription in just a few clicks. 58 languages and multiple platforms supported.
Have you ever wanted to record your iPhone or iPad screen to share with others? Maybe to show off a new game, create a how-to video, or a tutorial. Whatever the reason, there's good news coming your way!
It's easy to record the screen on your iPhone or iPad. All it takes is a few simple steps. This handy guide will show you how.
Follow the steps below, and you’ll soon be screen recording on your iPhone or iPad like a pro!
Let's dive in!
How to add screen recording on iPhone & iPad
Open Settings->Control Center. Make sure to toggle on Access Within Apps.
Scroll down and press the green + icon to add Screen Recording to your Control Center functions.
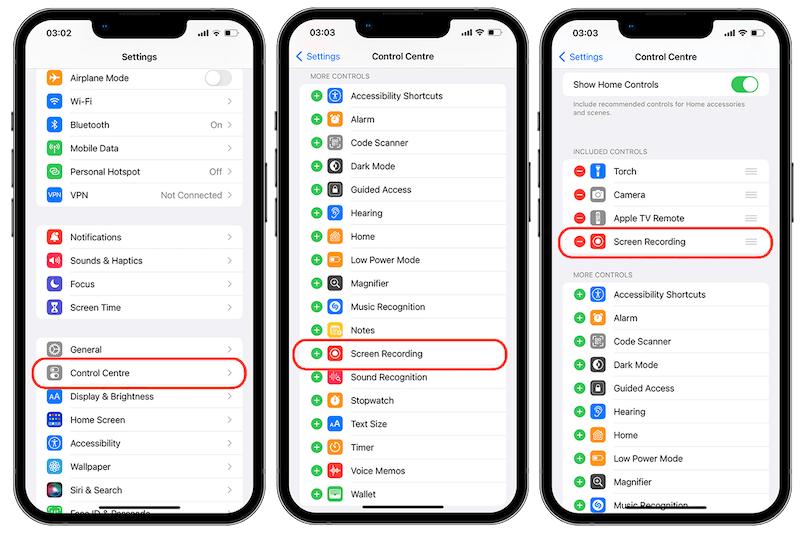
How to record the screen on iPhone & iPad
1. Set up the app, game, or screen you want to record.
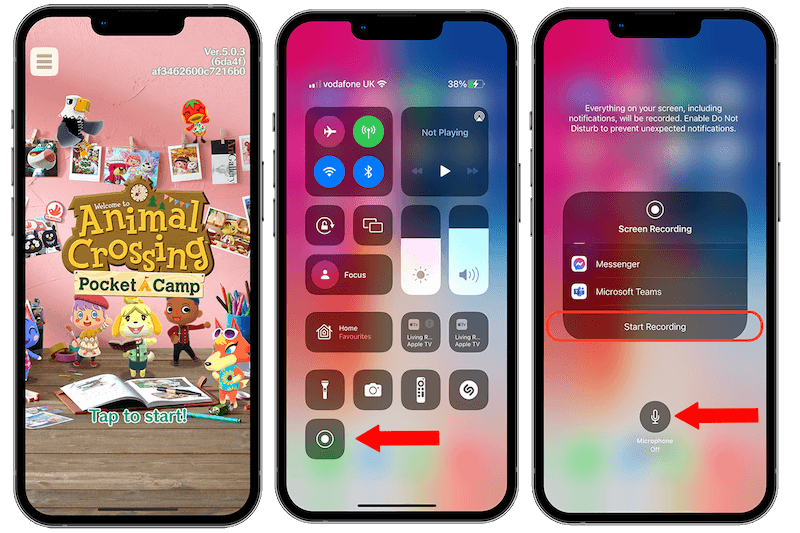
2. Select the Screen Recording icon. Press and hold the gray record icon.
3. The next screen allows you to Start Recording & toggle the Microphone on/off.
Once you begin recording, a red bar will appear at the top of your screen, allowing you to see how long you've been recording. Tapping on this will let you stop the recording.
Alternatively, can enter Control Center again and tap the Stop Recording button. These steps work in precisely the same way on iPhone and iPad.
How to record the screen with internal & external sound on iPhone & iPad
You’ll need to have iOS 11 or later installed on your device. If you're unsure which version of iOS you have, go to Settings -> General- > About. Your version number will be listed under Software Version.
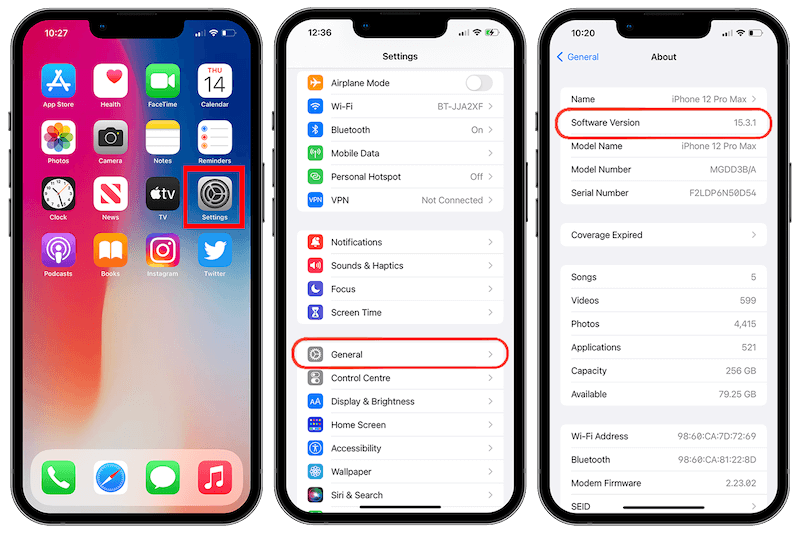
Once you've confirmed that you're running iOS 11 or later, open the Control Center by swiping down from the top of your screen.
If you're using an iPhone with a Home button, you'll need to swipe up from the bottom of the screen and hold your finger in place until the Control Center appears.
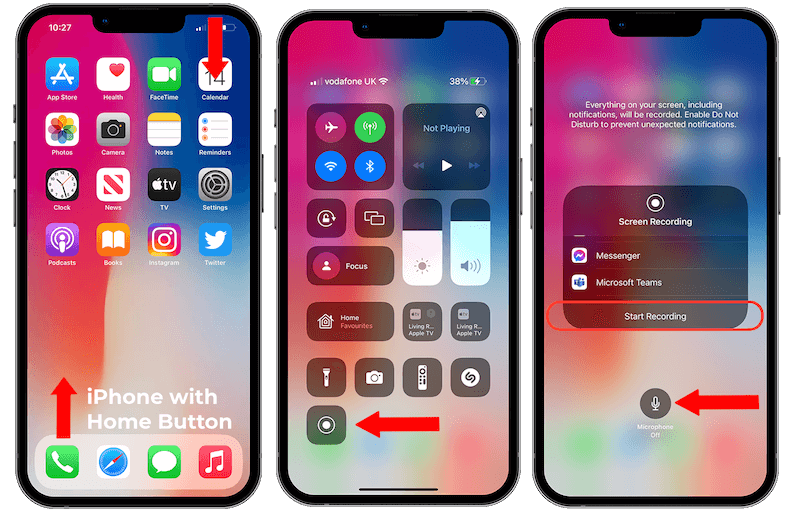
To record internal audio, tap on the gray Record icon; to ensure that any audio playing on the device is captured.
If you want to record external audio, tap the Microphone button to add the external source.
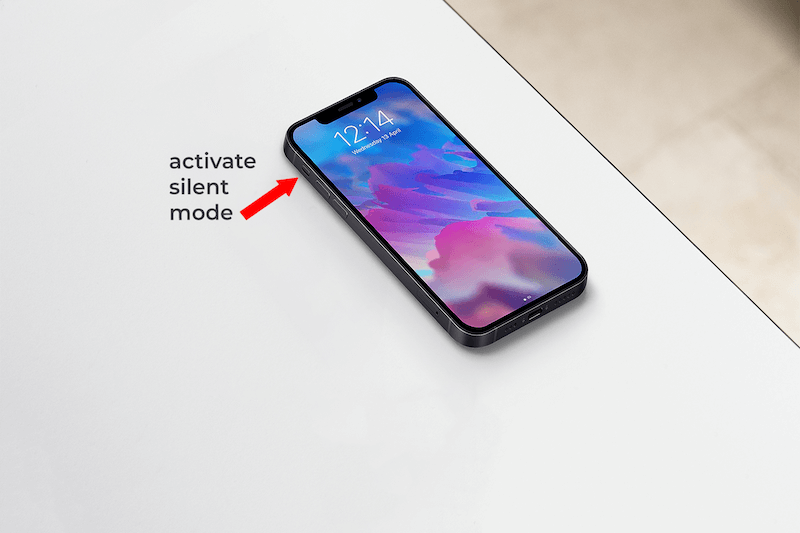
If you want to include the sounds playing on the phone, ensure the device is in Ring Mode by confirming that the switch on the top right side of the device is not set to off (red).
To record only external audio, place the iPhone or iPad in silent mode and turn the media volume to zero.
Notta AI meeting assistant records, transcribes, and summarizes meetings so everyone can stay engaged without missing important details.
Recommended third-party screen recorders
With Apple’s screen recording setup offered free, most users probably won’t need a standalone screen recorder.
That said, it undoubtedly comes with a few significant limitations:
No ability to Livestream.
Limited to 720p/30fps.
No customization features.
Some users have complained of crashes.
If you’re a gamer, live-streamer, or want to use your device to create tutorials or reviews, a third-party app is more likely to meet your needs.
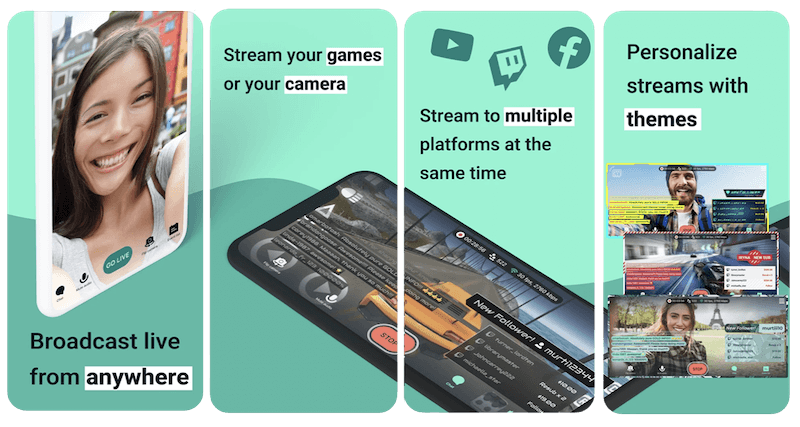
While this is not a comprehensive review, the app listed below will offer you higher frame-rate streaming and the ability to customize your feed with themes, overlays, and widgets.
Streamlabs: Live Streaming App
Key Features:
Mobile streaming.
Chat features.
Social live streaming (Facebook, YouTube, and more).
Custom RTMP destinations.
Personalize your stream (overlays, widgets, logos, etc.).
With multi-streaming capabilities and simple and advanced modes, as well as 1080p resolution, Streamlabs is a significant upgrade to Apple’s built-in screen recorder.
Link: Streamlabs
Screen Recorder +
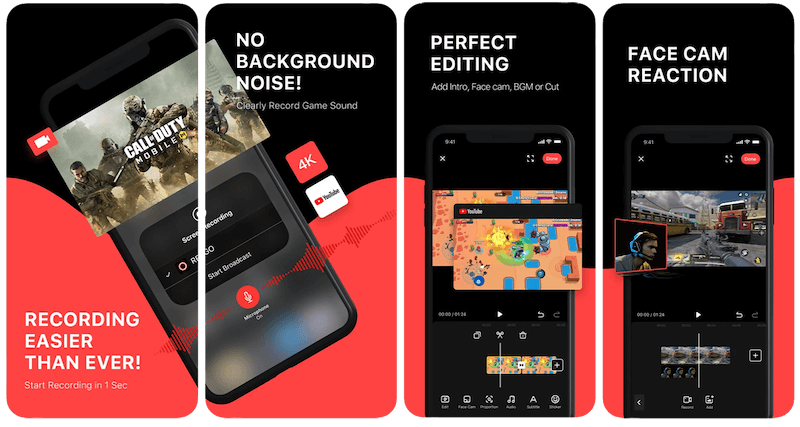
Key Features:
HD video recording
Face Cam for reaction videos
In-app editing
Music, text & stickers
Social sharing options
Straightforward and easy-to-use Screen Recorder + adds plenty of fun features to its high resolutions, frame rates, and bit quality.
5 cool tips for screen recording on iPhone & iPad
You can edit anything saved to your camera roll later! The built-in editing tools will let you trim start and endpoints and apply all edits you use on your photos!
If your recording has background music and in-game sounds consider muting the music to ensure your narration is clear and easy to hear. You can always mix the music later.
When you’re recording, it’s a good idea to clean up your Home screen before you begin. Consider creating a new page with just the apps you want to show. That way, it’s easy to navigate, and everything looks great on the recording!
Remember to mute notifications. Go to Settings->Focus. ->Do Not Disturb and toggle the Do Not Disturb switch on.
A little time spent preparing will benefit the recording enormously. Record in a quiet environment and have the main points you mention written down.
Bonus! Check out how to record audio on iPhone in case you need it.
Conclusion
So now you have everything you need to screen record like a pro on iPhone and iPad. I’ve also included some additional links below.
Have fun and “happy screen recording!”