
How to Schedule a Zoom Meeting
Unlock the power of AI — Notta's meeting assistant records, transcribes and summarizes meeting minutes with one click.
Imagine you are busy juggling multiple deadlines, and your team is spread across different time zones. Now you are constantly struggling to find how to schedule a Zoom meeting in a few clicks. The pressure to align everyone for a crucial Zoom meeting is mounting. If this seems similar, this guide has got you covered!
I have researched and found the five best answers to schedule a Zoom meeting. In this article, I will reveal a step-by-step process to schedule virtual Zoom sessions using the Zoom web portal, Zoom desktop client, and mobile app. In addition, I will cover how you can connect Zoom with Outlook or Google Calendar to make scheduling meetings a breeze.
Prerequisites for scheduling a Zoom meeting
In order to schedule a Zoom meeting, you must have a free or paid Zoom account. Once you have created a Zoom account, generate a Personal Meeting ID (PMI) to schedule a meeting.
Method 1: Schedule from Zoom desktop client
Zoom desktop client lets users schedule a virtual meeting by downloading and installing the application on their computer. The best part about this commonly used method is that you can control all the basic and advanced meeting settings within the Zoom desktop application.
Here's how to schedule a Zoom meeting using the Zoom desktop app.
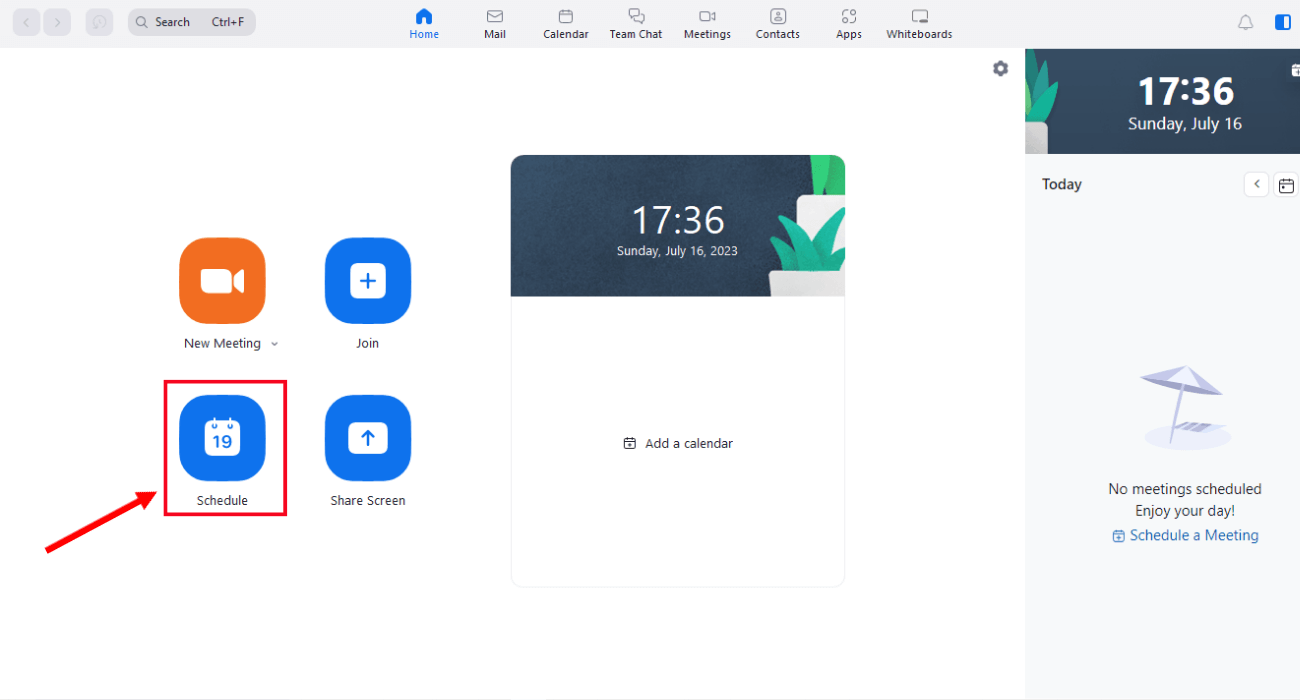
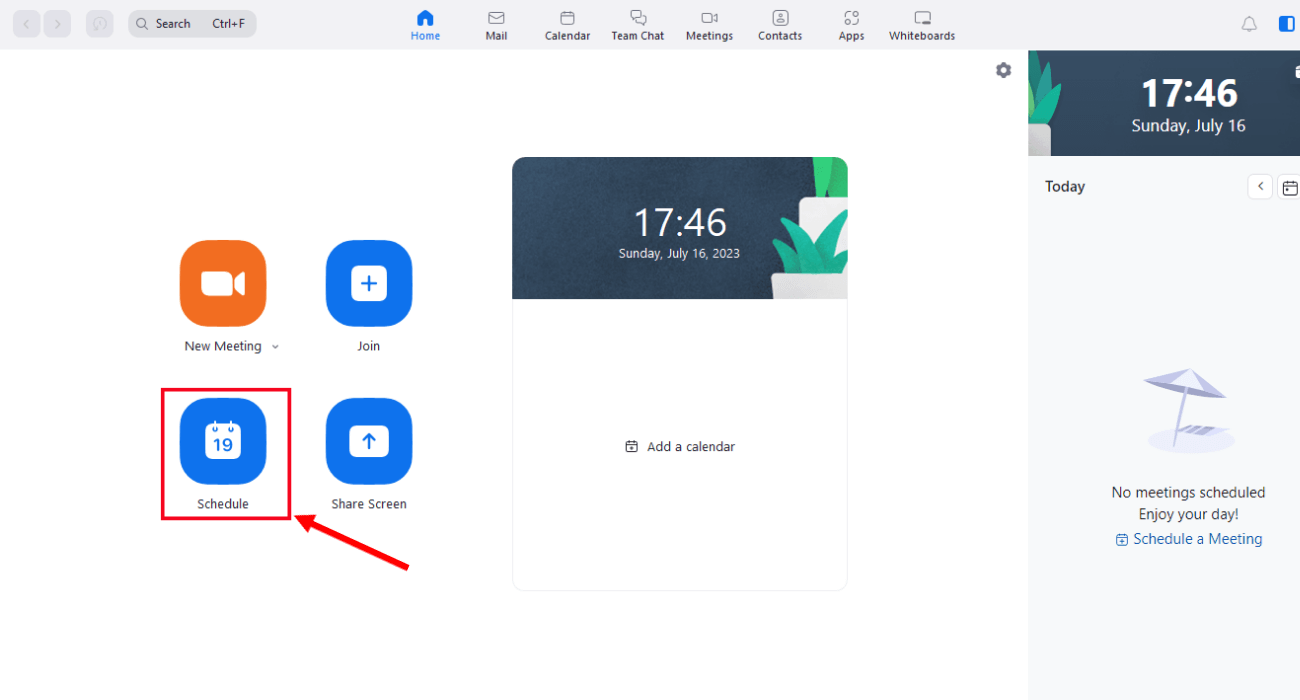
Step 1: Install Zoom desktop client on your Windows or macOS. Open the Zoom desktop client and sign in. On the Zoom home page, locate and select the 'Schedule' option.
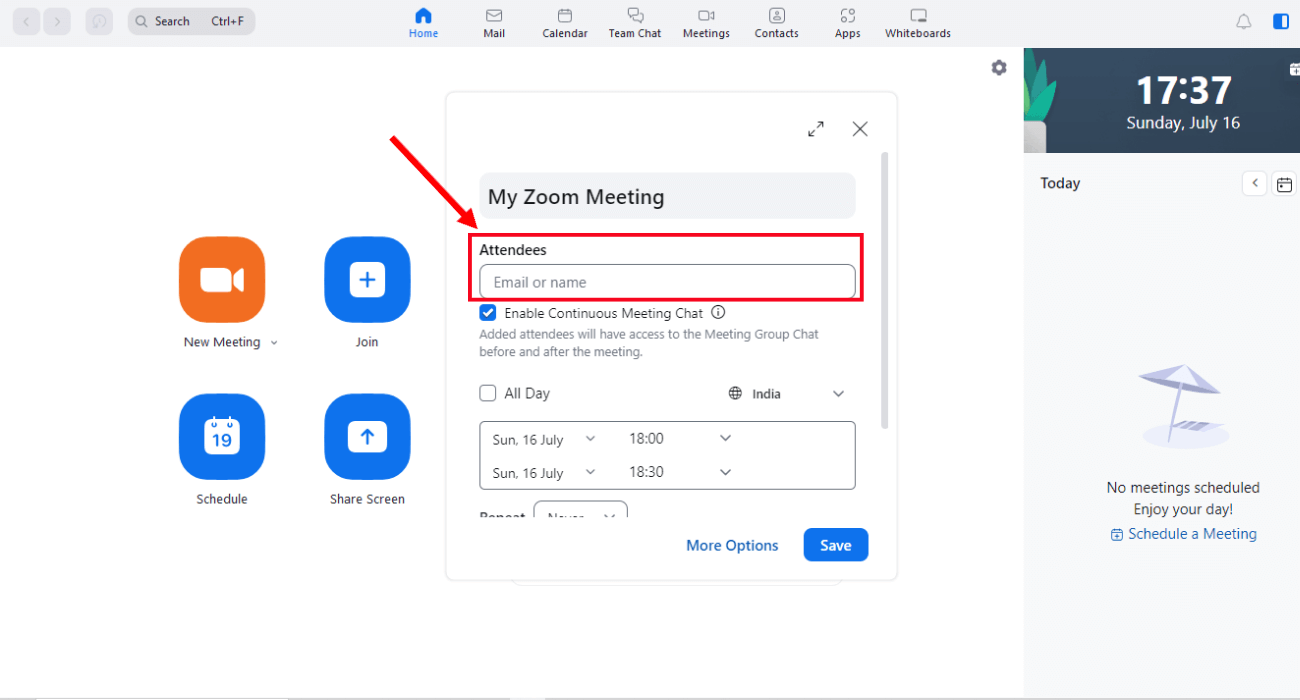
Step 2: In the meeting scheduler window, enter the topic name, date, and time. If you want to invite participants, fill in their email address or name in the 'Attendees' section.
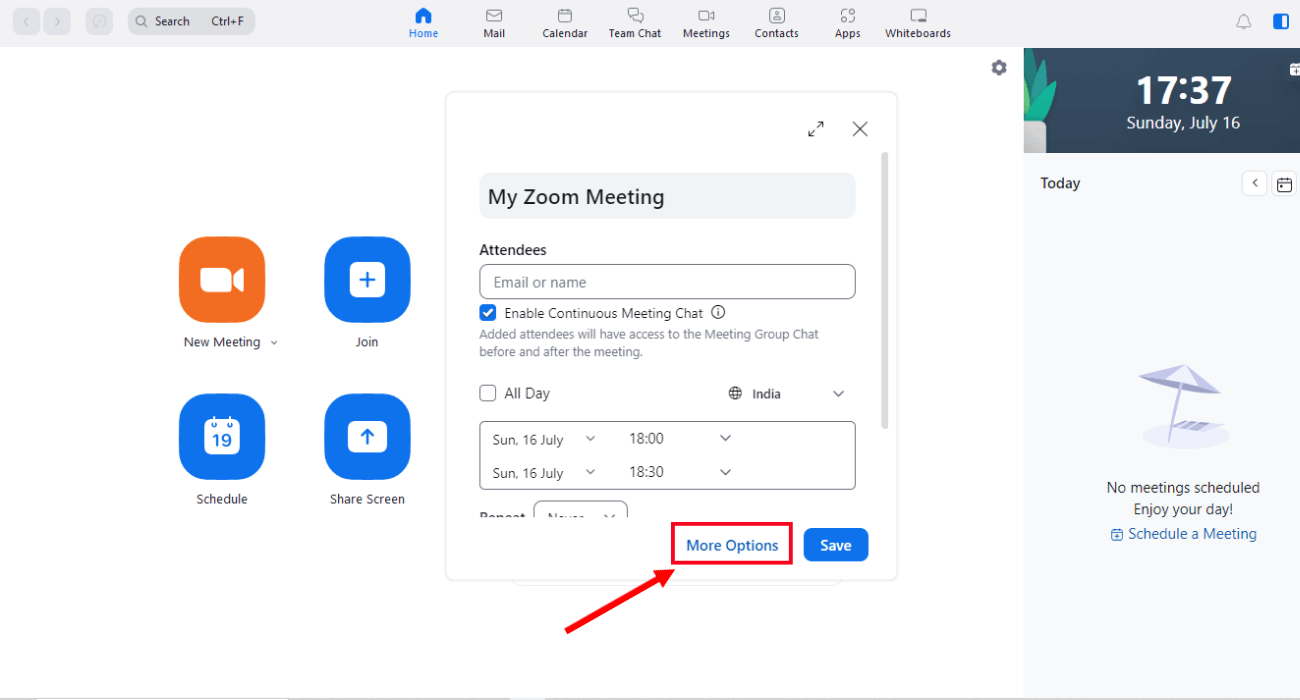
Step 3: Select 'More Options,' and a new window will pop up. Here you get to change different settings like meeting security, video, audio, etc.
Step 4: Click the 'Save' option to confirm the newly changed settings.
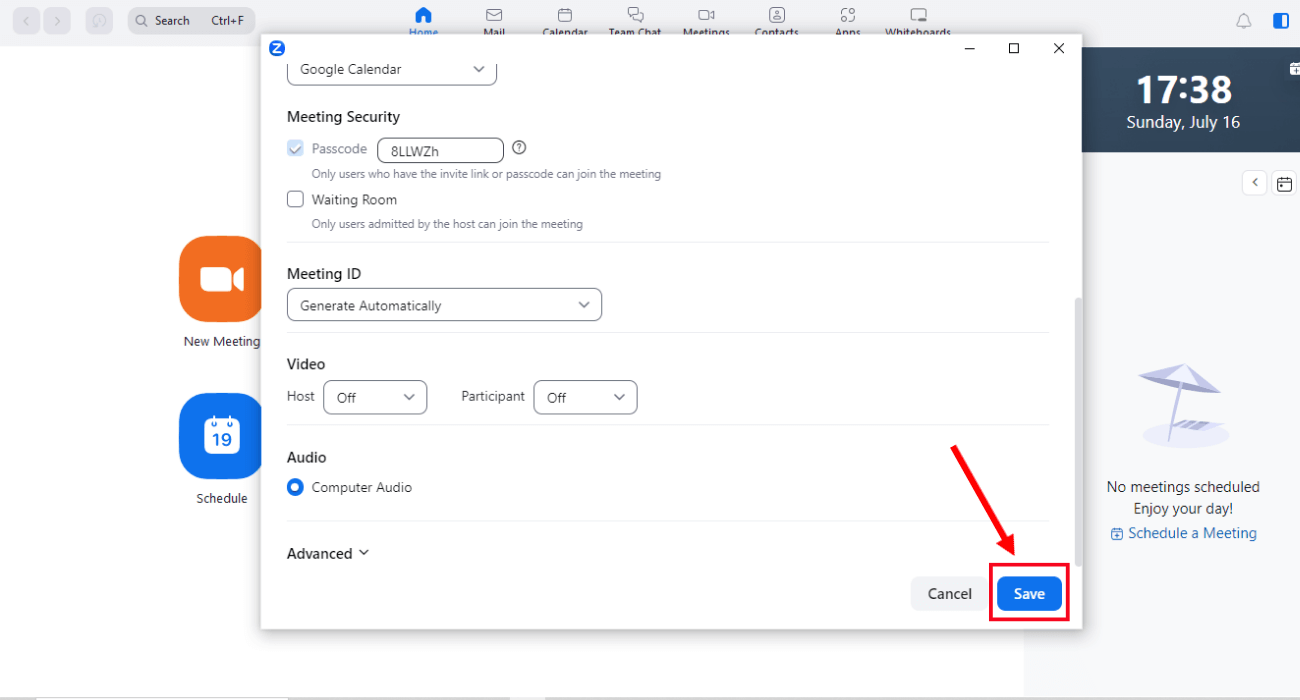
Note: If you have linked your Zoom app with the calendar, clicking the 'Save' option will automatically open a window to save the scheduled virtual session in your Google Calendar.
Advantages:
User-friendly interface: The interface of the Zoom desktop app is uncluttered and user-friendly, making it easy to set up, start, or schedule virtual meetings.
Disadvantages:
Requires desktop app: You'll have to install the Zoom desktop client on your system to schedule meetings using this method.
Method 2: Schedule from Zoom mobile app
If you want to schedule a Zoom meeting using your Android or iOS device, you’ll need to install the Zoom mobile application from Google Play Store or App Store. This method comes in handy when you are away from your computer or laptop.
Follow these steps to schedule a virtual session using the Zoom mobile app.
Step 1: Open the Zoom application on your Android or iOS device. At the bottom toolbar, select 'Meetings.' Next, click the 'Schedule' option at the top of your screen.
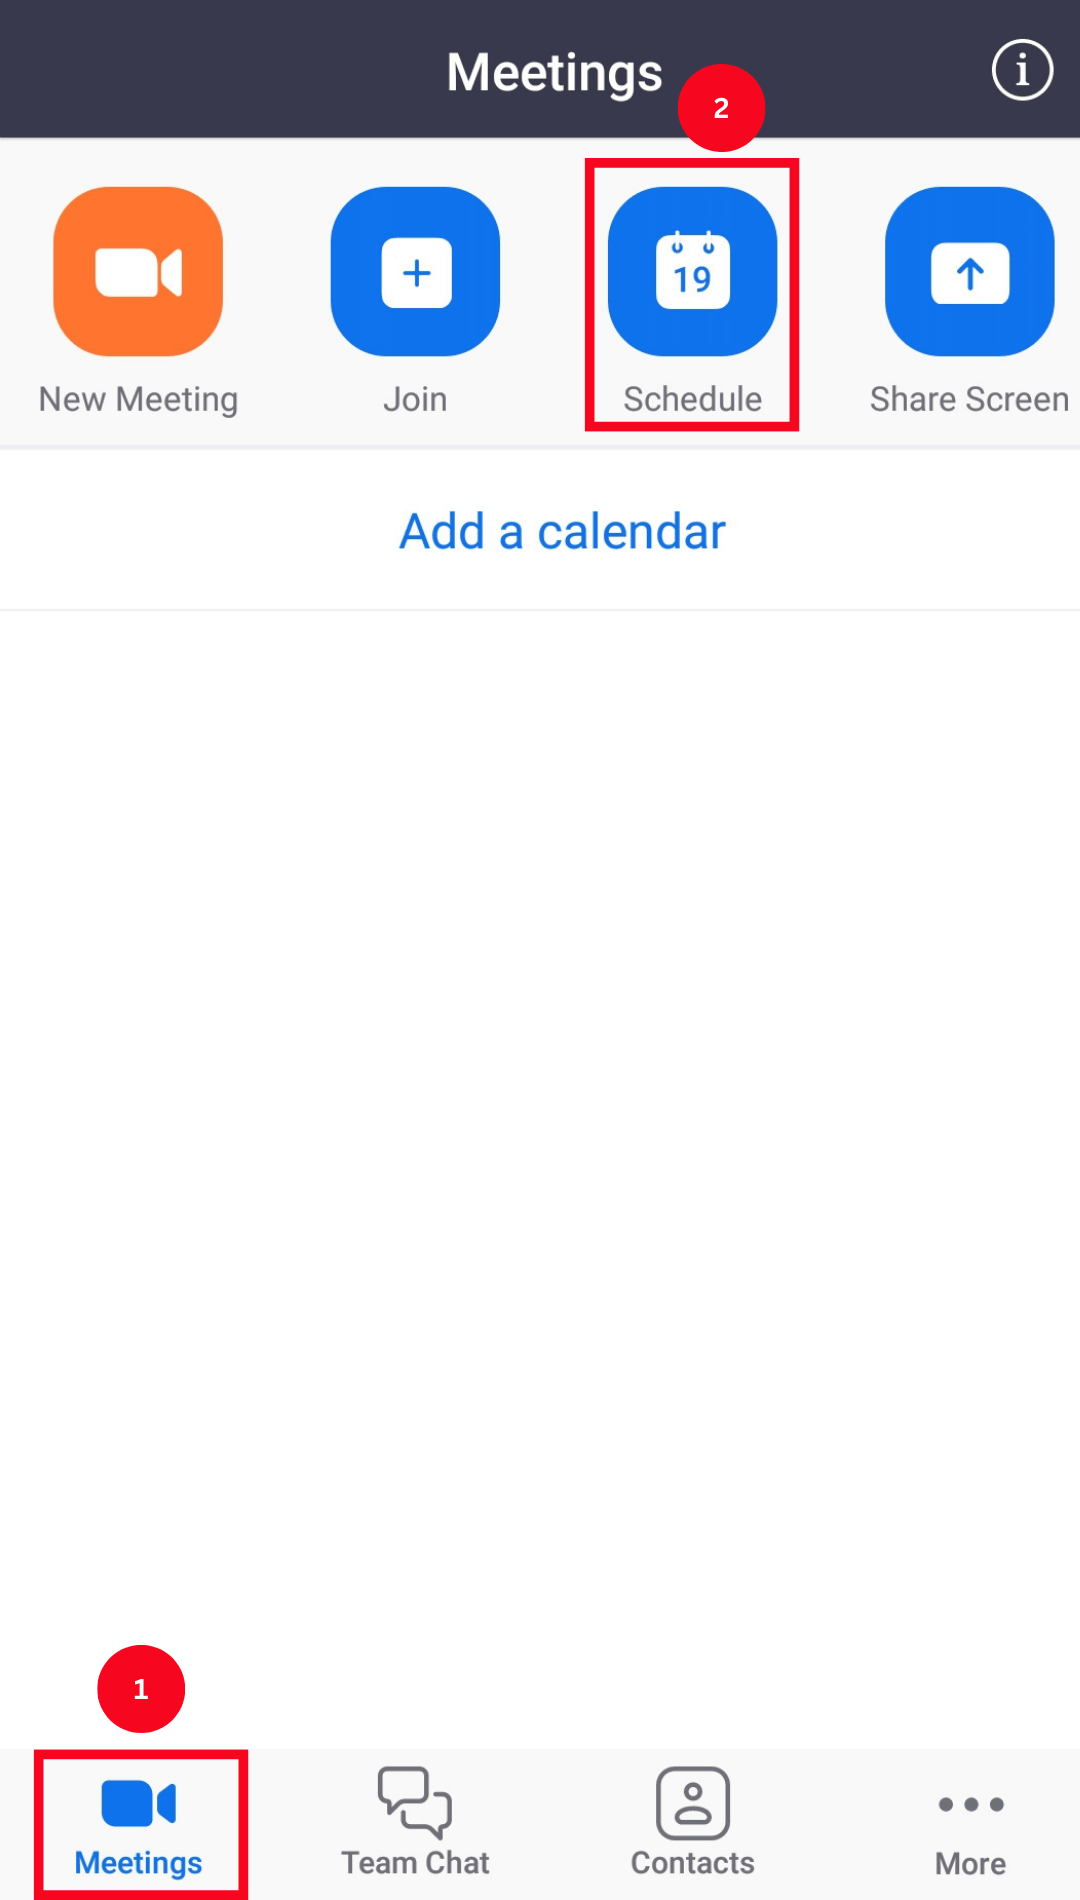
Step 2: You’ll be redirected to a new page, where you can enter the meeting name, date, invite participants, etc. Finally, click the 'Done' option located at the top-right corner of the screen.
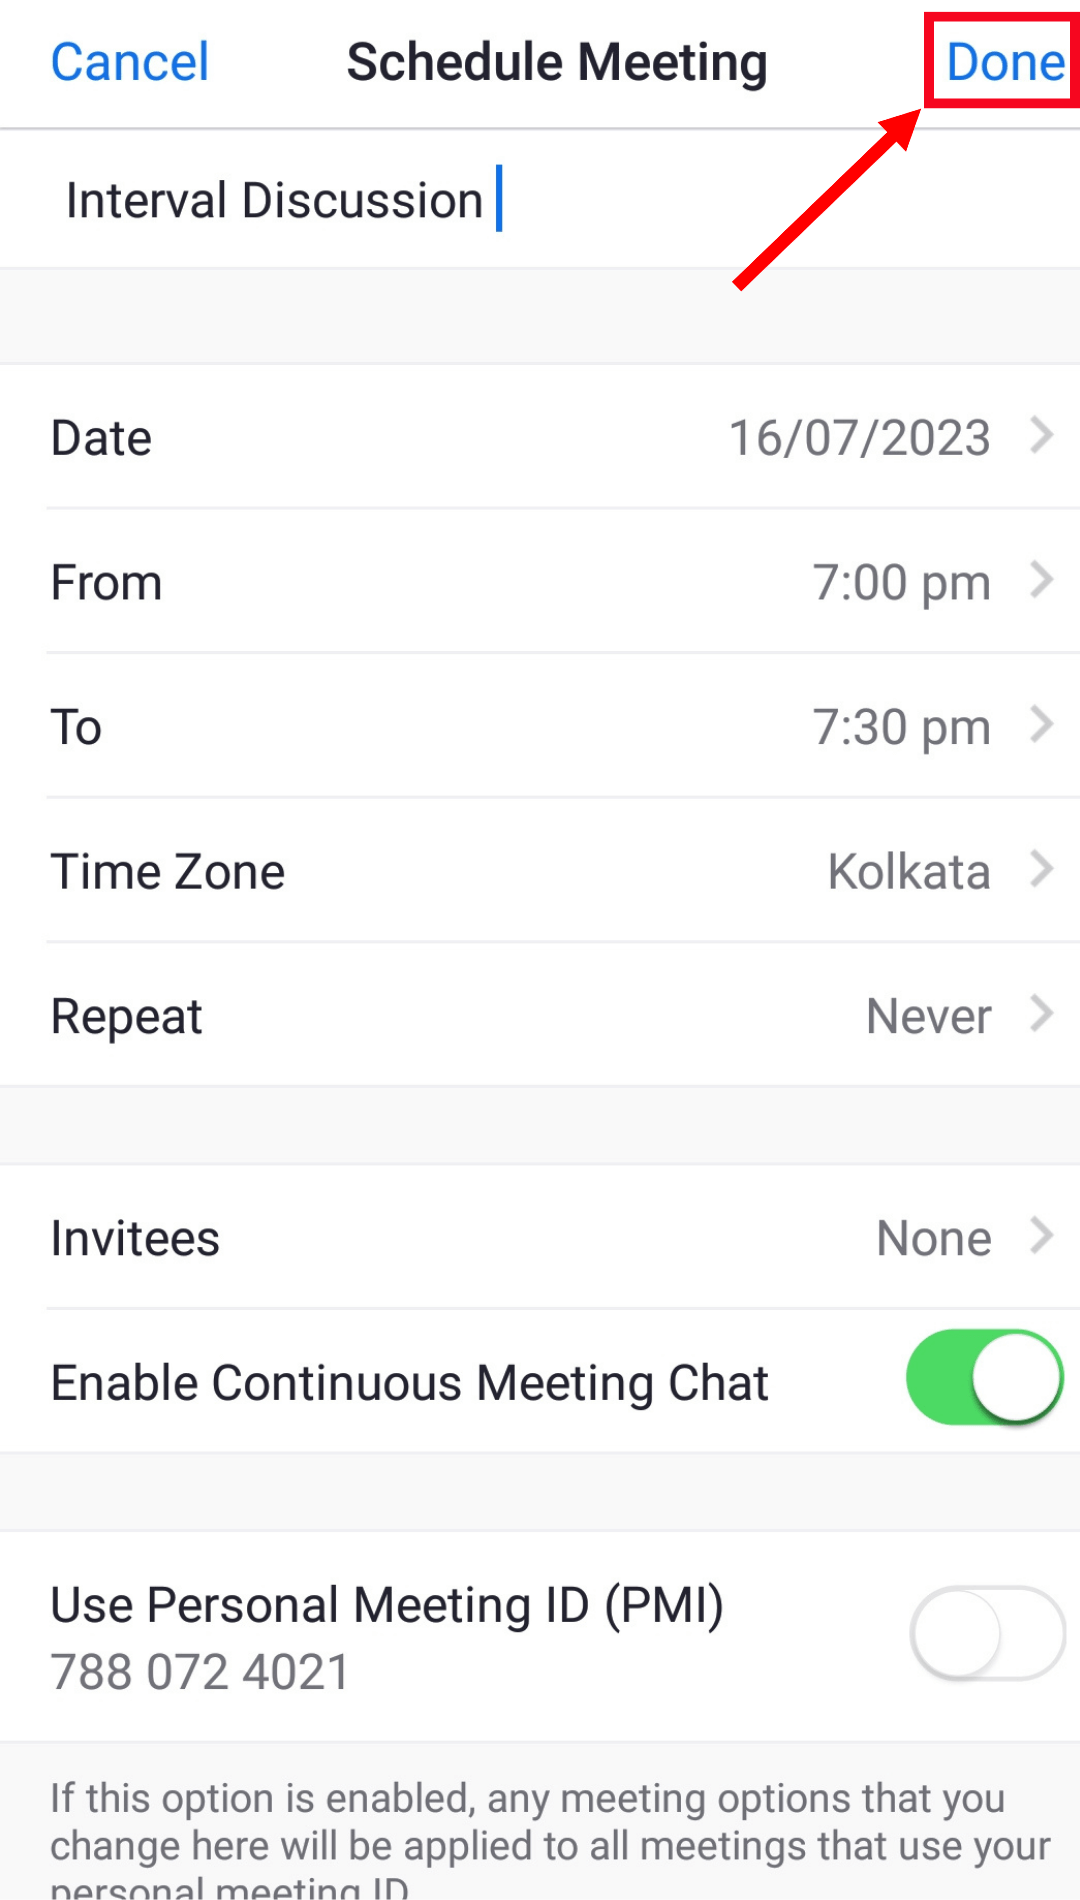
The scheduled Zoom meeting will be visible on the home screen. You can click the title of the meeting to invite participants to the virtual sessions.
Advantages:
Convenient: You can schedule a Zoom meeting anytime if you have your mobile device with you.
On-the-go scheduling: The mobile app is straightforward to use, allowing you to schedule meetings with your smartphone.
Disadvantages:
Device-specific: The mobile app method is similar to scheduling a meeting from the desktop client, but it is designed especially for smartphones.
Smaller screen: The mobile app has a smaller screen than the desktop client. Therefore, it can be more challenging to see and interact with all the controls in the below toolbar.
Notta AI meeting assistant records, transcribes, and summarizes meetings so everyone can stay engaged without missing important details.
Method 3: Schedule from Zoom web portal
Unlike the Zoom desktop app, you don't have to install any app on the desktop or mobile phone to use the web portal. In order to use this method, all you need is a stable internet connection. Here's how to schedule a Zoom meeting via the web portal.
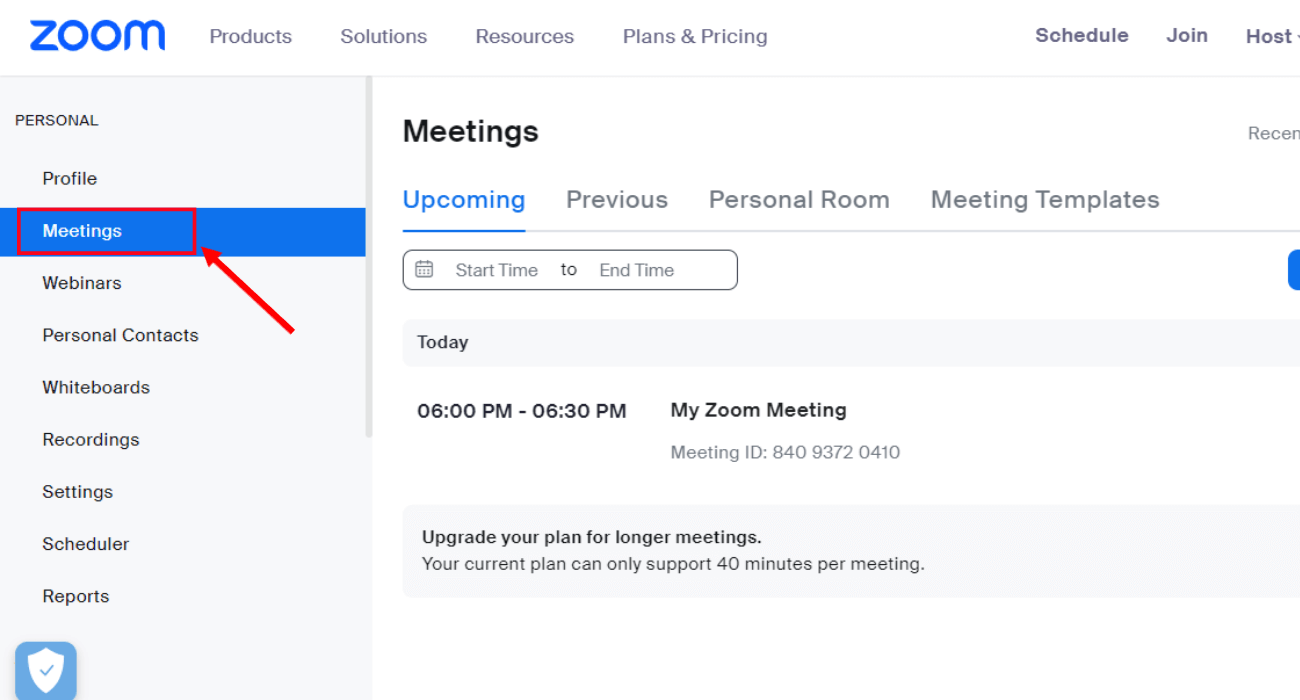
Step 1: To begin, log in to your free or pro account on the Zoom web portal. In the navigation panel, click the 'Meetings' tab.
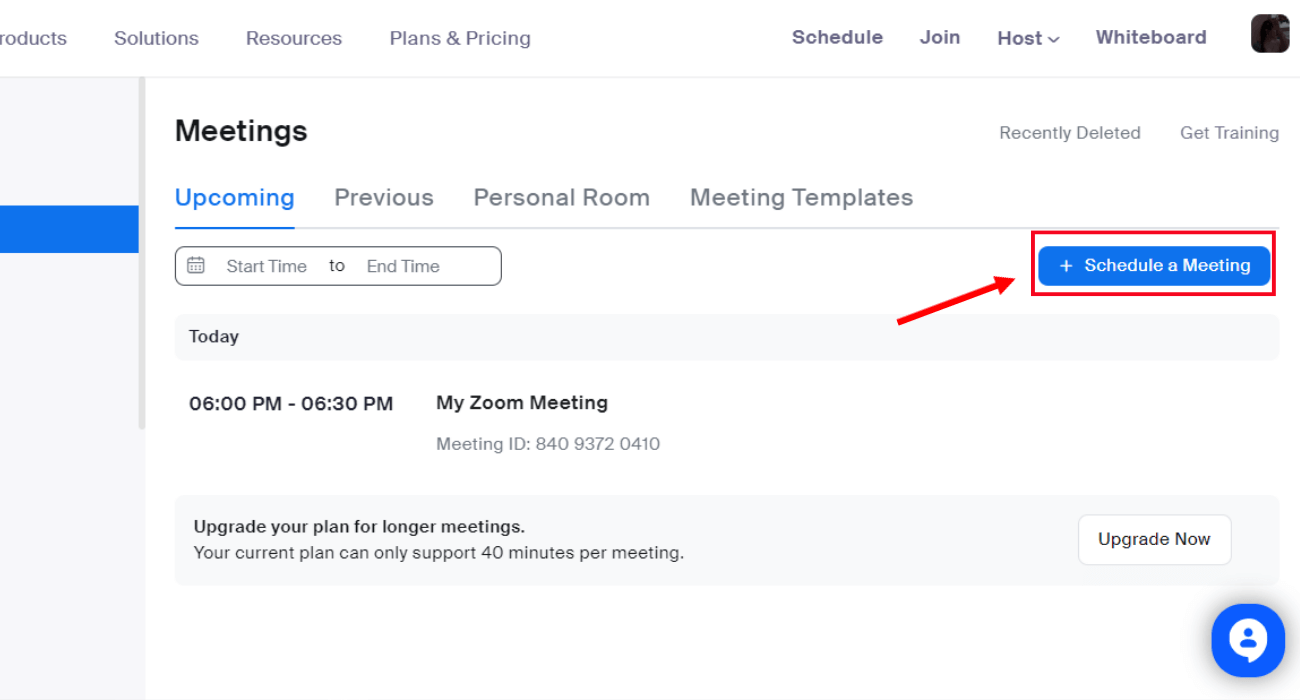
Step 2: Select 'Schedule a Meeting,' and the scheduler window will open.
Step 3: Next, fill in the meeting details, including the topic, description, duration, time, date, etc. You can invite attendees by entering the user names or email addresses in the 'Attendees' section.
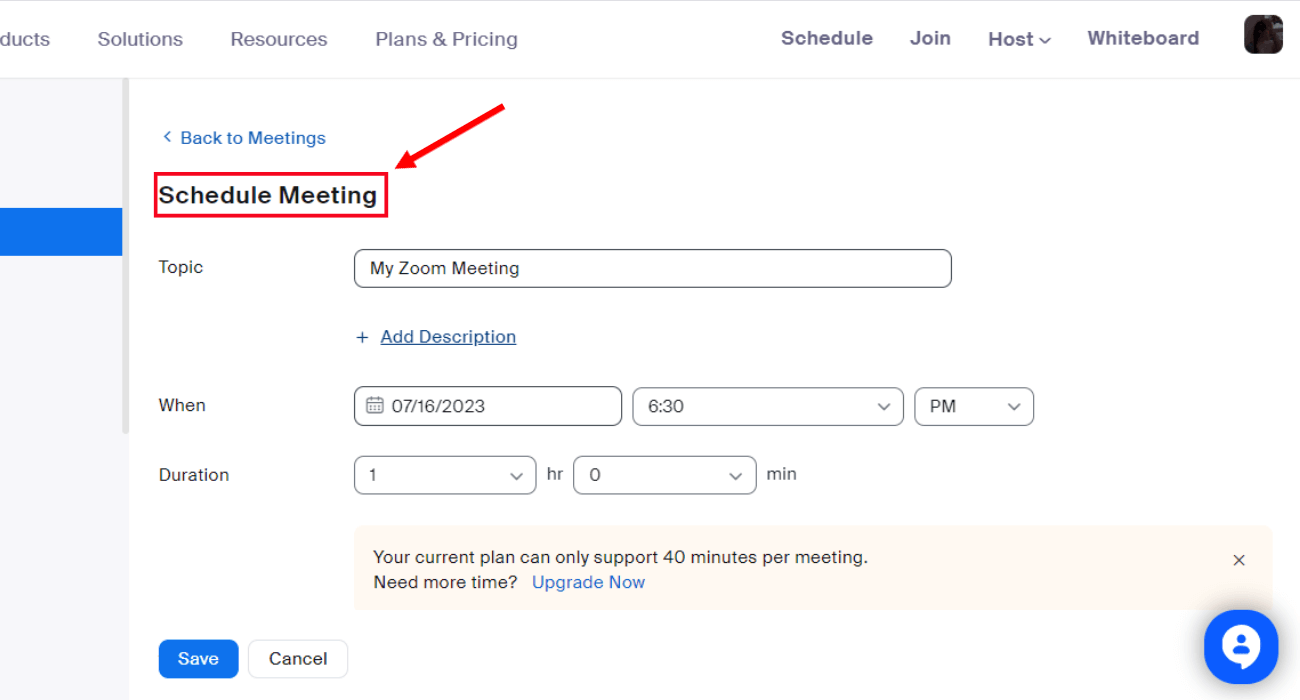
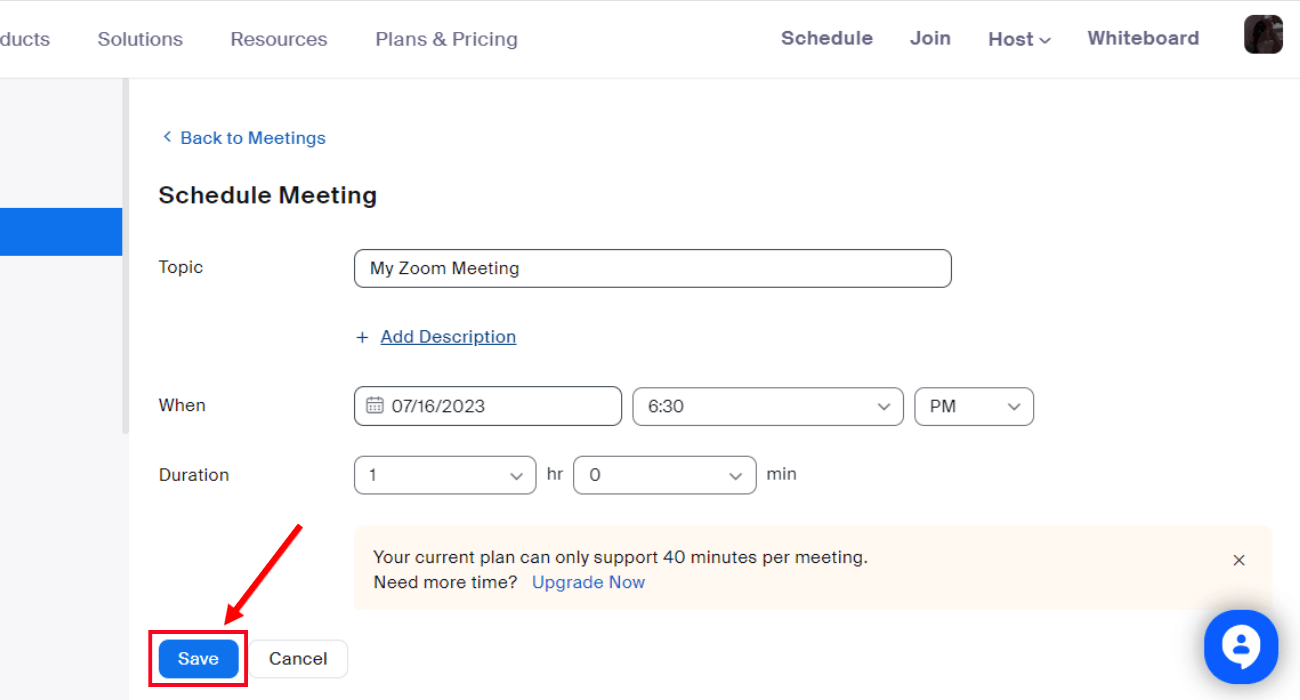
Step 4: Click the 'Save' option to confirm and schedule a meeting.
Advantages:
Easily accessible: Since you don't have to download or install any apps, it is easy to access the web portal via an URL in your browser.
Versatile: You can schedule Zoom meetings from any device with an internet connection, making it quite versatile.
Disadvantages:
No advanced settings: In the Zoom web portal, you might not be able to view all the advanced settings while scheduling the meetings.
Method 4: Schedule a Zoom meeting in Outlook
If you are already using Outlook, this method allows you to schedule a Zoom meeting directly from your Outlook calendar. All you need to do is install either Zoom add-in or Zoom Outlook Plugin to streamline scheduling Zoom meetings.
Let's look at how to schedule a Zoom meeting in Outlook.
Step 1: Install Zoom add-in for Outlook and navigate to Microsoft Outlook Calendar. Choose the desired time and date for your meeting.
Step 2: Double-click the date when you want to schedule the meeting, and a window will appear. On the top of the window, locate and select 'three dots (...).'
Step 3: A drop-down menu will appear where you must select the Zoom icon. Choose 'Add a Zoom Meeting,' and all the details will be automatically added to the email body.
Step 4: When you've modified all the meeting settings, click 'Save' to confirm.
If you want to learn the step-by-step process to add Zoom to Outlook, check out the 'How to add Zoom to Outlook' guide. In this guide, we have covered how you can install and use Outlook add-in and Outlook Plugin for Zoom.
Advantages:
Convenient: Using the Zoom Outlook add-in, you can schedule a Zoom meeting from your existing Outlook calendar.
Quick Outlook Integration: The Zoom Outlook add-in integrates with Outlook, so you can easily view and organize your Zoom meetings in your Outlook calendar.
Disadvantages:
Limited features: The Zoom Outlook add-in does not have all of the features of the desktop client or the mobile app.
Method 5: Schedule a Zoom meeting in Google Calendar
If you want to schedule your Zoom meetings directly from Google Calendar, consider using this method. This eliminates the hassle of switching between Zoom and Google Calendar, ensuring everything is available in one place. Here's how to schedule a Zoom meeting in Google Calendar in simple steps.
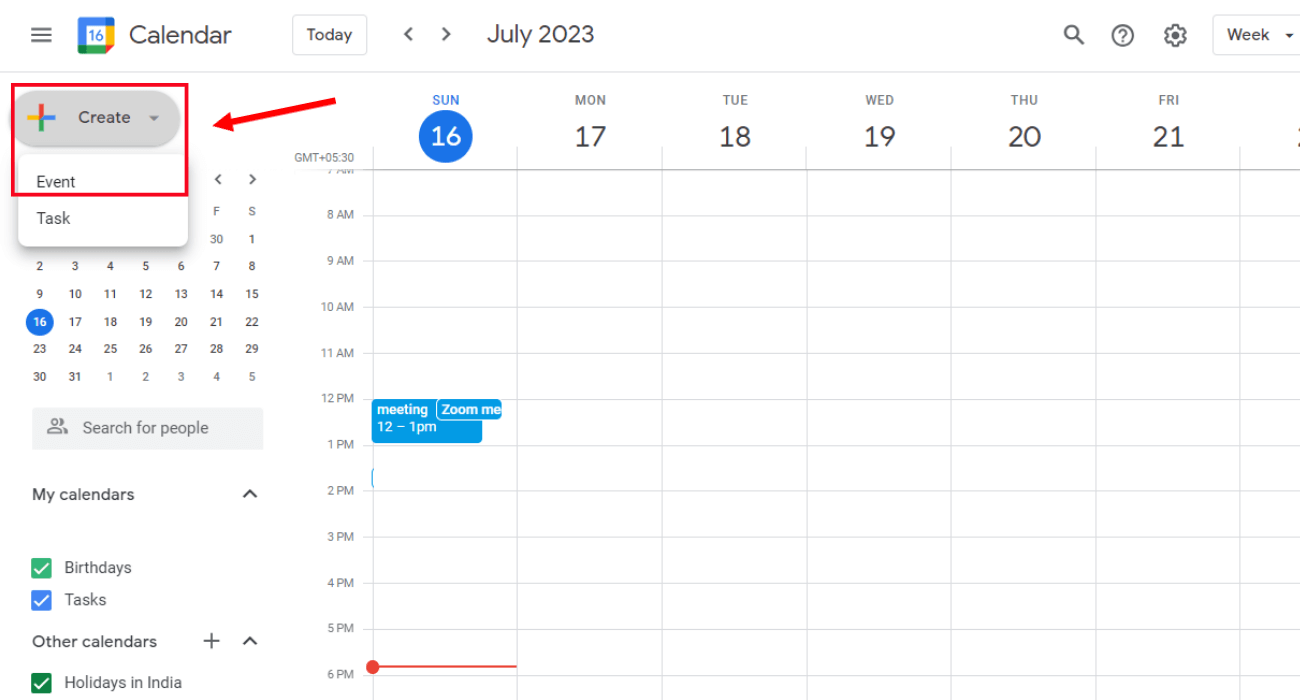
Step 1: Go to your Google Calendar. At the top left corner, click '+ Create.' From the drop-down menu, select 'Event.'
Step 2: In the new pop-up, select 'More Options.'
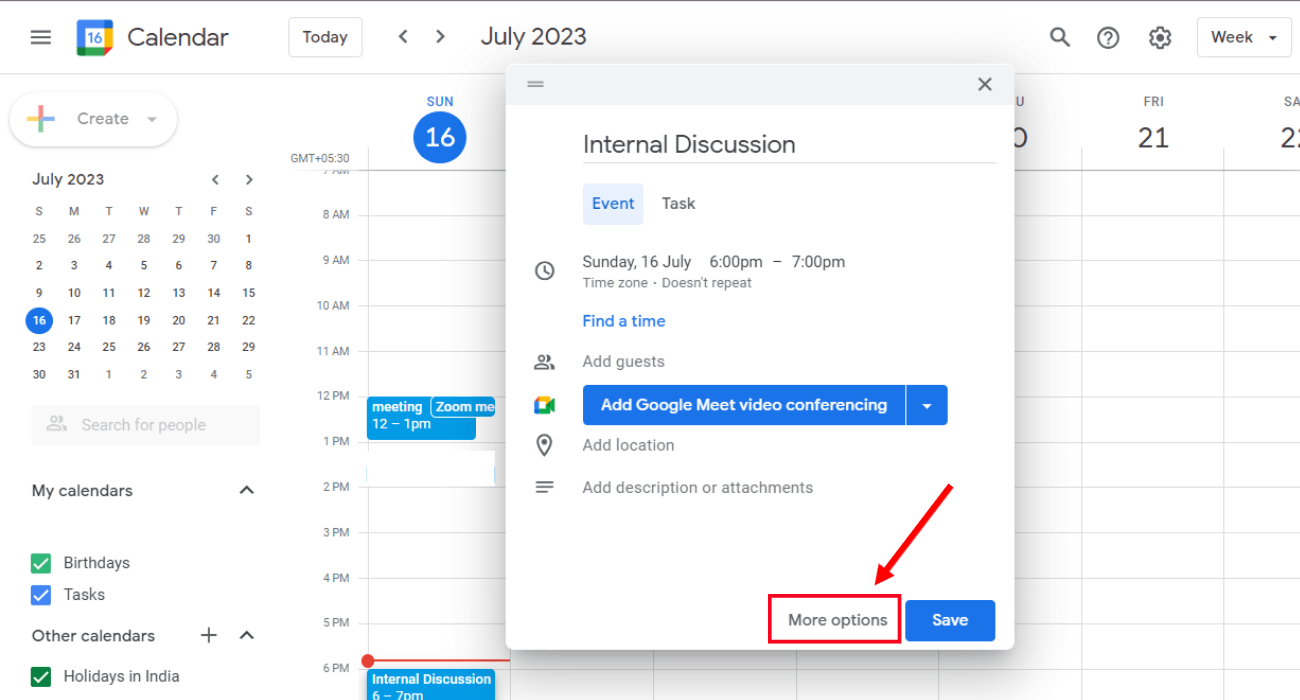
Step 3: Fill in the meeting details, such as title, time, description, etc. You'll see an arrow next to 'Add Google Meet video conferencing.' Click it and select 'Zoom Meeting.'
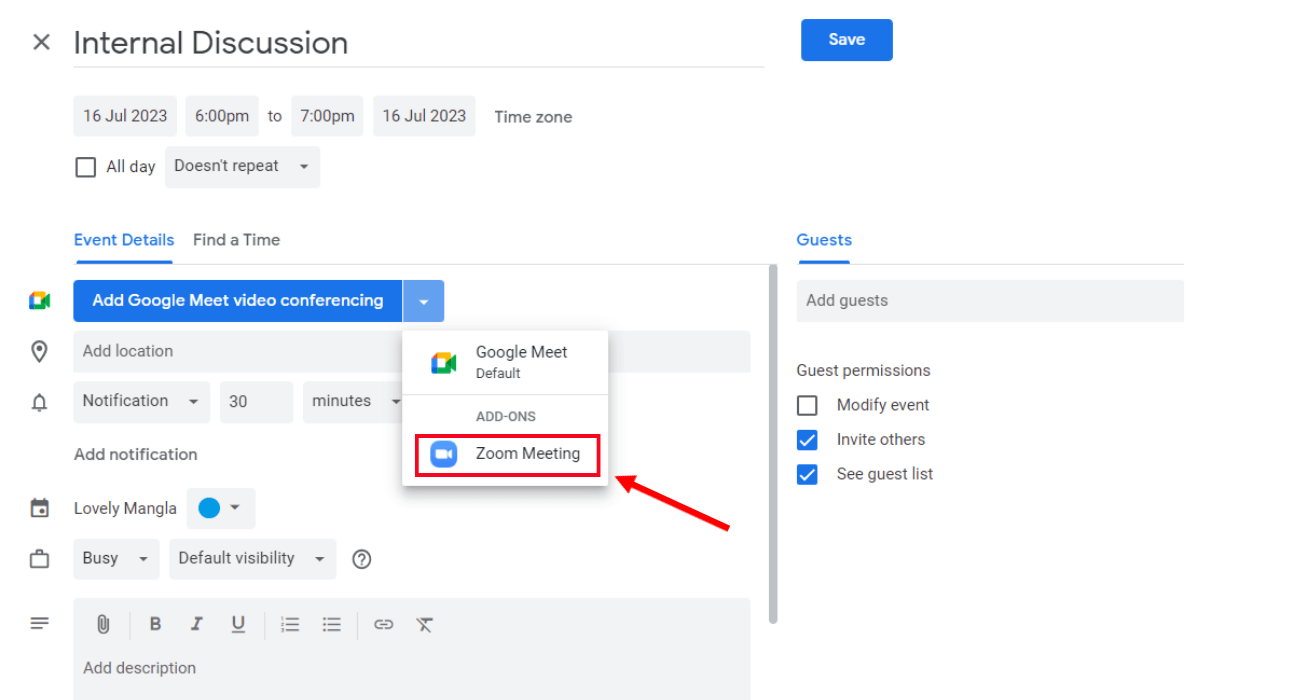
Note: Zoom add-on will only be visible if you've installed and connected it with your Google Calendar. If you cannot locate the Zoom add-on, click the '+' icon on the homepage of Google Calendar and install the 'Zoom for Google Workspace' add-on.
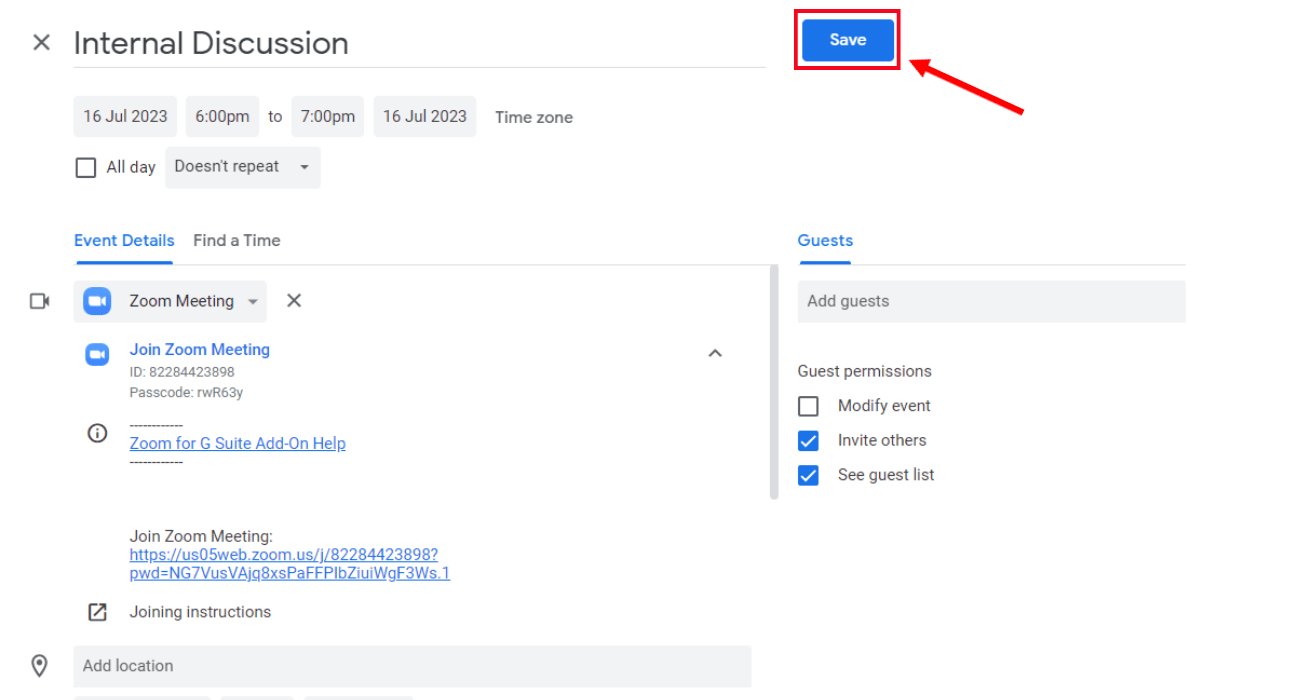
Step 4: Once you've modified the settings, click the blue 'Save' option. Your Zoom meeting will be automatically added to your Google Calendar.
Advantages:
Easy to use: The Zoom for Google Workspace add-on is easy, even if you are less familiar with Zoom.
Integrated with Google Calendar: Google Workspace add-on integrates with Google Calendar, ensuring you don't have to switch between apps.
Disadvantages:
No advanced meeting settings: You might not be able to use some features when you schedule meetings using Zoom for the Google Workspace add-on.
FAQs
Can I schedule a Zoom meeting for someone else as a host?
Yes. Zoom lets users organize a Zoom meeting for someone else as a host. The trick, however, is to ensure you have the scheduling privileges. Here's how to schedule a Zoom meeting for someone else.
Step 1: Sign in to the Zoom desktop client. On the Zoom home tab, select 'Schedule.'
Step 2: In the scheduler window, fill in the meeting details. Locate the 'Scheduler for' option and choose the user you want to schedule the meeting for.
Step 3: Once done, click 'Save' to finish.
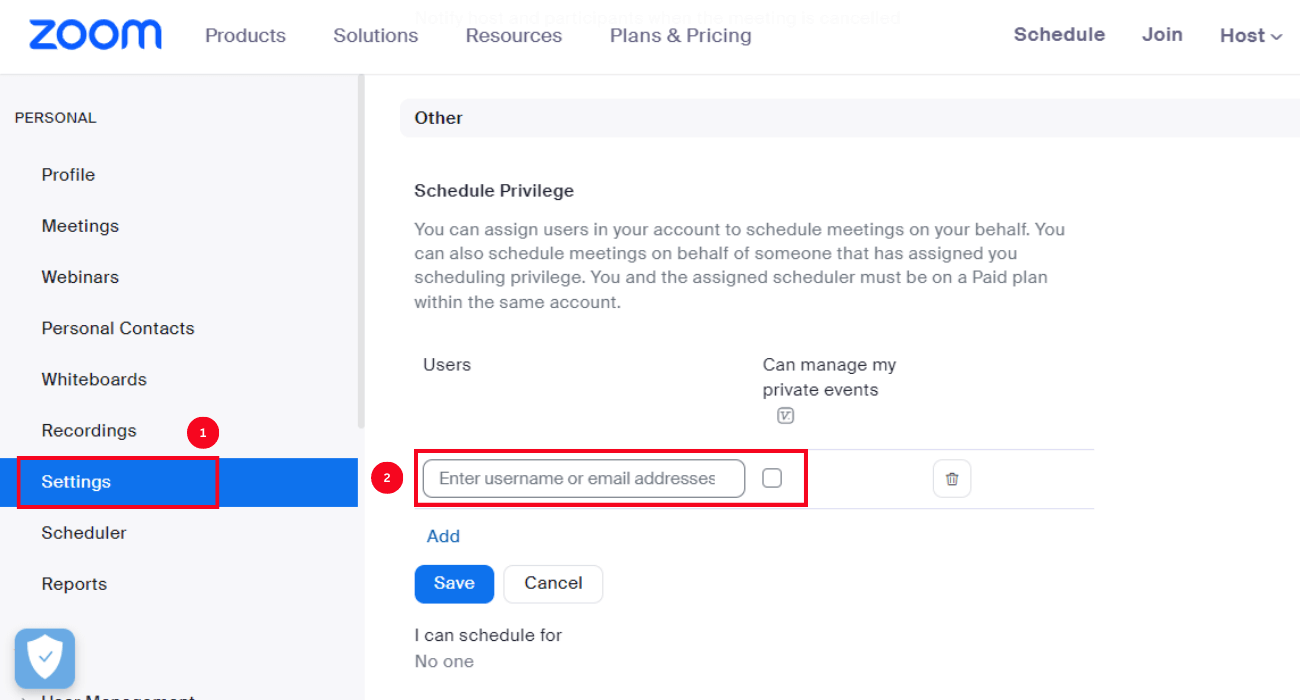
Note: The user needs to follow these steps to assign scheduling rights to someone else.
Sign in to the Zoom web portal and locate 'Settings.' In the 'Meeting' tab, scroll down until you find the 'Schedule Privilege' setting. Next to 'Assign scheduling privilege to,' click 'Add' and enter the username or email address. Click 'Save.'
How do I schedule a Zoom meeting in advance and invite others?
Zoom is a popular meeting platform that allows you to organize virtual meetings and invite participants in advance from your desktop client, mobile app, web portal, or Outlook add-in. Here are simple steps on how to schedule a Zoom meeting and invite others.
Step 1: First, log in to your Zoom account. On the 'Home' tab, select 'Schedule.' In the scheduler window, fill in the meeting details.
Step 2: In the 'Attendees' section, enter the email address or name of the meeting participants. Click 'Save,' and your Google Calendar will open.
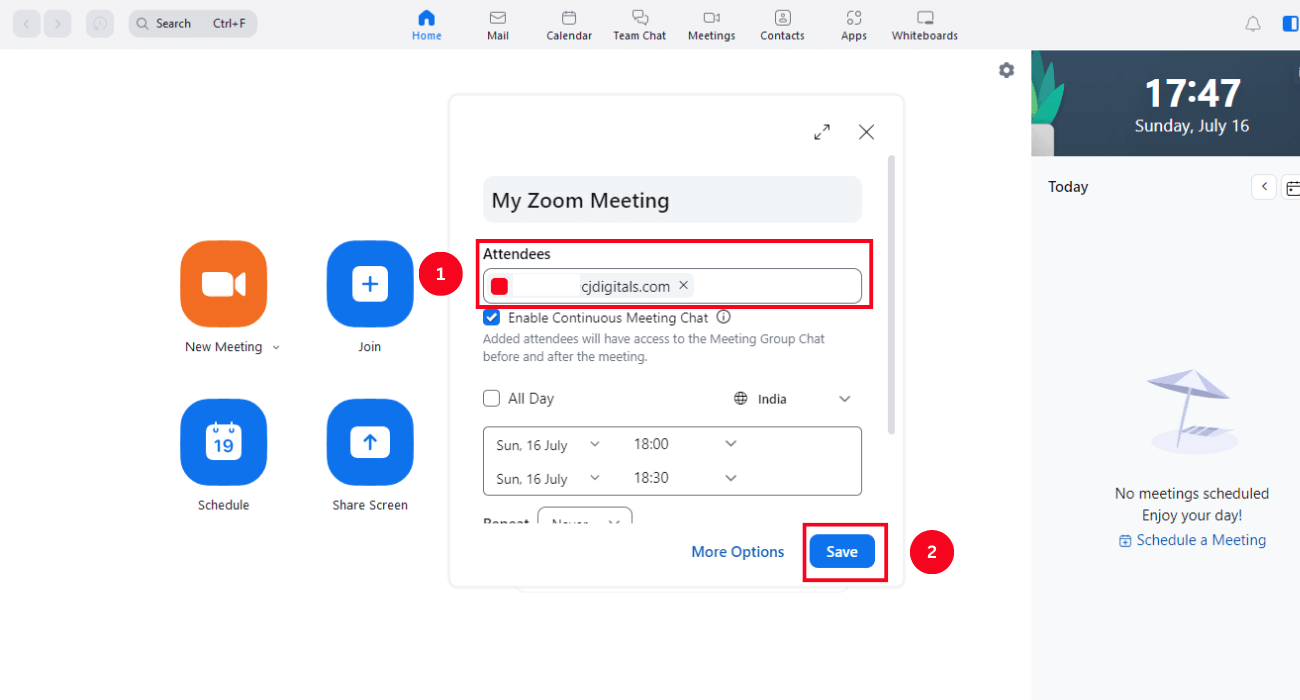
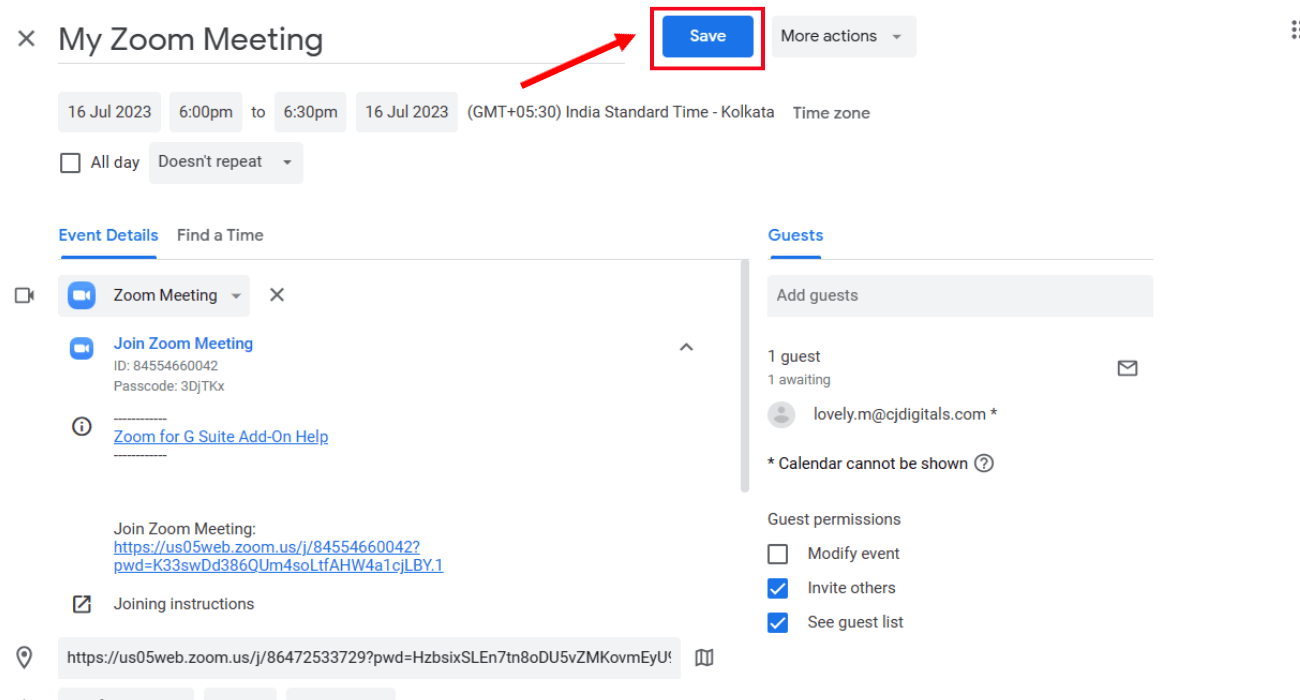
Step 3: Check the meeting information and select the blue 'Save' button.
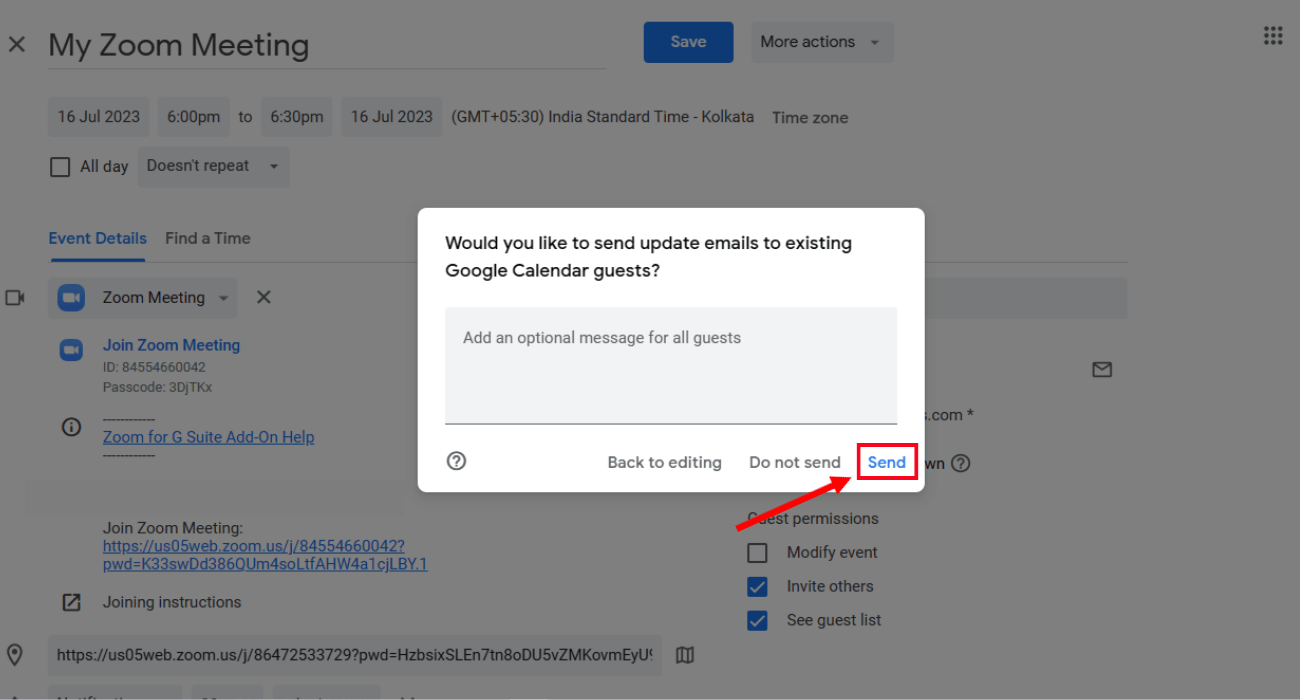
Step 4: A small pop-up will appear asking whether you want to send an invitation email to Google Calendar guests. Click 'Send.'
For more information, check out our ultimate guide on 'how to invite someone before a meeting.'
Do I need a Zoom account to schedule a Zoom meeting?
Yes. You'll need to create a Zoom account to schedule Zoom meetings. Once you have your Zoom account, you can set up or schedule sessions following the steps mentioned in the above sections.
Notta: The intelligent AI meeting assistant
Notta is an intelligent AI meeting assistant that allows users to eliminate the hassle of taking meeting notes in an ongoing conversation. The voice-to-text application lets you transcribe meeting audio in a readable format and translate transcripts into 58 languages.
Notta takes things up a notch by offering a 'Scheduler' feature. It lets users schedule Zoom meetings directly from the dashboard without switching between multiple apps. However, you'll need to allow Notta access to your Google Account to use the scheduling feature.
Once done, follow the steps to use Notta's scheduler feature.
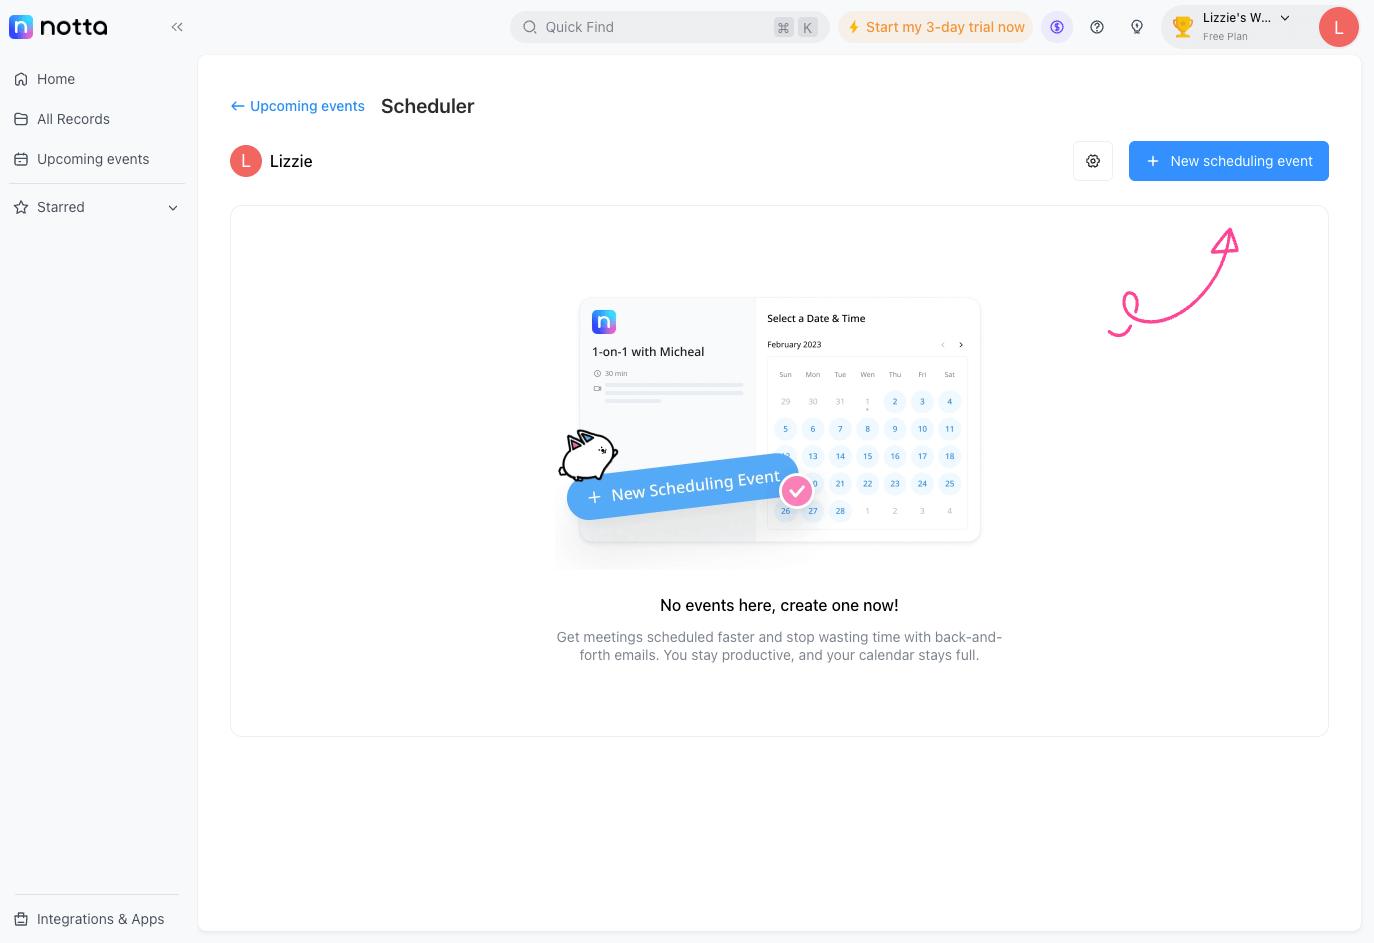
Step 1: Sign in to your Notta account. In the left navigation panel, select 'Upcoming events.' Connect your Google or Outlook Calendar with Notta. On the right side, click the ‘Start scheduling a meeting’ button.
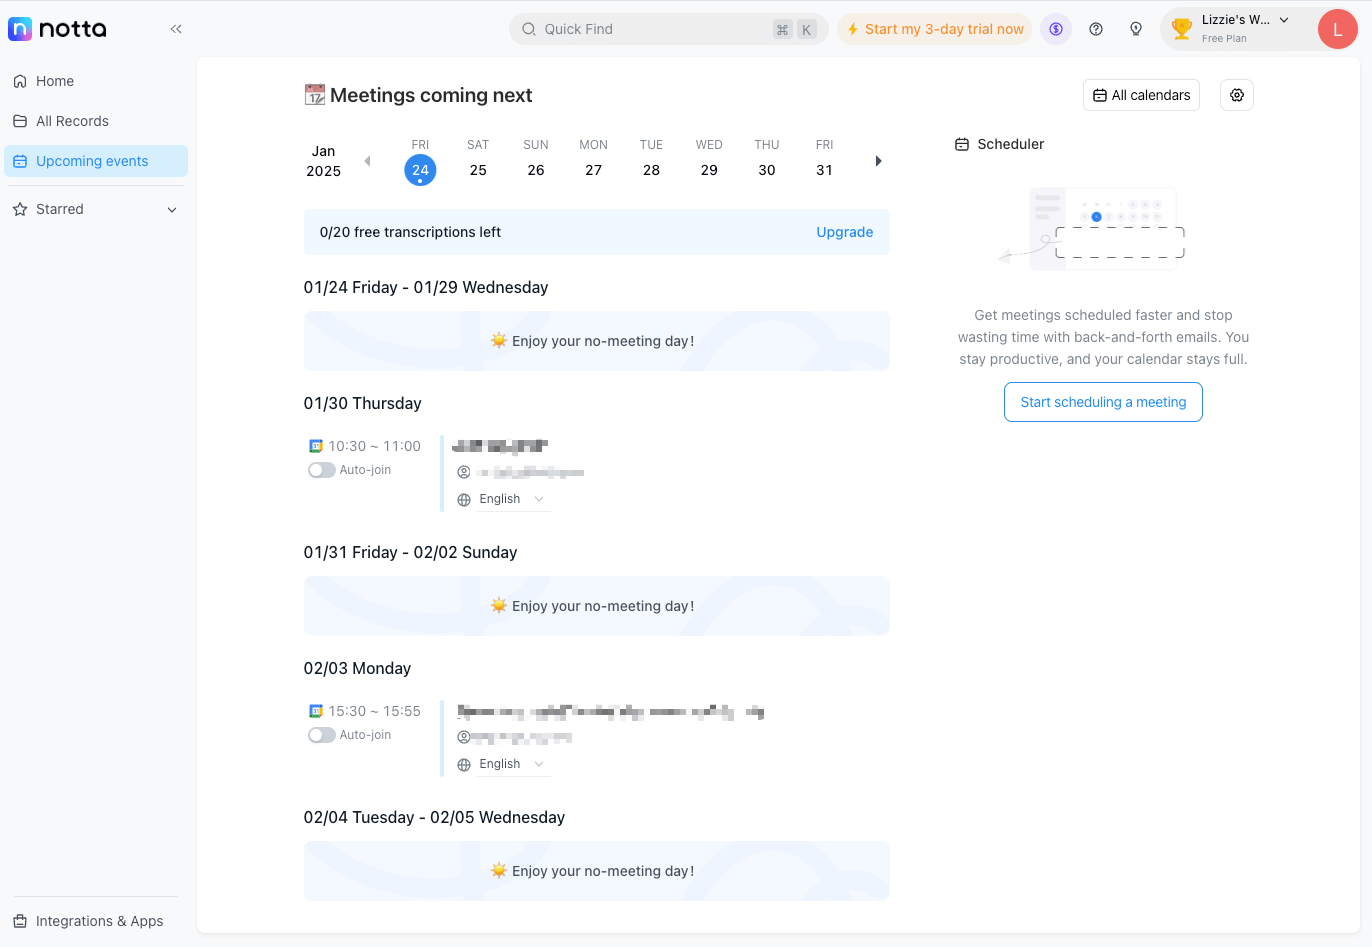
Step 2: In the 'Scheduler' window, click "New scheduling event."
Step 3: In the 'Location' section, click the arrow, and a drop-down menu will appear. Select 'Zoom.' Click 'Continue' to proceed.
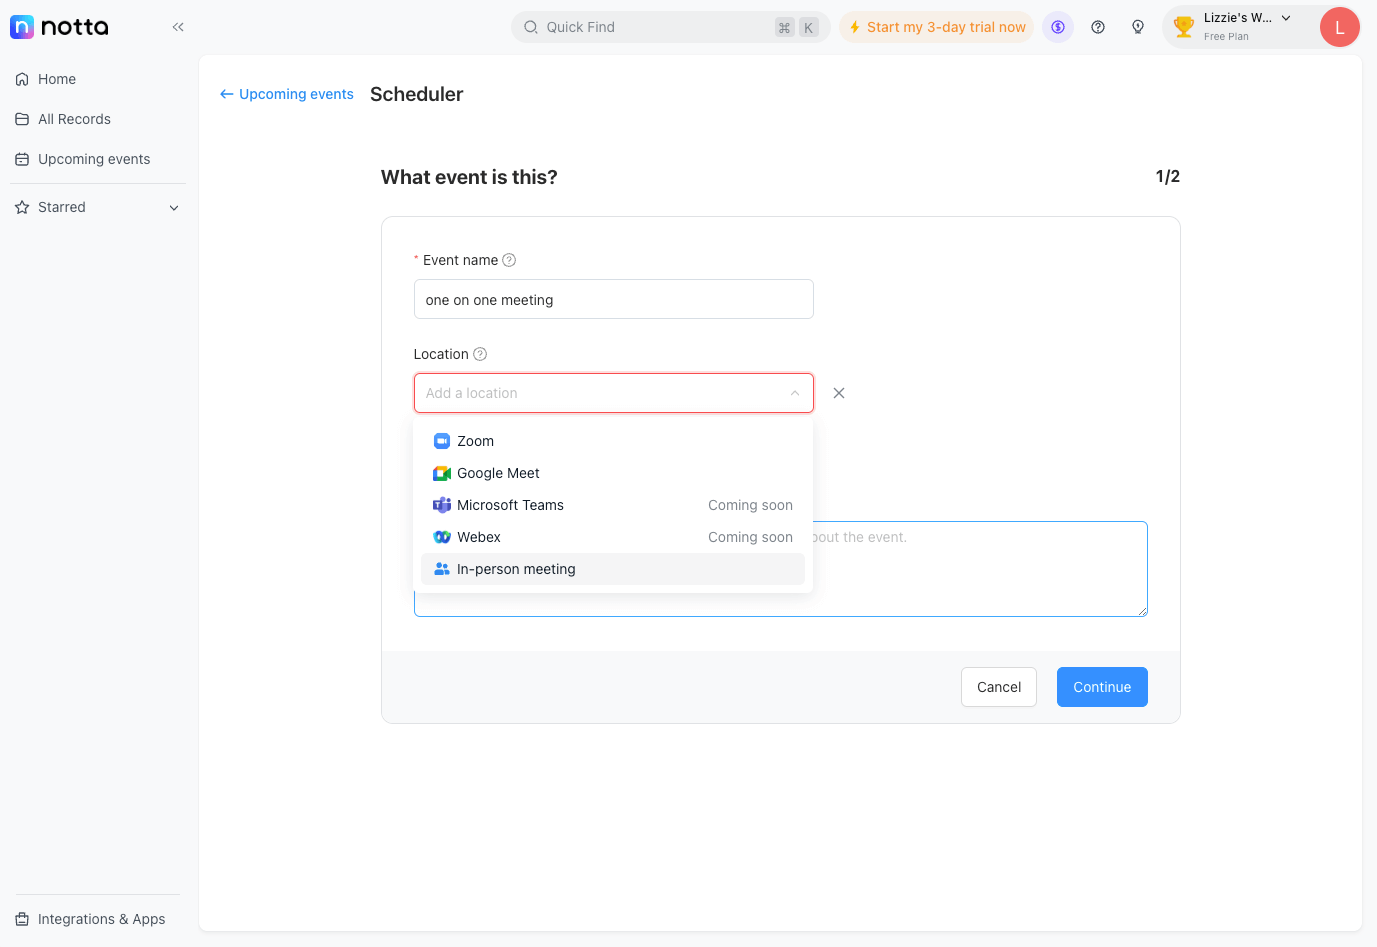
Note: If you haven't yet connected your Zoom account with Notta, it will ask you to connect before proceeding. Select 'Connect Now' and follow the on-screen instructions.
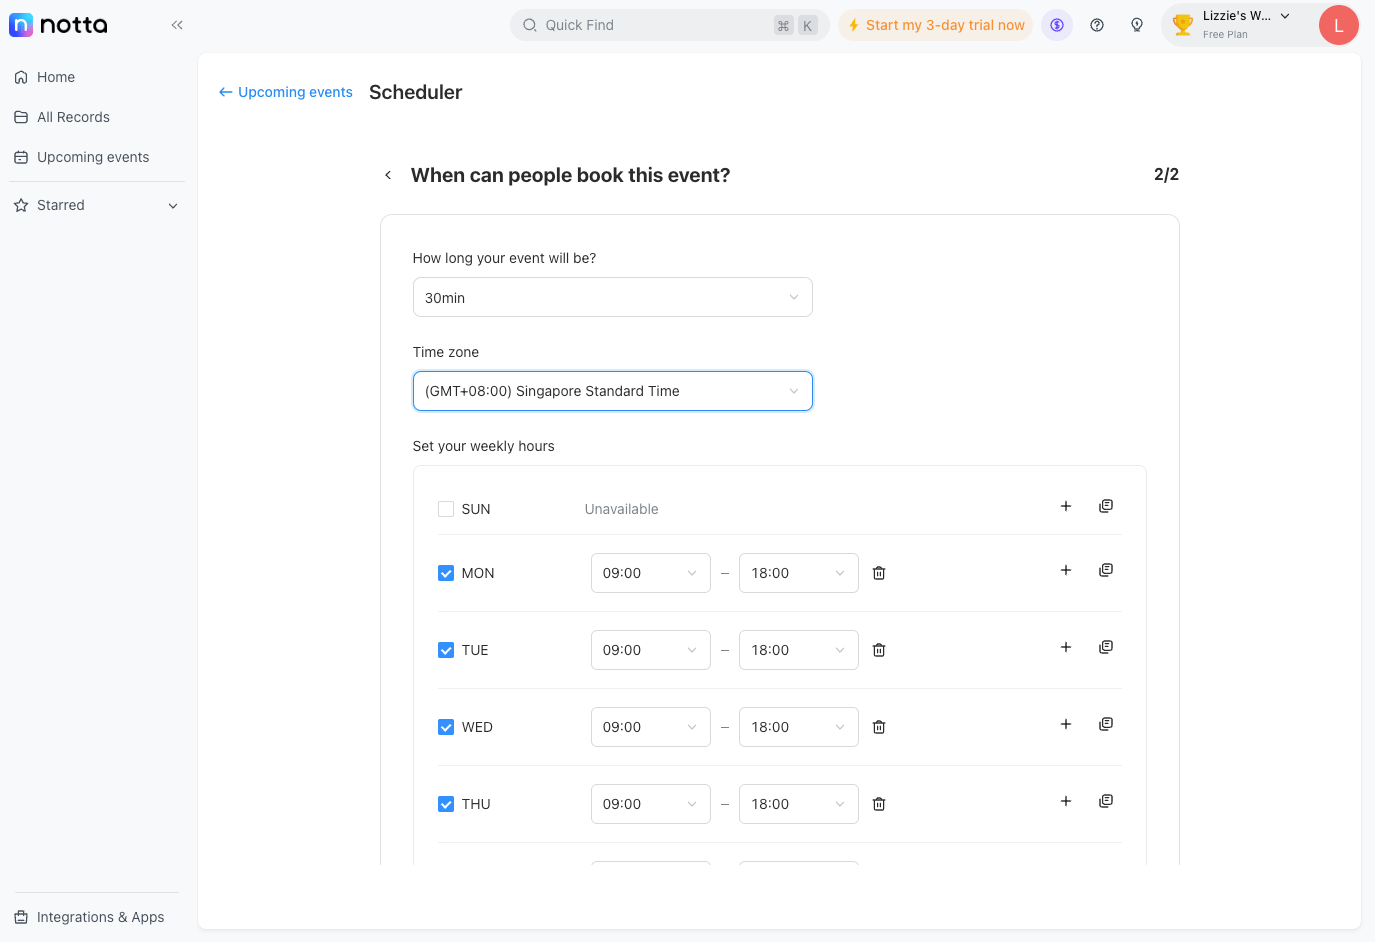
Step 4: In the 'When can people book this event?' window, fill in the session length, time zone, and set your working hours. Once done, click 'Create.'
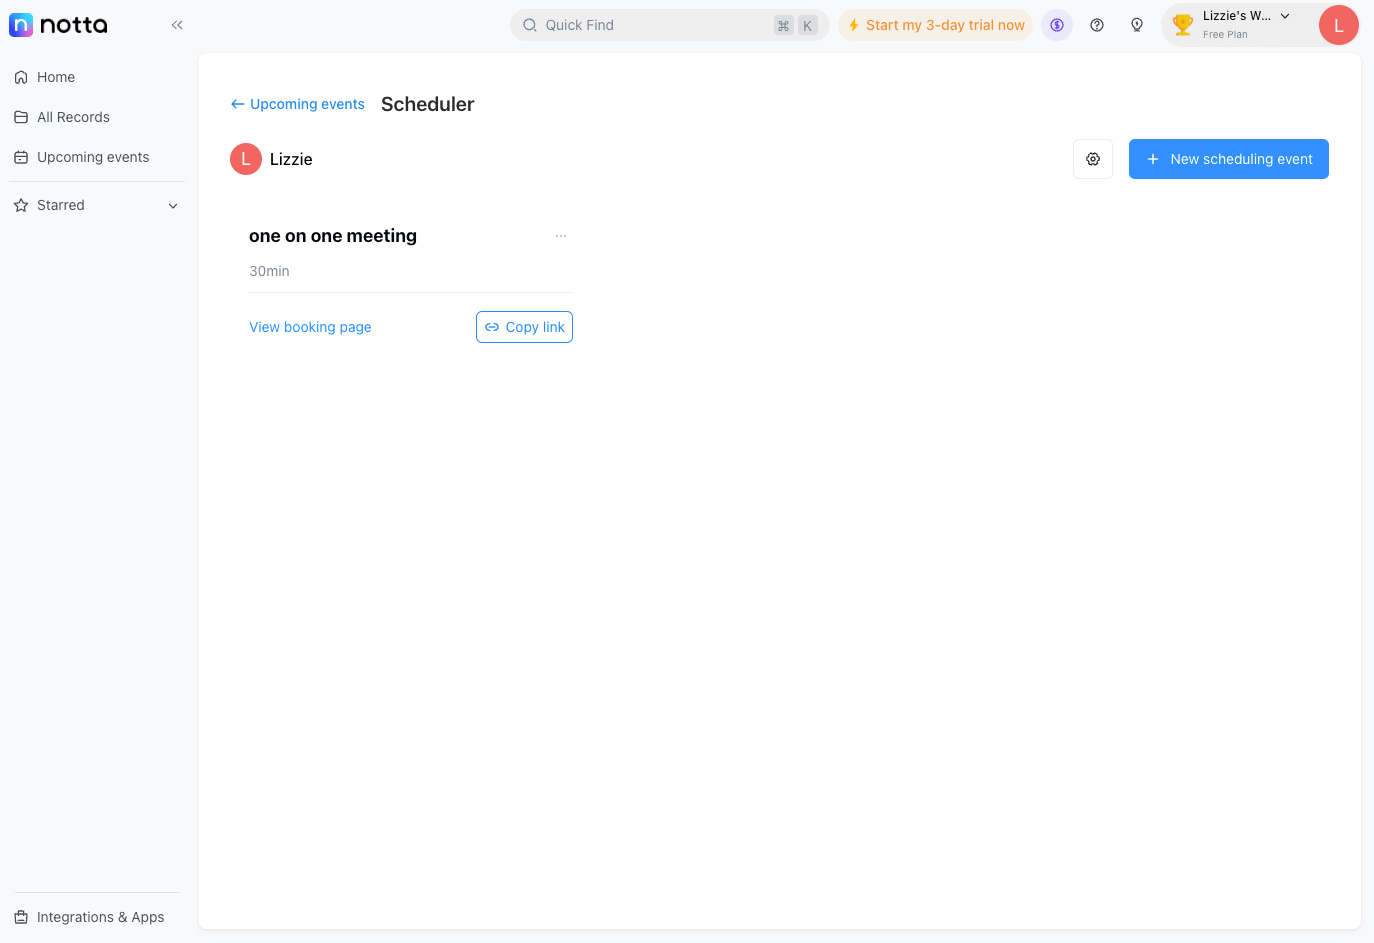
That's it! Your Zoom virtual session will be scheduled. You can now select 'Copy link' to copy the meeting link and send it to the participants.
Notta offers the most integrated AI meeting notes, summaries, and action items so nothing gets missed.
Key takeaways
Remember, there are multiple methods to schedule a Zoom meeting and invite participants. Depending on your scheduling needs, you can choose the appropriate method. For instance, if you schedule sessions frequently, it's best to go ahead with a Zoom desktop client or mobile app.
Alternatively, you can consider using Notta's scheduler feature to explore more benefits. It lets you schedule Zoom meetings directly from the Notta dashboard. In addition, you can generate transcripts using the Notta recording and transcribing tool.
Sign up for a free Notta account today, and get ready to schedule and transcribe your meetings without a hitch!