
How to Use Zoom Mail and Calendar
Unlock the power of AI — Notta's meeting assistant records, transcribes and summarizes meeting minutes with one click.
How often do you toggle between apps and tabs for professional communication and scheduling meetings? For digital workers, juggling between different websites and applications has become an inescapable part of work.
Fortunately, Zoom Mail and Zoom Calendar are game-changing all-in-one solutions that simplify your work life by combining email, calendar, team chat, phone, and meetings in a single app.
You might be wondering if it really works. To help you understand better and provide accurate information, I have connected Zoom Mail and Zoom Calendar within the Zoom app. Not only did it help me reduce the time spent on switching between apps, but it also ensured I had all the information handy.
In this comprehensive guide, we will reveal the step-by-step process of utilizing Zoom Email and Calendar directly within the Zoom app.
How to enable Zoom Mail and Calendar?
While Zoom Mail helps users view and manage their emails directly from the Zoom desktop client, the role of Zoom Calendar Clients is to streamline the scheduling and managing of calendar events. You can connect your existing Google or Microsoft 365 account (Exchange) to manage emails and calendar events through the Zoom client.
Prerequisites for enabling Zoom Mail and Calendar
If you are the Zoom account owner or have admin privileges, you can easily enable Zoom Mail and Calendar Clients. However, one must consider a few prerequisites to use Zoom Mail and Calendar Services.
You must have a Zoom One Pro or Standard Pro, Zoom One Enterprise, or Zoom One Business account in the US or Canada.
You must enable Zoom Mail and Calendar Clients.
You must be the Zoom account owner or have admin privileges.
Note: By default, the Zoom Mail, Calendar services, and Calendar clients are enabled in Zoom Basic and Pro accounts. However, they are disabled if you are using Business and Enterprise accounts.
Steps to enable Zoom Mail and Calendar
Once you meet the Zoom Mail and Calendar prerequisites, here's how to enable or disable these services.
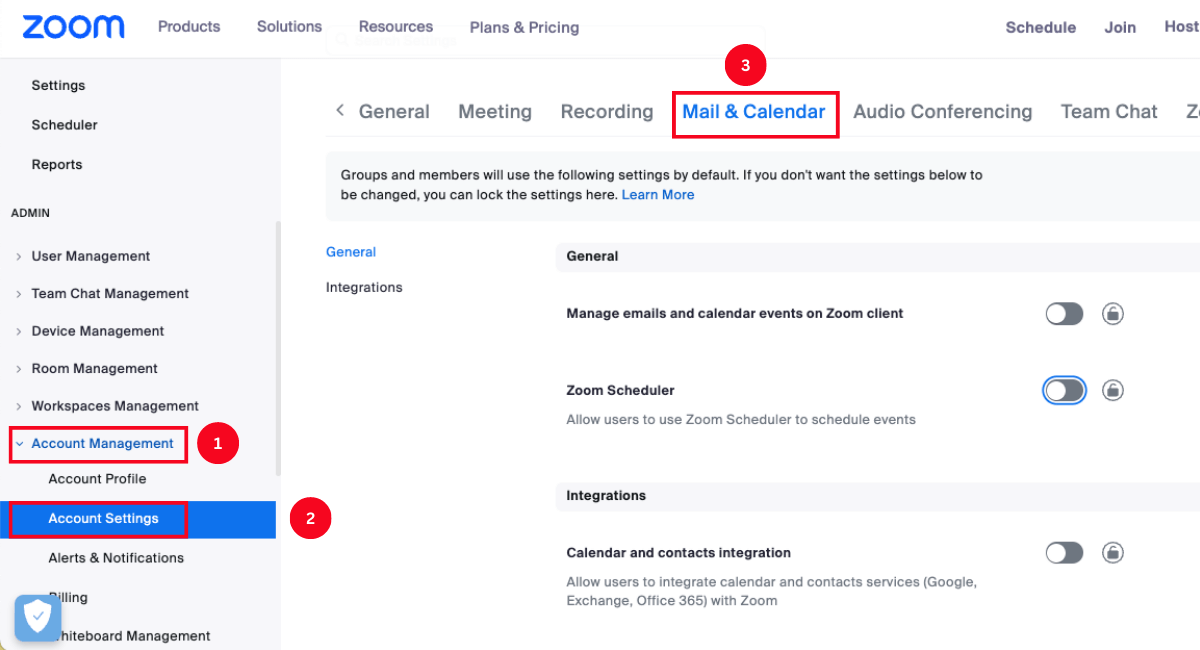
Step 1: Sign in to the Zoom web portal and navigate to Account Management > Account Settings in the navigation panel. From there, select the 'Mail & Calendar' tab.
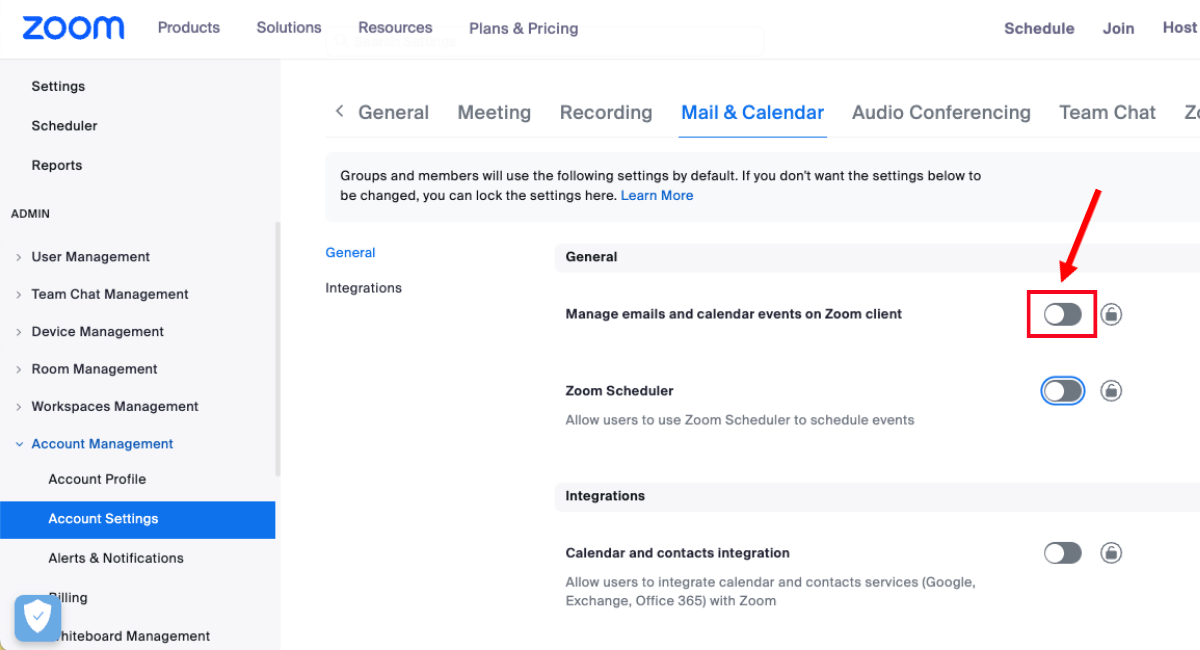
Step 2: Under the 'General' category, locate the 'Manage emails and calendar events on Zoom client' option. If it is currently disabled, simply toggle the switch to activate it.
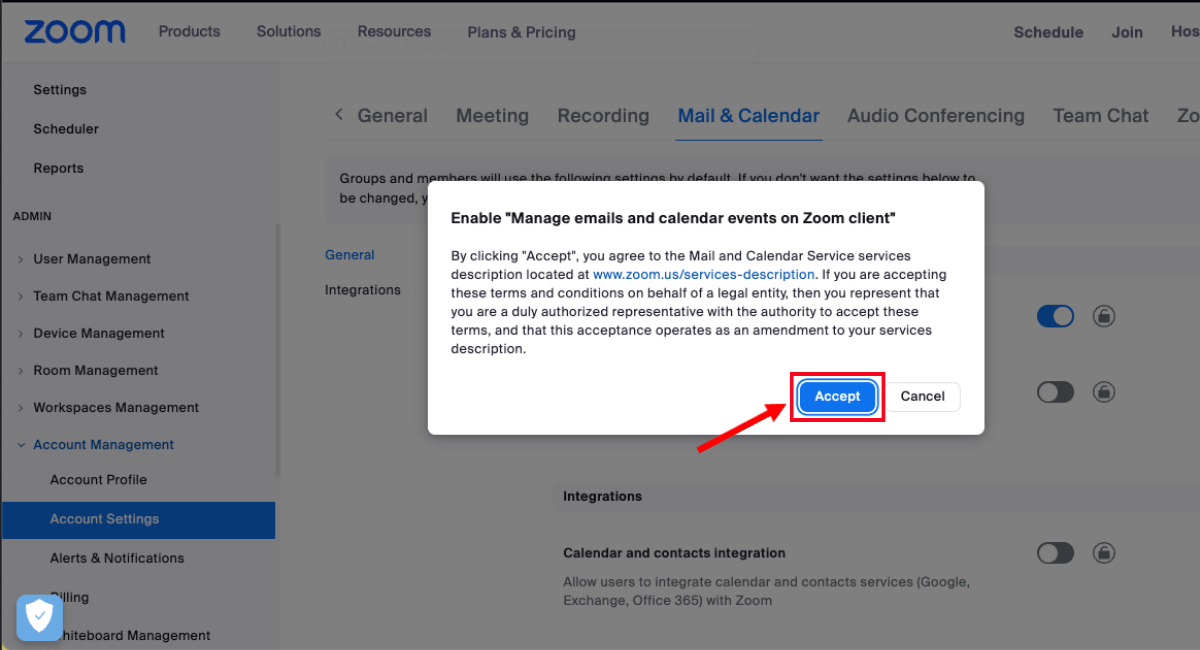
Step 3: In the verification pop-up, select 'Accept' to agree to the terms and conditions of services.
Step 4: Check the boxes indicating 'Allow users to manage emails' and 'Allow users to manage calendar events' to permit users to access and manage emails and calendars on the Zoom app.
Similarly, click the checkbox displaying 'Allow users to choose Zoom as their email/calendar service provider' to let users create a Zoom mail account.
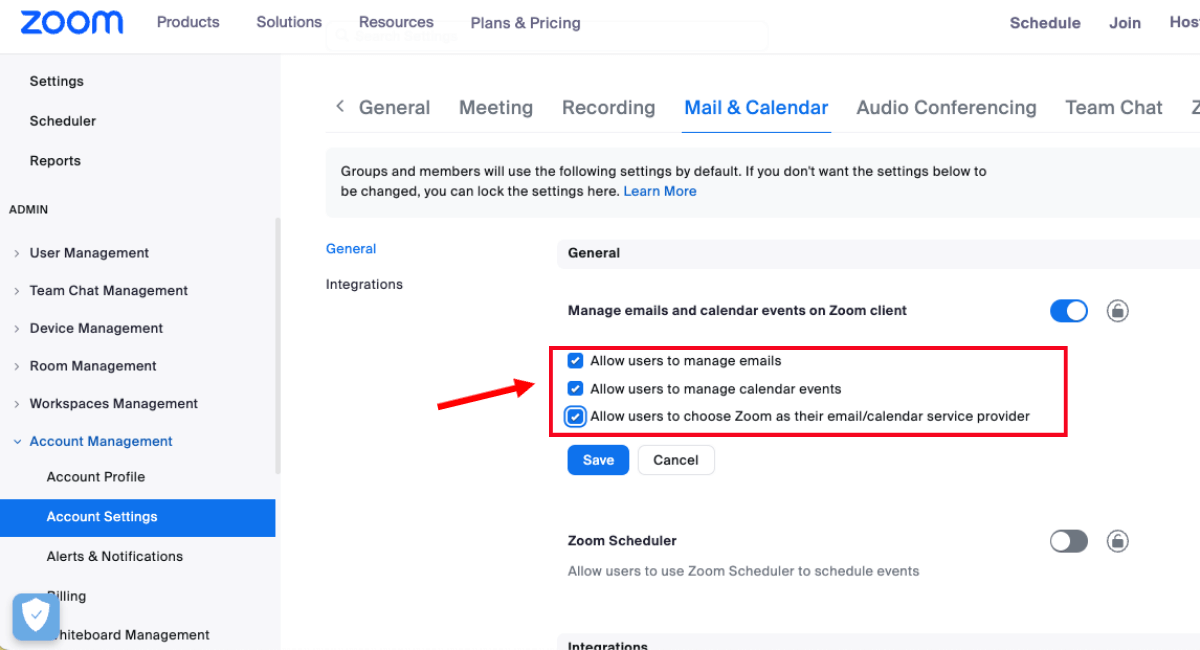
Step 5: Click 'Save' and then select the 'Lock' icon to restrict users from modifying the settings.
![]()
How to set up Zoom Mail?
Zoom Mail Client offers a centralized solution for managing phone, chat, meetings, whiteboard, and email, all within the Zoom desktop client. With Zoom Mail, you can conveniently view and handle your emails without leaving the Zoom app.
How to connect Your Google/Office 365 account with Zoom Mail?
In order to use the Zoom Mail Client, you must have a Zoom desktop client of 5.14.5 or higher on your Windows or macOS. In addition, you must enable Zoom Mail and Calendar Clients in Zoom settings.
Below are the simple steps to connect your Google/Microsoft 365 account with Zoom Mail.
Step 1: Navigate to the Zoom desktop client and click the 'Mail' tab.
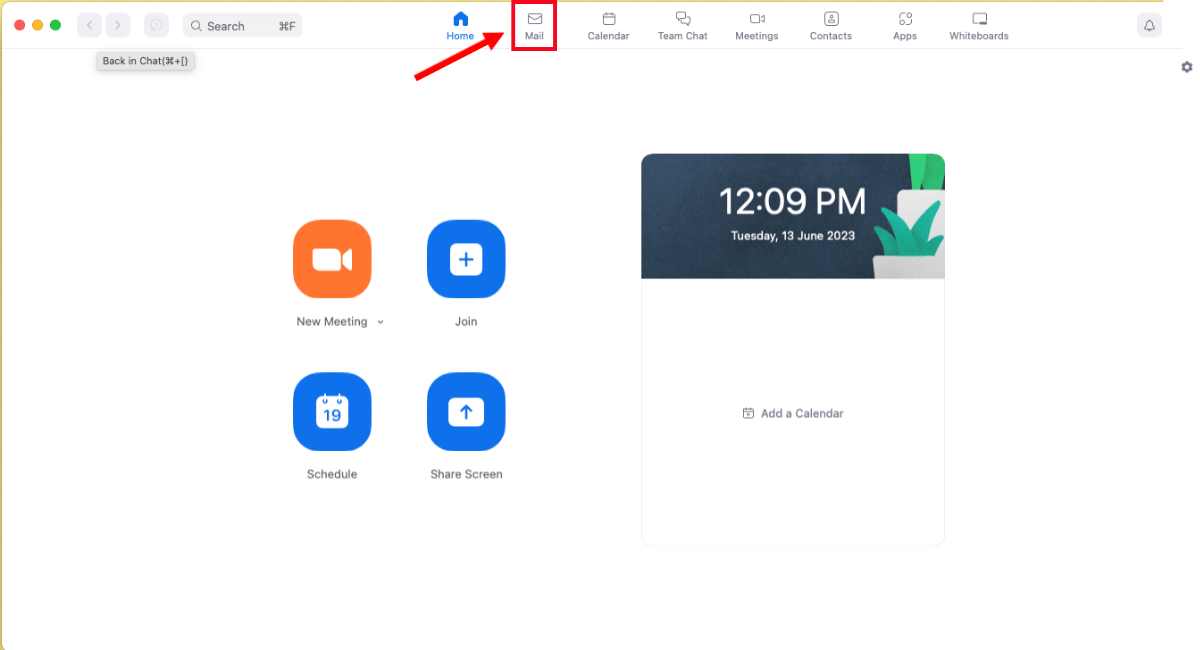
Step 2: Look for the option 'Sign in with Google' to initiate the account connection process. This action will prompt you to open the Zoom Profile page in your browser and open the 'Calendar and Contacts Integration' permissions.
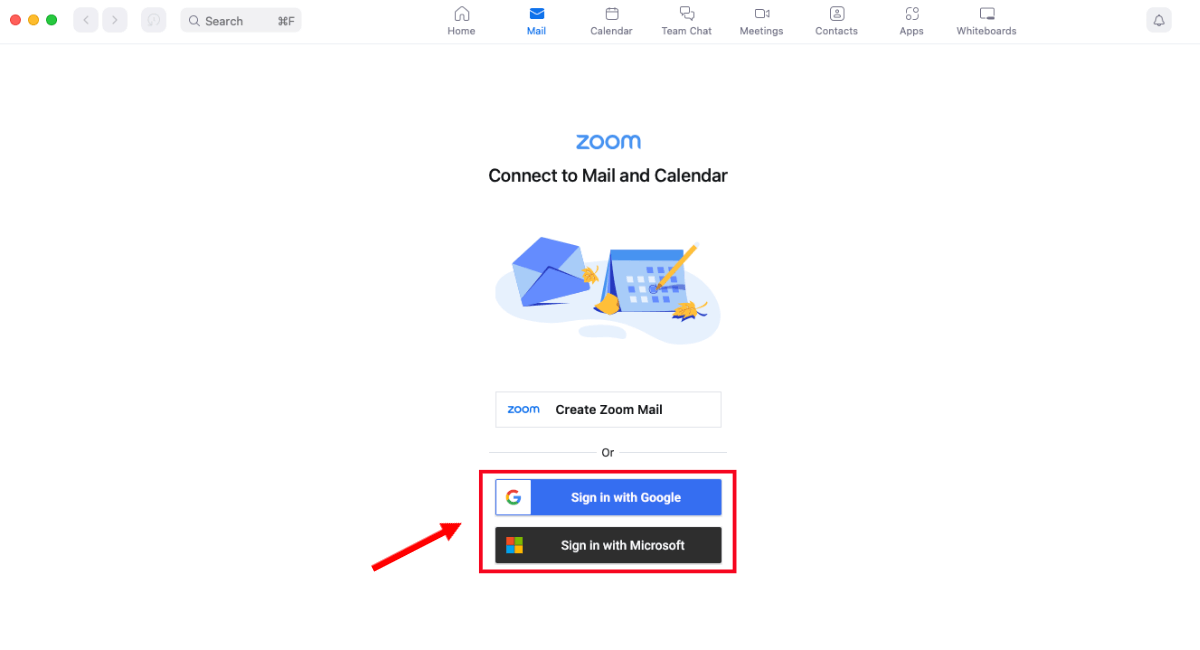
Note: If you want to connect Zoom Mail with Microsoft 365, select 'Sign in with Microsoft.' If you don't have a Zoom mail, select 'Create Zoom Mail.'
Step 3: Modify and allow 'Read' and 'Write' permission for Mail.
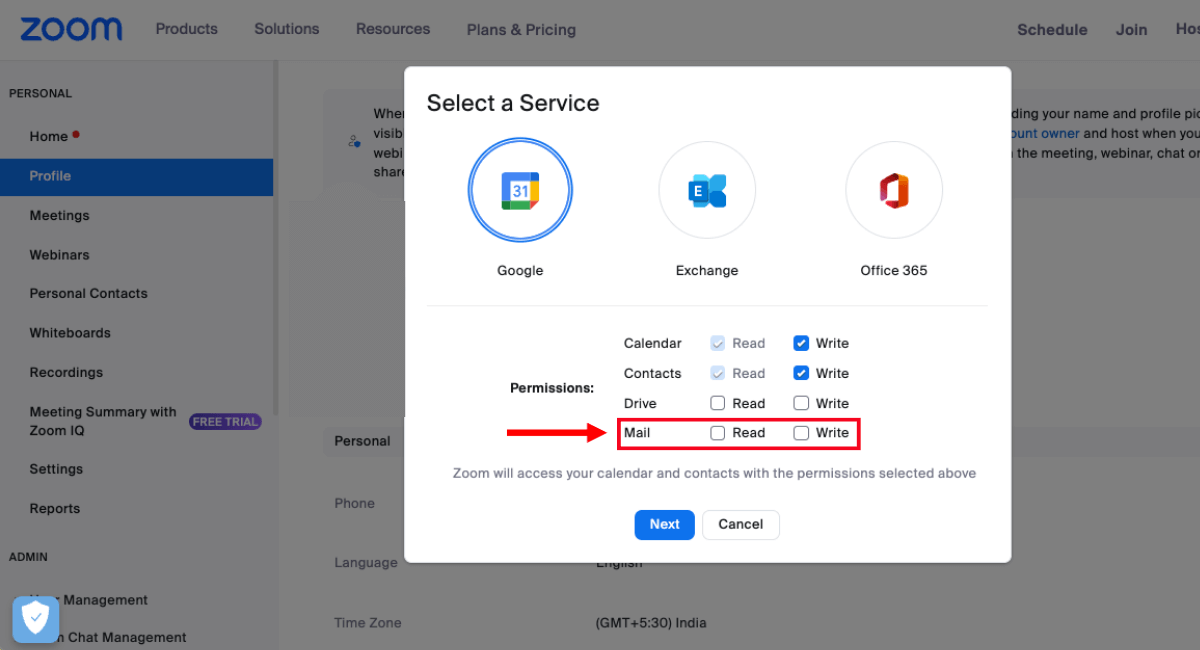
Step 4: Choose 'Google' as the service you want to connect your Zoom Mail to and select 'Next.' This action will redirect you to Google's sign-in page.
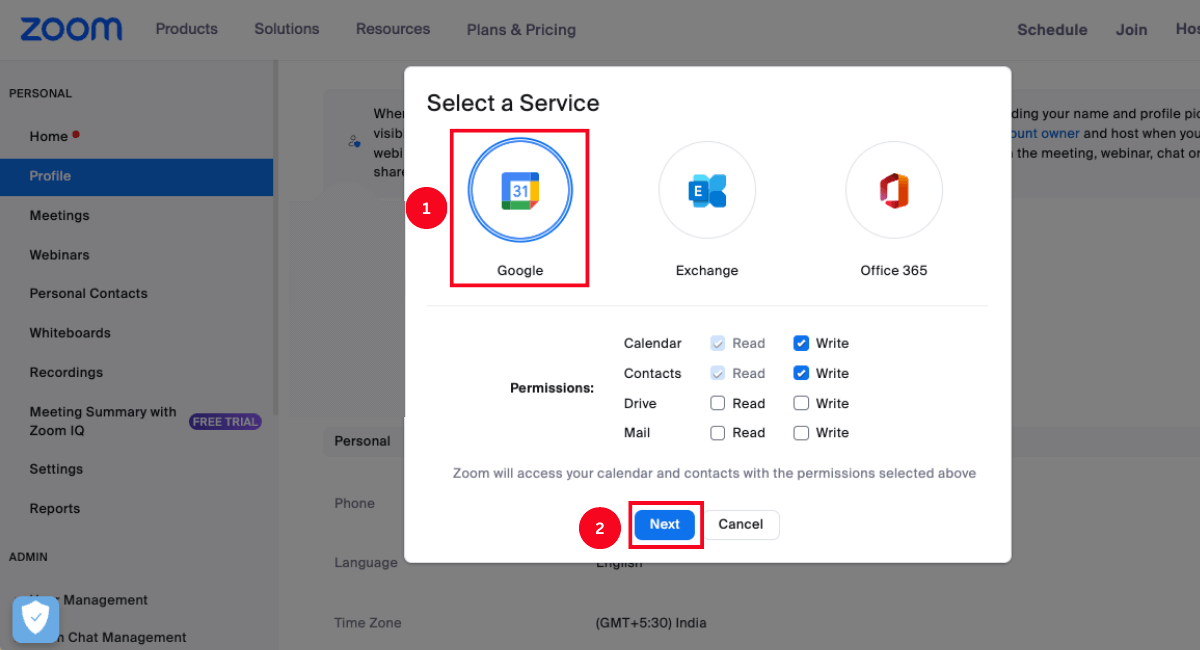
Note: You must select 'Office 365' to connect Zoom Mail and Microsoft 365 accounts.
Step 5: Now, sign in to your Google account and select 'Allow' to let Zoom access your email and calendar. Once you grant permission, you will be redirected back to Zoom Mail Client.
Note: Microsoft 365 users must enable 'Authorize with OAuth 2.0' before clicking 'Allow.'
How to connect Your Zoom Mail service account with Zoom Mail?
Connecting your Zoom Mail Service with Zoom Mail requires a Zoom One Pro, Zoom One Business, Zoom Standard Pro, or Zoom One Enterprise account. If you are using any of these Zoom accounts, follow the steps below to establish the connection.
Step 1: Sign in to the Zoom desktop client and select the 'Mail' tab. This is where you will configure your Zoom account to enable email and calendar access.
Step 2: Click 'Get Started' and find different mail service options. Select 'Connect Zoom Mail.'
Note: You must be a licensed Zoom user to create your account for Zoom Mail Service. Make sure to copy your personal encryption key for future reference or in case you need to recover encrypted emails in the event of a lost device.
Step 3: Select the 'Next' option to proceed.
Step 4: Fill in the email address to create your Zoom Mail Service account, and click 'Create Account.' This will load your new Zoom Mail inbox.
Notta AI meeting assistant records, transcribes, and summarizes meetings so everyone can stay engaged without missing important details.
How to use Zoom Mail?
Zoom Mail is an integrated feature that lets you conveniently access your third-party email account (such as Gmail or Microsoft 365) directly within the Zoom interface. Follow these steps to make the most of Zoom Mail and efficiently view your emails.
Step 1: Sign in to the Zoom desktop client and navigate to the 'Mail' tab. To ensure you have the latest emails, click the 'Refresh' icon to sync your mailbox.
select-mail-and-click-refresh-to-sync-mails
Step 2: Click on an email to view its full content. For quick actions, simply hover your cursor over the email. You can utilize the 'Star' icon to mark the email as important or under a starred category.
If you wish to delete an email, use the 'Delete' icon. To archive a Zoom email, click on the 'Archive' icon. The 'Mark as Unread/Mark as Read' icon allows you to manage the read status of the message.
![]()
Within the Zoom Mail, you can open any email you want to reply to. It is easy to send an email using the Zoom app. All you need to do is compose an email, add recipients, and click 'Send.'
If you need to search for a specific email or filter emails based on certain categories, you can use the available search and filtering options. Here are the simple steps to search and filter emails.
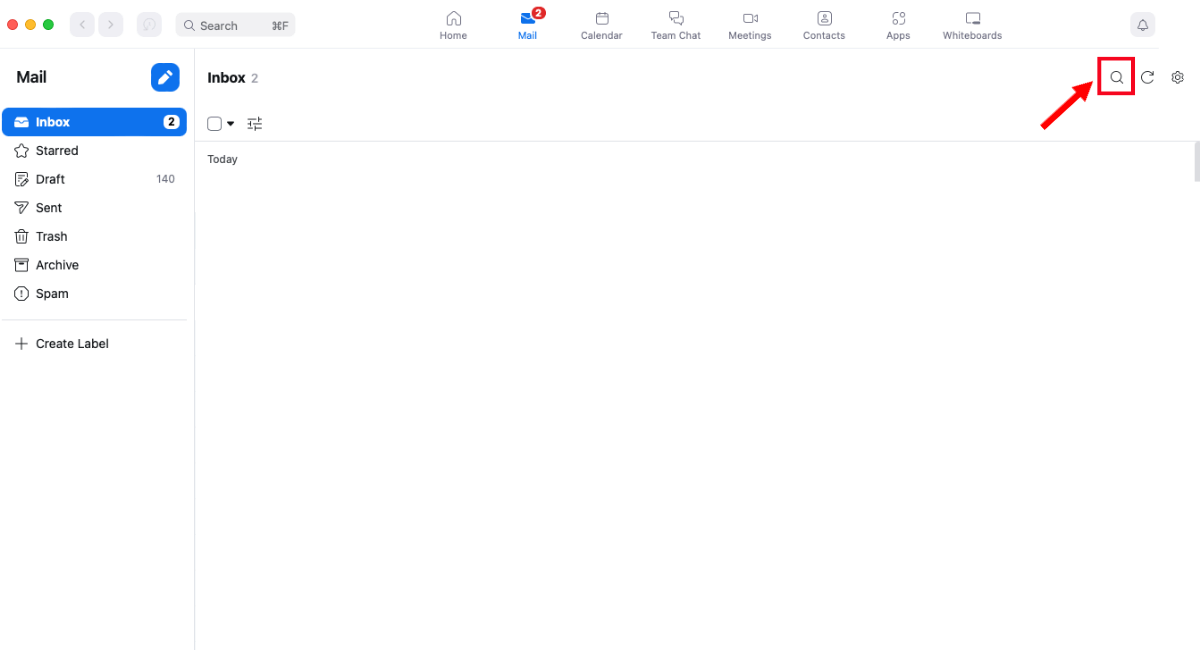
Step 1: At the top-right mailbox corner, select the 'Search' icon.
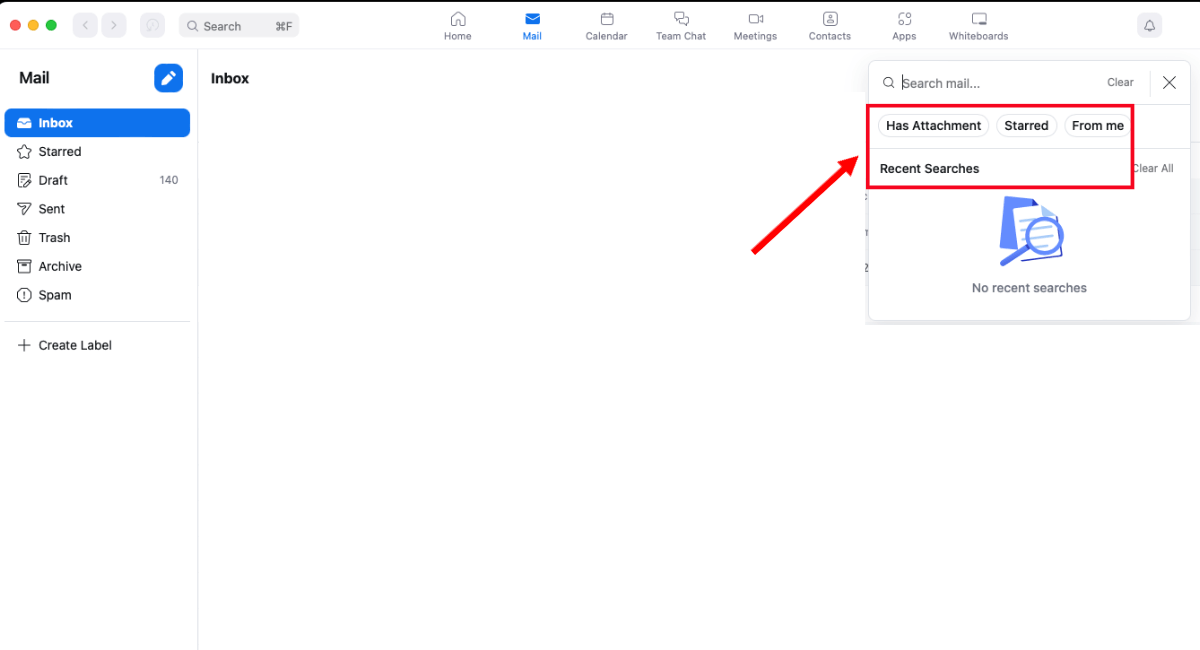
Step 2: Enter your search query in the search bar and utilize search filters like 'Has Attachment,' 'Starred,' or 'From me' to refine your search.
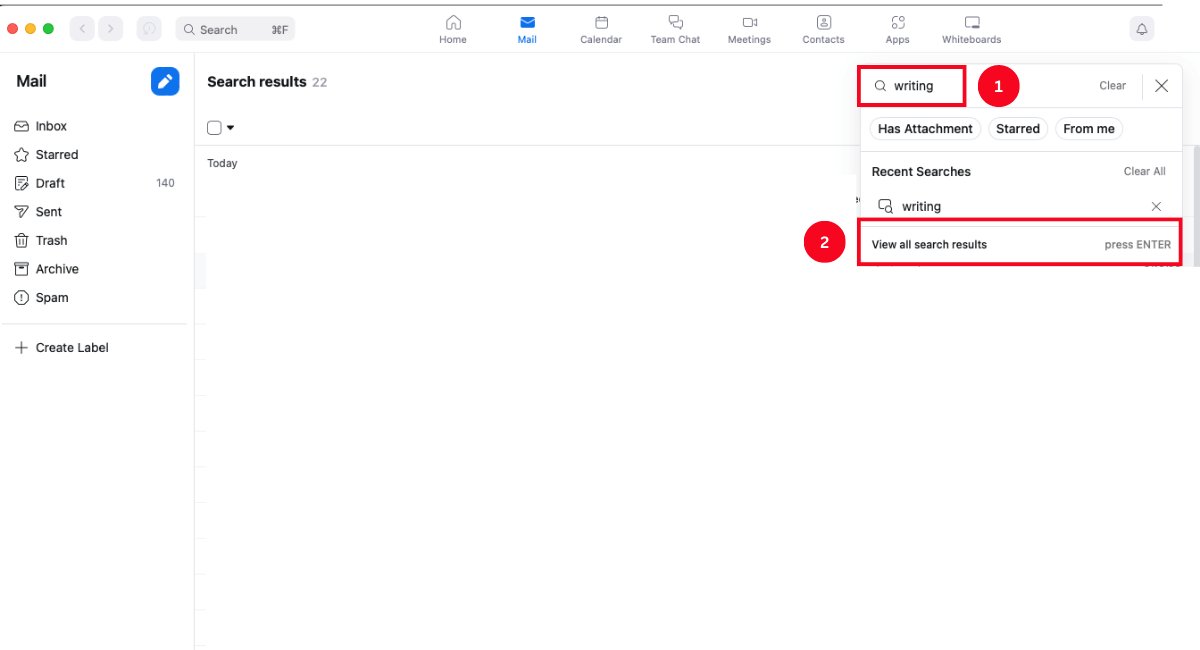
Step 3: Click the 'Enter' to search, and all the emails matching the query will be displayed.
If you want to disconnect your current email inbox, follow the steps mentioned below.
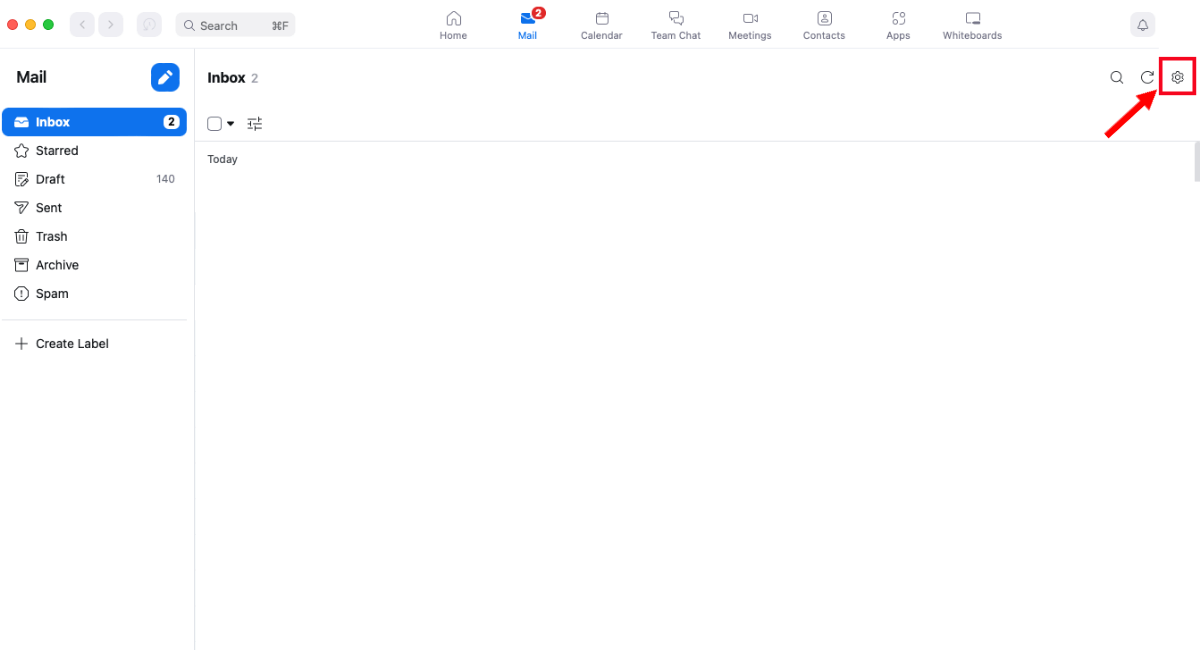
Step 1: At the top-right corner of the window, click the 'Gear' icon.
Step 2: Select 'Email Preferences.'
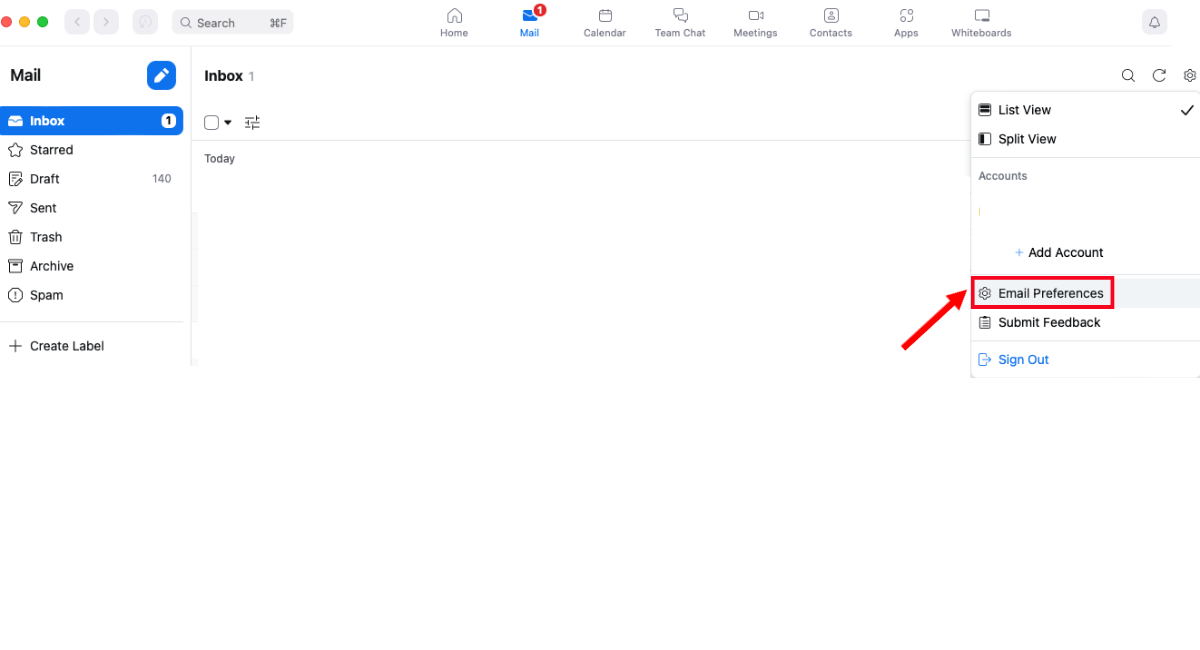
Step 3: Click 'Logout' to disconnect your email account.
How to set up Zoom Calendar?
Setting up a Zoom Calendar is a straightforward process that will empower you to stay organized. In this section, we will guide you through the step-by-step instructions to set up the Zoom Calendar, enabling you to manage your schedule seamlessly.
How to connect Your Google/Office 365 account with Zoom Calendar?
Follow these easy steps to integrate your Google or Office 365 account with Zoom Calendar and experience the power of synchronized scheduling at your fingertips.
Step 1: Sign in to the Zoom desktop client and select the 'Calendar' tab.
Step 2: Navigate to 'Sign in with Google' to open your Zoom Profile page. Select the 'Calendar and Contacts Integration' permissions and allow both 'Read' and 'Write' permissions for the calendar.
If you want to connect Microsoft 365 to Zoom Calendar, click 'Sign in with Microsoft.'
Step 3: Select 'Google or Office 365' to connect your account with Zoom Calendar. Click 'Next' to proceed.
Step 4: Now sign in to your Google account and click 'Allow' to authorize Zoom to access your calendar.
If you are an Office 365 user, enable the 'Authorize with OAuth 2.0' option before clicking 'Allow' to complete the authorization process.
How to connect Your Zoom Mail service account with Zoom Calendar?
Connecting your Zoom Mail Service account with Zoom Calendar opens up a world of convenience and seamless integration. Learn how to connect your Zoom Mail service account with the Zoom calendar.
Step 1: Sign in to the Zoom desktop client and select the 'Calendar' tab.
Step 2: Click the 'Connect Zoom Calendar' and log in to your Zoom Mail account.
If you don't have an account, click 'Create an Account' by entering a Zoom Mail email address.
How to use Zoom Calendar?
Zoom Calendar is essential for efficient scheduling and seamless collaboration. Whether you're a beginner or an experienced user, these step-by-step guidelines will empower you to navigate Zoom Calendar easily and ensure you never miss a meeting or appointment.
Step 1: In the Zoom desktop client, click the 'Calendar' tab to open your Zoom Calendar.
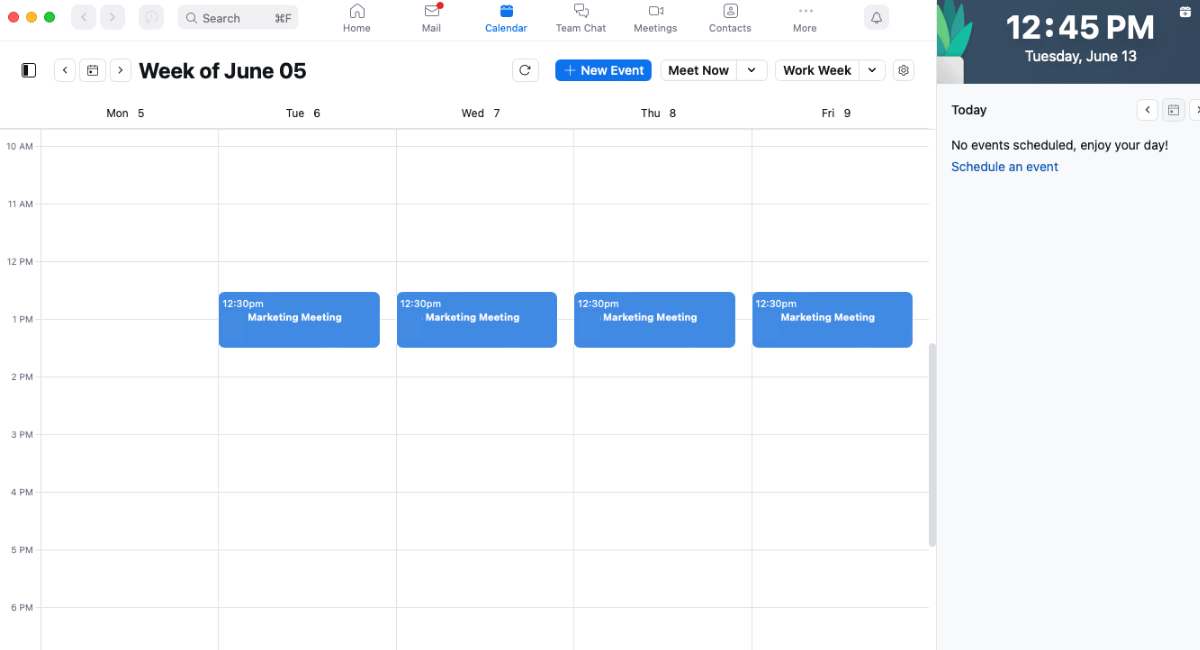
Step 2: At the top-right corner, you can find the current calendar view. The 'Forward' and 'Back' icons let you move forward and backward, depending on the calendar's current view.
![]()
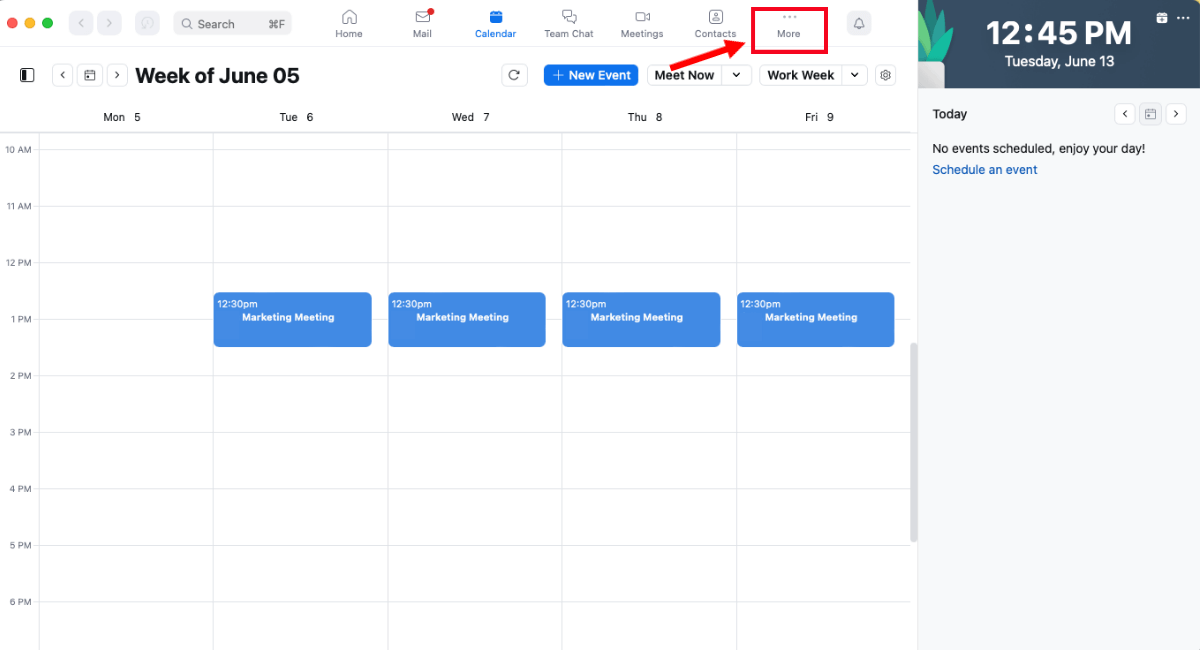
Step 3: Click the 'More' icon to view additional calendars or search contacts in the search people bar.
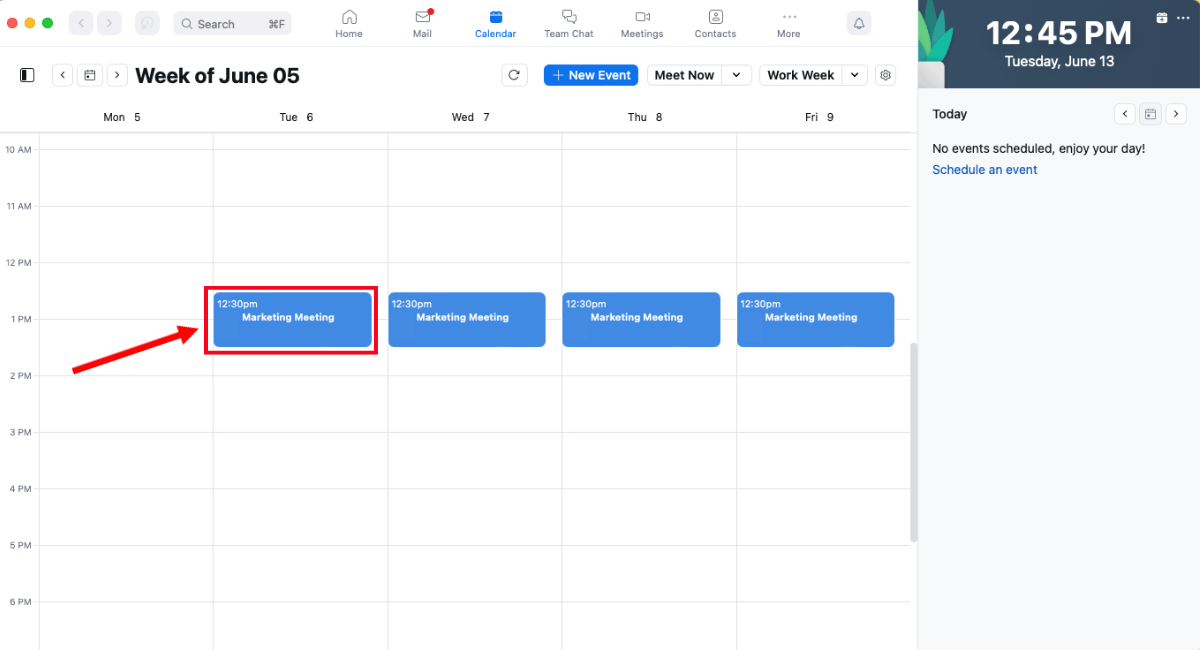
Step 4: Click on a calendar event to view additional details like title, date and time, etc.
Zoom Calendar Client allows you to schedule calendar events, add meeting details, and invite contacts to any calendar event. At the top of the calendar, you can click the 'New Event' icon to quickly create a new calendar event.
If you want to disconnect your Zoom Calendar account, click the 'Gear' icon in the window's top-right corner. You can find 'Disconnect' to sign out of the current calendar account.
FAQs
Does Zoom work with any email?
The in-built feature of Zoom Mail lets you access a third-party email address directly within the Zoom interface. Zoom Mail Client supports connecting with Google, Gmail, Microsoft 365 (Exchange), and Zoom mail services.
Is Zoom Mail free?
Yes, Zoom Mail and Calendar services are free and can be easily accessed within the Zoom app. However, it's important to download and install the latest Zoom app version to use these services.
How do I access my Zoom Calendar?
Connecting your Zoom Calendar Client to your Zoom Calendar, Google, or Microsoft 365 (Exchange) account helps you access your calendar directly from the Zoom desktop client. The 'Calendar' icon on the Zoom desktop client interface can help you schedule or attend events from the Zoom app.
Bonus: An AI-powered recording and transcribing app
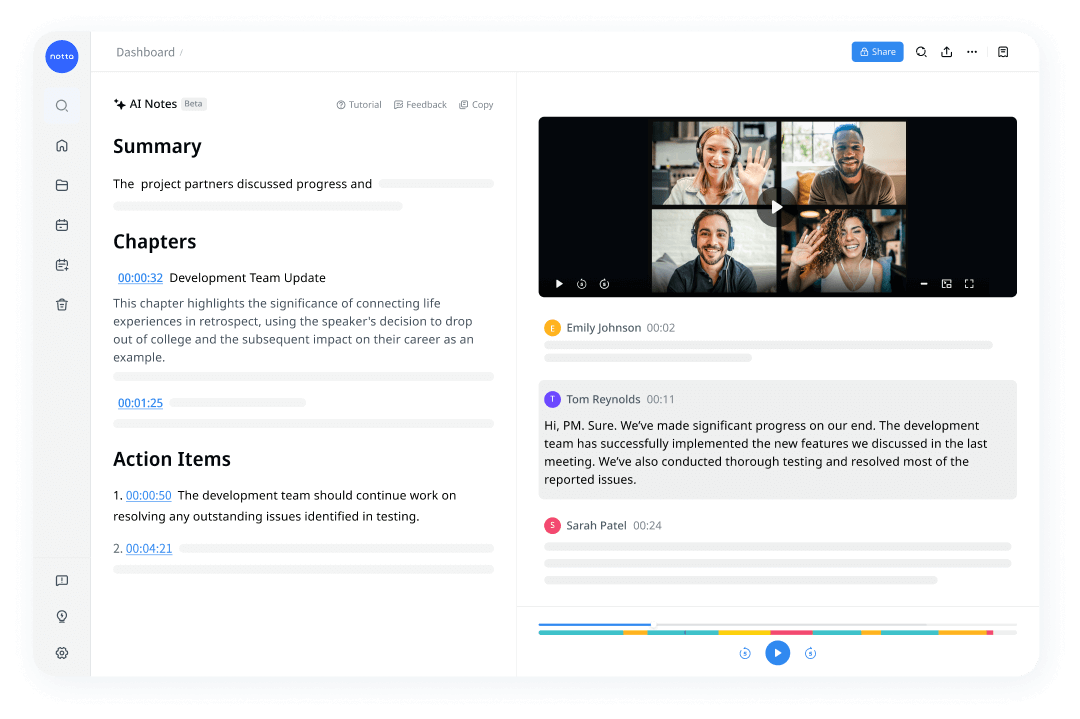
Recording and transcribing Zoom meetings help remote workers save important information in text format.
Notta is a revolutionary AI-powered recording and transcribing app for web and mobile platforms. With its exceptional accuracy and intuitive interface, Notta effortlessly transforms video and audio content into text, saving you valuable time and boosting productivity.
One of the standout features of Notta is its seamless integration with Google Calendar. By connecting your Google Calendar account to Notta, you can access your upcoming meetings and appointments right within the app.
But Notta doesn't stop there. With the innovative 'Scheduler' feature, you can effortlessly create scheduling events with others. Whether it's coordinating meetings, interviews, or collaborative projects, Notta streamlines the scheduling process, making it a breeze to set up and manage.
Notta offers the most integrated AI meeting notes, summaries, and action items so nothing gets missed.
Key takeaways
Zoom Mail and Calendar stand out as indispensable tools that will revolutionize the way you work and streamline your productivity. The single, centralized hub eliminates the need to switch between countless tabs and apps, helping you effortlessly manage your emails and schedule meetings without the hassle of constant context-switching.
In addition to Zoom's in-built features like Zoom email and calendar, consider using a recording and transcribing tool like Notta. The AI-powered recording and transcribing app for web and mobile allows you to convert video/audio to text with 98.86% accuracy. Create a free Notta account today to explore its features in detail.