
How to Use Language Interpretation in Zoom Meetings
Unlock the power of AI — Notta's meeting assistant records, transcribes and summarizes meeting minutes with one click.
Do you have a critical Zoom meeting lined up with team members or clients who speak different languages? If so, you might be wondering how to ensure everyone can understand the Zoom meeting content. Fortunately, Zoom's language interpretation feature can help you to do just that.
Zoom interpretation allows you to add interpreters to your meetings so that participants can listen to the discussion in their preferred language. As a Zoom user, I have found language interpretation to be an invaluable tool. I have used it to host meetings with participants worldwide, and it has always been a success.
In this Zoom language interpretation guide, I will walk you through how to enable the feature, add interpreters, listen to the interpretations, and much more.
Zoom language interpretation vs. live transcription
Zoom offers two main types of translation technology for multilingual meetings: Zoom language interpretation and Zoom live transcription. Zoom's language interpretation feature lets you connect multiple interpreters to sessions who relay the original speech in another language. Alternatively, Zoom live transcription or real-time closed captioning provides captions or subtitles of the spoken content. Let's compare both the Zoom features below:
| Parameters | Zoom Language Interpretation | Zoom Live Transcription |
|---|---|---|
| Description | The Zoom language interpretation feature lets you add interpreters to your scheduled meetings. The meeting host can grant interpretation rights to 20 participants during the Zoom session or while scheduling the session. Attendees can select the audio channel and the language of their choice to listen to the interpretation. | Zoom live transcription feature lets the meeting host and participants automatically transcribe all the spoken content in the virtual meeting. The real-time live captioning feature is a game-changer during Zoom meetings, providing better knowledge retention and accessibility for all the participants. |
| Pros | The feature lets participants choose the interpretation channel of their desired language. That means if a meeting is in German, but certain participants understand only English, they can easily select the language of their choice. | Zoom's live transcription feature helps overcome language barriers and improves accessibility during virtual sessions. Zoom currently offers captioning in nearly 12 languages, including English, Dutch, Italian, Russian, and more. |
| Cons | Participants joining from the web client or mobile app can only listen to interpretation audio channels and view the interpreted text. The interpretation feature is not available in Zoom breakout rooms. | While there are 12 translation languages available, you can only translate from English into these languages, not vice versa. The feature does not offer complete accuracy of names, brands, acronyms, etc. |
How to enable or disable language interpretation?
Zoom users with a Pro, Business, Enterprise, or Education account can use the language transcription feature. One important thing to note is that you can find this feature only on the Zoom web portal or desktop client. Zoom mobile apps do not currently support the feature. Let's read how to enable or disable the feature:
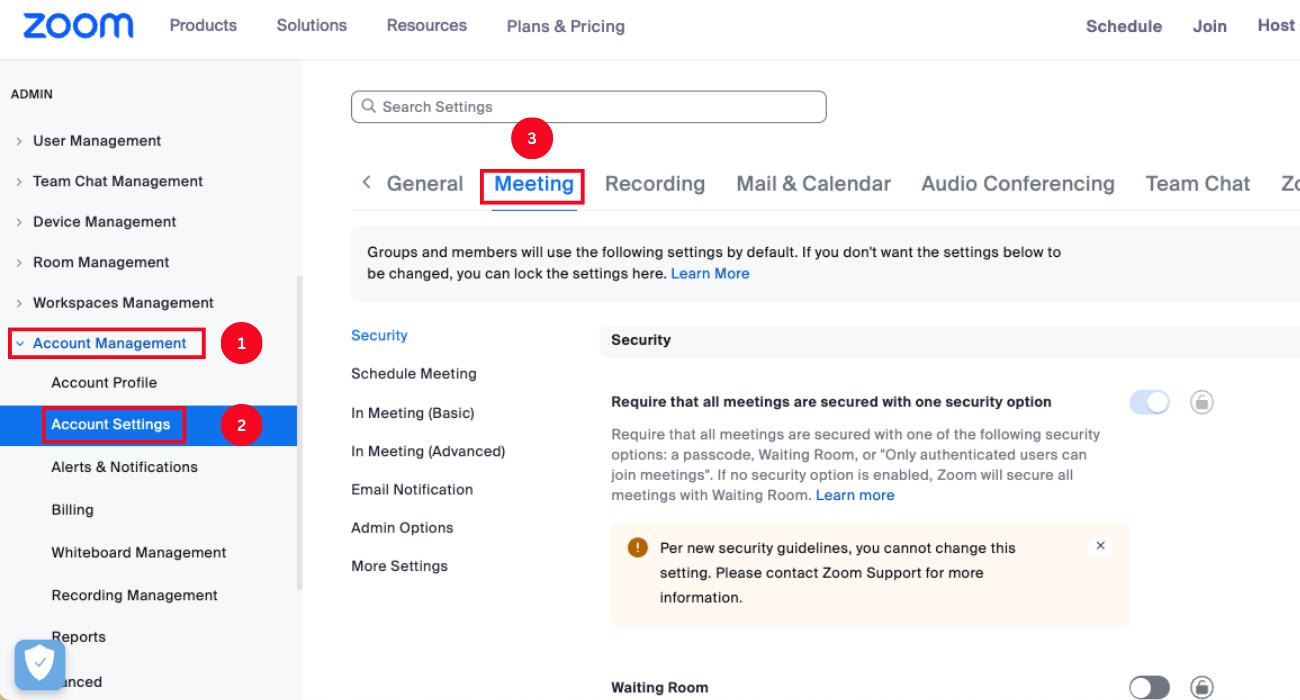
Step 1: Sign in to the Zoom web portal. Locate the navigation menu, and click Account Management > Account Settings. Locate the 'Meeting' tab.
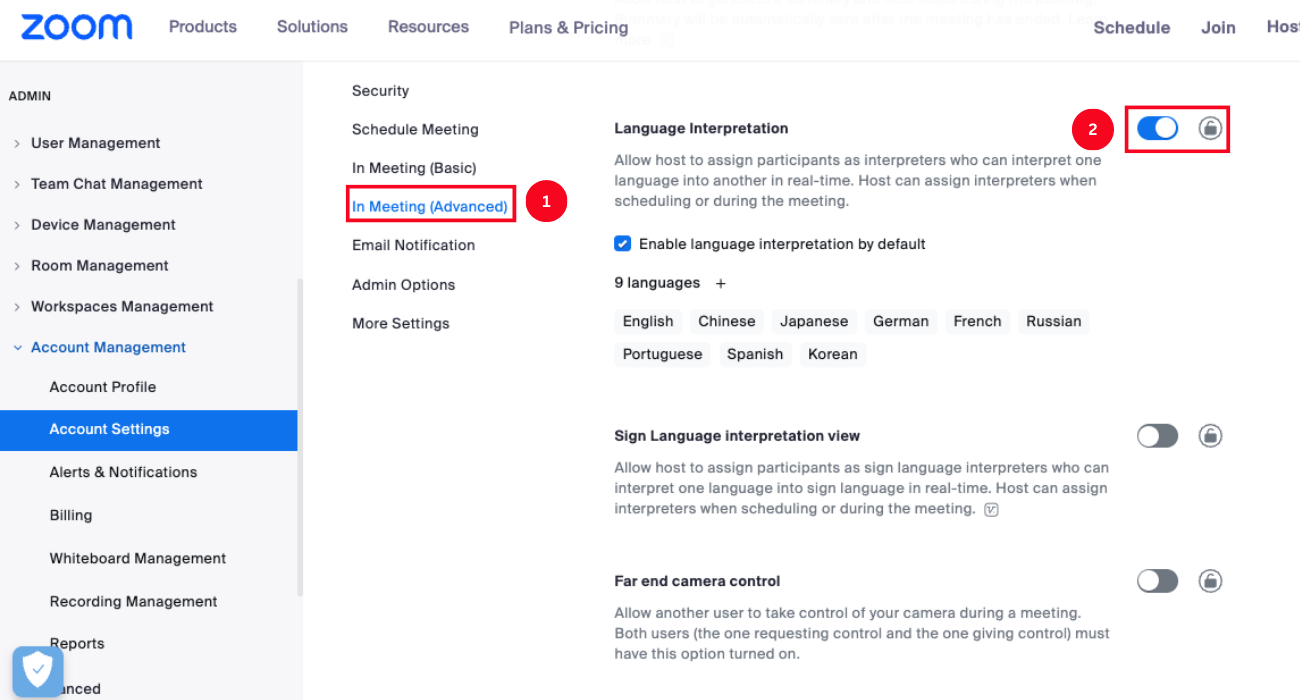
Step 2: Select 'In Meeting (Advanced).' Scroll down until you find 'Language Interpretation.' If it is disabled, click the toggle to enable it.
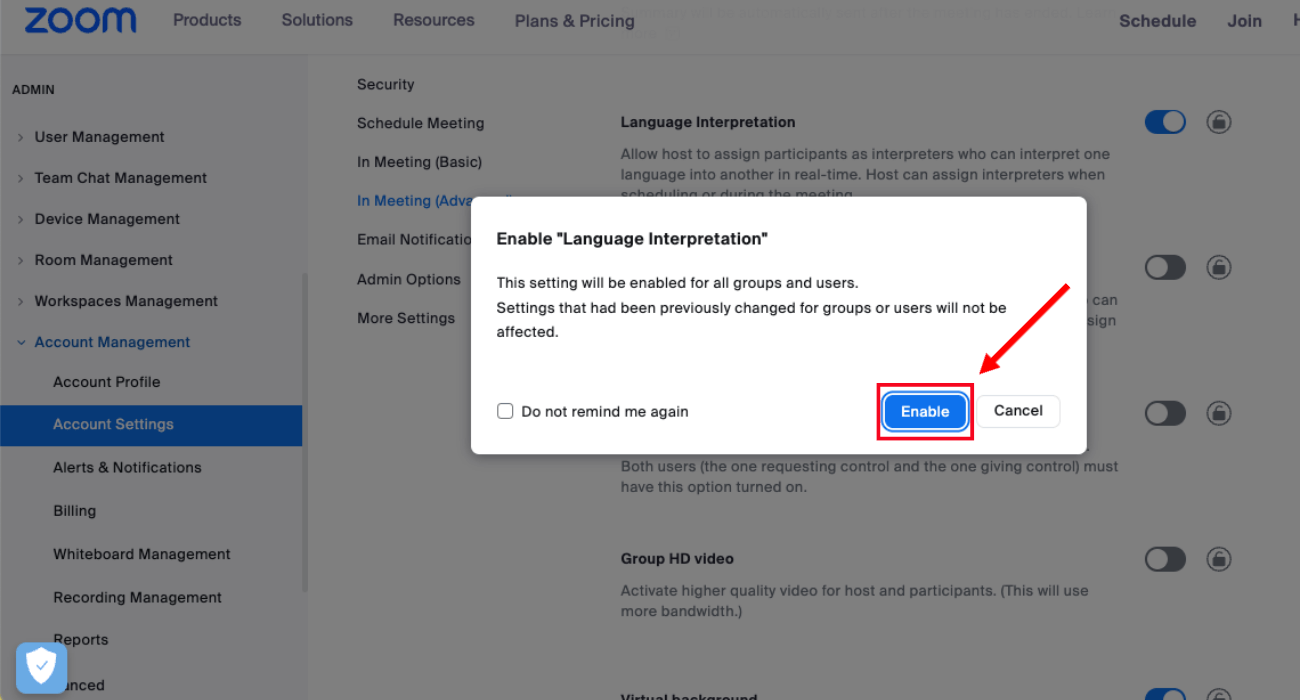
Step 3: A verification dialog box will appear, where you can click 'Enable' to confirm the setting.
Step 4: Select the lock icon to make this setting mandatory for all users. If the verification pop-up appears, click 'Lock.'
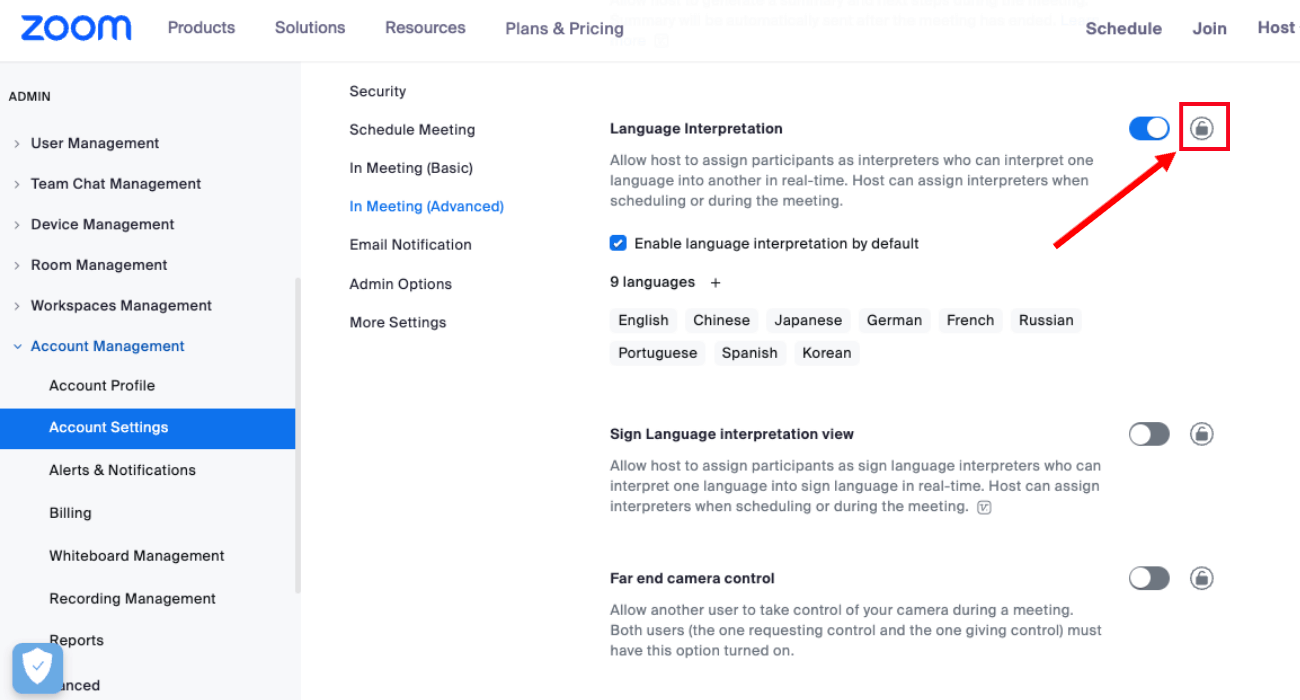
Step 5: If you want to enable language interpretation as a default setting for all your future scheduled meetings, check the box indicating 'Enable language interpretation by default.' Click 'Save.'
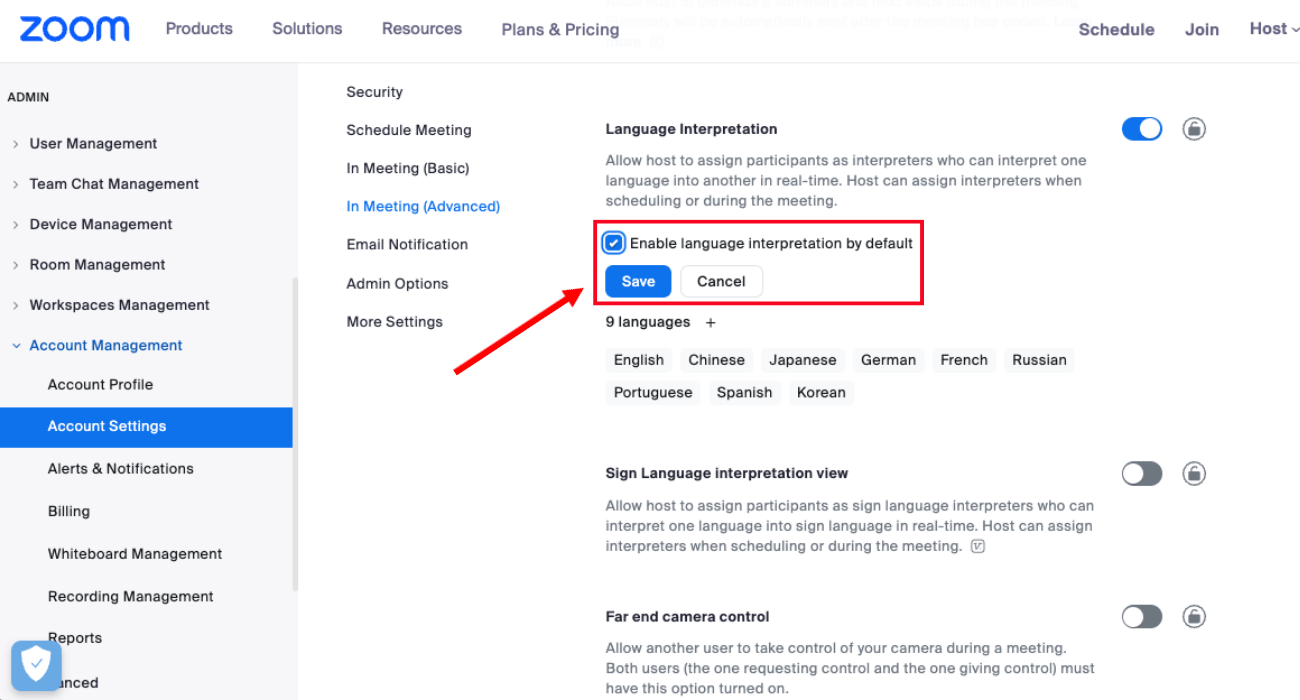
In order to enable or disable Zoom interpretation for your account, locate the navigation panel and select 'Settings.' Follow steps 2 to 5 to use the interpretation feature.
The process to disable the Zoom interpretation is similar. All you need to do is click 'Disable' in step 3.
If you want to enable or disable the language interpretation feature using the Zoom desktop client, follow the below steps.
Step 1: Navigate to the Zoom desktop client and click on your profile picture. A drop-down menu will appear. Select 'Settings.'
Step 2: This will open the general settings of the Zoom app. At the bottom page, click 'View More Settings.'
Step 3: Scroll down the Zoom web page to locate the 'Language Interpretation' setting. Toggle it to enable the Zoom interpretation.
If it is already enabled and you want to disable it, toggle it off.
Notta can convert your spoken interviews and conversations into text with 98.86% accuracy in minutes. Focus on conversations, not manual note-taking.
How to add language interpreters to meetings?
Once the Zoom language interpretation feature is enabled, the meeting host can view the 9 default languages such as French, Japanese, Russian, Korean, English, Portuguese, Spanish, and Chinese. Follow the steps mentioned below to add language interpreters to meetings or webinars.
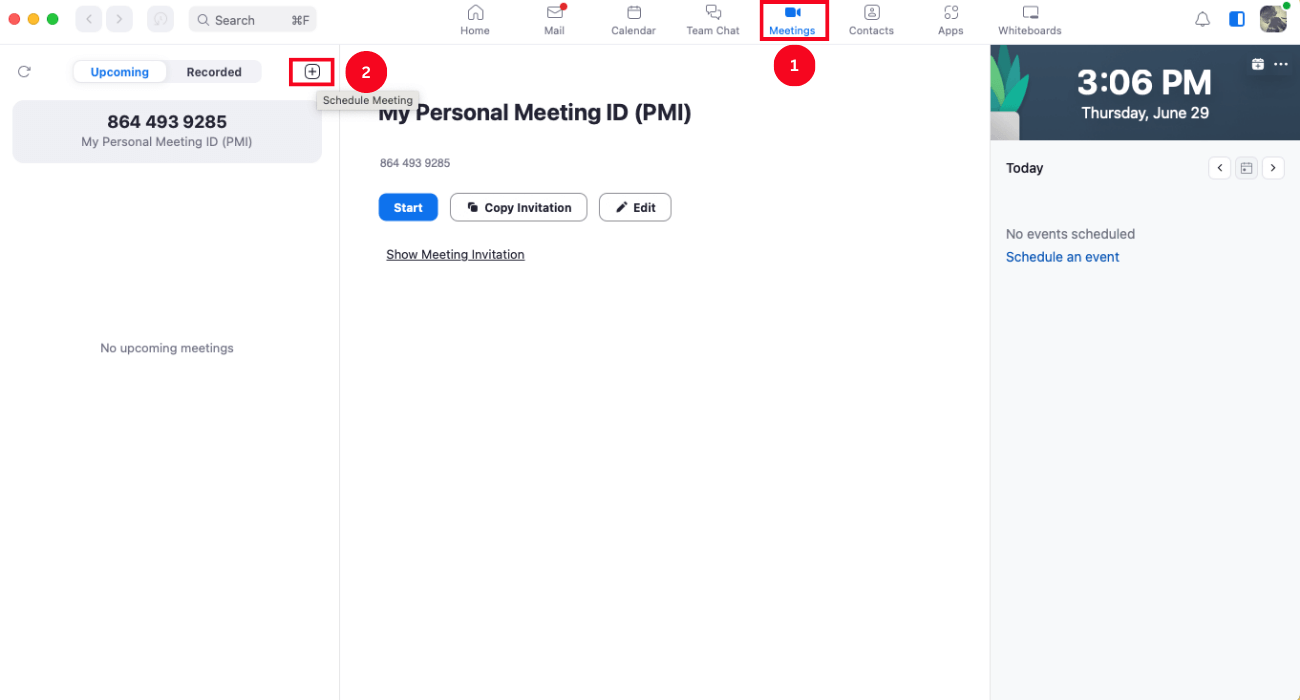
Step 1: To begin, sign in to your Zoom account on the desktop client. In the navigation panel, select 'Meetings.' In the right panel, click the plus (+) icon that indicates 'Schedule a Meeting.'
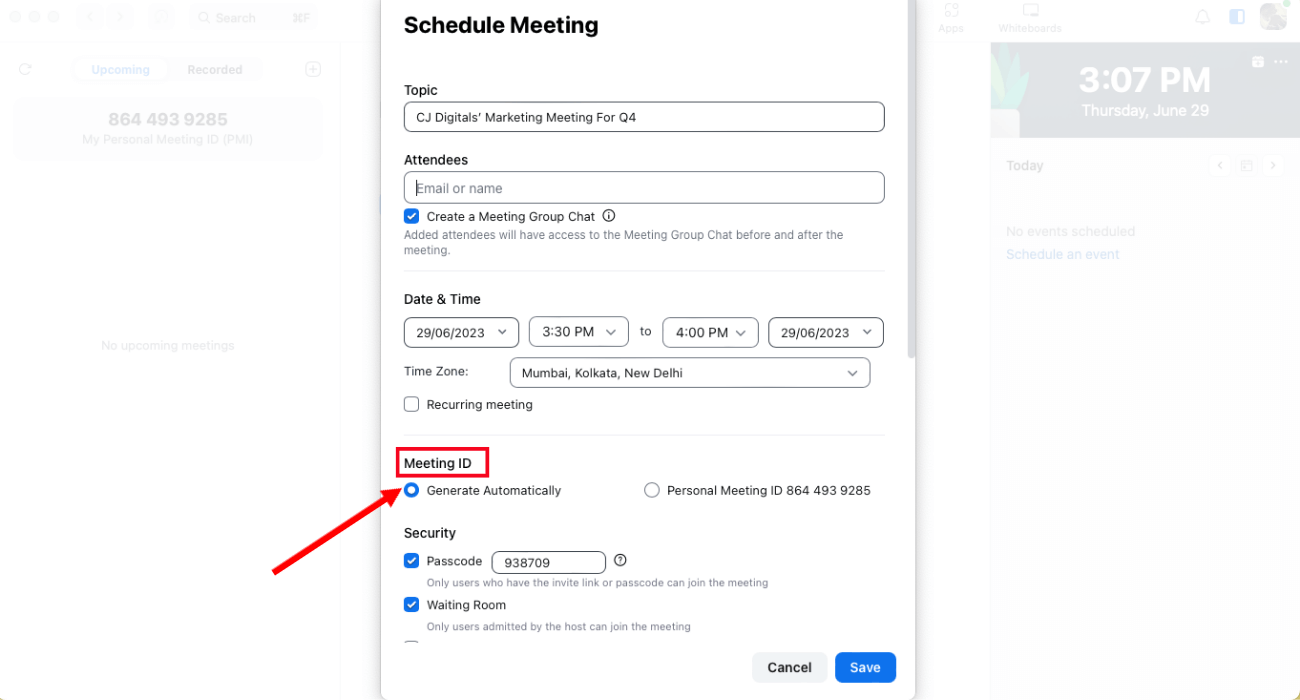
Step 2: A window pop-up will appear. Locate the 'Meeting ID' and select 'Generate Automatically.'
Step 3: Find 'Interpretation' and check the box displaying 'Select language interpretation (audio channels) below.' If you have followed the steps mentioned in the previous section, this check box will be already selected.
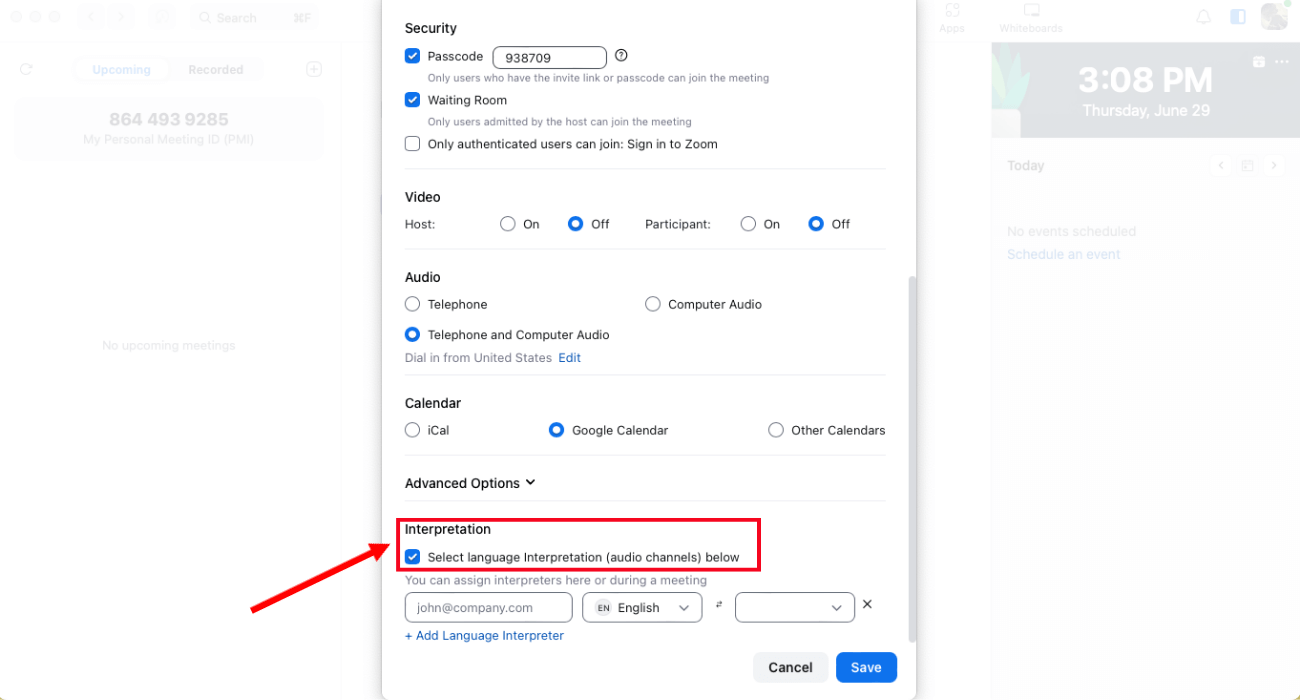
Step 4: Enter the interpreters' information and select the languages to create meeting audio channels.
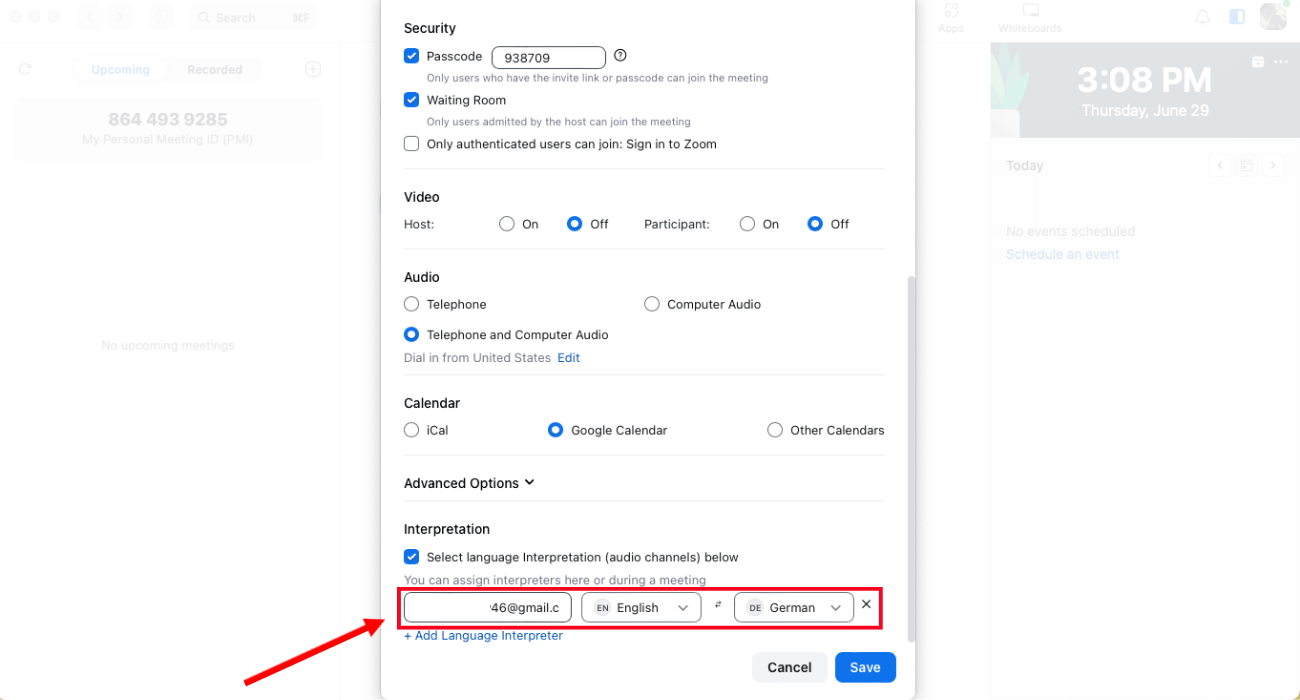
Note: All the pre-assigned interpreters must sign in to Zoom with the chosen email address, or the host has to manually assign them the interpreter rights in the meeting.
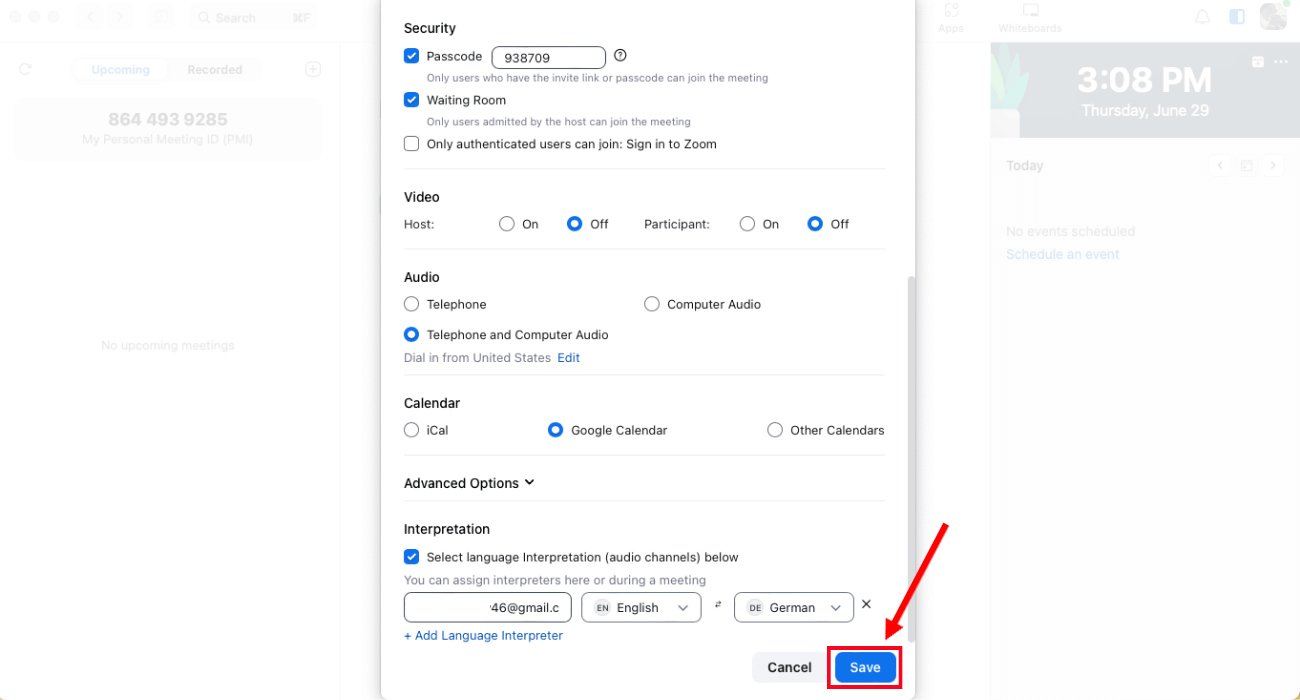
Step 5: Once you have made the necessary changes, click 'Save' to confirm.
How to start language interpretation at meetings?
Starting the language interpretation feature during Zoom meetings is pretty straightforward. Here are a few simple steps to understand how to use interpretation on Zoom.
Step 1: First, log in to the Zoom desktop client. Start or join the scheduled Zoom meeting.
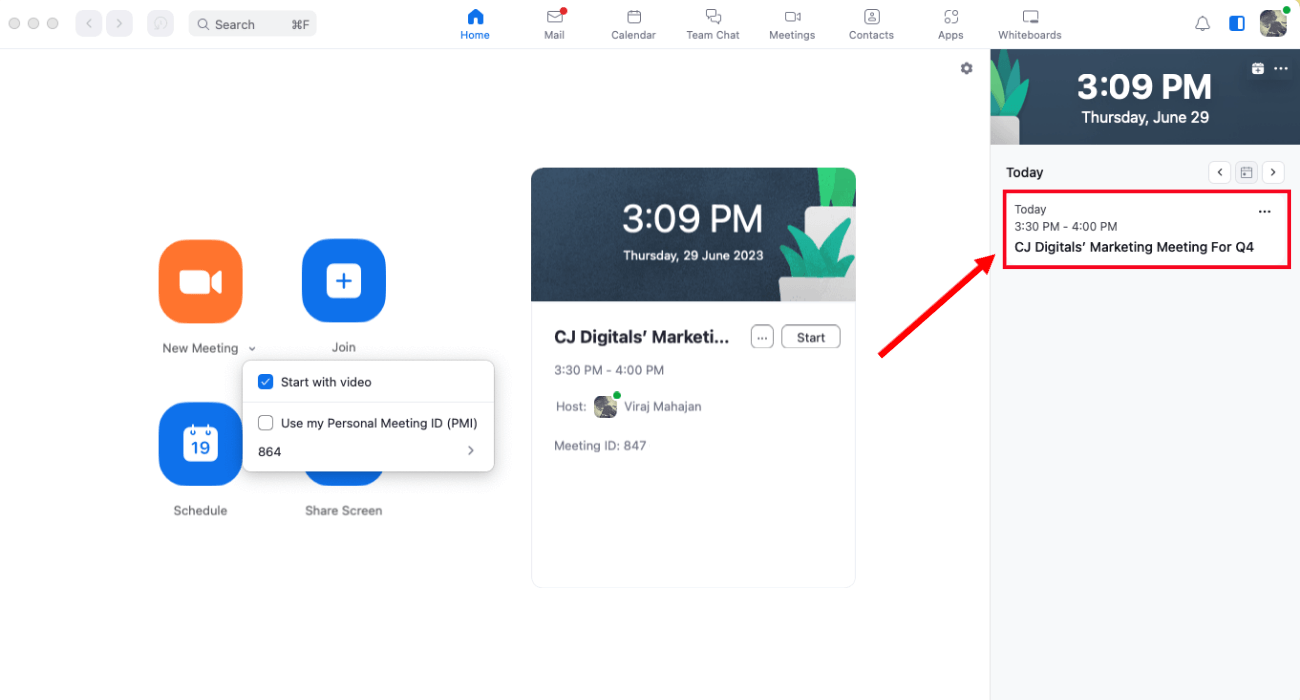
Step 2: In the meeting controls, locate the 'Interpretation' icon.
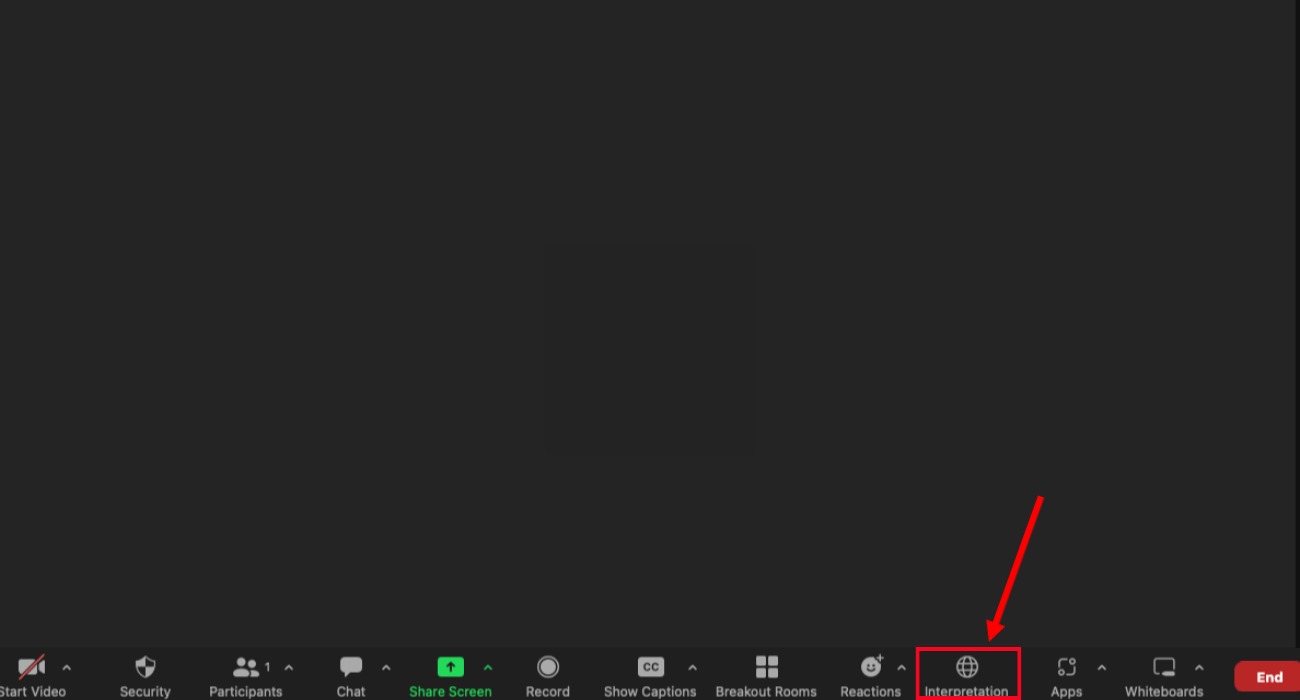
Step 3: Click 'Interpretation.' Select 'Start,' and the Zoom interpretation session will be started. The interpreter will receive a notification indicating they have been assigned a language.
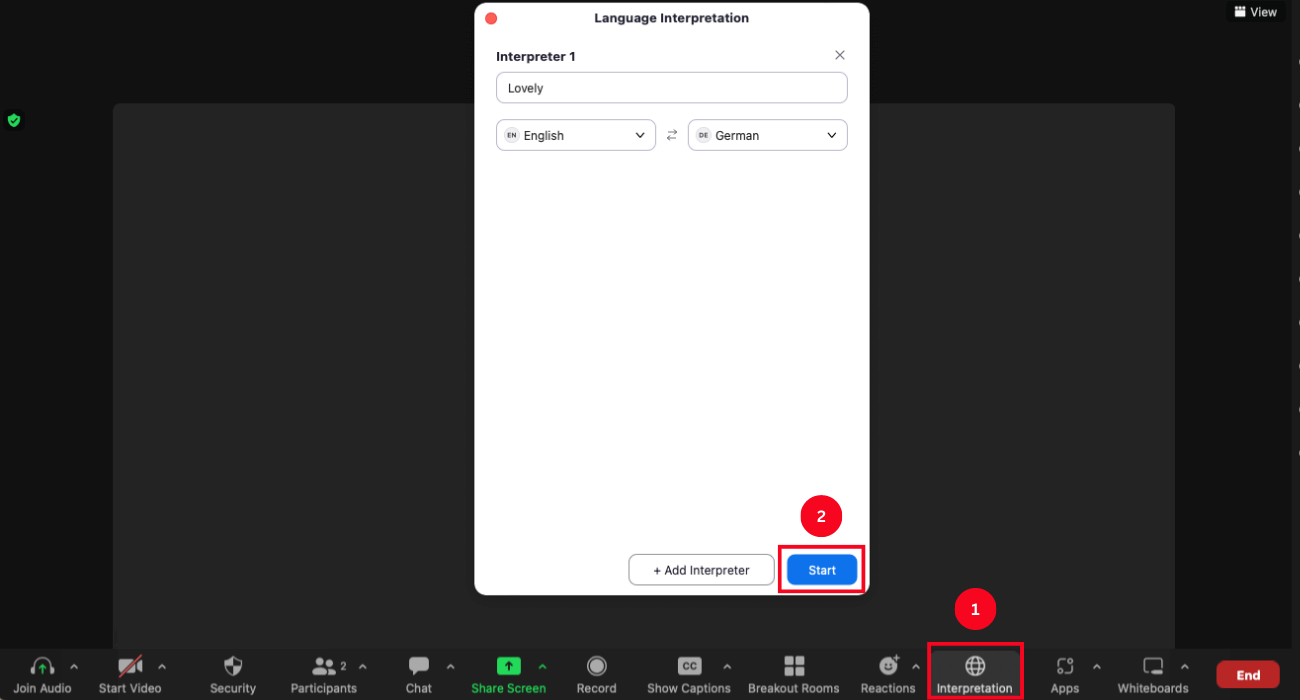
Step 4: In the meeting controls, interpreters and attendees can click 'Interpretation' and select a language channel.
Once you start Zoom interpretation, the interpreter will hear the original meeting audio that needs to be translated. The meeting participants will listen to the translated and original audio at a lower volume.
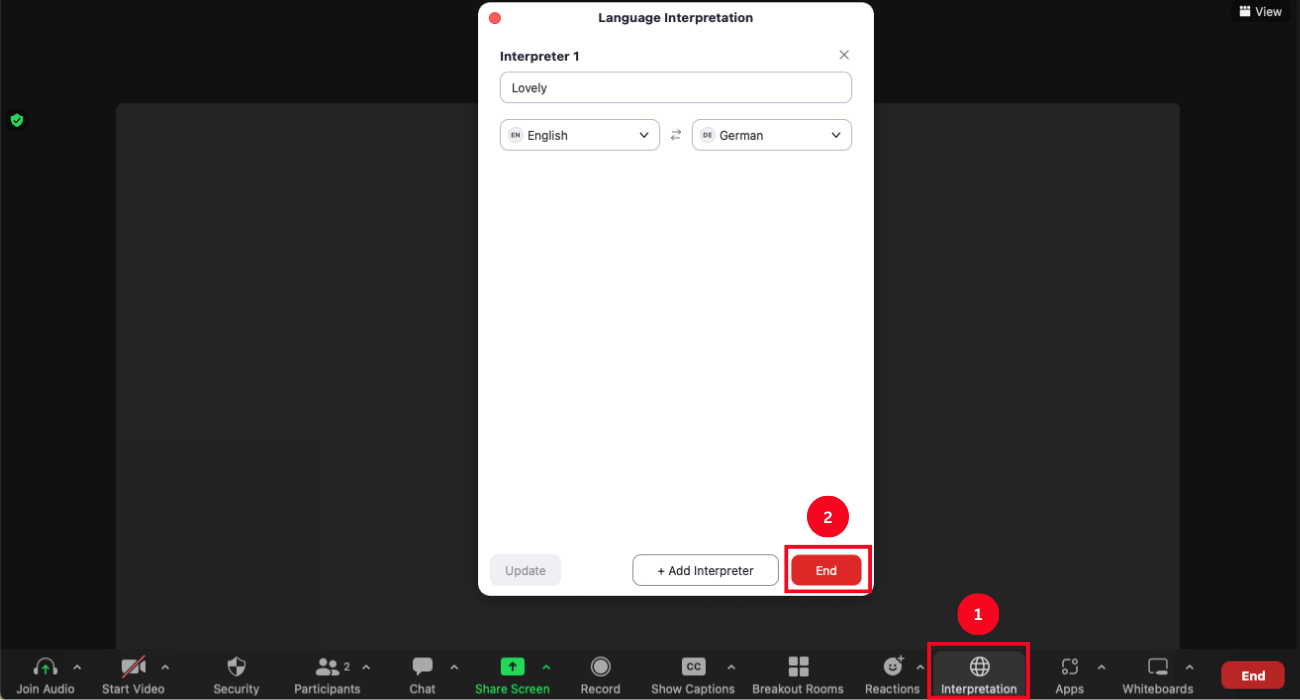
Step 5: Click the 'Interpretation' option again, and a 'Language Interpretation' window will appear. The host can click 'End' to end the Zoom interpretation session.
Note: You cannot start the Zoom interpretation feature using the Zoom mobile app. However, the participants can join sessions, listen to the interpretation audio channels, and view interpreted text via Zoom mobile app.
Use Notta's AI transcription tool to quickly and easily transcribe audio and videos. We guarantee accuracy and ease of use.
How to listen to language interpretation?
If you are the meeting participant, you can listen to or view the interpreted text by the interpreters. Whether you're joining Zoom meetings through Windows/macOS, web client, or mobile device, you can listen to the language interpretation following the below steps.
Step 1: Locate the meeting controls and select 'Interpretation.'
Step 2: Select the interpretation language you want to hear during the meeting.
Step 3: Click 'Mute Original Audio' to hear the interpreted language only.
FAQs
Can you record the interpretation on Zoom?
Yes, Zoom allows you to record and save the interpretation of the session locally on your device or on the cloud. In the cloud recording of the interpretation session, you can find both original audio and translation recordings of your meeting. Alternatively, the local recordings of interpretation will only record the audio that the person is hearing, but not multiple audio channels.
How to enable ASL interpretation in Zoom?
The meeting host can enable the sign language interpretation view and assign users as sign language interpreters. If you want to use this feature during Zoom meetings, generating the Meeting ID automatically is vital. Here's how to enable the ASL interpretation in Zoom.
Step 1: Log into the Zoom web portal and locate Account Management > Account Settings. Click the 'Meeting' tab.
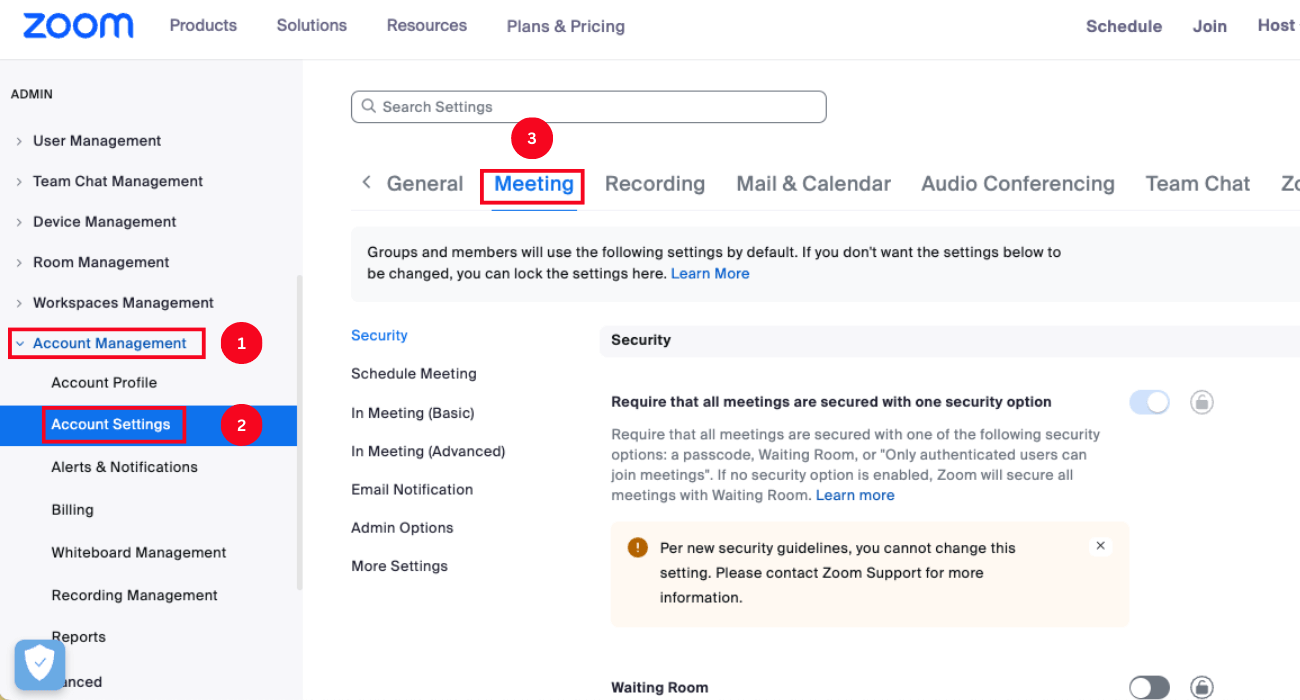
Step 2: Select 'In Meeting (Advanced),' then enable the 'Sign language interpretation view.'
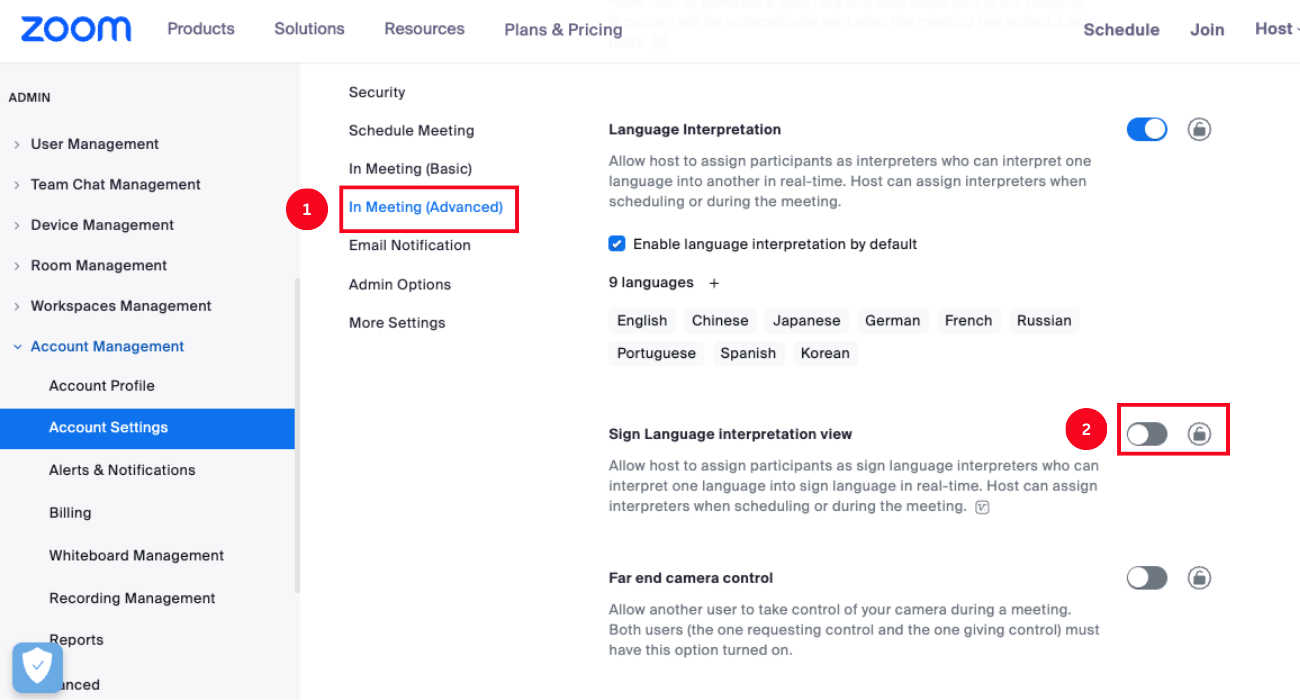
If the verification box appears, click 'Enable' to confirm the change.
Step 3: If you want to set it as the default setting, select the checkbox displaying 'Enable sign language interpretation view by default in scheduler.' Click the 'Save.'
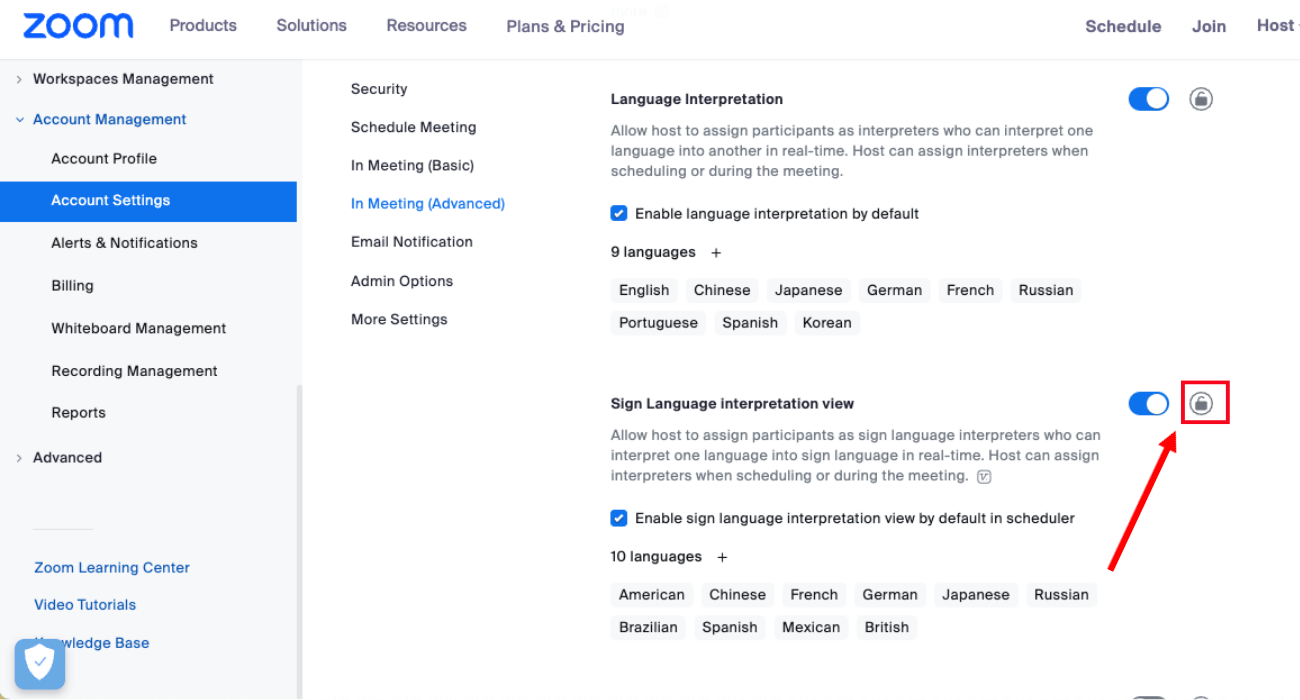
Note: The meeting hosts must join the Zoom session through the Zoom desktop client. They cannot manage or initiate the Zoom meeting while joining from Zoom mobile app or web client. Additionally, the feature must be selected while meeting scheduling and cannot be used for an instant Zoom session.
How accurate are Zoom transcriptions?
The machine-generated transcriptions by Zoom are 70-80% accurate. However, this may vary depending on background noise, volume and clarity of the speaker's voice, low audio quality, etc.
How to transcribe your Zoom meetings in real time?
Real-time virtual meeting transcriptions ensure hosts and participants can save all the valuable information from the session in the written format on their devices. Notta is one of the feature-filled recording and transcribing tools that lets you generate transcripts and share them with team members.
You only need the meeting link to transcribe your Zoom meeting using the Notta tool. Join the Zoom meeting, and click the arrow next to 'Participants.' Select 'Copy Invite Link' to copy the meeting URL. Once you have the joining link, follow the below steps to use the recording and transcribing tool — Notta.
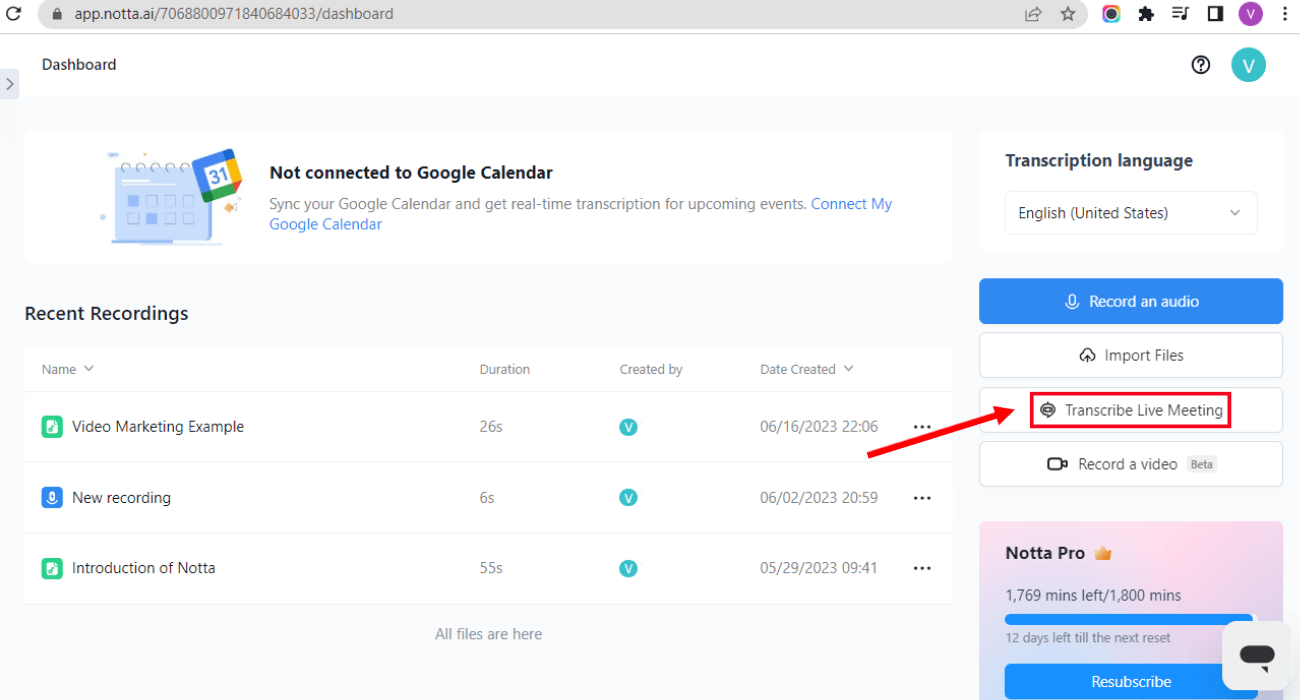
Step 1: Sign in to your Notta dashboard and select 'Transcribe Live Meeting.'
Step 2: A pop-up window will be visible where you can change the transcription language, paste the meeting invite link, and rename the Notta bot. Once done, click 'Transcribe Now.'
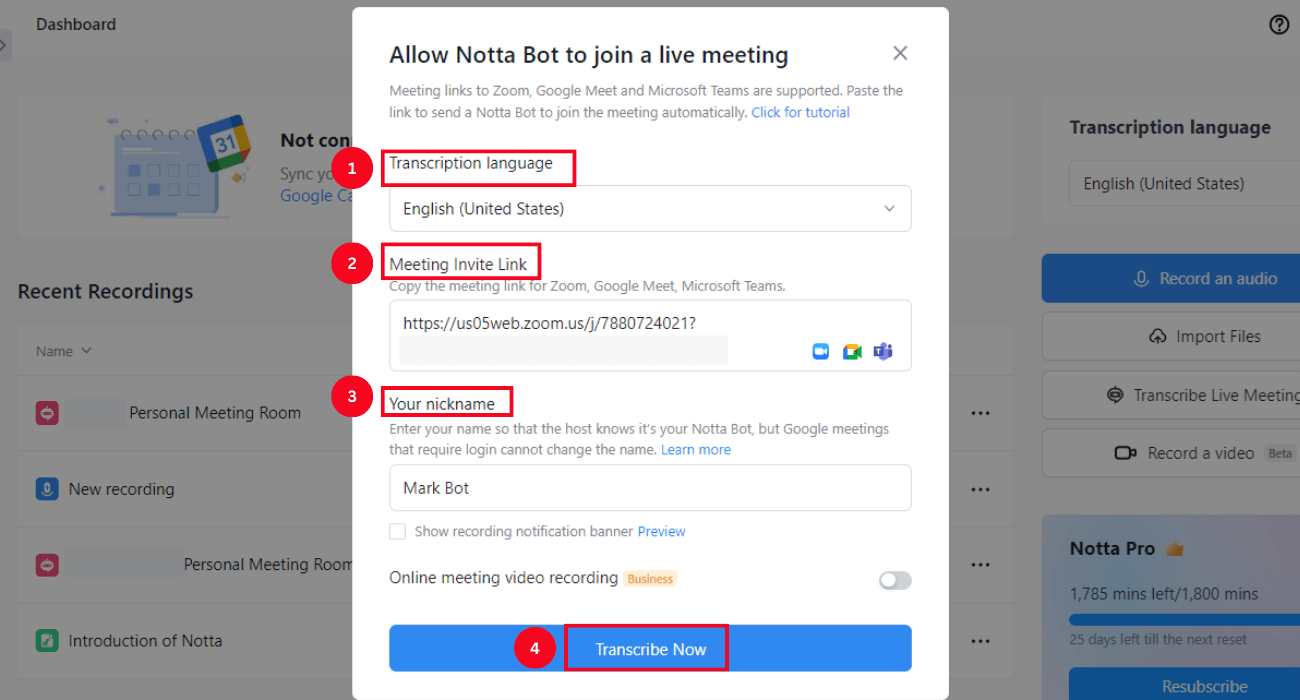
Note: It's always a good idea to check the box indicating 'Show recording notification banner.' This will let other participants know you are recording and transcribing the Zoom session.
Step 3: The Notta bot will join the Zoom meeting and generate transcripts in real time. If you want to view the transcription, go to your Notta dashboard. Under 'Recent Recordings,' click the meeting.
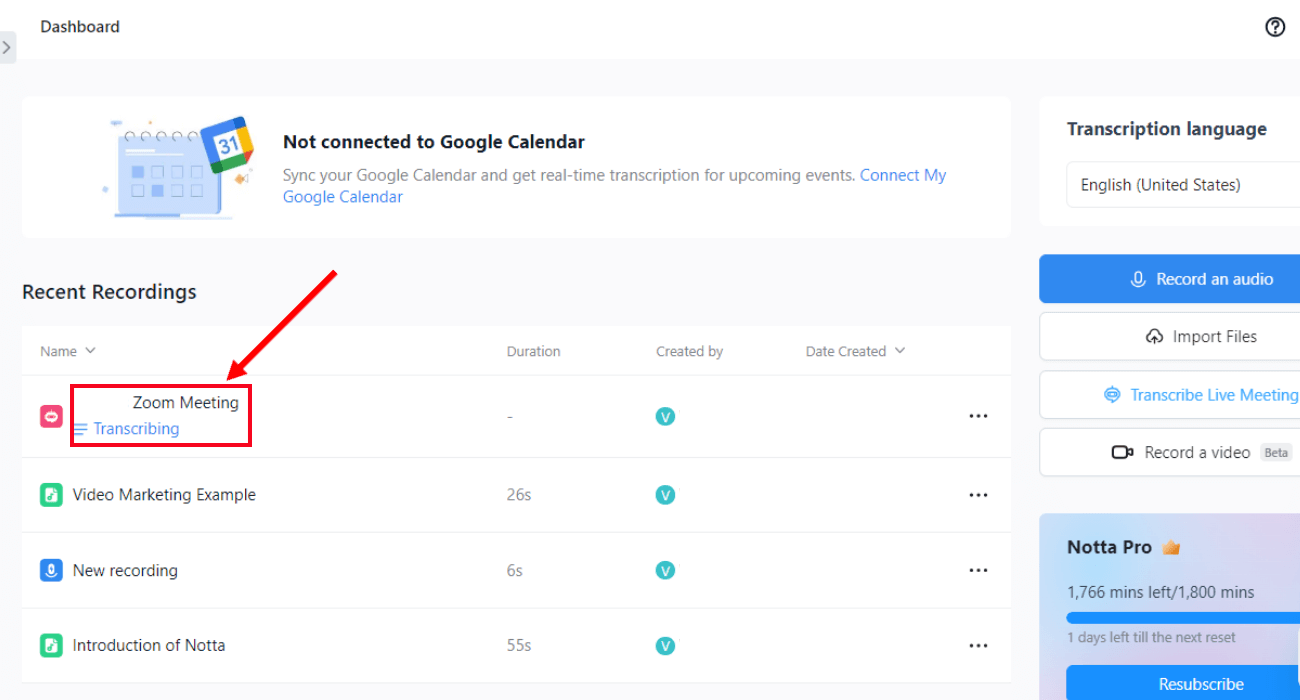
Step 4: Notta bot will generate the transcript. Once the meeting ends, the Notta bot will stop transcribing and leave the Zoom session. Alternatively, click the 'Stop' option to end further recording and transcribing. The transcript will be saved in the Notta dashboard.
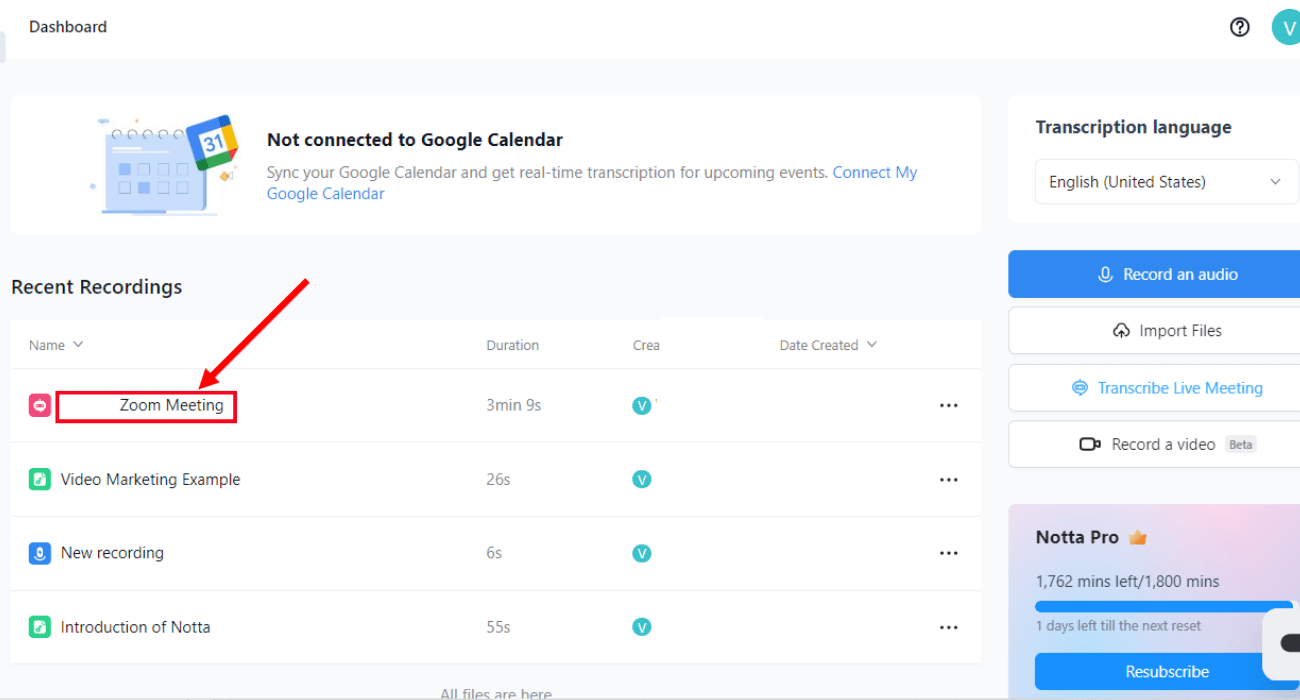
The best part about the recording and transcribing tool is the 98.86% accuracy. Additionally, you can share the transcripts in various formats, making Notta an ideal solution.
Notta offers the most integrated AI meeting notes, summaries, and action items so nothing gets missed.
Key takeaways
Zoom's built-in language interpretation feature is valuable for businesses and organizations that want to communicate with people who speak different languages. It is easy to use, reliable, and accurate way to help every participant make the most out of the meeting.
In addition to Zoom interpretation, consider using a recording and transcribing tool like Notta during virtual meetings. This can help you capture all meeting content by generating transcripts, including discussions in different languages.
You can then review the transcript later to make sure that you understand everything that was said. Sign up for a free Notta account today to explore the features of the recording and transcribing tool.