Read next: how to take meeting notes in Zoom
How to Enable Live Transcription on Zoom Meetings?
Unlock the power of AI — Notta's meeting assistant records, transcribes and summarizes meeting minutes with one click.
Have you ever been in a Zoom meeting where you don’t hear the speaker due to noisy backgrounds, or you just don’t understand the accents?
Either case, you may hope there is a magic spell to help.
Good news, Zoom has announced its magic feature — call live transcription that converts the speaker’s audio into text in real-time so you can follow the conversations easily.
Excited to know more about the live transcription feature? Let’s dive into this guide.
What are the benefits of Zoom live transcription?
When Zoom live transcription is enabled, all participants will see the transcript as subtitles as the video meeting goes on. It has several benefits as follows:
Increase engagement in the conversation as you don’t need to split attention between taking notes and listening.
Make the meetings more inclusive for participants with hearing impairment and non-native language users.
Improved audience comprehension. The captioned text can be a visual learning aid for students or those in loud areas.
The transcript makes your video content searchable and therefore easier to find specific information.

How to enable live transcription on Zoom?
Zoom call live transcription allows you to follow conversations during your Zoom meetings. But before moving to the steps, we should note some prerequisites for the Zoom native transcription feature:
You must have the latest version of the Zoom desktop client installed. It requires version 5.11.9 or higher for Windows and macOS computers.
The Zoom mobile app requires a version of 5.11.9 or higher for Android and iOS devices.
You need a Pro, Business, or Enterprise Zoom account.
You are the account owner or have admin privileges.
Now, follow the steps below to enable live transcription (automated captions) in Zoom.
Step 1: Log in to your Zoom account from your browser.
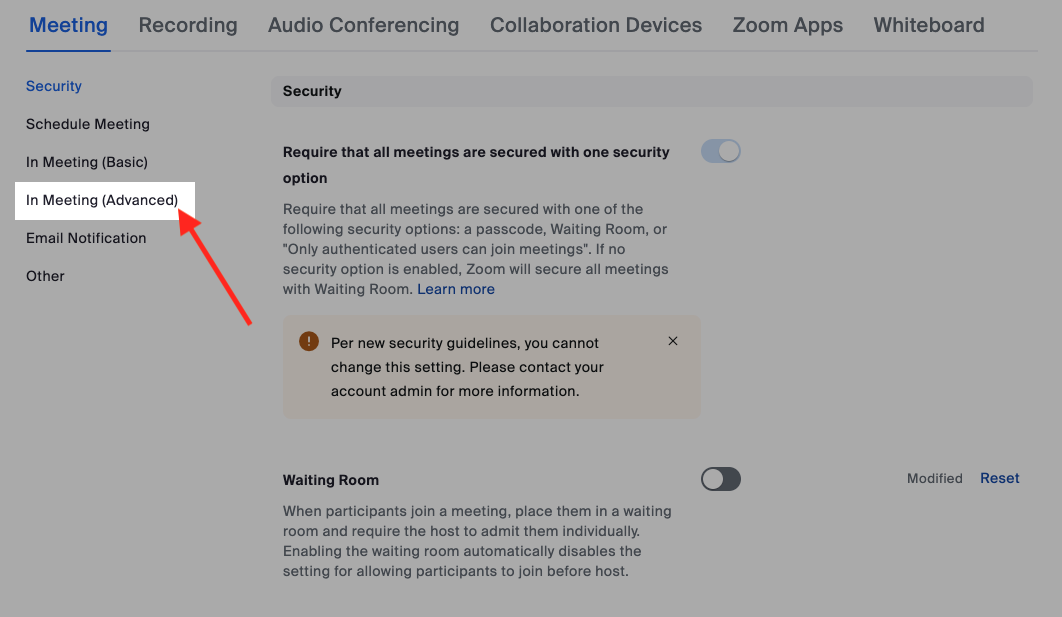
Step 2: Click on Settings on the left side panel, and select Meeting > In Meeting (Advanced).
Step 3: Scroll down and switch on the toggle for Automated captions, Full transcript, and Save captions.
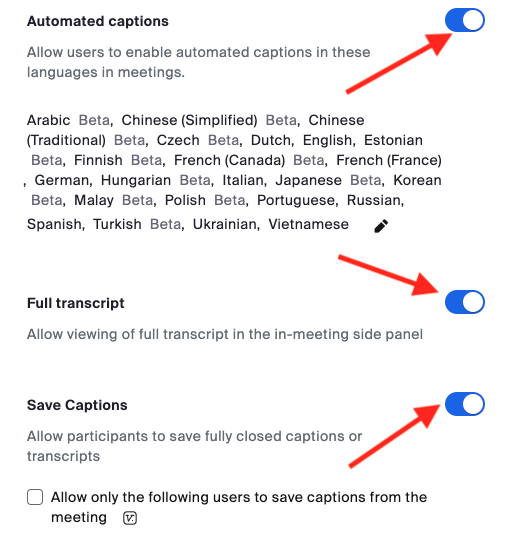 Once set up, this option will be available during your meetings permanently.
Use live transcription during a Zoom call
Here’s how to activate the transcription during your Zoom call. Note that only the meeting host can turn automatic transcription on or off.
Step 1: In a Zoom meeting, click Live Transcript at the bottom toolbar.
Step 2: Select Enable Auto-Transcription from the options; a notification will pop up confirming that live transcription is on.
Step 3: An up arrow will appear beside the Live Transcript button. The host and participants can click on it to adjust the transcripts.
Show/Hide Subtitle: Display/hide the live video subtitles at the bottom screen.
View Full Transcript: View the full transcript in the in-meeting side panel.
Subtitle Settings allows personalization for the subtitles.
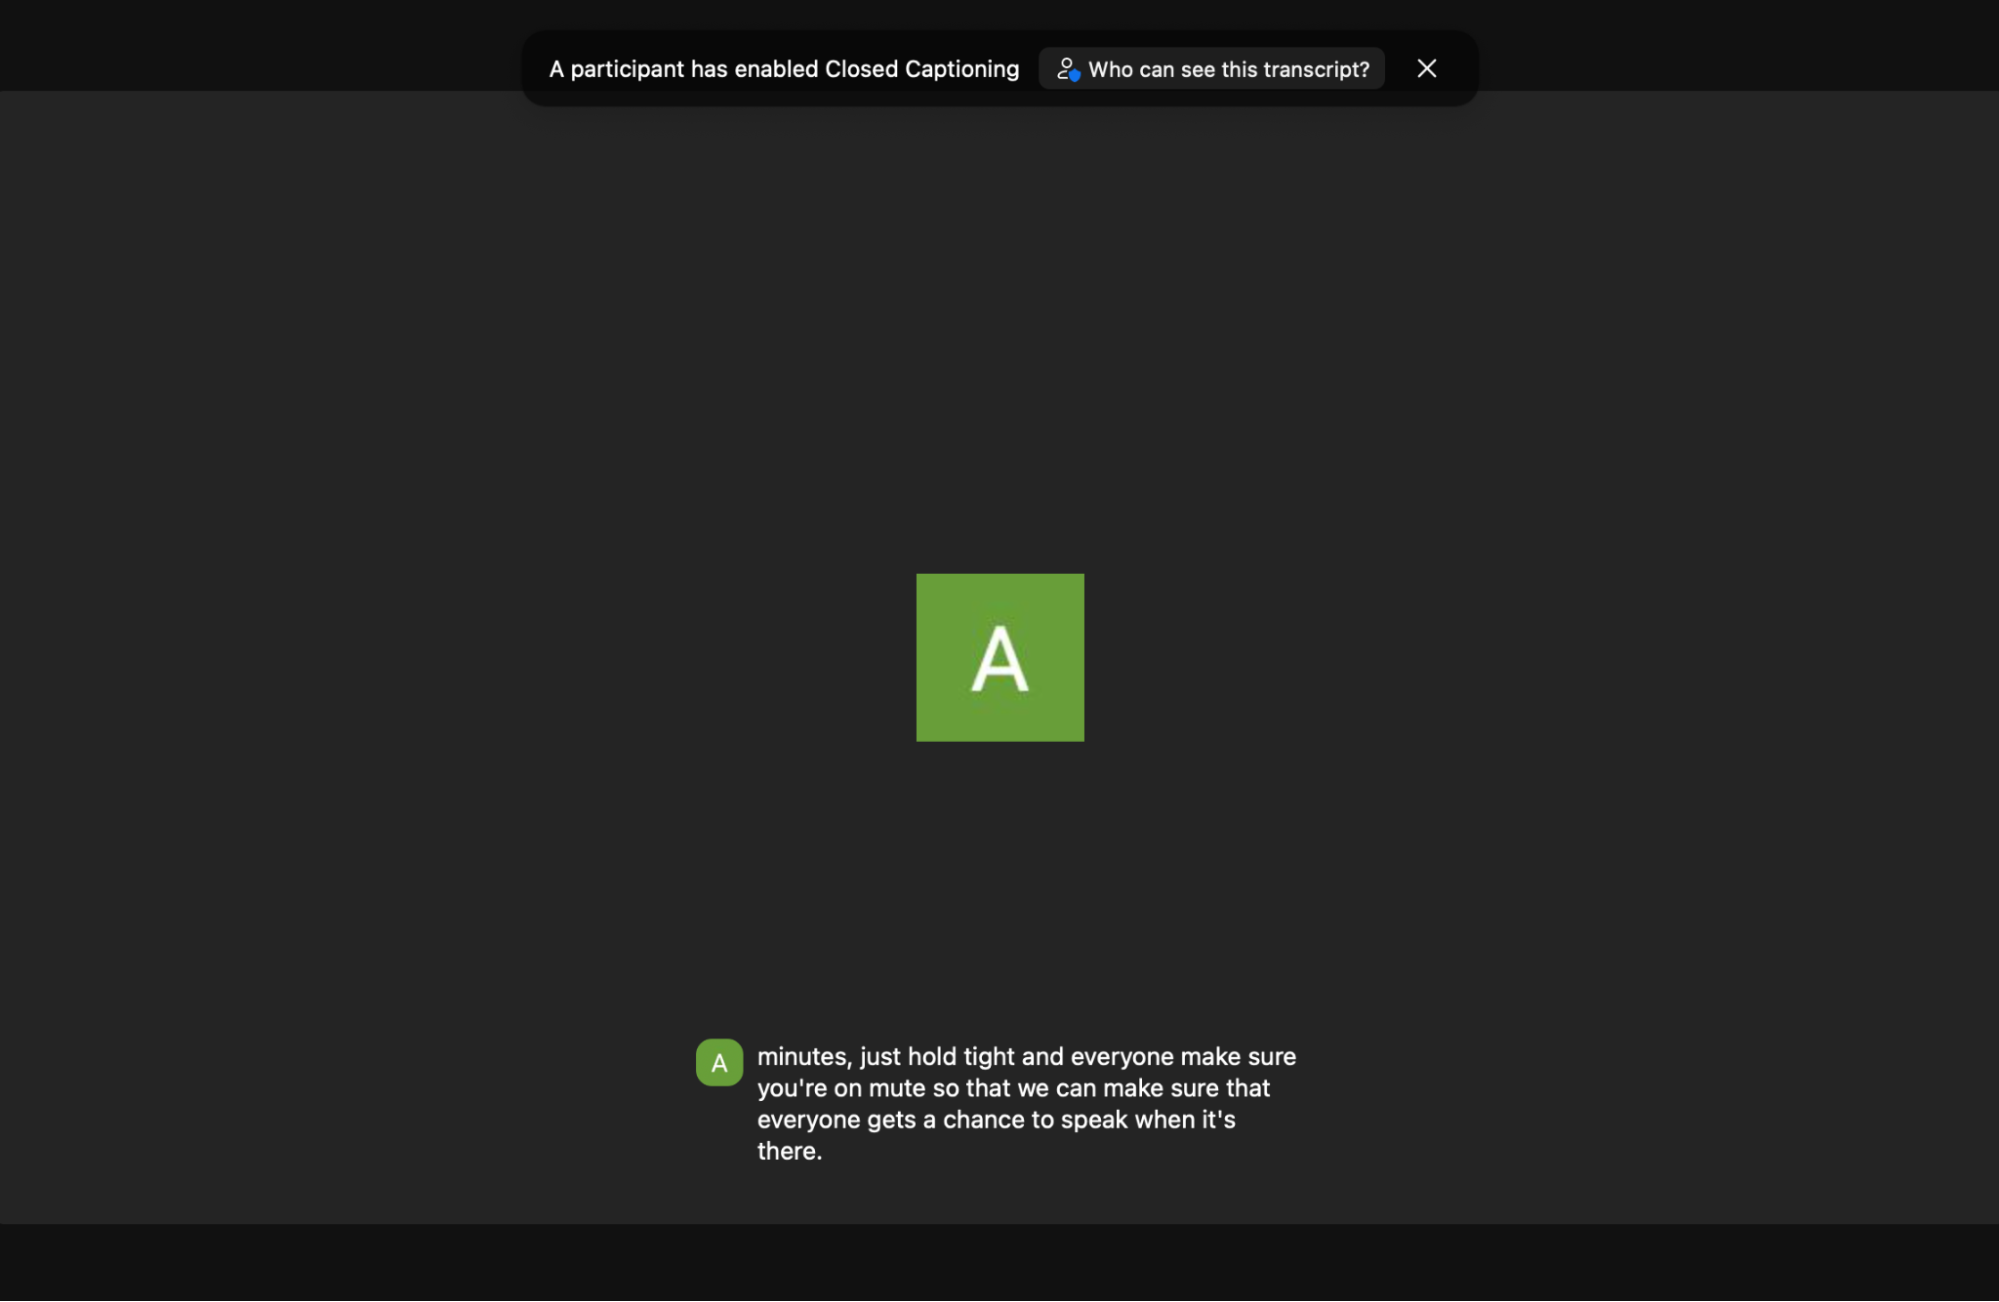
You will then see the transcript show up on your screen as you speak.
How to generate Zoom live transcript with Notta
Zoom live transcription is no doubt helpful; however, it has some limitations:
It currently only supports English.
It is relatively sensitive to background noise and can fail to capture dialects or specific vocabulary related to your industry properly.
These constraints may motivate you to seek a third-party service for your transcription needs, and the Notta meeting transcription tool is one of the best choices in the market for its advanced features.
Generate a live transcript of the Zoom meeting alongside the audio recording.
Supports 58 languages for transcription: English, German, French, Spanish, Portuguese, etc.
Speaker names and time stamps are displayed.
You can view, search through, edit, and export the transcript easily.
Notta is also compatible with Google Meet, Microsoft Teams, and Webex.
Notta offers the most integrated AI meeting notes, summaries, and action items so nothing gets missed.
Transcribe Zoom calls live using Notta
After creating a Notta account with your Google or Microsoft account or using your email, you can now move ahead to transcribe a Zoom meeting.
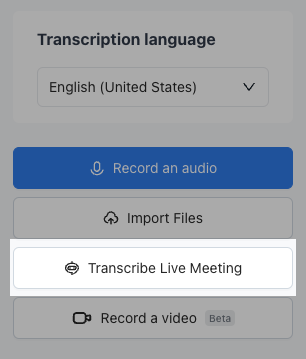
Step 1: Once you are in a Zoom meeting. Go to your Notta dashboard. On the toolbar to the right, click ‘Transcribe Live Meeting.’
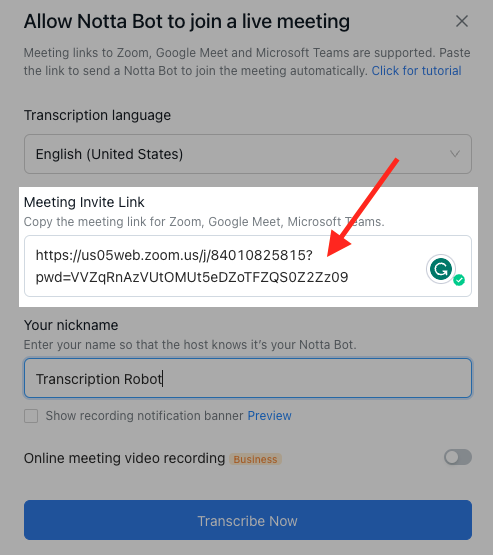
Step 2: Select the transcription language and paste the Zoom meeting link, then click ‘Transcribe Now.’
It is also a good idea to check the “Show recording notification banner” box. This will alert those that you are recording and transcribing the meeting. Unless you have explicit consent from all attendees to record the meeting, keep this on.
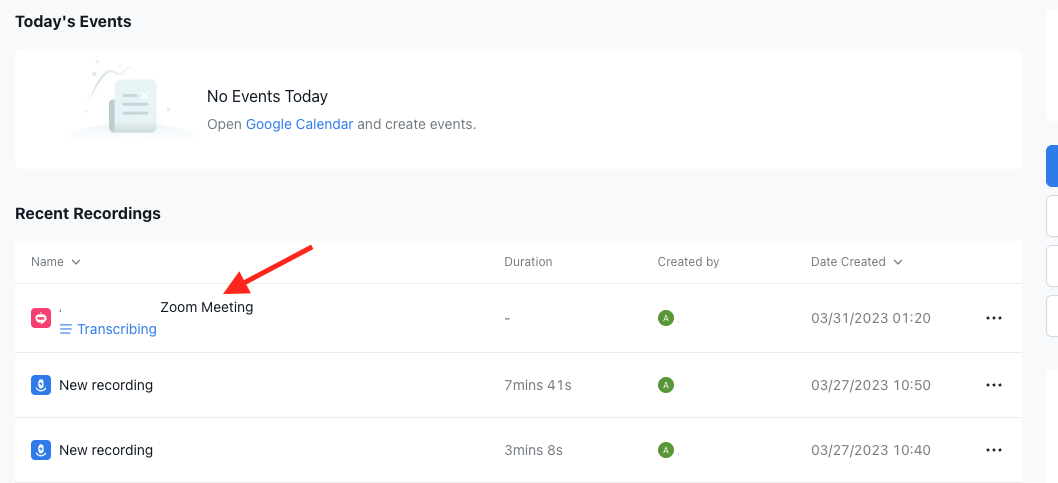
Step 3: The Notta robot will join the meeting. Return to the Notta dashboard and you will see a live transcription, open it and you'll view the transcript in real-time as the meeting continues.
What can you do with Notta's Zoom transcript?
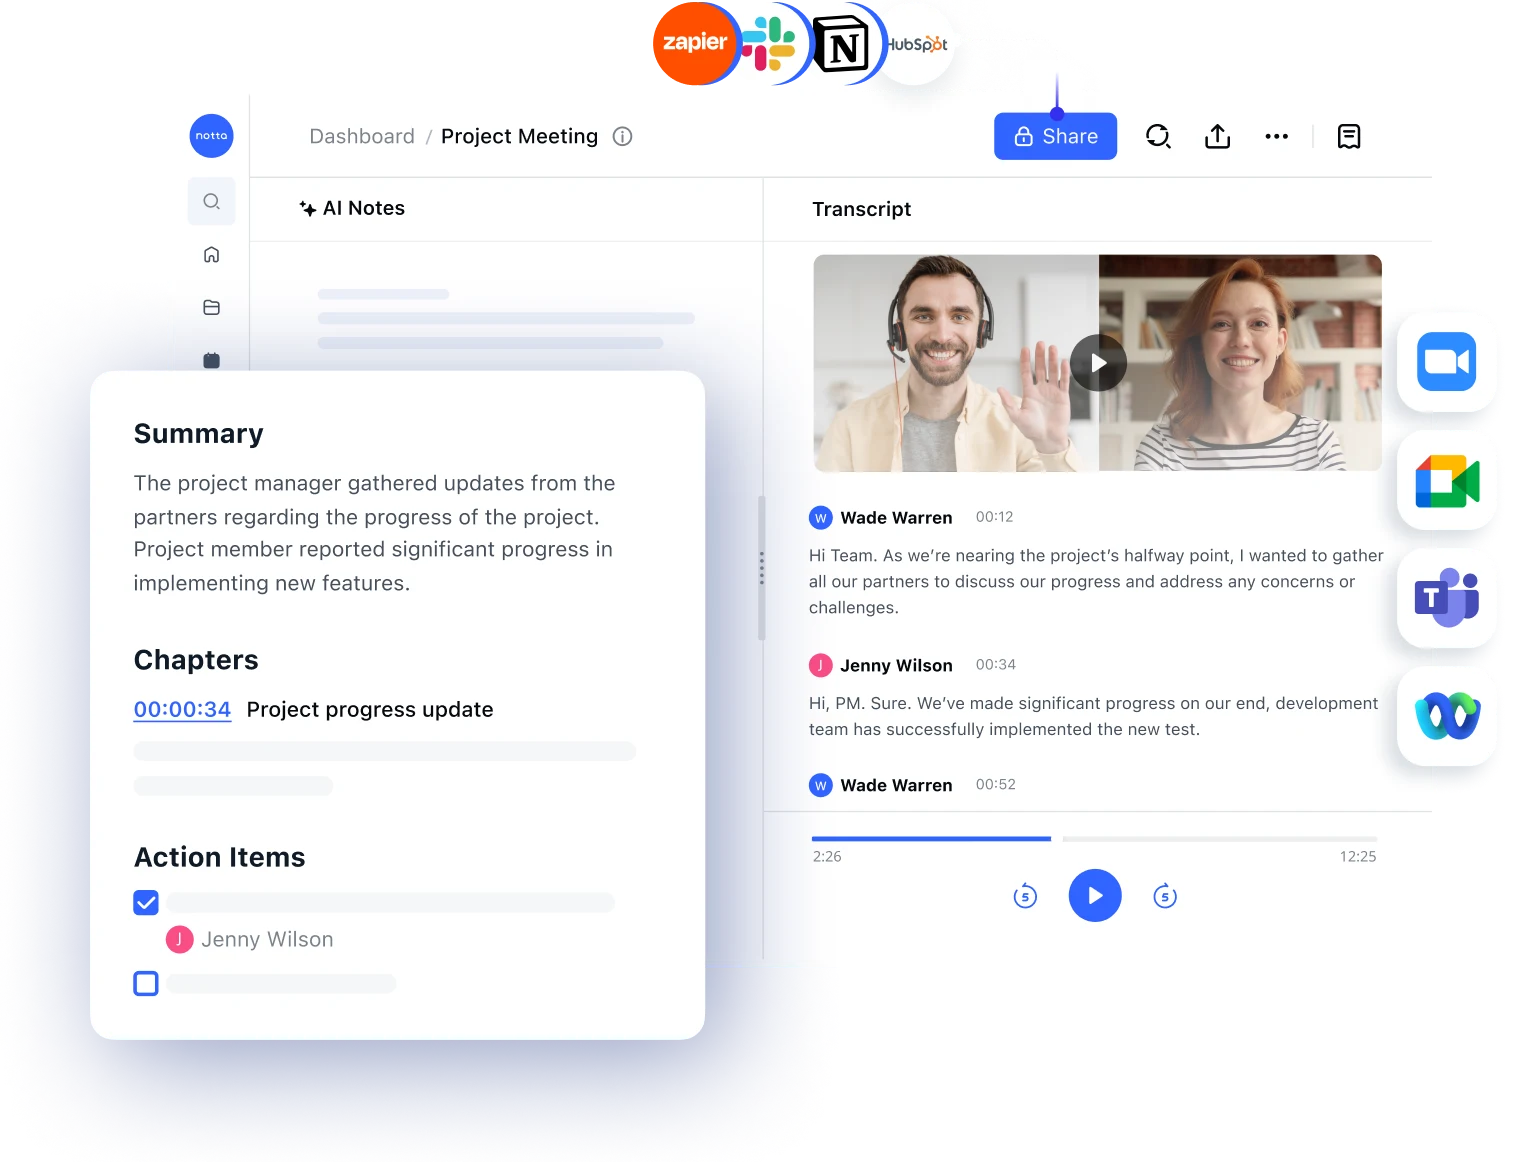
When the meeting is over, you will view the transcript within the app and make edits; there is no need to switch to other tools.
Quick search
Click on the ‘search icon’ or use a ‘Ctrl+F’ command; you can quickly search through the whole transcript to find crucial information quickly.
Edit your transcript
Feel free to edit individual words in the transcript. Notta also has an auto-correction feature to eliminate spelling errors and allows you to listen to the recording in the meantime to aid the editing.
Share a clip
Instead of sharing the whole transcript, you can make a clip and only share the most important part.
Export the transcript
Export a transcript to your desktop as PDF, Doc, or Txt so that you can view it conveniently.
Easily schedule meetings, auto-record and transcribe meeting minutes, and summarize key action items — all with one tool!
Zoom native transcription vs. Notta transcription
We have introduced two ways to enable Zoom live transcription above, and you may still hesitate to make a choice. Therefore hereby, we make a comparison to give you a clear insight.
Language support
Currently, Zoom supports English only while Notta supports over 58 languages, including English, French, Spanish, Japanese, and more.
Accuracy
Notta transcription is highly affected by background sound while Notta has an extremely high accuracy of over 95%.
Processing time
Zoom takes a while to process the transcript while it is immediately available in Notta.
Sharing
In Zoom, you can only share the whole transcript. But Notta allows you to share the necessary parts and also the whole.
Editing
For Zoom transcript, you need to download it and edit it with third-party tools. While you can make edits within the Notta app.
The most common way of getting live transcription via Zoom is through the built-in feature. However, if you want a free and accurate transcription, complete with interactive live features, Notta is your go-to solution.
FAQs about Zoom transcription
Is the Zoom auto transcript free to use?
No, Zoom live transcription is not a free feature. You need a Pro, Business, or Enterprise account to use it.
Besides, you must have the necessary software and settings enabled for it to work.
Why is Zoom not showing live transcription?
Only the host can enable live transcription on Zoom. A common reason for Zoom not displaying live transcription is that the feature is off in the meeting settings. To enable it:
Step 1: The host of the meeting must go into zoom.us and open settings.
Step 2: Scroll down to "Automated captions" and "Full Transcript”.
Step 3: Make sure both of them are toggled on.
Does Zoom live transcription show up on the Recording?
Yes, Zoom live transcription will show up on the recording. You just have to enable "Save Captions" in your settings.
To enable this feature:
Step 1: Login on Zoom
Step 2: Select the setting
Step 3: Turn on the ‘Save Captions’ option.
Once this is enabled, the live transcriptions will be automatically included in your recordings.